はじめに
新規サービスの開発プロジェクトに参加しています。プロジェクト発足当初はGitレポジトリをホスティングするシステムがありませんでした。そのためDockerを使用してAWSのEC2でGItLabを構築したときの記録です!
本構成はReference architecture: up to 1,000 usersを参考にしており、多くのユーザ利用を想定しません。
(プロジェクトの関係者のみの利用を想定)
考慮する点としては
If you need to serve up to 1,000 users and you don’t have strict availability requirements, a single-node solution with frequent backups is appropriate for many organizations.
のため冗長構成にせず、バックアップを頻繁に取得することで障害に対応する方針です。
構築
EC2の設定とDockerの設定をメインで記述します。
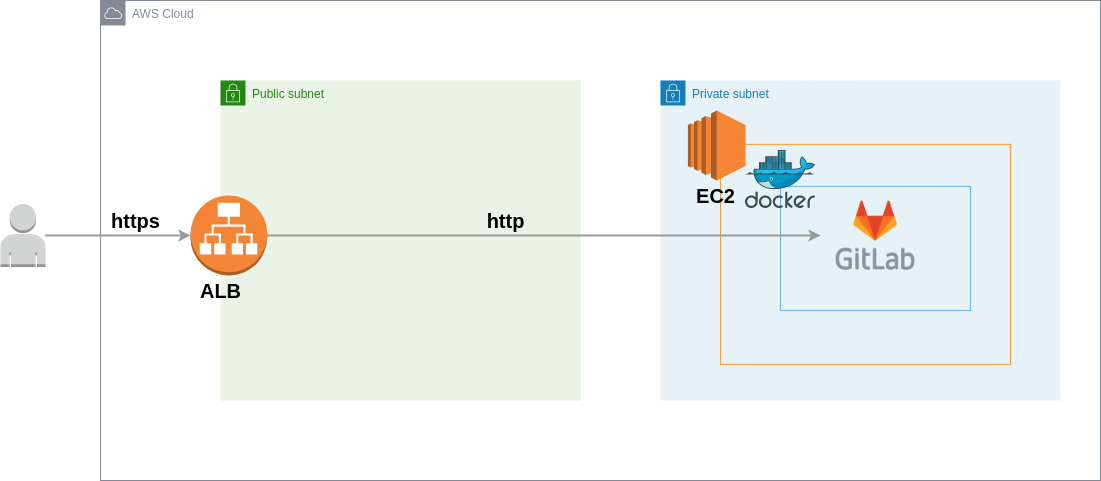
構成図
- ユーザはGitLabの
https://gitlab.example.comにhttps通信 - ALBとEC2間はhttp通信
環境
| 項目 | 値 |
|---|---|
| インスタンスタイプ | c5.xlarge |
| OS | Amazon Linux 2 |
Docker, Docker Composeのインストール
Docker のインストールを参考にEC2にDockerをインストールします。
sudo yum update -y
sudo amazon-linux-extras install docker
sudo service docker start
sudo usermod -a -G docker ec2-user
docker info
# サーバ再起動後も自動でDockerが起動
sudo systemclt enable docker
docker infoで権限エラーが発生する場合は、インスタンスに再接続してみてください!
続いてInstall Docker ComposeのLinuxのタブを参考にDocker Composeをインストールします。
sudo curl -L "https://github.com/docker/compose/releases/download/1.29.2/docker-compose-$(uname -s)-$(uname -m)" -o /usr/local/bin/docker-compose
sudo chmod +x /usr/local/bin/docker-compose
docker-compose --version
GitLabのdocker-compose.ymlを作成
Docker Composeの選定理由として
公式ドキュメントのInstall GitLab using Docker Composeで
With Docker Compose you can easily configure, install, and upgrade your Docker-based GitLab installation:
の記載があり、さくっと構築するのにピッタリと思い使用しています!
version: '3.6'
services:
  web:
    image: 'gitlab/gitlab-ce:14.9.1-ce.0'
    restart: always
    environment:
      GITLAB_OMNIBUS_CONFIG: |
        external_url 'https://gitlab.example.com'
        gitlab_rails['initial_root_password'] = 'password'
        gitlab_rails['time_zone'] = 'Asia/Tokyo'
        nginx['listen_port'] = 80
        nginx['listen_https'] = false
        nginx['proxy_set_headers'] = {
          "X-Forwarded-Proto" => "https",
          "X-Forwarded-Ssl" => "on"
        }
        letsencrypt['enable'] = false
    ports:
      - '80:80'
    volumes:
      - '$GITLAB_HOME/config:/etc/gitlab'
      - '$GITLAB_HOME/logs:/var/log/gitlab'
      - '$GITLAB_HOME/data:/var/opt/gitlab'
主な変更点として
- イメージのタグを明示的に指定してバージョンを固定
-
latest→14.9.1-ce.0
-
-
external_urlにブラウザでアクセスしたいURLを記載 - ポート80のみホストにマッピング
- 443, 22は使用しないため削除
- SSLの無効化
- SSLの終端がALBのため、GitLabのコンテナ内ではSSLの処理は行わない
- External, proxy, and load balancer SSL termination
起動
上記のdocker-compose.ymlを使用してEC2内でGitLabのコンテナを起動します。
# docker-compose.ymlと同じ階層でコマンドを実行
export GITLAB_HOME="/path/to/gitlab"
docker-compose up -d
ALBの設定
上記で設定したEC2のポート80をターゲットとするターゲットグループを作成し、ALBに紐付けます。
Route53やACMの設定方法は他の記事で詳しく説明されているので割愛させてください!
終わりに
お役に立てれば幸いです!
