はじめに
以下の2つを利用します。 まだ準備できていない方は準備をおねがいします。
- Ruby 2.7.1
- ngrok
- 準備がまだの方はこちらから準備ください:https://bit.ly/36ctimN
前回参加されていない方はこちらからclone & 環境変数の設定をしてLINE Botがメッセージを返すところまで進めてください
$ git clone https://github.com/4geru/rails-line-bot-lecture.git
$ cd rails-line-bot-lecture
$ cp .env.sample .env
$ bundle install
環境変数はこちらから: https://developers.line.biz/console/
前回の資料: 【第1回】LINE×Ruby on Railsで作ろう!シゴトに生かすLINE Bot! - Speaker Deck
今日のゴール
- LINE Botをデコる
- LINEスタンプを使ってみる
- LINE絵文字を使ってみる
- 外部APIを使ってみる
- 楽天レシピAPIを使う
- faradayを使う
今回開発していくフロー
LINE Botが動くようにする
Railsのサーバーを起動する
前回から今回用に新たにデータの追加したので、最新のプロジェクトをローカルに持ってきます
$ cd rails-line-bot-lecture/
$ git pull origin
$ git checkout origin/master
note: うまく動かない方はこちらを試してください
$ git stash
$ bundle install
Railsのサーバーを起動させます
$ bundle exec rails s -p 3000
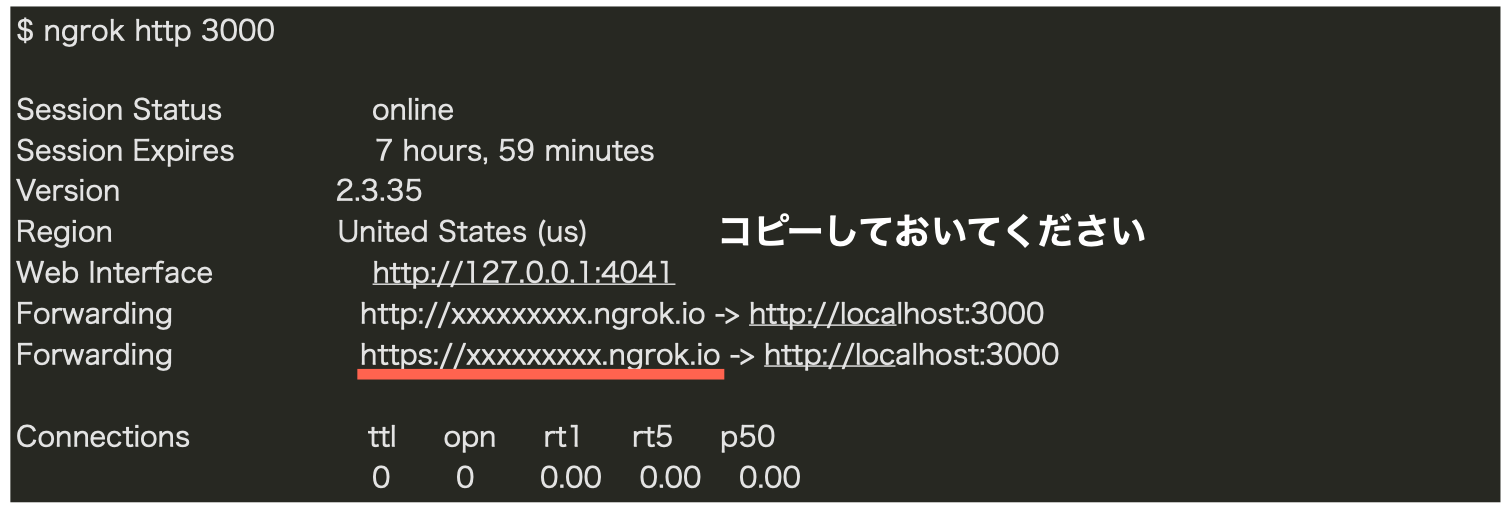
ngrokの起動
※ ngrokとは一時的に外部にportを解放するものです。
webhookの登録
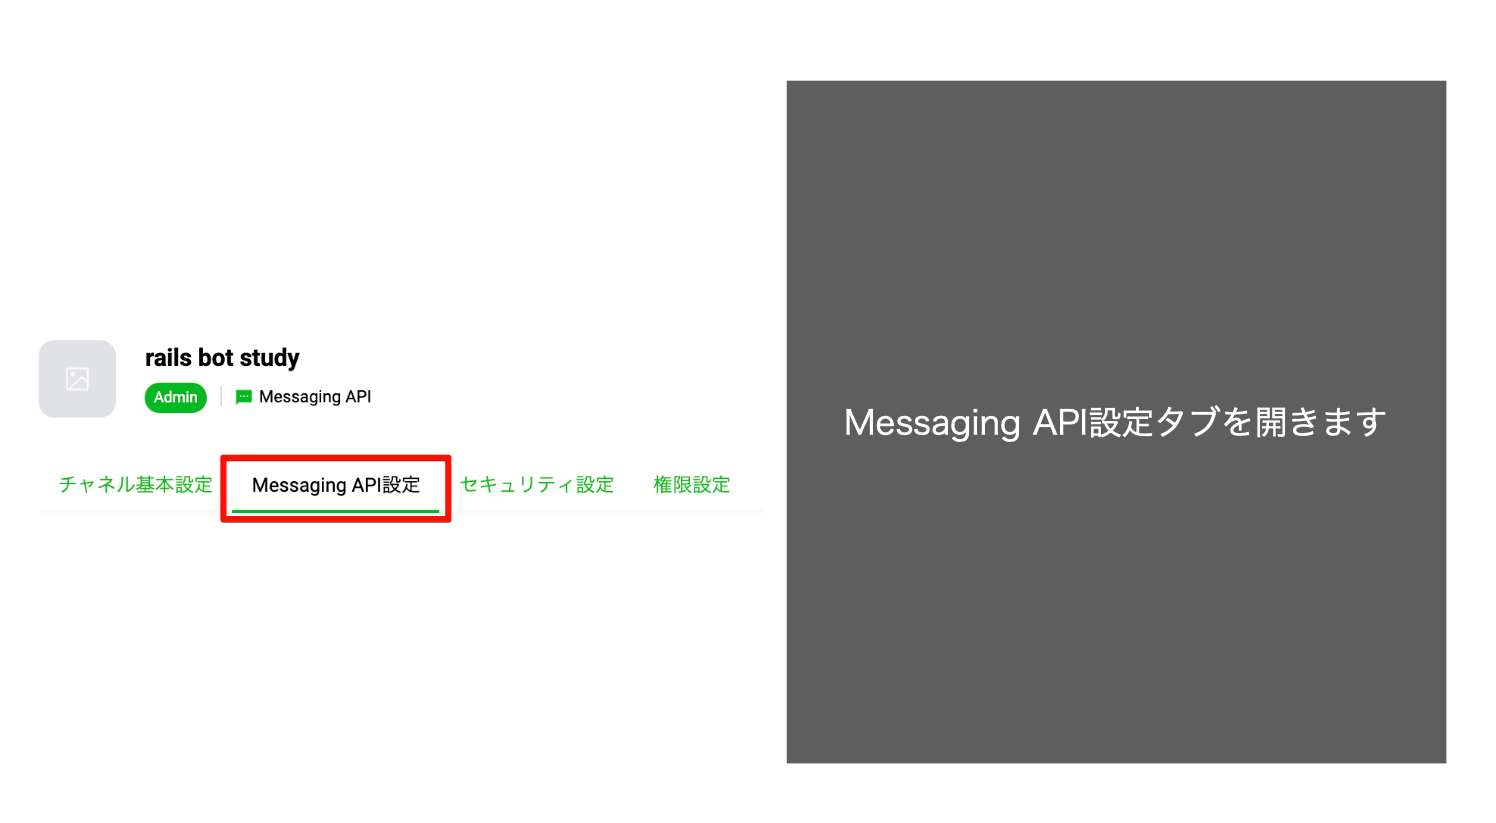
以下にアクセスします。
LINE Developers:https://developers.line.biz/console/
- 「Messaging API」をクリック
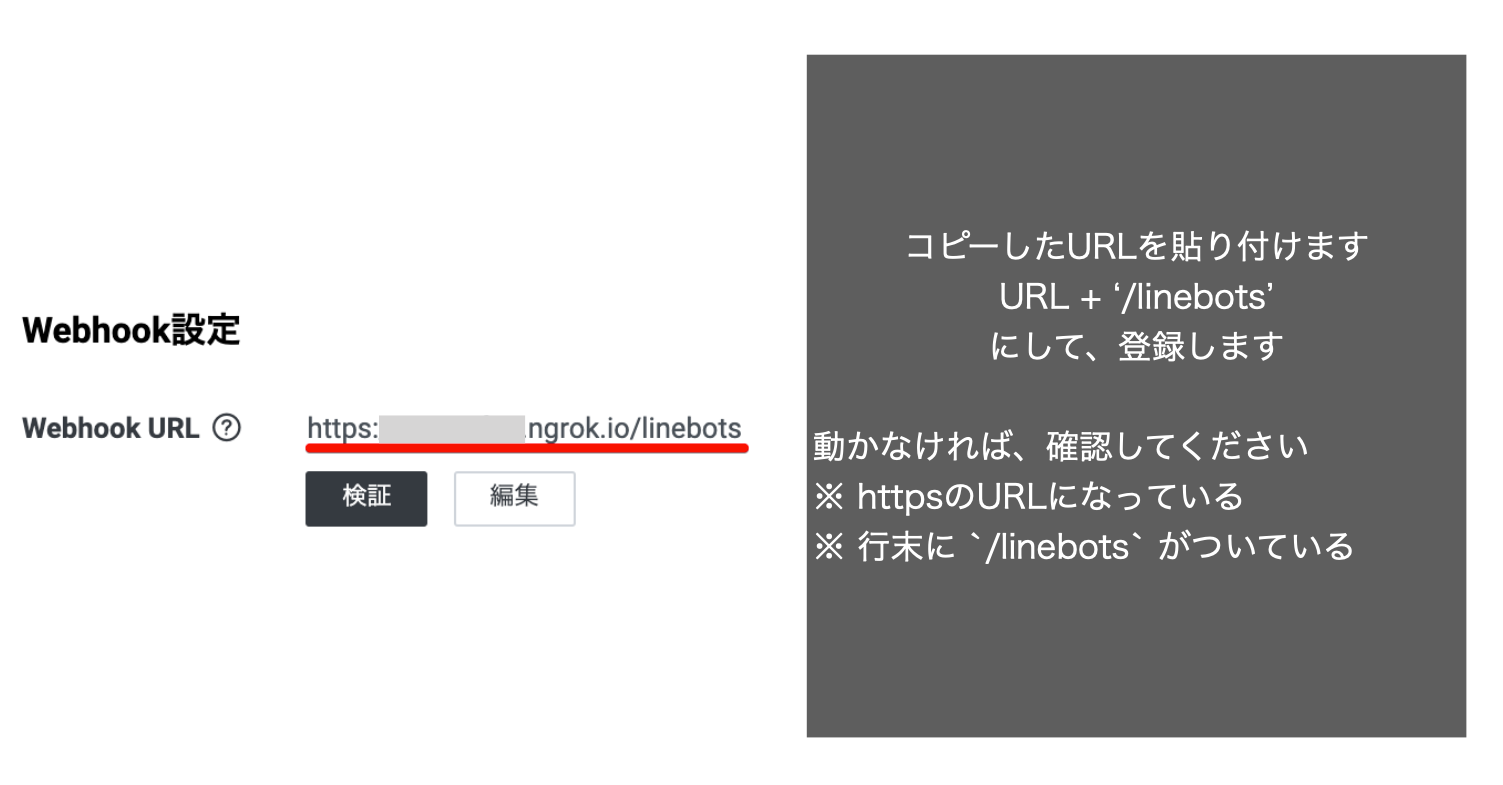
- 前項でコピーしたngrokが生成したURLの末尾に
/linebotsを加えたものをWebhook URLの欄に入力します。
LINE Botをデコってみよう
スタンプを送ろう
スタンプが送られたらスタンプを送り返すBotを作ります
メッセージイベント
スタンプが送られた時にスタンプを返すようにします。
前回までは、テキストのみだったのですが、他のメッセージイベントを受け取っていいきます。
スタンプもテキストもメッセージイベントです。
他には音声・GPSなどのメッセージイベントが存在します。
イベントの例
-
スタンプのメッセージイベント:https://developers.line.biz/ja/reference/messaging-api/#sticker-message
-
テキストのメッセージイベント:https://developers.line.biz/ja/reference/messaging-api/#wh-text
スタンプメッセージ
スタンプメッセージは type, packageId, stickerId を持ちます。
送れるスタンプの種類は、スタンプリストに記述されているもののみ送信できます。
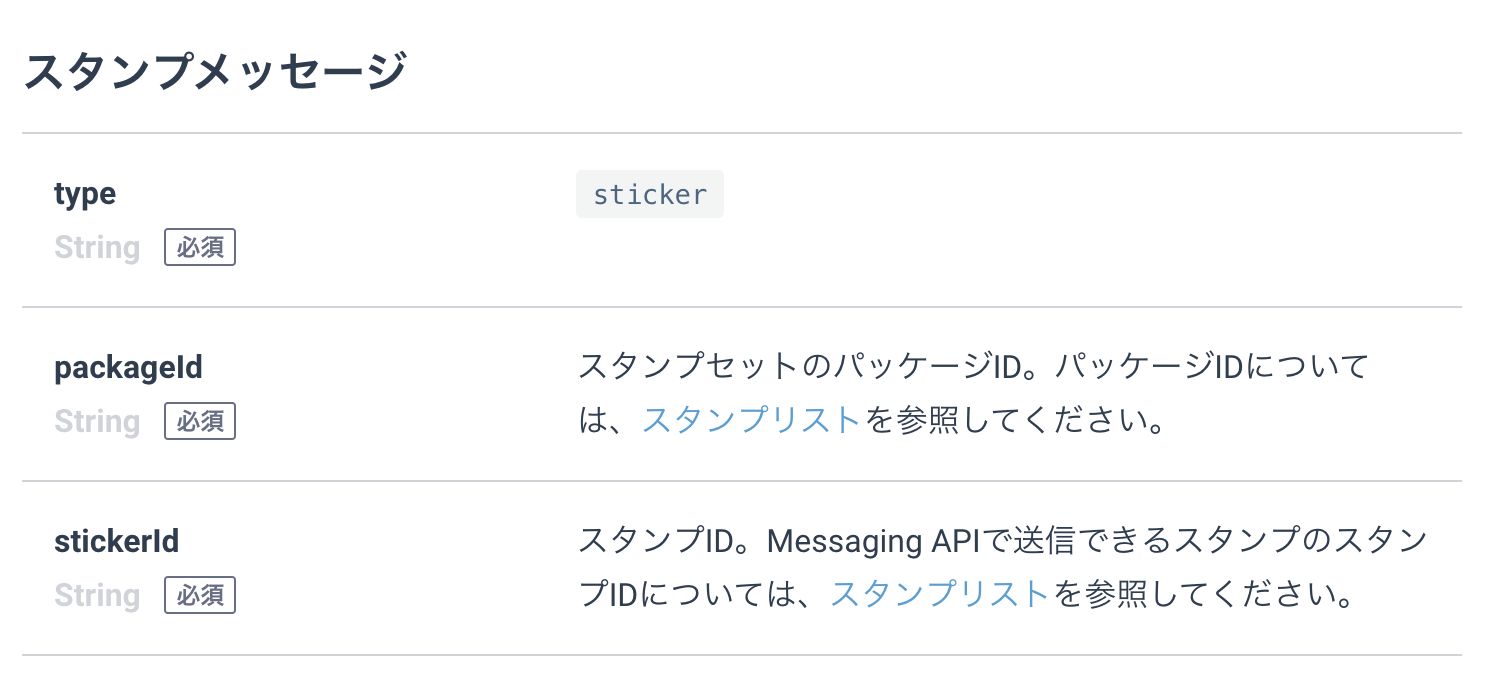
参照:https://developers.line.biz/ja/reference/messaging-api/#text-message
スタンプリスト:https://developers.line.biz/media/messaging-api/sticker_list.pdf
実装
eventには event['message']['type'] が存在し、どのメッセージイベントのリクエストかを判別できます。
-
app/controllers/linebots_controller.rbにコードを追記します
when Line::Bot::Event::Message
  case event['message']['type']
  when 'sticker' # スタンプイベントの時
    # === ここに追加する ===
    # スタンプメッセージ
    {
      "type": "sticker",
      "packageId": '11537',
      "stickerId": '52002740'
    }
    # === ここに追加する ===
  when 'text' # メッセージイベントの時
    # event['message']['text'] = ユーザーが送ってきた
    if event['message']['text'] =~ /カテゴリ/
動作確認
スタンプを返すようになりました!

コードの解説
前回まではテキストのメッセージイベントを対象にメッセージを返していました。
case文でテキストイベントとスタンプイベントを分けて、スタンプのメッセージを受け取った時に返す処理を追加しました。
画像や動画のイベントのなども取得できます。是非是非、楽しんでみてください。
packageIdとstickerIdは スタンプリスト のリンク先にあるものであれば置き換えることが可能です。
スタンプリスト:https://developers.line.biz/media/messaging-api/sticker_list.pdf
メッセージ同時に複数送信することができるので、「メッセージ」+「スタンプ」などを送信するとよりチャーミングなLINE Botを作ることができます
emojiを送ってみよう
次にLINE emojiを使って遊んでいきます
emoji
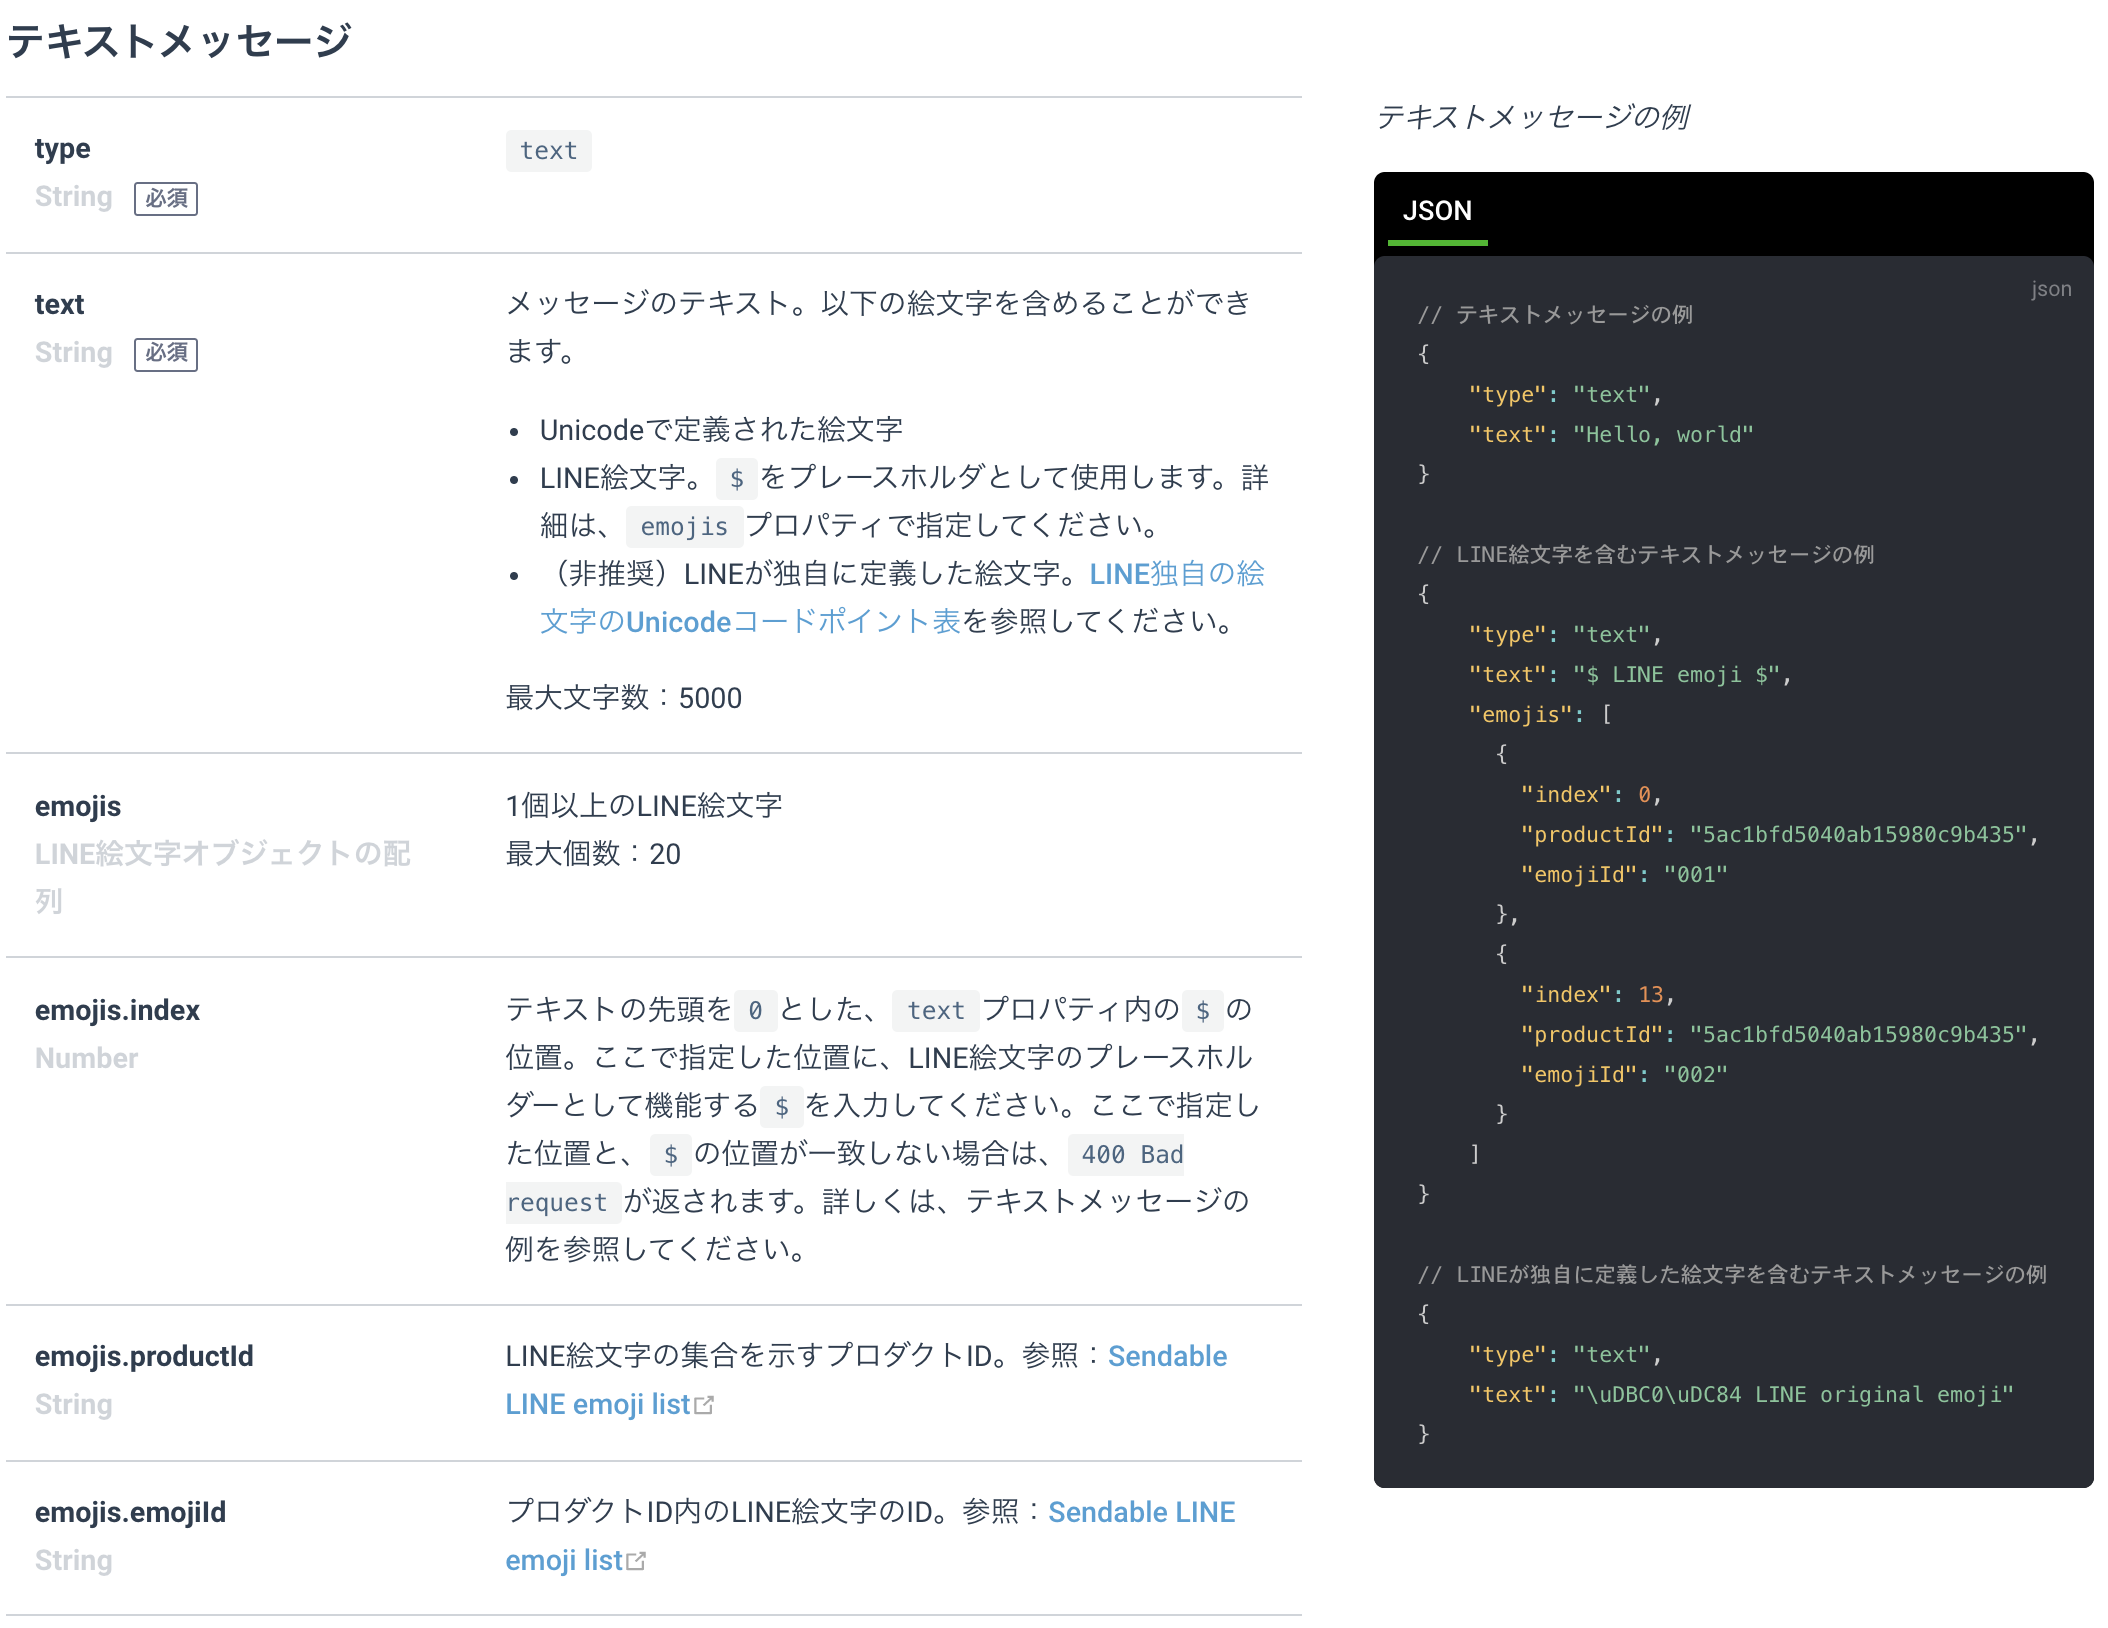
emojiはテキストメッセージの拡張です。index, productId, emojiId を持ちます。
textにUnicodeを記述してメッセージを送ることも可能です。
LINEオリジナルのemojiについては、index, productId, emojiId を記述することを推奨しています。
参照:https://developers.line.biz/ja/reference/messaging-api/#text-message
Sendable LINE emoji list:https://d.line-scdn.net/r/devcenter/sendable_line_emoji_list.pdf
実装
- emojiを変えたりしてみましょう
-
app/controllers/linebots_controller.rbにコードを追記します
elsif event['message']['text'] =~ /じゃんけん/
  LineBot::Messages::JankenMessage.new.send
# === ここに追加する ===
elsif event['message']['text'] =~ /emoji/
  {
    "type": "text",
    "text": "$ LINE emoji $",
    "emojis": [
      {
        "productId": "5ac1bfd5040ab15980c9b435",
        "emojiId": "001",
        "index": 0
      },
      {
        "productId": "5ac1bfd5040ab15980c9b435",
        "emojiId": "002",
        "index": 13
      }
    ]
  }
# === ここに追加する ===
else
動作確認

コードの解説
emojiが出る場所は text の $ の存在する場所に対応しています。
productIdとemojiIdは Sendable LINE emoji list のリンク先にあるものであれば置き換えることが可能です
emojiを出力する場所を、indexで指定します。1文字目を0として数えます。
indexと textの $ がずれているとメッセージが表示されないので、注意してください。
emojiを1文字だけ表示すると少し大きく表示されます。是非試してみてください。
Sendable LINE emoji list:https://d.line-scdn.net/r/devcenter/sendable_line_emoji_list.pdf
今回やること
外部APIの話
- 楽天レシピAPIを触ってみる
- faradayを使う
- APIへアクセスするためののgem
- Javascriptのaxiosみたいなもの
楽天API
楽天には「商品検索」「ブックス」「トラベル」など様々なAPIがあります。
楽天APIの良いところは、APIのテストをWebから行うことができます。
楽天APIドキュメント: https://webservice.rakuten.co.jp/document/
楽天レシピAPI
楽天レシピAPIは「カテゴリー」と「カテゴリごとのレシピ」を検索するAPIがあります。
APIキーの登録
※今回のハンズオン用に用意しました。「環境変数の設定」まで飛ばしてください。
ハンズオン終了後1週間で使えなくなるので、お気をつけください。
application key: 1045608916855809793
APIキーは以下のURLから新規アプリ作成をします。
新規アプリ登録画面:https://webservice.rakuten.co.jp/app/create
今回は「アプリ名」「アプリURL」「認証」の3つを入力すれば大丈夫です。
「アプリURL」は今回は何でも大丈夫です。githubでプロジェクトを管理ている場合は、githubのURLでも大丈夫です。

作るものイメージ
実装
「カテゴリー」は大・中・小の3種類があり、小カテゴリごとに「各カテゴリオススメのレシピ」が存在します
今回実装する部分
- 「料理」とメッセージを送ると、 large categories message を表示する
- small categories のボタンを押すと recipe message を表示する
- 楽天API keyを設定して、楽天APIから返ってきた値を recipe message を表示する

「料理」とメッセージを送ると、 large categories message を表示する
「料理」というメッセージが入力されるとlarge categoriesのメッセージが返り、検索できるようにします
-
app/controllers/linebots_controller.rbにコードを追記します
class LinebotsController < ApplicationController
  ...
  def message(event)
    ...
    case event
    when Line::Bot::Event::Message
      ...
      case data['type']
      case event['message']['type']
        ...
      when 'text' # メッセージイベントの時
       elsif event['message']['text'] =~ /じゃんけん/
          LineBot::Messages::JankenMessage.new.send
        # === ここに追加する ===
        elsif event['message']['text'] =~ /料理/
          LineBot::Messages::LargeCategoriesMessage.new.send
        # === ここに追加する ===
        elsif event['message']['text'] =~ /emoji/
small categories のボタンを押すと recipe message を表示する
ポスtバックとは「ユーザーが、ボタンを押したなどアクションを実行したことを示す」イベントです。
ポストバックイベントにはレシピの結果を追加していきます。
参考:https://developers.line.biz/ja/reference/messaging-api/#postback-event
-
app/services/line_bot/postback_event.rbにコードを追記します
module LineBot
  class PostbackEvent
    def self.send(data)
      ...
      when 'small_search'
        LineBot::Messages::SmallCategoriesMessage.new.send(data['category_id'].to_i)
      # === ここに追加する ===
      when 'recipe_search'
        LineBot::Messages::RecipesMessage.new.send(data['category_id'].to_i)
      # === ここに追加する ===
      else
楽天API keyを設定して、楽天APIから返ってきた値を recipe message を表示する
faradayの設定
faradayとは、外部のAPIにアクセスを簡単にしてくれるrubyのパッケージです。
faradayの公式ドキュメント:https://www.rubydoc.info/gems/faraday
- APIを扱う
app/services/rakuten_api/recipes_api.rbにコードを追記します -
_APPLICATION_ID_に先ほどのapplication keyを貼り付けます。
※ハンズオンの場合は「1045608916855809793」で大丈夫です。
module RakutenApi
  class RecipesApi
    def self.get(small_category_id)
      # 基本の設定
      conn = Faraday::Connection.new(:url => 'https://app.rakuten.co.jp') do |conn|
        conn.use Faraday::Request::UrlEncoded  # リクエストパラメータを URL エンコードする
        conn.use Faraday::Response::Logger     # リクエストを標準出力に出力する
      end

      # レシピAPIに必要なパラメータ
      params = {
        applicationId: '_APPLICATION_ID_',
        categoryId: category_id(small_category_id)
      }

      # 実際にリクエストを送る部分
      # GET https://app.rakuten.co.jp/services/api/Recipe/CategoryRanking/20170426?applicationId=_application_id_&categoryType=large
      response = conn.get do |req|
        req.url "/services/api/Recipe/CategoryRanking/20170426?", params
      end
    end
解説
Faradayというgemを使って、APIとの通信を行います。
「基本の設定」 の url でホストとドメインを指定します。
「実際にリクエストを送る部分」 の url でAPIまでのパスを指定します。
「基本設定」と「実際にリクエストを送る部分」を分けることにより、共通の基本設定で、複数のAPIを管理することができます。
Faradayを使うと楽天レシピAPI以外にも他のAPIも簡単に使うことができます。
楽天のAPIに限っても様々なAPIが提供されているので、ぜひ試してみてください。
試してみる
- 「料理」とメッセージを送るとカテゴリーを選択するFlexメッセージが出てきます。

- ボタンを押していくと先ほど登録したAPIからレシピのAPIが叩かれ、最終的にはレシピが表示されます

解説
今回登場したFlex Messageは「large categories」「middle categories」「small categories」「recipe」の4種類が登場しました。
カテゴリのFlex Messageは似ているため、今回のハンズオンでは紹介しませんでしたが、 app/services/line_bot/messages/ の中に入っています。
データの受け渡しはポストバックイベントの data を利用して受け渡しをしています。
FlexMessageのポストバックイベントから controller を伝って、app/services/line_bot/postback_event.rb にデータが渡ります。
postback_event.rb の中では、 data['type'] によってどのメッセージを返すか切り分けています。
必要な情報に関しては、sendメソッドに引数として渡して、各classが独立してメッセージを返すようにしています。
case data['type']
when 'none'
  # noneの時は何もしない
when 'janken_result'
  LineBot::Messages::JankenResultMessage.new.send(data)
when 'middle_search'
  LineBot::Messages::MiddleCategoriesMessage.new.send(data['category_id'].to_i)
when 'small_search'
  LineBot::Messages::SmallCategoriesMessage.new.send(data['category_id'].to_i)
when 'recipe_search'
  LineBot::Messages::RecipesMessage.new.send(data['category_id'].to_i)
else
  LineBot::Messages::UnknownMessage.new.send
end
これで今回は終了です!
トラブルシューティング
- プログラムのコードは
finished_part3のブランチにまとまっています -
git checkout finished_part3でハンズオン終了時のコード を見が見れます - ハンズオン開始時と終了時のコードを比べたい場合は、以下 のURLを参照してください
- https://github.com/4geru/rails-line-bot-lecture/compare/c7345b7124b2c56c2059b9bb8e81ffb75851fb9e...finished_part3
時間が余った方へ
コストを表示させてみよう
楽天レシピAPIのドキュメントを読んでみると「費用の目安」をみることができます。
「費用の目安」を先ほど出力したrecipe messageに追記します。

参考:https://webservice.rakuten.co.jp/api/recipecategoryranking/
楽天レシピAPIが返す値を見てみる
app/services/line_bot/messages/recipes_message.rb を開いて、APIから返ってきたデータの中身を確認します。
確認する際は binding.pry というデバッグツールを使います。 binding.pry を仕込んだら line bot から recipe messageを呼び出してみましょう。
module LineBot
  module Messages
    # 知らないイベントが発生したとき
    class RecipesMessage
      ...
      def send(small_category_id)
        @category = Category.find_by(category_id: small_category_id)
        response = RakutenApi::RecipesApi.get(small_category_id)

        recipes = JSON.parse(response.body)['result']
        binding.pry # 新しく追記する
LINEにメッセージを送って返ってこなくなったらサーバーを起動しているターミナルを開いてください。
※この時にngrokのターミナルを終了しないように気をつけてください。
recipeの中には複数レシピが入っているため、recipes.firstで1つ目の要素を見ます。
1つめの要素の中には、hashでレシピの情報が入っています。hashで recipeCost recipeTitle などの要素を確認することができます。
次はこの情報をメッセージとして、LINEに送れば完了です。
     9: def send(small_category_id)
    10:   @category = Category.find_by(category_id: small_category_id)
    11:   response = RakutenApi::RecipesApi.get(small_category_id)
    12:   binding.pry
    13:
 => 14:   recipes = JSON.parse(response.body)['result']
    15:   bubbles = recipes.map do |recipe|
    16:     bubble(recipe)
    17:   end
    18:
    19:   carousel(@category.name, bubbles)
    20: end

[1] pry(#<LineBot::Messages::RecipesMessage>)> recipes.first
=> {"foodImageUrl"=>"https://image.space.rakuten.co.jp/d/strg/ctrl/3/db58b2287bc7d1fcdc29b60bfab0d38fc9efe4d0.39.1.3.2.jpg",
 "recipeDescription"=>"沢山作っても次の日にはなくなってしまううちの定番人気メニューです。",
 "recipePublishday"=>"2010/12/05 17:52:46",
 "shop"=>0,
 "pickup"=>0,
 "recipeId"=>1910000566,
 "nickname"=>"パンダ☆9160",
 "smallImageUrl"=>
  "https://image.space.rakuten.co.jp/d/strg/ctrl/3/db58b2287bc7d1fcdc29b60bfab0d38fc9efe4d0.39.1.3.2.jpg?thum=55",
 "recipeMaterial"=>
  ["豚肉こま切れ", "ジャガイモ", "にんじん", "玉ねぎ", "糸こんにゃく又はしらたき", "ショウガ", "水", "めんつゆ(3倍濃縮)", "醤油", "砂糖", "酒", "みりん", "ごま油"],
 "recipeIndication"=>"約30分",
 "recipeCost"=>"500円前後",
 "rank"=>"1",
 "recipeUrl"=>"https://recipe.rakuten.co.jp/recipe/1910000566/",
 "mediumImageUrl"=>
  "https://image.space.rakuten.co.jp/d/strg/ctrl/3/db58b2287bc7d1fcdc29b60bfab0d38fc9efe4d0.39.1.3.2.jpg?thum=54",
 "recipeTitle"=>"簡単♪定番♪肉じゃが"}
[2] pry(#<LineBot::Messages::RecipesMessage>)> recipes.first["recipeCost"]
=> "500円前後"
[3] pry(#<LineBot::Messages::RecipesMessage>)> recipes.first["recipeTitle"]
=> "簡単♪定番♪肉じゃが"
「費用の目安」をLINEに表示させる
「🥬素材」や「⏰時間」のように「💰コスト」を追記します。
「⏰時間」のデータをコピーして text を変更してすると「費用の目安」をLINE Botで表示させることができます。
{
  "type": "box",
  "layout": "baseline",
  "contents": [
    {
      "type": "text",
      "text": "⏰時間", # "💰コスト" に変える
      "flex": 1,
      "size": "sm",
      "color": "#aaaaaa"
    },
    {
      "type": "text",
      "text": recipe['recipeIndication'], # recipe['recipeCost'] に変える
      "flex": 3,
      "size": "sm",
      "color": "#666666"
    }
  ]
}
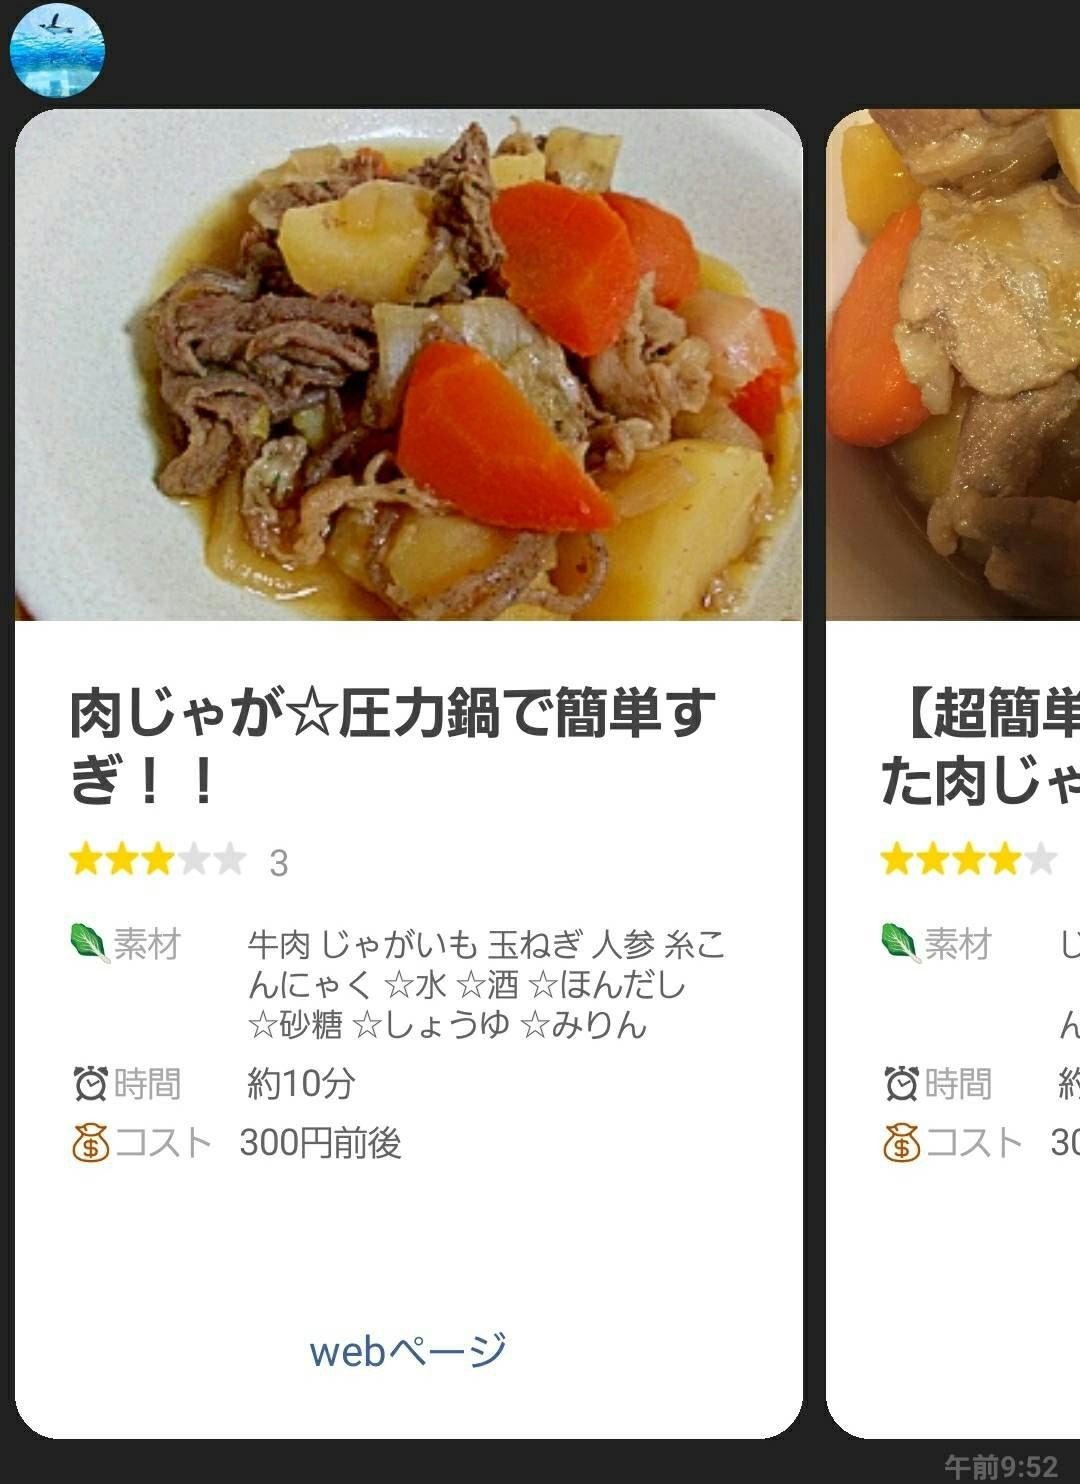
「⏰時間」の下に「💰コスト」が表示されていれば成功です。
リッチメニューから検索できるようにしよう
前回の実装を元にリッチメニューを追加してみましょう。
リッチメニューの設定
emojiの文字を返してみよう
- emojiを改良してみました。
- app/controllers/linebots_controller.rbのtextのelseにしたのコードを追加してみてください。
when 'text'
  # event['message']['text'] = ユーザーが送ってきた
  if event['message']['text'] =~ /カテゴリ/
    ...
  else
    translatec_text, emoji_list = LineBot::EmojiWord.new.translate_to_emoji(event['message']['text'])
    {
      "type": "text",
      "text": translatec_text,
      "emojis": emoji_list
    }
  end

- app/services/line_bot/emoji_word.rb の中に実装はあるので、興味があれば見てみてください。

