最初に
この記事は操作入力をC++側からマッピングに追加したり処理を登録して実際に挙動を登録するところまで記事にしたものとなります。間違いや更に良い方法があった場合にはそっとTwitter( @ろっさむ )やコメント、修正リクエストなどでお知らせ頂けるととても有難いです。
作業環境
記事内で使用する作業環境は以下の通りとなります。
- Unreal Engine:4.23.1
- Visual Studio:Community 2017 or Community 2017 for Mac or Enterprise 2019
実装方法
①Editor側からInputのキーなどをMappingして、C++側からアクションを登録する
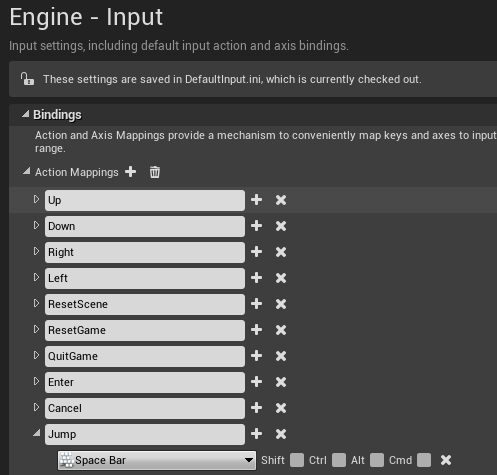
まずは左上メニューからEdit > Project Settings...を選択してInputを開きます。今回はActiono MappingsでJumpを作成してSpace Barを割り当てます。

割り当てたら次はC++側での記述を行います。前提としてプレイヤーキャラクタのクラスはC++、親クラスはACharacterとします。
// CPP_PlayerCharacter.h

// Fill out your copyright notice in the Description page of Project Settings.

# pragma once

# include "Characters/Base/CPP_CharacterBase.h"
# include "CPP_PlayerCharacter.generated.h"

UCLASS()
class ACPP_PlayerCharacter : public ACPP_CharacterBase
{
	GENERATED_BODY()

private:

    // 2段ジャンプ用
	static const int32 MaxJumpCount = 2;

    // Inputに処理を割り当てるためのセットアップメソッド
	virtual void SetupPlayerInputComponent(UInputComponent* PlayerInputComponent) override;

    // ジャンプ時に、着地した時呼び出すメソッド
    virtual void Landed(const FHitResult& Hit) override;

	void Jump();

	int32 JumpCount = 0;

};
// CPP_PlayerCharacter.cpp

# include "CPP_PlayerCharacter.h"

# include "Components/InputComponent.h"
# include "GameFramework/CharacterMovementComponent.h"

void ACPP_PlayerCharacter::SetupPlayerInputComponent(UInputComponent* PlayerInputComponent)
{
	Super::SetupPlayerInputComponent(PlayerInputComponent);

	check(PlayerInputComponent);

    // Editor側で設定しているキー`SpaceBar`押下時にJump()を呼び出すように設定
	PlayerInputComponent->BindAction("Jump", IE_Pressed, this, &ACPP_PlayerCharacter::Jump);

	PlayerInputComponent->BindAction("Jump", IE_Released, this, &ACPP_PlayerCharacter::StopJumping);
}

void ACPP_PlayerCharacter::Landed(const FHitResult& Hit)
{
	Super::Landed(Hit);
	JumpCount = 0;
}

void ACPP_PlayerCharacter::Jump()
{
	if (GetCharacterMovement()->IsFalling() && JumpCount < MaxJumpCount)
	{
		//To adjust the height of the second jump.
		const FVector JumpVelocity{ 0.0f, 0.0f, 800.0f };
		LaunchCharacter(JumpVelocity, false, false);

		JumpCount++;
	}
	else
	{
		Super::Jump();
		JumpCount++;
	}
}
これでSpace Barを押下した際にJump()を呼び出すようになります。また、地面に着地した際にはLanded()が呼び出されてJumpCountはリセットされます。また、ジャンプのカスタマイズとして2段ジャンプができるようにしています。
②C++側からInputのキーなどをMappingしてアクションを登録する
こちらはMappingも含めてC++で済ませる方法となります。.hは変わらないのでcpp側で変更する必要があるSetupPlayerInputComponent()だけ載せます。
void ACPP_PlayerCharacter::SetupPlayerInputComponent(UInputComponent* PlayerInputComponent)
{
	Super::SetupPlayerInputComponent(PlayerInputComponent);

	check(PlayerInputComponent);

    // ZキーをJumpという名前のアクションで登録するための情報群(今回は他に押下するキーなしなので0)
    // ("アクションの名前", Keyの種類, Shiftを押下するか, Ctrlを押下するか, Altを押下するか, Cmdを押下するか)
	FInputActionKeyMapping jump("Jump", EKeys::Z, 0, 0, 0, 0);

    // 実際に登録を行う
	GetWorld()->GetFirstPlayerController()->PlayerInput->AddActionMapping(jump);

    // これでZキー、スペースキーどちらでも反応するようになる
	PlayerInputComponent->BindAction("Jump", IE_Pressed, this, &ACPP_PlayerCharacter::Jump);
	PlayerInputComponent->BindAction("Jump", IE_Released, this, &ACPP_PlayerCharacter::StopJumping);
}