はじめに
この記事は、Elixir Advent Calendar 2019 の13日目です。
昨日は @Tsuyoshi84 さんのiexを便利にするハック集でした。
まさか初めてのQiita投稿がElixirになるとは。な気持ちで書いてます。
参考
Elixir入門の連載を開始(Elixir入門もくじ)
Elixir Circuits・GitHub
RaspberryPiで学ぶ電子工作 3章電子工作の予備知識およびRaspberry PiによるLEDの点灯
環境
- Raspberry Pi 3B+
- Raspbian 10.1
- Elixir 1.9.4 (compiled with Erlang/OTP 22)
- Raspberry Piで学ぶ電子工作パーツセット
環境構築
RaspberryPi、Elixirの環境構築は以下の記事でバッチグー
@nishiuchikazuma さんのElixirでラズパイのLEDをチカ〜RaspbianOSインストールから〜
やりたいこと
- Raspberry Pi上でElixir Circuitsを使用してLEDを操作する。
- RaspberryPiで学ぶ電子工作を参考に、PythonのコードをElixirに置き換える。
目次
- お試し:システムコマンドで基盤のLEDを操作する。
- 本題:Elixir Circuitsを使用してLEDを操作する。
- 用意するもの
- 配線図・回路図
- Elixir Circuitsの導入
- Elixirでコーディング
- まとめ
お試し:システムコマンドで基盤のLEDを操作する。
まずは基盤についてるLEDでお試しするのと、Elixirの記述を確認
System.cmdでコマンドを実行
% iex
defmodule LedSystemCmd do
  def heartbeat do
    System.cmd("sudo",["su","-c","echo heartbeat > /sys/class/leds/led0/trigger"])
  end

  def none do
    System.cmd("sudo",["su","-c","echo none > /sys/class/leds/led0/trigger"])
  end

  def manual(x) do
    System.cmd("sudo",["su","-c","echo #{x} > /sys/class/leds/led0/trigger"])
  end
end

# ledを消す
LedSystemCmdTest.none
# ledを点滅
LedSystemCmdTest.heartbeat
# ledを指定の方法で操作
LedSystemCmdTest.manual("none")
本題:Elixir Circuitsを使用してLEDを操作する。
用意するもの
- RaspberryPi 3 B+
- ブレッドボード*1
- 抵抗(330Ω)*1
- 赤色LED*1
- ジャンパー線(オス-メス)*2
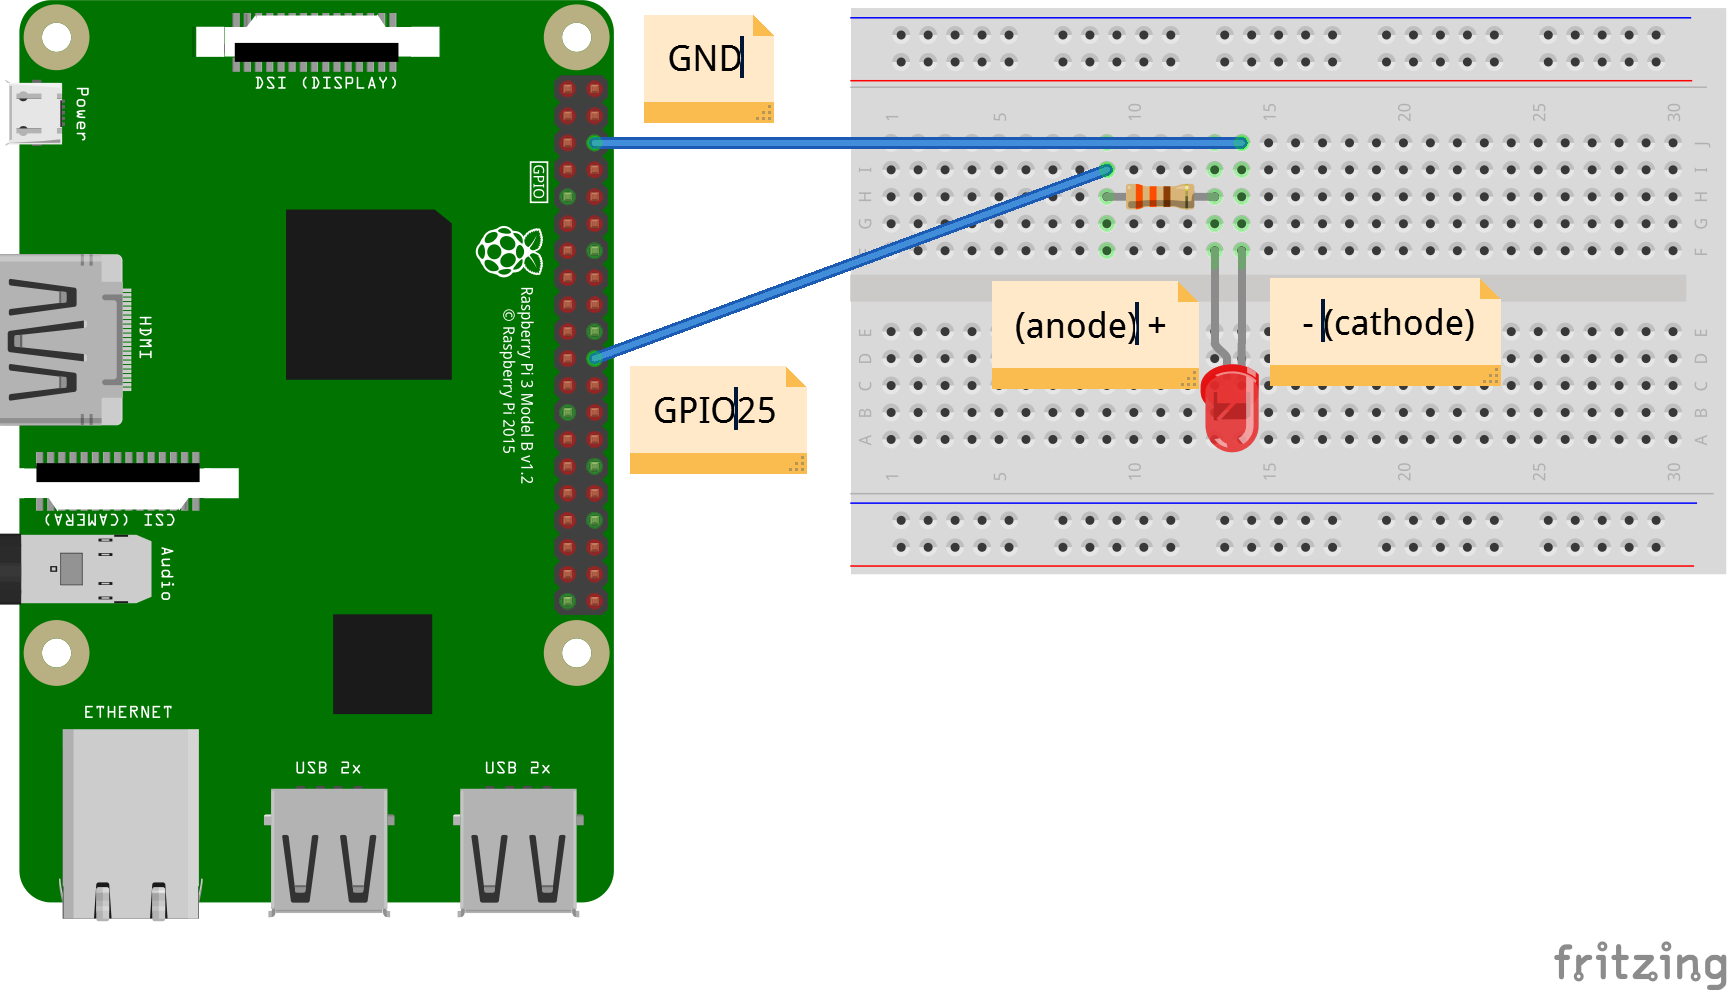
配線図・回路図
※ 配線はRaspberryPiの電源を落とした状態で行う。
※ 抵抗を忘れない。(忘れると焼けます。焼きました。)
※ 電源投入前に配線を確認。

Elixir Circuitsの導入
1.mix newで適当なプロジェクトを作成
- mix newでled_circuits_001ディレクトリを作成します。
(以下プロジェクトディレクトリと呼びます。)
# led_circuits_001ディレクトリが作成されます。
% mix new led_circuits_001
* creating README.md
* creating .formatter.exs
* creating .gitignore
* creating mix.exs
* creating lib
* creating lib/led_circuits001.ex
* creating test
* creating test/test_helper.exs
* creating test/led_circuits001_test.exs

Your Mix project was created successfully.
You can use "mix" to compile it, test it, and more:

    cd led_circuits_001
    mix test

Run "mix help" for more commands.
2.mix deps.getでcircuits_gpioを導入
記述はこちらを参考circuits_gpio
- mix.exsに追記
- mix deps.get プロジェクトディレクトリで実行
mix.exs
defmodule LedCircuits001.MixProject do
  use Mix.Project

  def project do
    [
      app: :led_circuits_001,
      version: "0.1.0",
      elixir: "~> 1.9",
      start_permanent: Mix.env() == :prod,
      deps: deps()
    ]
  end

  # Run "mix help compile.app" to learn about applications.
  def application do
    [
      extra_applications: [:logger]
    ]
  end

  # Run "mix help deps" to learn about dependencies.
  defp deps do
    [
      # {:dep_from_hexpm, "~> 0.3.0"},
      # {:dep_from_git, git: "https://github.com/elixir-lang/my_dep.git", tag: "0.1.0"}
      # この行を追記
      {:circuits_gpio, "~> 0.4"}
    ]
  end
end

# mix deps.get の実行
% mix deps.get
Resolving Hex dependencies...
Dependency resolution completed:
Unchanged:
  circuits_gpio 0.4.3
  elixir_make 0.6.0
* Getting circuits_gpio (Hex package)
* Getting elixir_make (Hex package)
Elixirでコーディング
- led_circuits001.exにモジュールを記述
- ltika(msec) で指定した秒数(ミリセック)の間隔でLEDを点滅
- loop関数は再帰で無限ループ
- 抜けるときはctrl+c
※本当は処理終了時にgpioを初期化すべきですが今回はやってません。
led_circuits001.ex
defmodule LedCircuits001 do
  def ltika(sleep_msec) do

    {:ok, gpio} = Circuits.GPIO.open(25, :output)
    loop(gpio, sleep_msec)

  end

  defp loop(gpio, sleep_msec) do
      Circuits.GPIO.write(gpio, 1)
      :timer.sleep(sleep_msec)

      Circuits.GPIO.write(gpio, 0)
      :timer.sleep(sleep_msec)

      loop(gpio, sleep_msec)
  end
end

# プロジェクトディレクトリで実行
% iex -S mix
# 関数実行
iex(1)> LedCircuits001.ltika(500)
まとめ
- まずはmix newでプロジェクト作成。
- ElixirでGPIOやI2C叩くのは、Elixir Circuitsを使うとサクッとできるよ。
- mix.exsに追記したらmix deps.getで依存関係を解決。
- ループをブレイクする時にGPIOを初期化したほうが良いよ。
- 今度はボタン押下でLチカ->別プロセスで。
明日のElixir Advent Calendar 2019 14日目の記事は, @koga1020 さんのPhoenixプロジェクトをmix releaseでパッケージ化してdockerコンテナで動作させるです。こちらもお楽しみに!