◾️ はじめに
1つ前の記事で、Infrastructure Composer + SAM で簡単にインフラ構築してみたという記事を書いたのですが、その続きで今回はLINEを組み込みます。
実行方法は、LINEからのメッセージをLamda経由でChatGPTに送り、応答をChatGPT botに返すよう設定します。
※今回、LINE Developer Consoleで、Messaging APIチャンネルの作成方法については、割愛します。
◾️ 事前準備
以下のツールやサービスが必要です。
AWS CLI:
AWS CLI をインストールし、プロファイルを設定します。
AWS CLI インストールガイド
AWS SAM CLI:
Serverless Application Model (SAM) CLI をインストールします。
SAM CLI インストールガイド
Node.js:
必須バージョン:20.x Node.js
ダウンロードページ
LINE Developer アカウント:
LINE Messaging API チャンネルを作成します。
◾️ Webhookエンドポイントの準備
API Gatewayを使ってLINEからのリクエストを受け取るLambda関数を作成します。
1. Lambda関数のコード
以下はLINEからのメッセージを受け取り、ChatGPT APIにリクエストを送る関数の例です。
import axios from "axios";

export const handler = async (event: any) => {
  const body = JSON.parse(event.body);

  if (!body.events || body.events.length === 0) {
  return {
    statusCode: 400,
    body: JSON.stringify({ message: "No events in request" }),
    };
 }

  // LINEの送信元を確認
  const replyToken = body.events[0].replyToken;
  const userMessage = body.events[0].message.text;

  const apiKey = process.env.OPENAI_API_KEY;

  try {
    // ChatGPT APIへリクエスト
    const gptResponse = await axios.post(
      "https://api.openai.com/v1/chat/completions",
      {
        model: "gpt-4o-mini",
        messages: [{ role: "user", content: userMessage }],
      },
      {
        headers: {
          Authorization: `Bearer ${apiKey}`,
          "Content-Type": "application/json",
        },
      }
    );

    const botReply = gptResponse.data.choices[0].message.content;

    // LINE Botに応答を送信
    const lineResponse = await axios.post(
      "https://api.line.me/v2/bot/message/reply",
      {
        replyToken: replyToken,
        messages: [
          {
            type: "text",
            text: botReply,
          },
        ],
      },
      {
        headers: {
          Authorization: `Bearer ${process.env.LINE_CHANNEL_ACCESS_TOKEN}`,
          "Content-Type": "application/json",
        },
      }
    );

    return {
      statusCode: 200,
      body: JSON.stringify({ message: "Success" }),
    };
  } catch (error) {
    console.error("Error:", error);
    return {
      statusCode: 500,
      body: JSON.stringify({ message: "Error" }),
    };
  }
};
2. 必要な環境変数の設定
.env ファイルに以下を記述します。
OPENAI_API_KEY:ChatGPTのAPIキー
LINE_CHANNEL_ACCESS_TOKEN:LINE Messaging APIのチャンネルアクセストークン
OPENAI_API_KEY=your-openai-api-key
LINE_CHANNEL_ACCESS_TOKEN=your-line-access-token
※Lambda関数の環境変数にも追加します。
◾️ SAMテンプレートの拡張
Messaging APIのWebhook対応として以下を追加します。
Resources:
  LineChatbotFunction:
    Type: AWS::Serverless::Function
    Properties:
      Handler: index.handler
      Runtime: nodejs20.x
      CodeUri: .
      Environment:
        Variables:
          OPENAI_API_KEY: !Ref OpenAIKey
          LINE_CHANNEL_ACCESS_TOKEN: !Ref LineAccessToken
      Events:
        LineWebhook:
          Type: Api
          Properties:
            Path: /line/webhook
            Method: post

Parameters:
  OpenAIKey:
    Type: String
    Description: "OpenAI API Key"
  LineAccessToken:
    Type: String
    Description: "LINE Channel Access Token"
◾️ 動作確認とデプロイ
1. SAMデプロイ
sam build の後、以下を実行します。
sam deploy --guided
OpenAI APIキーとLINEチャンネルアクセストークンを入力します。
◾️ LINE Messaging APIの設定
LINEからのメッセージをLambdaで受け取り、ChatGPTに転送する仕組みを構築するには、Messaging APIの設定が必要です。
1. Webhookの有効化
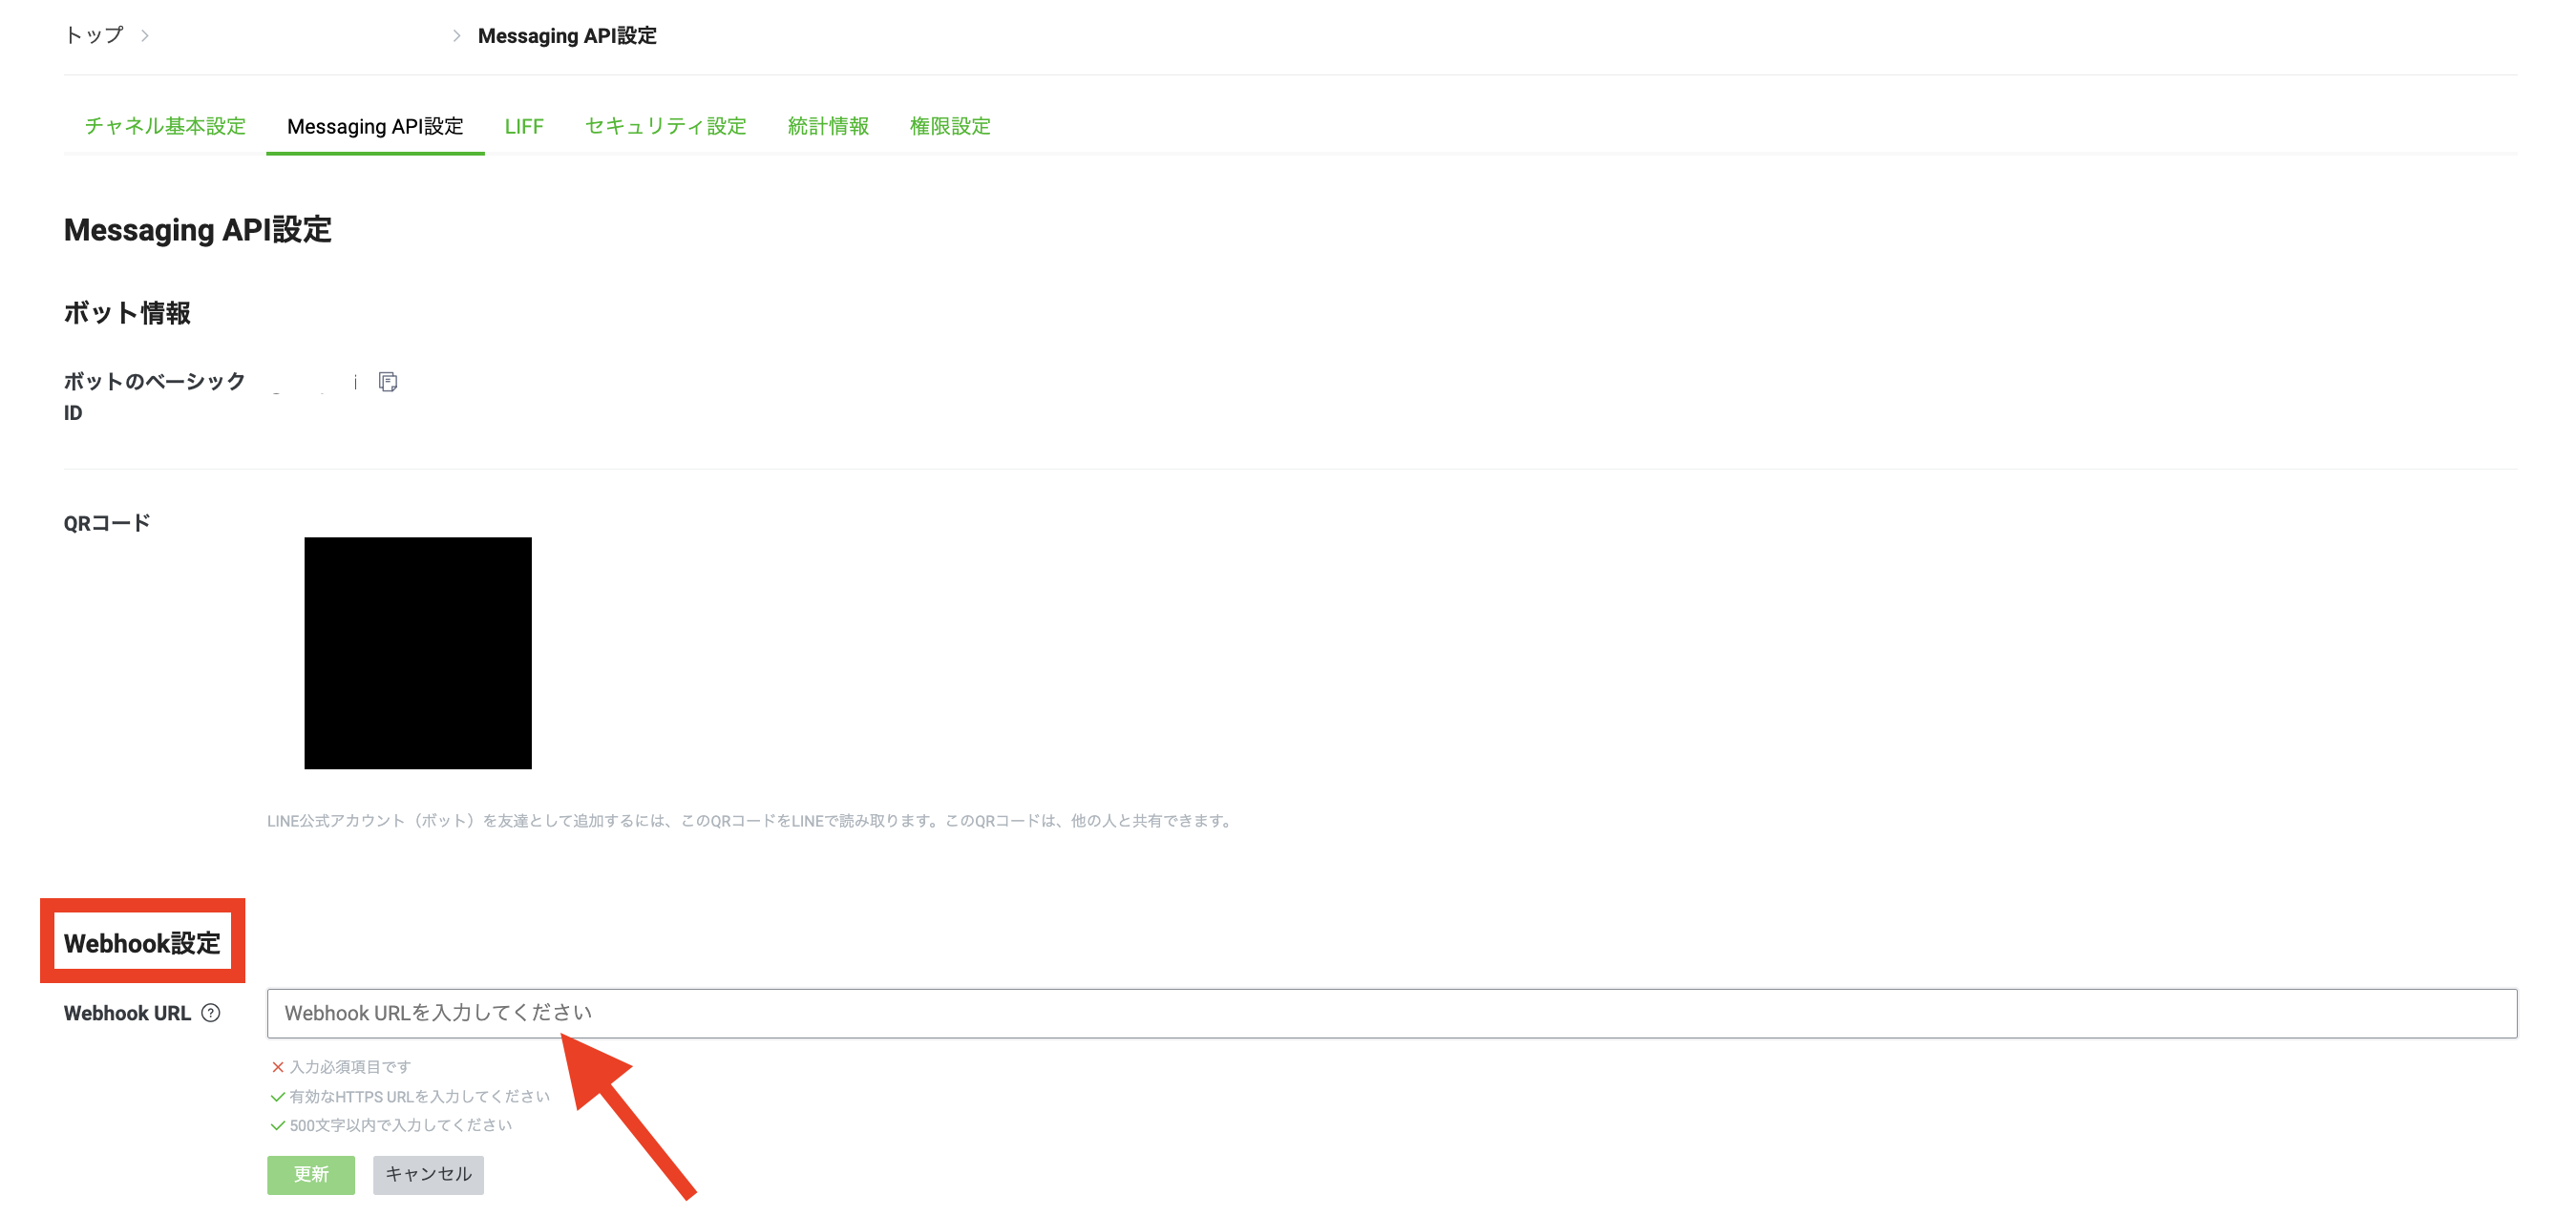
❶LINE Developer Consoleで、作成済みのMessaging APIチャンネルを開きます。
❷「Webhook URL」 の設定欄を探します。

❸Webhook URLには、API Gateway>ステージ>Prod>URL を呼び出すをコピーし、pathにline/webhookを追加します。
https://your-api-id.execute-api.ap-northeast-1.amazonaws.com/Prod/line/webhook
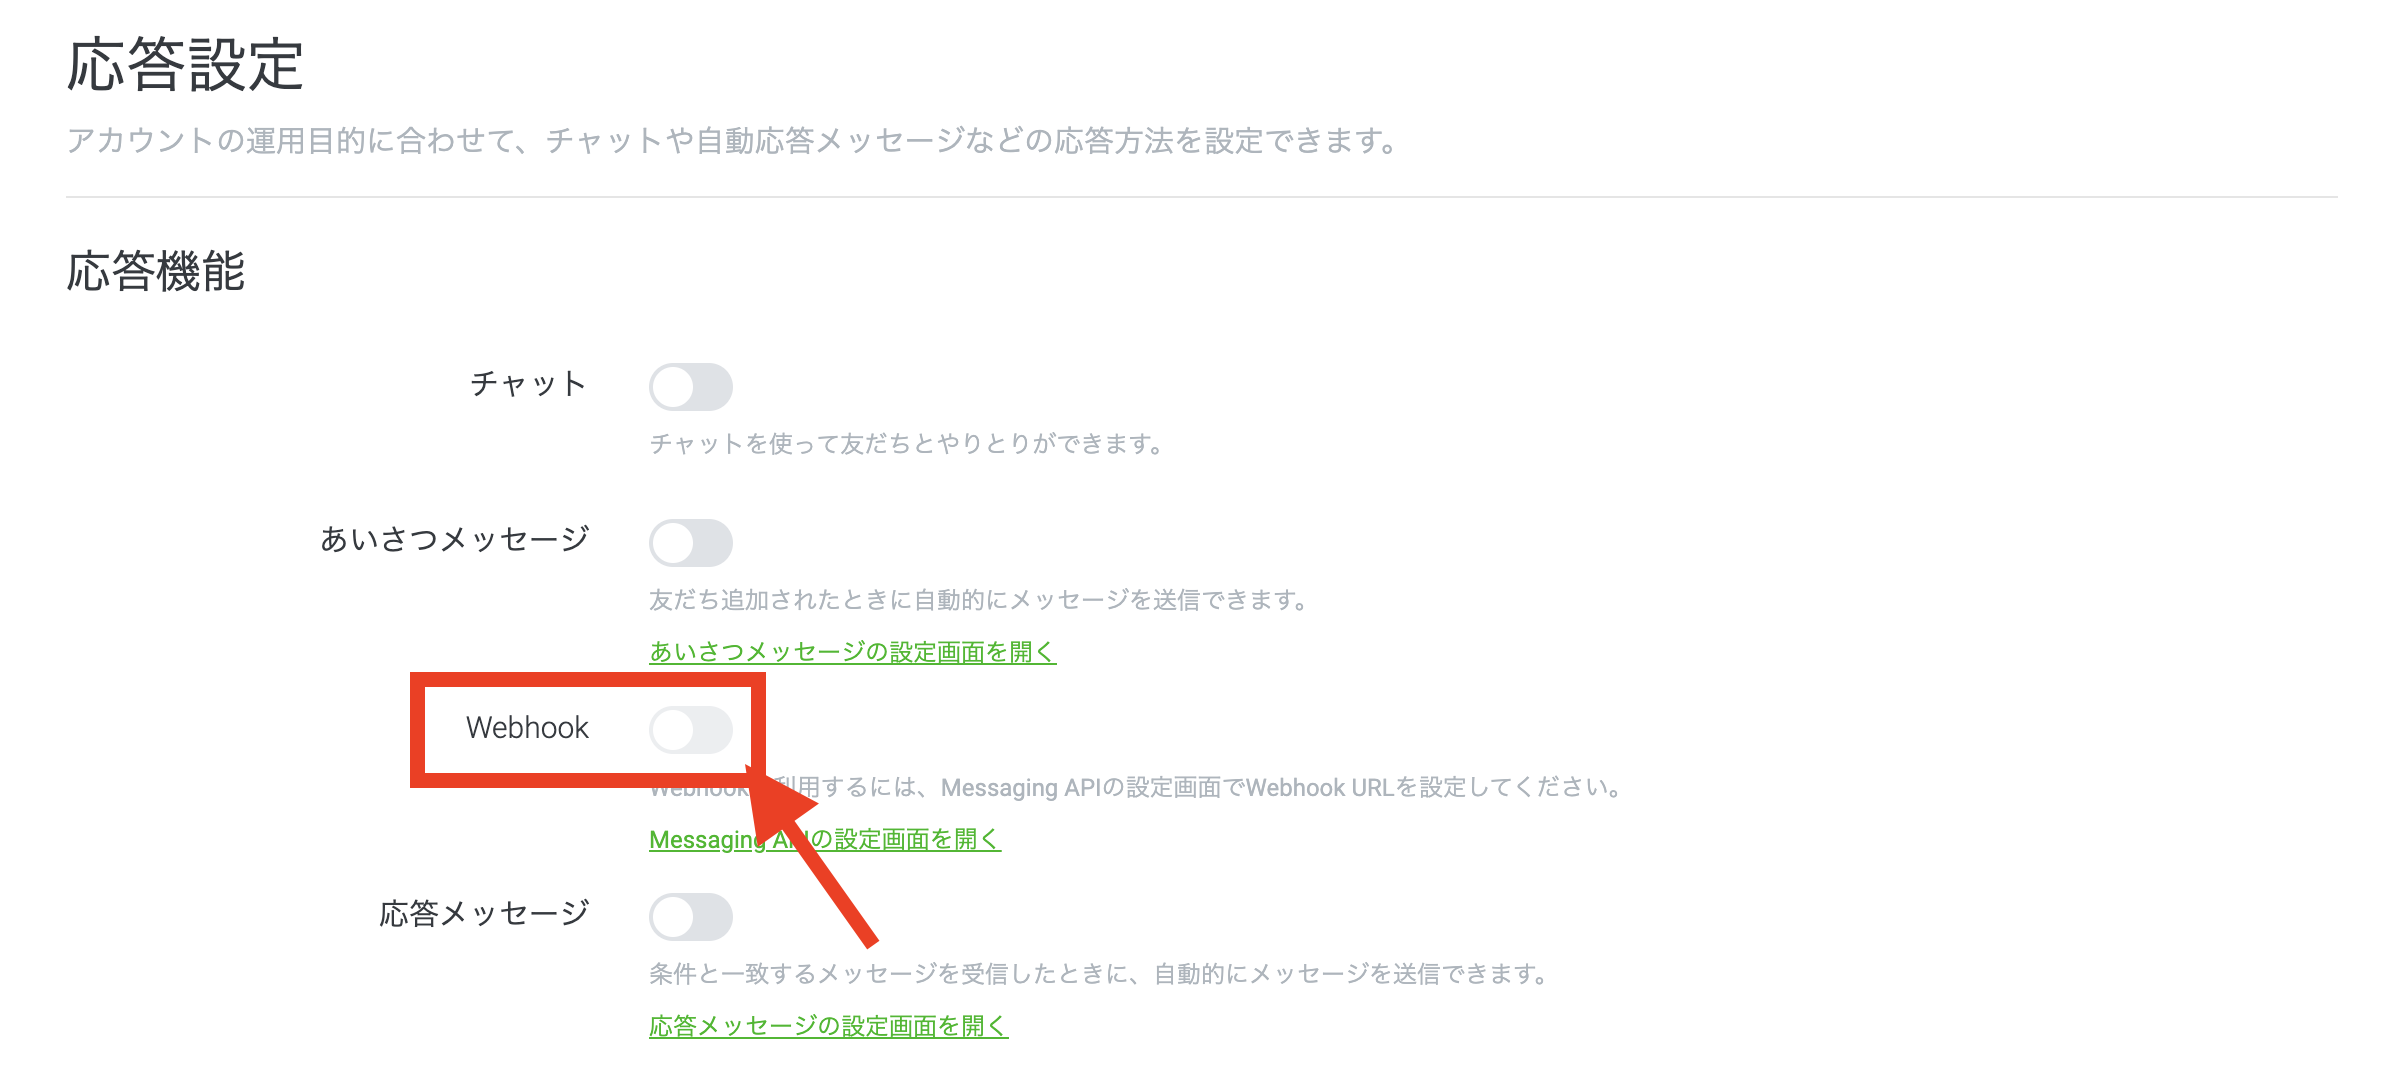
❹Webhookを「有効」にします。
応答メッセージ項目の編集をクリックし、以下の設定を変更します:
- チャット:無効
- あいさつメッセージ:無効
- Webhook:有効
- 応答メッセージ:オフ
2. LINE Botでテスト
- LINEアプリでBotを友達追加
- メッセージを送信します(例: こんにちは)
ChatGPTの応答が返ってくれば成功です✨
OpenAIのAPIを叩く際、別途課金する必要があります。
OpenAI Billing
◾️ トラブルシューティング
よくあるエラー
1. LINEからの応答がない
- Webhook URL が正しいか確認
- LINE Messaging API チャンネルの設定が有効になっているか確認
2. Lambda 関数でエラーが発生
CloudWatch Logs を確認してエラー内容を特定します
3.OpenAI API のエラー
- 環境変数に正しい API キーが設定されているか確認
- OpenAI API から返されるエラーメッセージを確認してください
