あんまHonoのことわかってなかったし、知りたかったし、Cloudflareのことも知りたかった。
で、HonoのGet StartにCloudflare Workersでデプロイできるようなこと書いてあって、全部盛でちょうどよかったので触った🦆
これはそのログ。
作業リポジトリ: https://github.com/11bluetree/hono-app
あ、言っとくけどHonoの強みを使ったアプリ作ってないからね。ただデプロイできるんだ。へ~というのをしたかっただけ。
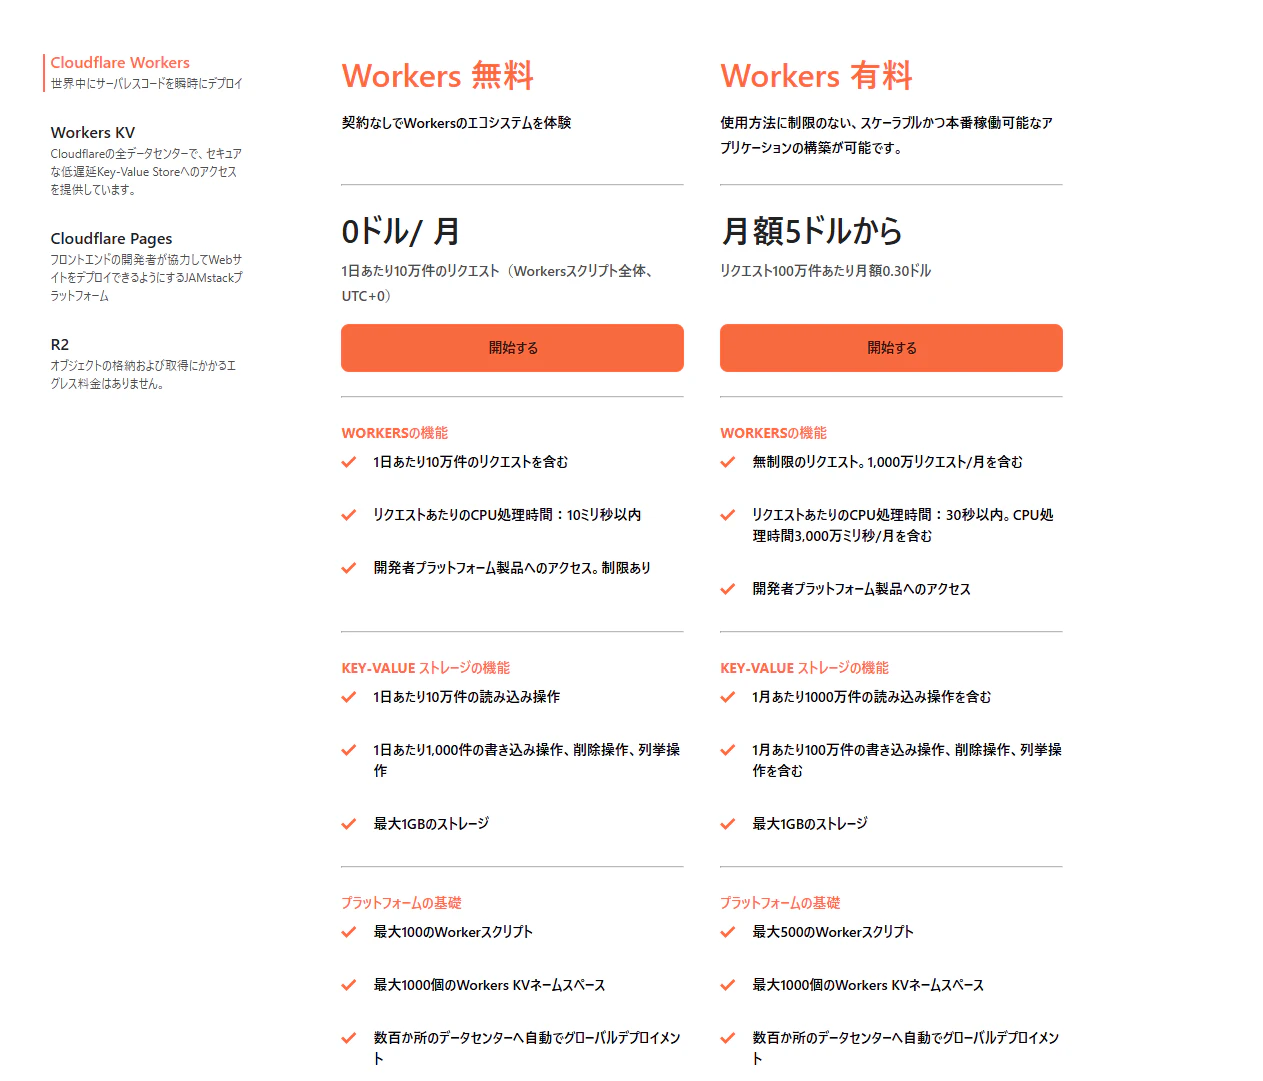
無料枠で余裕で試せるのだ。
https://www.cloudflare.com/ja-jp/developer-platform/products/workers/
環境
$ cat /etc/os-release
PRETTY_NAME="Ubuntu 24.04.3 LTS"
NAME="Ubuntu"
VERSION_ID="24.04"
VERSION="24.04.3 LTS (Noble Numbat)"
nodejs 22.20.0
pnpm 10.18.2
あとはgithub Copilot with Claude Sonet 4.5で諸々作業してもらった。
プロジェクト作成
Viteは常日頃触っておきたいのでcloudflare-workers+vite構成を選択。
次の記事ではVite + ReactのBE / FE モノレポ構成でデプロイするやつする。
pnpm create hono@latest
.../199d38ebeba-af7                      | Progress: resolved 1, reused 0, downloaded 0, add.../199d38ebeba-af7                      |   +1 +
.../199d38ebeba-af7                      | Progress: resolved 1, reused 0, downloaded 0, add.../199d38ebeba-af7                      | Progress: resolved 1, reused 0, downloaded 1, added 1, done
create-hono version 0.19.2
✔ Target directory hono-app
✔ Which template do you want to use? cloudflare-workers+vite
✔ Do you want to install project dependencies? Yes
✔ Which package manager do you want to use? pnpm
✔ Cloning the template
✔ Installing project dependencies
🎉 Copied project files
Get started with: cd hono-app
作成後はこんなかんじ
{
  "name": "hono-app",
  "type": "module",
  "scripts": {
    "dev": "vite",
    "build": "vite build",
    "preview": "$npm_execpath run build && vite preview",
    "deploy": "$npm_execpath run build && wrangler deploy",
    "cf-typegen": "wrangler types --env-interface CloudflareBindings"
  },
  "dependencies": {
    "hono": "^4.9.11"
  },
  "devDependencies": {
    "@cloudflare/vite-plugin": "^1.2.3",
    "vite": "^6.3.5",
    "vite-ssr-components": "^0.5.1",
    "wrangler": "^4.17.0"
  }
}
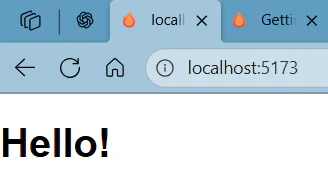
サーバー起動する
$ pnpm dev

> hono-app@ dev /home/bluetree/hono-app
> vite


  VITE v6.3.6  ready in 1486 ms

  ➜  Local:   http://localhost:5173/
  ➜  Network: use --host to expose
  ➜  Debug:   http://localhost:5173/__debug
  ➜  press h + enter to show help
12:09:23 AM [vite] (hono_app) ✨ new dependencies optimized: hono/jsx/jsx-dev-runtime
12:09:23 AM [vite] (hono_app) ✨ optimized dependencies changed. reloading
[vite] program reload
みれた!
アプリつくる
さっきも言ったけどHonoが持つ爆速APIサーバーの強みを活かしたアプリはつくらない。
単にJSX Renderer機能があるので、コンポーネントつくってクライアントサイドのロジックを埋め込んだような家計簿アプリを実装した。
ルーティング
家計簿アプリのダッシュボードと家計の推移がわかるページを用意した。
import { Hono } from 'hono'
import { renderer } from './renderer'
import { Dashboard } from './components/Dashboard'
import { TrendsPage } from './components/TrendsPage'

const app = new Hono()

app.use(renderer)

app.get('/', (c) => {
  return c.render(<Dashboard />)
})

app.get('/trends', (c) => {
  return c.render(<TrendsPage />)
})

export default app
あとはこんな感じでコンポーネント作るだけ。
export const Dashboard: FC = () => {
  return (
    <div id="app" class="min-h-screen flex flex-col bg-gray-100">
      <Header />

      <main class="flex-1 max-w-7xl mx-auto p-4 md:p-8 w-full">
        <SummaryCards />
        <ActionButtons />
        <RecurringTransactions />
        <TransactionList />
      </main>

      <TransactionModal />
      <RecurringModal />
    </div>
  )
}
クライアントサイドロジック
"jsxImportSource": "hono/jsx"でつくっているので、コンポーネントは全部tailwindで実装。dom操作もローカルストレージいじったりするだけなので特にライブラリ使わず書いた。
これも後ほどReactで書き直す予定。
アーキテクチャ
クライアントサイドは MVC (Model-View-Controller) パターン を採用。
Reactは使わず、Vanilla TypeScriptでクラスベースの設計にした。
src/client/
├── main.ts                    # エントリーポイント
├── controllers/
│   ├── ui-controller.ts       # UI操作の制御
│   └── recurring-controller.ts # 定期取引の制御
├── state/
│   └── app-state.ts          # アプリケーション状態管理
├── services/
│   └── storage.ts            # LocalStorage操作
└── models/
    ├── types.ts              # 型定義
    └── preset-tags.ts        # プリセットカテゴリ
型定義
家計簿アプリとして必要な基本的な型を定義。
export interface Transaction {
  id: string
  type: 'income' | 'expense'
  amount: number
  date: string
  tagId: string
  memo: string
  createdAt: string
}

export interface Tag {
  id: string
  name: string
  type: 'income' | 'expense' | 'both'
  isPreset: boolean
}

export interface Summary {
  income: number
  expense: number
  balance: number
}

export interface RecurringTransaction {
  id: string
  name: string
  type: 'income' | 'expense'
  amount: number
  tagId: string
  frequency: 'monthly' | 'yearly'
  startDate: string
  endDate?: string
  isActive: boolean
  lastExecutedAt?: string
  createdAt: string
  updatedAt: string
}
状態管理
AppStateクラスでアプリケーション全体の状態を一元管理。
LocalStorageとのやり取りはLocalStorageServiceに委譲。
import type { Tag, Transaction, Summary, RecurringTransaction } from '../models/types'
import { LocalStorageService } from '../services/storage'

export class AppState {
  private transactions: Transaction[] = []
  private tags: Tag[] = []
  private recurringTransactions: RecurringTransaction[] = []
  private currentType: 'income' | 'expense' = 'income'

  constructor() {
    this.loadData()
    this.processRecurringTransactions()
  }

  private loadData(): void {
    this.transactions = LocalStorageService.getTransactions()
    this.tags = LocalStorageService.getTags()
    this.recurringTransactions = LocalStorageService.getRecurringTransactions()
  }

  getTransactions(): Transaction[] {
    return [...this.transactions].sort(
      (a, b) => new Date(b.date).getTime() - new Date(a.date).getTime()
    )
  }

  addTransaction(transaction: Omit<Transaction, 'id' | 'createdAt'>): void {
    const newTransaction: Transaction = {
      ...transaction,
      id: LocalStorageService.generateId(),
      createdAt: new Date().toISOString(),
    }
    this.transactions.push(newTransaction)
    LocalStorageService.saveTransactions(this.transactions)
  }

  getSummary(): Summary {
    const income = this.transactions
      .filter((t) => t.type === 'income')
      .reduce((sum, t) => sum + t.amount, 0)

    const expense = this.transactions
      .filter((t) => t.type === 'expense')
      .reduce((sum, t) => sum + t.amount, 0)

    return {
      income,
      expense,
      balance: income - expense,
    }
  }
}
LocalStorage操作
データの永続化はすべてLocalStorageで実装。初回アクセス時にプリセットのカテゴリを自動生成。
import type { Tag, Transaction, RecurringTransaction } from '../models/types'
import { PRESET_TAGS } from '../models/preset-tags'

const LOCAL_STORAGE_KEYS = {
  TRANSACTIONS: 'household_transactions',
  TAGS: 'household_tags',
  RECURRING_TRANSACTIONS: 'household_recurring_transactions',
} as const

export class LocalStorageService {
  static getTransactions(): Transaction[] {
    const data = localStorage.getItem(LOCAL_STORAGE_KEYS.TRANSACTIONS)
    return data ? JSON.parse(data) : []
  }

  static saveTransactions(transactions: Transaction[]): void {
    localStorage.setItem(LOCAL_STORAGE_KEYS.TRANSACTIONS, JSON.stringify(transactions))
  }

  static getTags(): Tag[] {
    const data = localStorage.getItem(LOCAL_STORAGE_KEYS.TAGS)
    if (!data) {
      const tags: Tag[] = PRESET_TAGS.map((tag) => ({
        ...tag,
        id: this.generateId(),
      }))
      this.saveTags(tags)
      return tags
    }
    return JSON.parse(data)
  }

  static generateId(): string {
    return Date.now().toString(36) + Math.random().toString(36).substring(2)
  }
}
UIコントローラー
DOM操作とイベントハンドリングを担当。状態変更後にrender()を呼び出してUIを更新。
import type { AppState } from '../state/app-state'

export class UIController {
  private state: AppState
  private modal: HTMLElement | null = null
  private form: HTMLFormElement | null = null

  constructor(state: AppState) {
    this.state = state
    this.initializeElements()
    this.setupEventListeners()
    this.render()
  }

  private initializeElements(): void {
    this.modal = document.getElementById('transactionModal')
    this.form = document.getElementById('transactionForm') as HTMLFormElement
  }

  private setupEventListeners(): void {
    // 収入追加ボタン
    document.getElementById('addIncomeBtn')?.addEventListener('click', () => {
      this.openModal('income')
    })

    // 支出追加ボタン
    document.getElementById('addExpenseBtn')?.addEventListener('click', () => {
      this.openModal('expense')
    })

    // フォーム送信
    this.form?.addEventListener('submit', (e) => {
      e.preventDefault()
      this.handleSubmit()
    })
  }

  private openModal(type: 'income' | 'expense'): void {
    this.state.setCurrentType(type)
    const modalTitle = document.getElementById('modalTitle')

    if (modalTitle) {
      modalTitle.textContent = type === 'income' ? '収入を追加' : '支出を追加'
    }

    this.updateTagOptions(type)

    if (this.modal) {
      this.modal.style.display = 'block'
    }
  }

  private handleSubmit(): void {
    const typeInput = document.getElementById('transactionType') as HTMLInputElement
    const amountInput = document.getElementById('amount') as HTMLInputElement
    const dateInput = document.getElementById('date') as HTMLInputElement
    const tagSelect = document.getElementById('tag') as HTMLSelectElement
    const memoInput = document.getElementById('memo') as HTMLTextAreaElement

    const transaction = {
      type: typeInput.value as 'income' | 'expense',
      amount: Number(amountInput.value),
      date: dateInput.value,
      tagId: tagSelect.value,
      memo: memoInput.value,
    }

    this.state.addTransaction(transaction)
    this.closeModal()
    this.render()  // UIを再レンダリング
  }

  private render(): void {
    this.renderSummary()
    this.renderTransactions()
  }

  private renderTransactions(): void {
    const container = document.getElementById('transactionList')
    if (!container) return

    const transactions = this.state.getTransactions()
    const tags = this.state.getTags()

    if (transactions.length === 0) {
      container.innerHTML = '<li class="text-center text-gray-500 py-8">取引データがありません</li>'
      return
    }

    container.innerHTML = transactions
      .map((t) => {
        const tag = tags.find((tag) => tag.id === t.tagId)
        const amountColor = t.type === 'income' ? 'text-green-600' : 'text-red-600'
        return `
        <li class="flex items-center justify-between p-4 border border-gray-200 rounded-lg">
          <div class="text-sm text-gray-600">${new Date(t.date).toLocaleDateString('ja-JP')}</div>
          <div class="flex-1 mx-4">
            <div class="font-semibold">${tag?.name || 'タグなし'}</div>
            <div class="text-sm text-gray-600">${t.memo || ''}</div>
          </div>
          <div class="text-xl font-bold ${amountColor}">
            ${t.type === 'income' ? '+' : '-'}¥${t.amount.toLocaleString()}
          </div>
        </li>
      `
      })
      .join('')
  }
}
エントリーポイント
アプリケーションの初期化は、DOMContentLoaded後に実行。
import { AppState } from './state/app-state'
import { UIController } from './controllers/ui-controller'
import { RecurringController } from './controllers/recurring-controller'

function initializeApp(): void {
  const state = new AppState()
  new UIController(state)
  new RecurringController(state)
}

document.addEventListener('DOMContentLoaded', initializeApp)
import { jsxRenderer } from 'hono/jsx-renderer'
import { Link, ViteClient, Script } from 'vite-ssr-components/hono'

export const renderer = jsxRenderer(({ children }) => {
  return (
    <html>
      <head>
        <ViteClient />
        <Link href="/src/style.css" rel="stylesheet" />
      </head>
      <body>
        {children}
        {/* クライアントサイドスクリプトを読み込む */}
        <Script src="/src/client/main.ts" type="module" />
      </body>
    </html>
  )
})
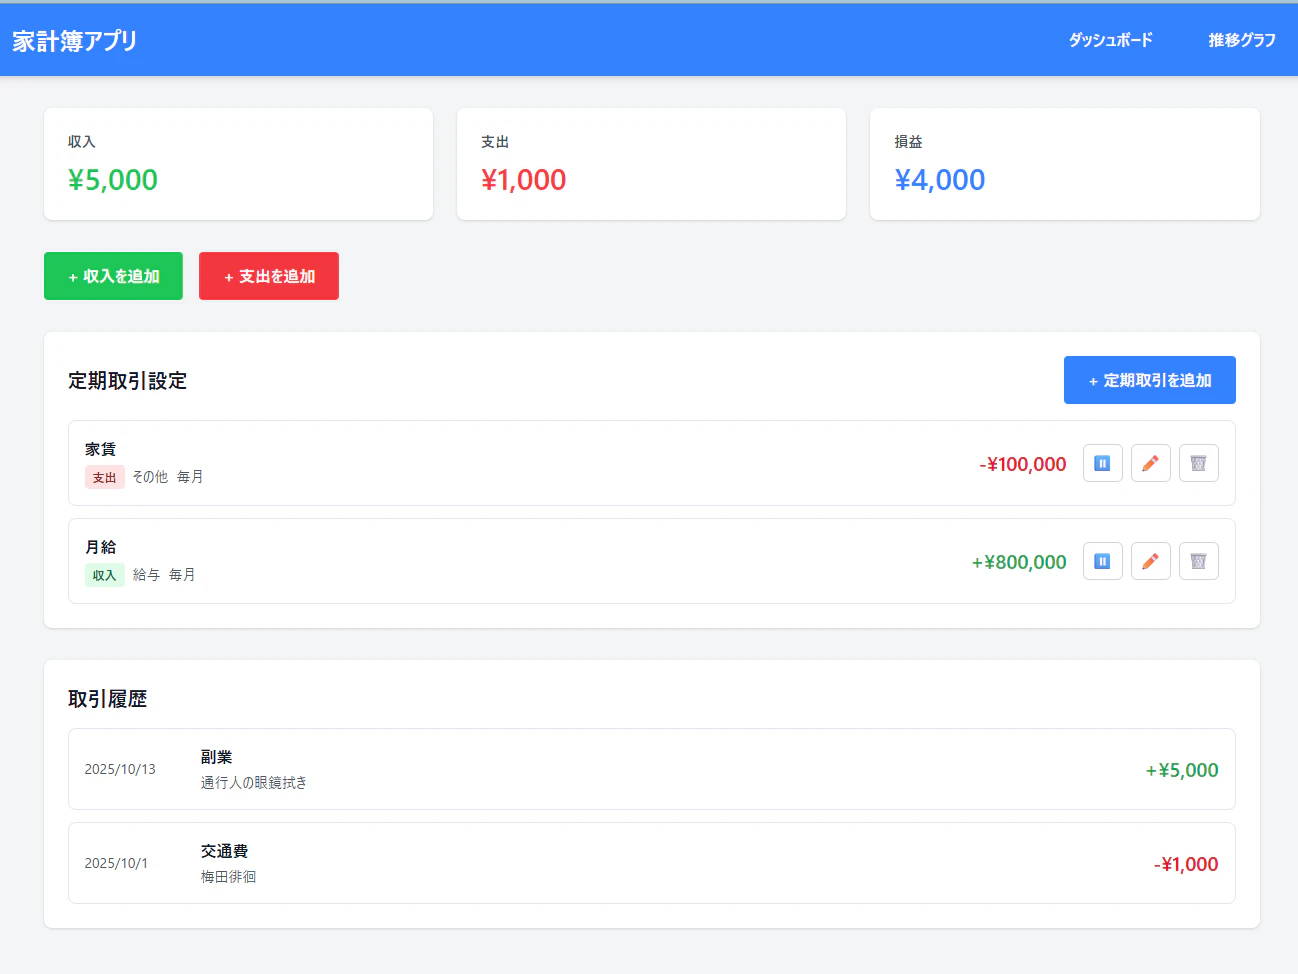
動作確認
とりあえず動く。今回はデプロイが目的なので細かいロジック修正は放置!
なんかGoogle コンソールみたいな色味

デプロイする
まずはwrangler経由でcloudflareにログイン。このタイミングで私はアカウント作成した
$ pnpm wrangler login
そしてデプロイ
$ pnpm run deploy

> hono-app@ deploy /home/bluetree/hono-app
> $npm_execpath run build && wrangler deploy


> hono-app@ build /home/bluetree/hono-app
> vite build

vite v6.3.6 building for production...
✓ 1 modules transformed.
dist/client/.vite/manifest.json         0.12 kB │ gzip: 0.11 kB
dist/client/assets/style-DMjtEE-U.css  15.11 kB │ gzip: 3.87 kB
✓ built in 81ms
vite v6.3.6 building SSR bundle for production...
✓ 62 modules transformed.
dist/hono_app/.vite/manifest.json    0.16 kB
dist/hono_app/wrangler.json          1.05 kB
dist/hono_app/index.js             112.90 kB
✓ built in 369ms

 ⛅️ wrangler 4.42.2
───────────────────
Using redirected Wrangler configuration.
 - Configuration being used: "dist/hono_app/wrangler.json"
 - Original user's configuration: "wrangler.jsonc"
 - Deploy configuration file: ".wrangler/deploy/config.json"
🌀 Building list of assets...
✨ Read 6 files from the assets directory /home/bluetree/hono-app/dist/client
🌀 Starting asset upload...
No updated asset files to upload. Proceeding with deployment...
Total Upload: 110.26 KiB / gzip: 25.41 KiB
Uploaded hono-app (9.54 sec)
▲ [WARNING] You need to register a workers.dev subdomain before publishing to workers.dev


✔ Would you like to register a workers.dev subdomain now? … yes✔ What would you like your workers.dev subdomain to be? It will be accessible at https://<subdomain>.workers.dev … bluetree-hono
✔ Creating a workers.dev subdomain for your account at https://bluetree-hono.workers.dev. Ok to proceed? … yes
Success! It may take a few minutes for DNS records to update.
Visit https://dash.cloudflare.com/6d9b283887c679e08cf2b531f41790e0/workers/subdomain to edit your workers.dev subdomain
▲ [WARNING] You are enabling the 'workers.dev' subdomain for this Worker, but Preview URLs are still disabled.

  Preview URLs will automatically generate a unique, shareable link for each new version
  which will be accessible at:
    https://<VERSION_PREFIX>-hono-app.bluetree-hono.workers.dev

  You may want to enable the Preview URLs as well by setting `preview_urls = true` in your
  Wrangler config file.


▲ [WARNING] Worker has workers.dev disabled, but 'workers_dev' is not in the config.

  Using default config 'workers_dev = true', current status will be overwritten.


Deployed hono-app triggers (42.76 sec)
  https://hono-app.bluetree-hono.workers.dev
Current Version ID: edba646f-edf1-48d8-aaeb-be102dc7f56b
🪵  Logs were written to "/home/bluetree/.config/.wrangler/logs/wrangler-2025-10-13_03-30-32_242.log"
デプロイできた。簡単。
https://hono-app.bluetree-hono.workers.dev/ にアクセスする。
(サブドメインみすったな
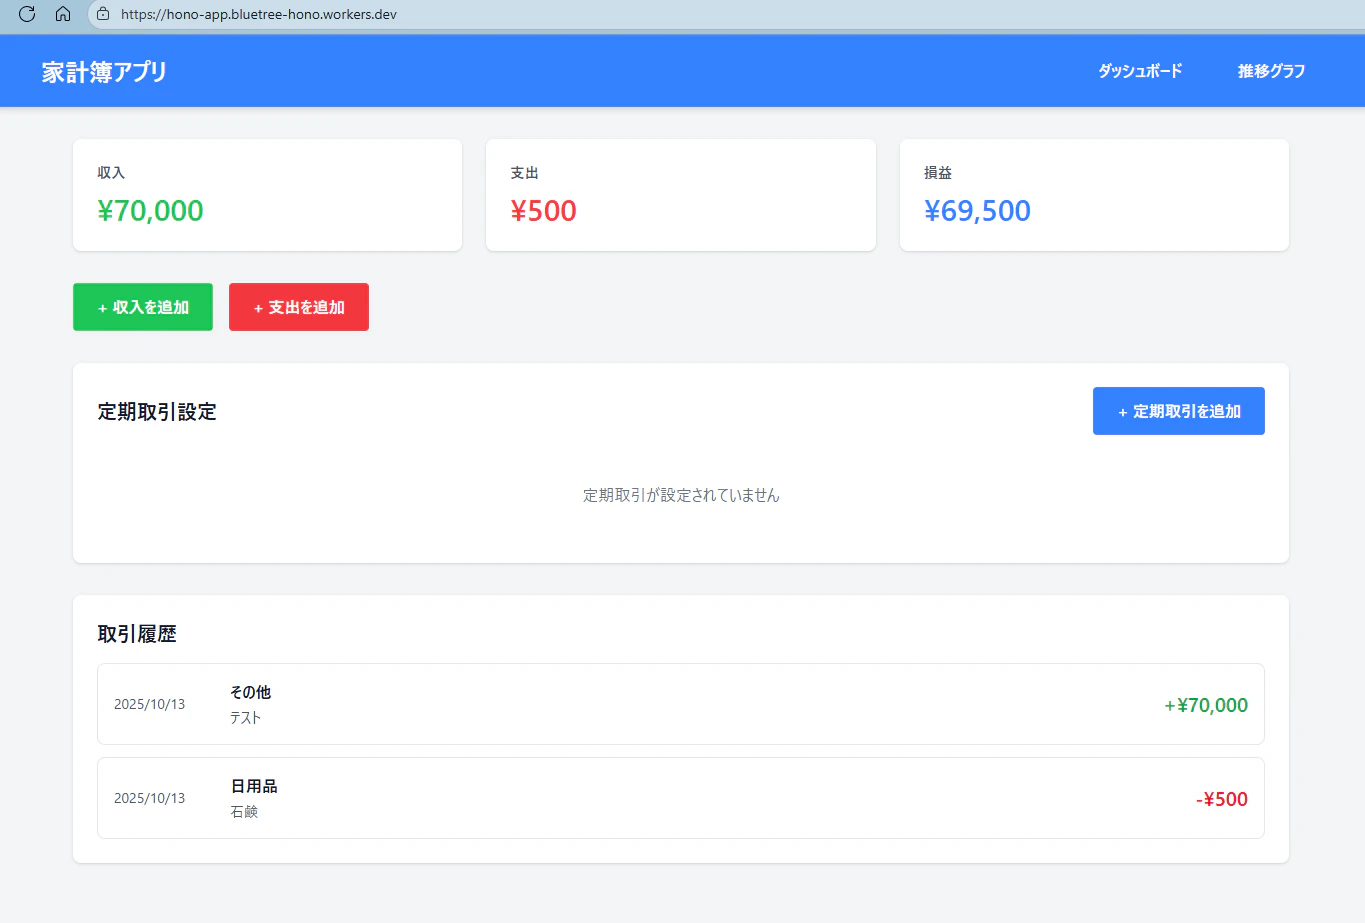
Great🦆
あとは機能追加のたびにデプロイすればよい。
まとめ
特にない。
Hono簡単ありがてぇ
次はVite + React のモノレポ構成でCloudflare Pagesも使ってみる。
以上!!!