はじめに
XLPagerTabStripというSwift製のiOSライブラリを使った際に、TabBarControllerと絡めた実装をしました。storyboardでの設定等で少し詰まったりもしましたので、備忘録として投稿します。
動作環境
【Xcode】Version 12.0.1
【Swift】Version 5.3
【CocoaPods】version 1.9.3
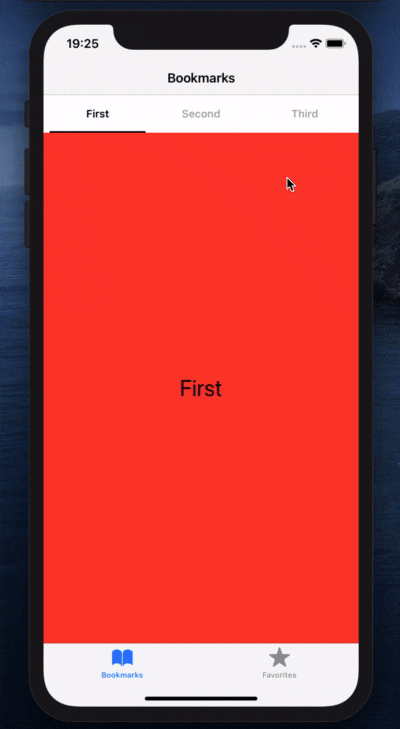
実装後の画面
実装手順
1. TabBarControllerの用意
-
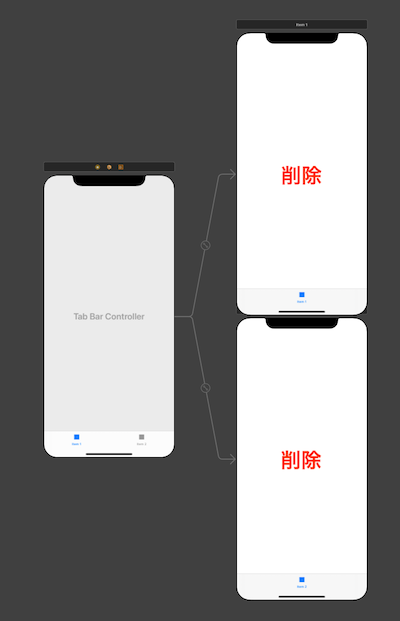
Main.storyboardの元々あるViewControllerを削除して、TabBarControllerを追加します。付属のViewControllerも消しておいてください。(storyboard1つに対してViewController1つとする理由です。)
-
Is Initial View Controllerにチェックを入れます。

-
MainTabBarController.swiftを作成し、Main.storyboardのClassに割り当ててください。
class MainTabBarController: UITabBarController {

    override func viewDidLoad() {
        super.viewDidLoad()
        // 各画面となるViewControllerを格納する変数を用意
        var viewControllers = [UIViewController]()

        // それぞれの画面の設定(tabの画像など)
        let tab1VC = UIStoryboard(name: "Bookmarks", bundle: nil).instantiateInitialViewController()
        tab1VC?.tabBarItem = UITabBarItem(tabBarSystemItem: .bookmarks, tag: 0)
        viewControllers.append(tab1VC!)

        let tab2VC = UIStoryboard(name: "Favorites", bundle: nil).instantiateInitialViewController()
        tab2VC?.tabBarItem = UITabBarItem(tabBarSystemItem: .favorites, tag: 0)
        viewControllers.append(tab2VC!)

        self.setViewControllers(viewControllers, animated: false)
    }
}
2. 各画面となるViewControllerの用意
- 上記の
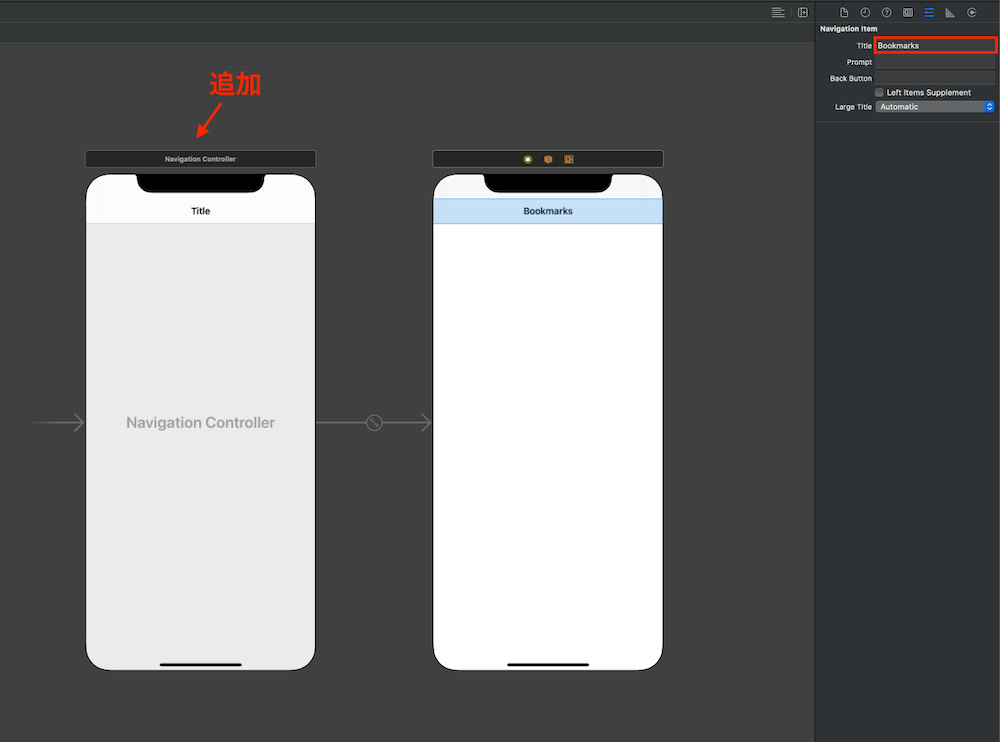
tab1VCをBookmarks.storyboard、tab2VCをFavorites.storyboardとして用意します。それぞれUINavigationControllerを設定し、見分けがつくようにタイトルを付けます。
3. XLPagerTabStripを導入
- CocoaPodsを利用します。
- ターミナルを開いて
cd 対象ファイルで移動します。 -
pod initでpodfile作成 -
podfileに下記を追加し保存して、pod installにて完了です。
pod 'XLPagerTabStrip'
4. 管理元クラスButtonBarPagerTabStripViewControllerの用意
-
ViewControllerたちを管理するButtonBarPagerTabStripViewControllerを継承したクラスを用意します。今回はBookmarksを管理元とします。BookmarksViewController.swiftを作成します。
import UIKit
import XLPagerTabStrip

// 継承元を書き換える ( UIViewController → ButtonBarPagerTabStripViewController )
class BookmarksViewController: ButtonBarPagerTabStripViewController {

    override func viewDidLoad() {
        super.viewDidLoad()
    }

    override func viewControllers(for pagerTabStripController: PagerTabStripViewController) -> [UIViewController] {
        //管理されるViewControllerを返す処理
        let firstVC = UIStoryboard(name: "First", bundle: nil).instantiateViewController(withIdentifier: "First")
        let secondVC = UIStoryboard(name: "Second", bundle: nil).instantiateViewController(withIdentifier: "Second")
        let thirdVC = UIStoryboard(name: "Third", bundle: nil).instantiateViewController(withIdentifier: "Third")
        let childViewControllers:[UIViewController] = [firstVC, secondVC, thirdVC]
        return childViewControllers
    }

}
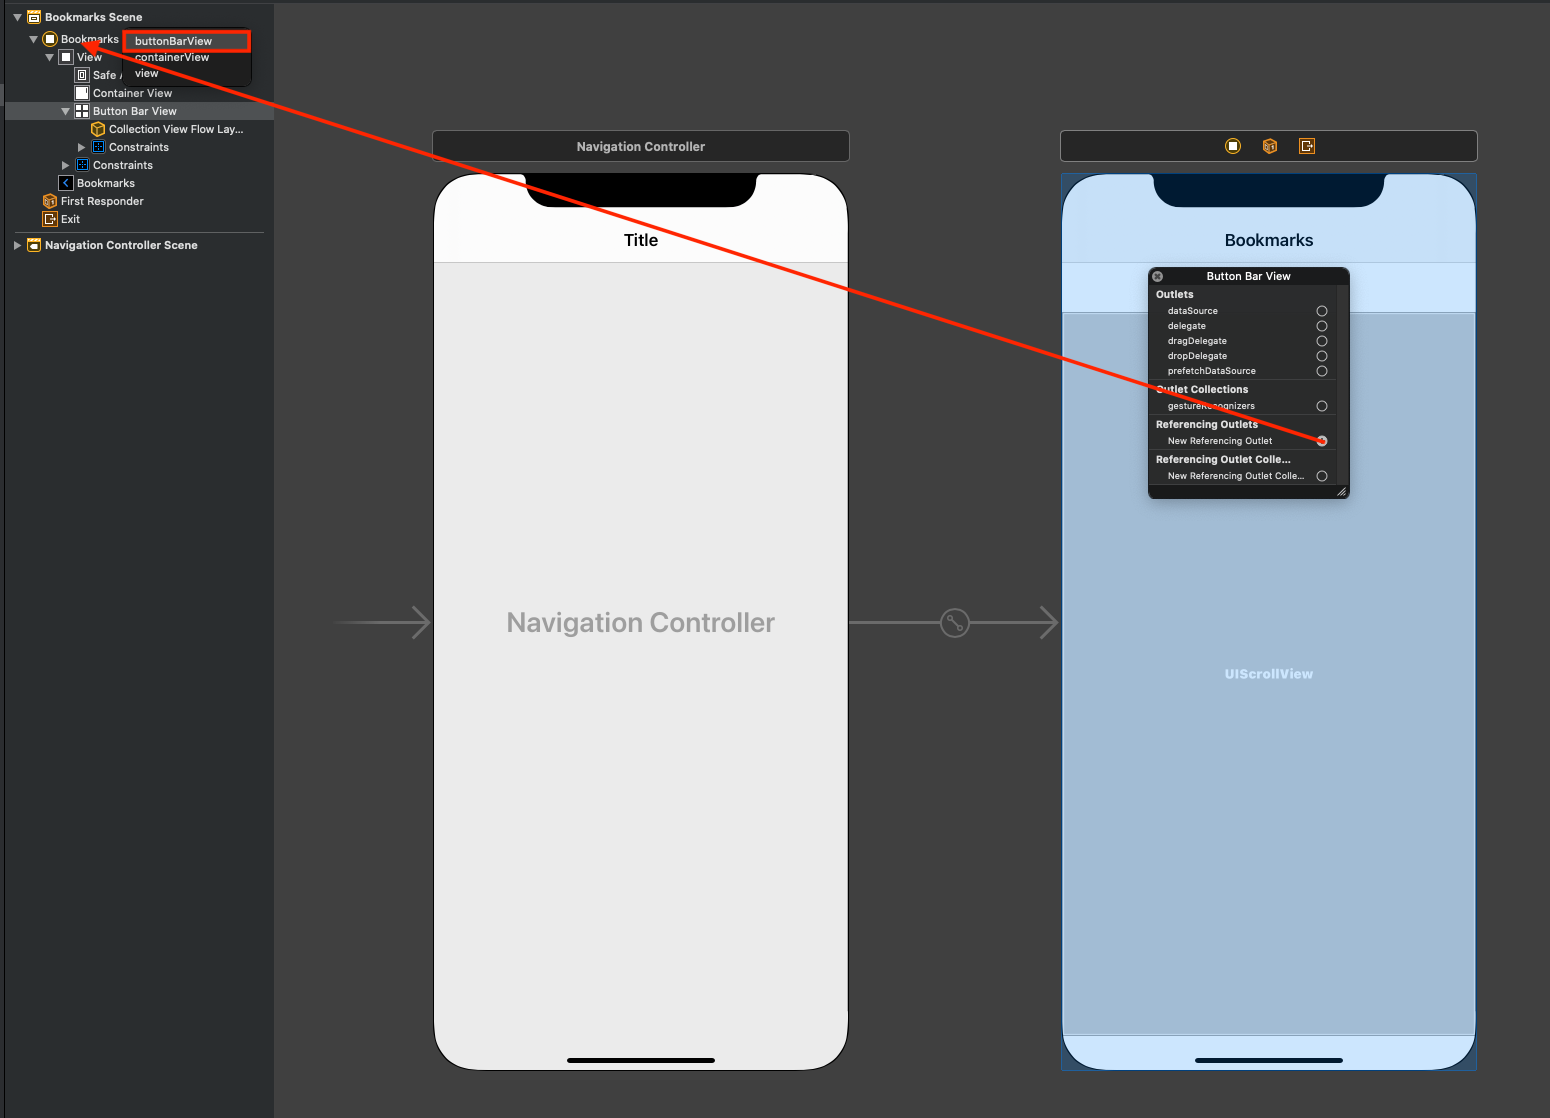
1. ボタン部分になるCollection Viewの設置
-
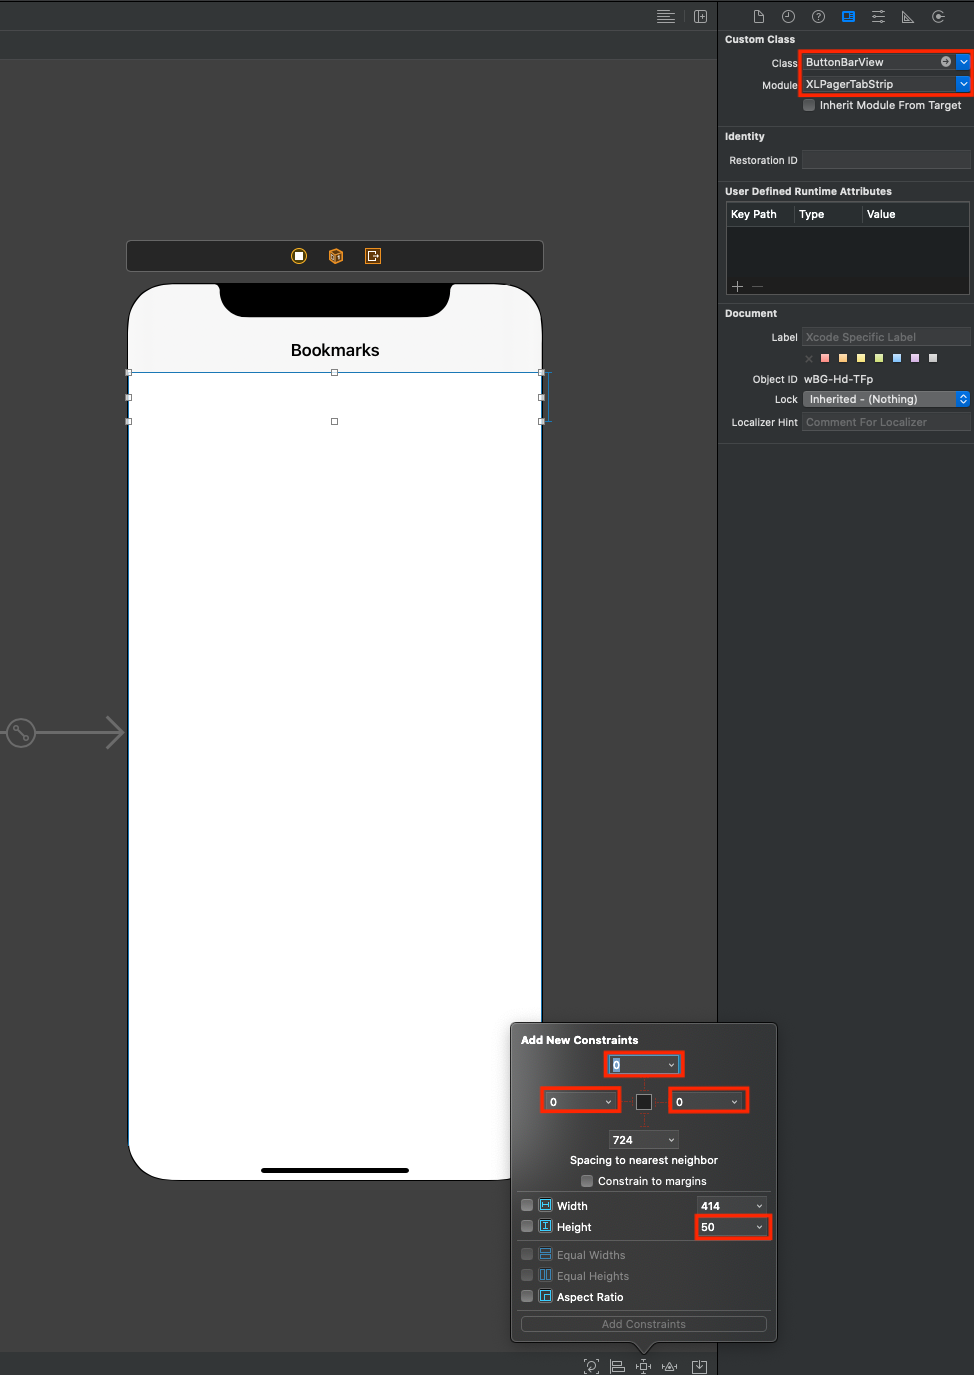
ボタン部分になる
Collection Viewを配置し、下記画像のようにAutoLayoutを設定します。Cellは消しておきましょう。 -
Collection ViewのクラスをButtonBarViewと結びつけ、ModuleをXLPagerTabStripとします。
-
Collection Viewを右クリックします。Referencing OutletsのNew Referencing OutletをViewControllerにドラッグし、ButtonBarViewを選択します。
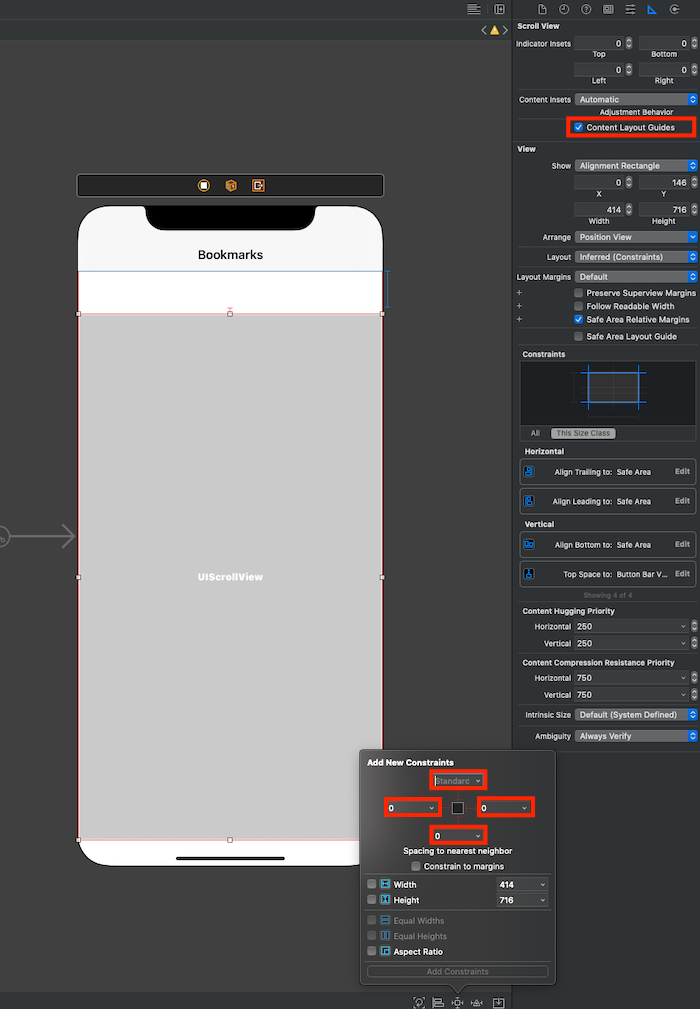
2. 切り替え部分になるScrollViewの設置
- 切り替え部分になる
ScrollViewを配置し、下記画像のようにAutoLayoutを設定します。 - あいまいなレイアウトと警告がでるので
Content Layout Guidesのチェックを外しましょう。
-
ScrollViewを右クリックします。Referencing OutletsのNew Referencing OutletをViewControllerにドラッグし、containerViewを選択します。
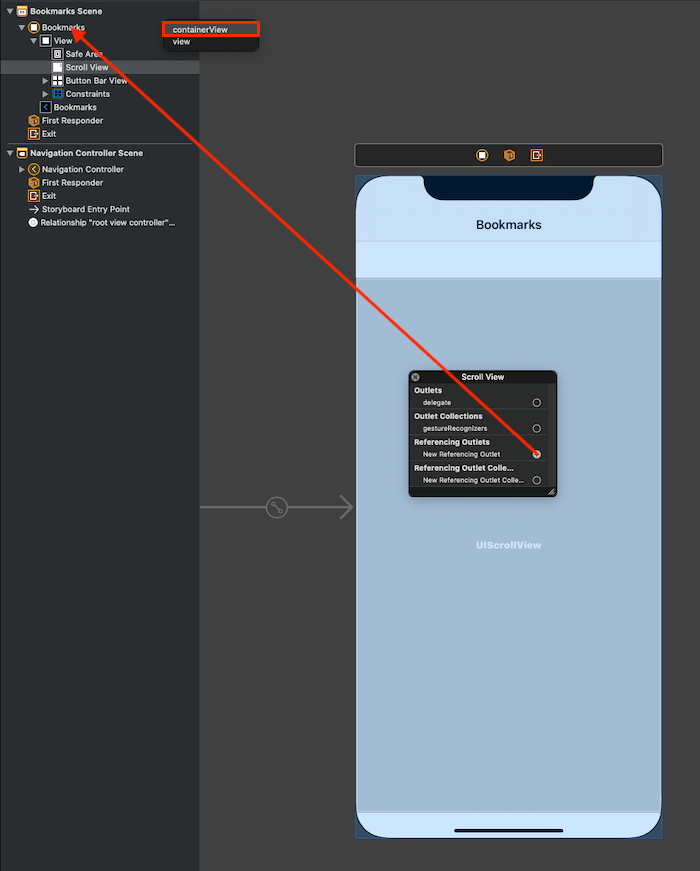
-
正しく繋ぐことができると、
ScrollViewの表示がContainerViewに変わります。
5. 管理されるViewControllerたちの用意
- スワイプやボタンを押されて遷移する
ViewControllerになります。 -
IndicatorInfoProviderプロトコルを実装したUIViewControllerを下記3つそれぞれ用意します。
-
First.storyboard、FirstViewControllerを用意。(storyboardの背景色は赤色) -
Second.storyboard、SecondViewControllerを用意。(storyboardの背景色は青色) -
Third.storyboard、ThirdViewControllerを用意。(storyboardの背景色は緑色)
import UIKit
import XLPagerTabStrip

class FirstViewController: UIViewController {

    //ここがボタンのタイトルに利用されます
    var itemInfo: IndicatorInfo = "First"

    override func viewDidLoad() {
        super.viewDidLoad()
    }

}

extension FirstViewController: IndicatorInfoProvider {
    func indicatorInfo(for pagerTabStripController: PagerTabStripViewController) -> IndicatorInfo {
        return itemInfo
    }
}
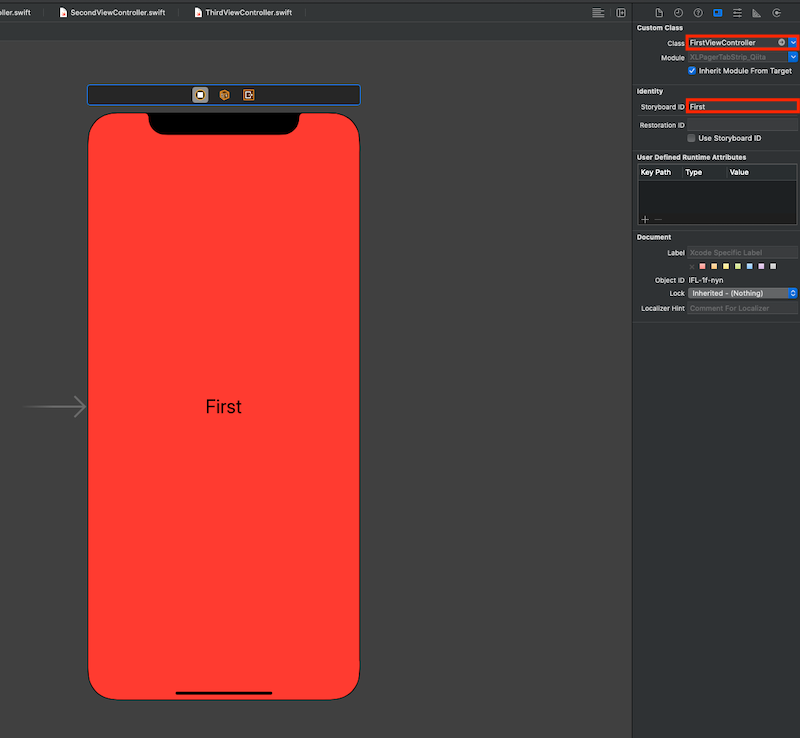
-
Labelを配置し、Textを__First__、Fontを__24__、AutoLayoutの設定をします。
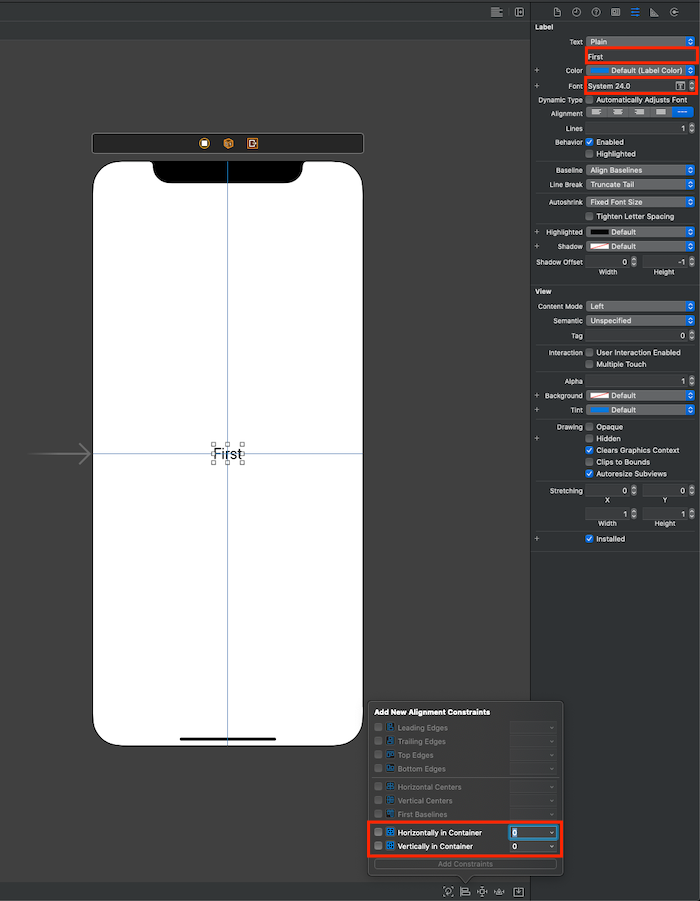
-
Classの割り当てと、Storyboard IDを設定します。
6. buttonBarの見た目と振る舞いを追加
import UIKit
import XLPagerTabStrip

class BookmarksViewController: ButtonBarPagerTabStripViewController {

    override func viewDidLoad() {
        // 画面UIについての処理
        setupUI()
        super.viewDidLoad()
    }

    override func viewDidAppear(_ animated: Bool) {
        super.viewDidAppear(animated)
        // 強制的に再選択し、changeCurrentIndexProgressiveを動作させる( 0番目 → 1番目 → 0番目 )
        moveToViewController(at: 1, animated: false)
        moveToViewController(at: 0, animated: false)
    }

    func setupUI() {
        // ButtonBar全体の背景色
        settings.style.buttonBarBackgroundColor = UIColor.white
        // ButtonBarItemの背景色
        settings.style.buttonBarItemBackgroundColor = UIColor.white
        // ButtonBarItemの文字色
        settings.style.buttonBarItemTitleColor = UIColor.lightGray
        // ButtonBarItemのフォントサイズ
        settings.style.buttonBarItemFont = .boldSystemFont(ofSize: 14)
        // 選択中のButtonBarインジケーターの色
        settings.style.selectedBarBackgroundColor = UIColor.black
        // 選択中のButtonBarインジケーターの太さ
        settings.style.selectedBarHeight = 2.0
        // ButtonBarの左端の余白
        settings.style.buttonBarLeftContentInset = 8
        // ButtonBarの右端の余白
        settings.style.buttonBarRightContentInset = 8
        // Button内の余白
        settings.style.buttonBarItemLeftRightMargin = 32
        // スワイプやButtonBarItemタップ等でページを切り替えた時の動作
        changeCurrentIndexProgressive = { oldCell, newCell, progressPercentage, changeCurrentIndex, animated in
            // 変更されたか、選択前後のCellをアンラップ
            guard changeCurrentIndex, let oldCell = oldCell, let newCell = newCell else { return }
            // 選択前のセルの状態を指定
            oldCell.label.textColor = UIColor.lightGray
            // 選択後のセルの状態を指定する
            newCell.label.textColor = UIColor.black
        }
    }

    override func viewControllers(for pagerTabStripController: PagerTabStripViewController) -> [UIViewController] {
        //管理されるViewControllerを返す処理
        let firstVC = UIStoryboard(name: "First", bundle: nil).instantiateViewController(withIdentifier: "First")
        let secondVC = UIStoryboard(name: "Second", bundle: nil).instantiateViewController(withIdentifier: "Second")
        let thirdVC = UIStoryboard(name: "Third", bundle: nil).instantiateViewController(withIdentifier: "Third")
        let childViewControllers:[UIViewController] = [firstVC, secondVC, thirdVC]
        return childViewControllers
    }

}