XLPagerTabStripとは
SmartNews等のスワイプやタブ選択による画面遷移を実現するライブラリです。
似たようなものがいくつかあり、以前は PageMenu というライブラリを使っていましたが、今回乗り換えてみました。
公式で解説がありましたが、英語でわかりにくい部分があったので共有します。
色々な「Pager Types」が用意されていますが、今回は一番人気だと思われる ButtonBar を導入します。
Cocoa Pods または Carthage でインストール
Cocoa Pods の場合
podfile に pod 'XLPagerTabStrip', '~> 7.0 を追記して、ターミナルで pod install
Xcodeでプロジェクト作成
親コントローラの設定
新しいファイルを作成(ここでは分かりやすいようにParentViewControllerとします)
import XLPagerTabStrip // ライブラリをインポートする

// デフォルトで継承している UIViewController を ButtonBarPagerTabStripViewController に書き換える
class ParentViewController: ButtonBarPagerTabStripViewController {
  // …
}
Storyboard の ViewController の Custom Class に 「ParentViewController」 を設定する
ScrollViewを設置
その ViewController に UIScrollView をドラッグし、 AutoLayout の制約を追加する
ButtonBar と コンテンツ部分は好きな位置(ButtonBarを下部など)に配置できますが、今回はメニュー部分を上部に配置してみます。
- 上方向: 64(任意の数値)
- 右方向: 0
- 下方向: 0
- 左方向: 0
ScrollView を右クリックして ▼Referencing Outlets の New Referencing Outlet を ViewController にドラッグ。
containerView と view、2つの選択肢が出るので containerView を選択。

正しく繋ぐことができると、 ScrollView の表示が ContainerView に変わります。
CollectionViewを設置
次は CollectionView をVCにドラッグして、自動で挿入されている Collection View Cell を削除。
このままだと CollectionView が先に置いた ScrollView(ContainerView) と親子関係になってしまっているので、Document Outline画面 で CollectionView をドラッグして兄弟の関係に設置します。
 CollectionView に AutoLayout の制約を追加する
- 上の余白: 0
- 右の余白: 0
- 左の余白: 0
- Height: 64(ScrollViewの上方向の数値と合わせる)
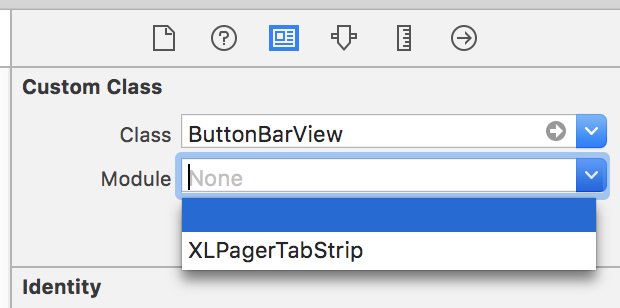
CollectionView の Custom Class を ButtonBarView に設定。

ContainerView を選択して右クリックし、 ViewController にドラッグして New Referencing Outlet。
今度は buttonBarView を選びます。 CollectionView 名前が ButtonBarView に変わったことを確認して、
Custom Class の Module を XLPagerTabStrip に設定。
buttonBarの見た目と振る舞いを設定(例)
override func viewDidLoad() {
    // ButtonBar全体の背景色
    settings.style.buttonBarBackgroundColor = .white
    // ButtonBarItemの背景色
    settings.style.buttonBarItemBackgroundColor = .white
    // ButtonBarItemのフォント
    settings.style.buttonBarItemFont = .boldSystemFont(ofSize: 14)
    // 選択中のButtonBarインジケーターの色
    settings.style.selectedBarBackgroundColor = .orange
    // 選択中のButtonBarインジケーターの太さ
    settings.style.selectedBarHeight = 2.0
    // ButtonBarの左端の余白
    settings.style.buttonBarLeftContentInset = 8
    // ButtonBarの右端の余白
    settings.style.buttonBarRightContentInset = 8
    // Button間のスペース
    settings.style.buttonBarMinimumInteritemSpacing = 16
    // Button内の余白
    settings.style.buttonBarItemLeftRightMargin = 32
    // スワイプやButtonBarItemタップ等でページを切り替えた時の動作
    changeCurrentIndexProgressive = { oldCell, newCell, progressPercentage, changeCurrentIndex, animated in
        // 変更されたか、選択前後のCellをアンラップ
        guard changeCurrentIndex, let oldCell = oldCell, let newCell = newCell else { return }
        // 選択前のセルの状態を指定
        oldCell.contentView.backgroundColor = .lightGray
        oldCell.label.textColor = .darkGray
        // 選択後のセルの状態を指定する
        newCell.contentView.backgroundColor = .green
        newCell.label.textColor = .white
    }
    super.viewDidLoad()
}
注意点として、super.viewDidLoad()を呼び出す前に設定しないと、設定が反映されない項目があります。
また、ここでは省きましたが、viewDidLoad()が肥大化するので、別途privateメソッドを定義して呼び出した方が良いかと思います。
子ビューを作り設定する
例として2つの新しい ViewController を作成します。
1Storyboard - 1ViewControllerを推奨したいので、それぞれのStoryboardも作成して、Is Initial View Controllerに設定しましょう。
ViewControllerのファイル(.swift)も作成し、 ViewController の CustomClass に設定。
子ビュー(例:ChildViewController1)でも、 import XLPagerTabStripし、
class に IndicatorInfoProvider を拡張、プロトコルに準拠する1つの関数を実装します。
import XLPagerTabStrip

class ChildViewController1: UIViewController {
  // 中略
}

extension ChildViewController1: IndicatorInfoProvider{
    func indicatorInfo(for pagerTabStripController: PagerTabStripViewController) -> IndicatorInfo {
        return IndicatorInfo(title: "Child1") // ButtonBarItemに表示される名前になります
    }
}
子ビューの数だけ同じくカスタムクラスファイルを編集します。
import XLPagerTabStrip

class ChildViewController2: UIViewController {
  中略
}

extension ChildViewController2: IndicatorInfoProvider{
    func indicatorInfo(for pagerTabStripController: PagerTabStripViewController) -> IndicatorInfo {
        return IndicatorInfo(title: "Child2") // 親のButtonBarで使われる名前になります
    }
}
ParentViewController.swift に戻り、子コントローラを親コントローラに関連付けます。
override func viewControllers(for pagerTabStripController: PagerTabStripViewController) -> [UIViewController] {
    let child1VC = UIStoryboard(name: "child1", bundle: nil).instantiateViewController()
    let child2VC = UIStoryboard(name: "child2", bundle: nil).instantiateViewController()
    return [child1VC, child2VC]
}
参考元
How to implement Android-Like Tab Layouts in iOS using swift 3