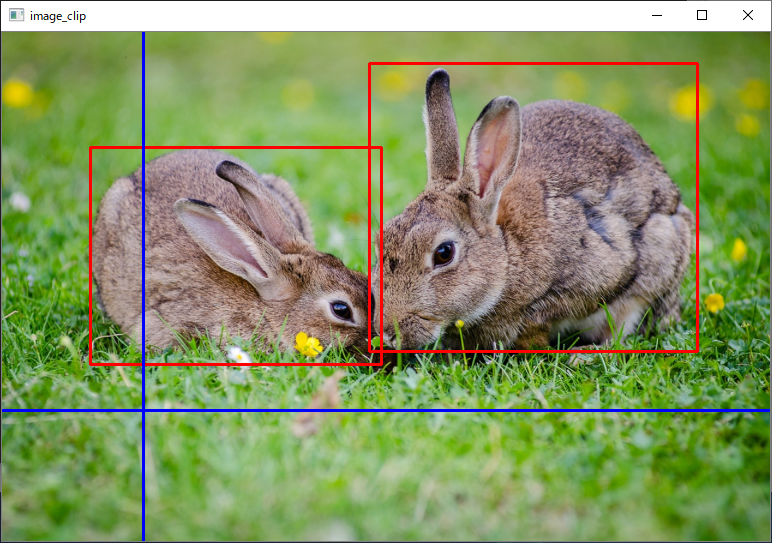
OpenCVで物体検出を自作するためには、訓練データとして大量の画像を切り出す必要があります。
そこで二つのツールを作成しました。
簡易的なGUIで画像の切り出しを行い、opencv_createsamples.exeにわたすファイルを生成します。
コードは下に載せました。
突貫工事で作ったので、バグが多々あるかもしれません。
使用方法
準備
以下のようなディレクトリ構成にします。
適当なディレクトリ/
  ├── images/
  |      ├── 画像ファイル1.png
  |      ├── 画像ファイル2.jpg
  |      |     ︙
  |      └── 画像ファイルn.bmp
  ├── clipper.py
  ├── make_negative.py
  ├── opencv_createsamples.exe
  ├── opencv_traincascade.exe
  └── (OpenCVのDLL類)
画像切り出し支援ツールの使用方法
- 左クリックのドラッグで、検出したい物体の範囲を選択
- 右クリックで、最後に選択した範囲の削除
- マウルホイールで画像の切り替え
- ESCキーか「Q」キーで終了
終了するとopencv_createsamples.exeに入力できるファイルpos.datが生成されます。
途中経過はファイルに保存されるので、終了しても作業を再開できます。
負例自動作成ツールの使用方法
画像切り出し支援ツールを使ってから、make_negative.pyを実行するだけです。
そうすると、ディレクトリnegativesに負例画像が生成され、bg.datに負例のリストが生成されます。
opencv_createsamples.exeの使用方法
とりあえず、下のコマンドを実行すれば大丈夫です。
opencv_createsamples.exe -info pos.dat -vec pos.vec
opencv_traincascade.exeの使用方法
opencv_traincascade.exe -data 出力ディレクトリ -vec pos.vec -bg bg.dat
コード
画像切り出し支援ツール
clipper.py
import cv2
import glob
import lzma
import os
import pickle


file_dir = './images'
state_file = './data'
output_file = './pos.dat'
display_size = 768
window_name = 'image_clip'

state = {}

mouse_position = [0, 0]
mouse_wheel    = 0
crop_origin    = None
crop_end       = None
selecting      = False
remove         = False

def load_state():
    global state

    if os.path.exists(state_file):
        with lzma.open(state_file, 'rb') as f:
            state = pickle.load(f)

def save_state():
    with lzma.open(state_file, 'wb') as f:
        pickle.dump(state, f)

def output():
    with open(output_file, 'w') as f:
        for file_name, rects in state.items():
            if len(rects) == 0:
                continue
            values  = [os.path.abspath(file_name), str(len(rects))]
            values += sum([[str(int(r)) for r in rect] for rect in rects], [])
            f.write(' '.join(values) + '\n')

def mouse_callback(event, x, y, flags, param):
    global mouse_position
    global mouse_wheel
    global crop_origin
    global selecting
    global crop_end
    global remove

    mouse_position = (x, y)

    if event == cv2.EVENT_LBUTTONDOWN:
        crop_origin = mouse_position
        selecting = True
    if event == cv2.EVENT_LBUTTONUP:
        crop_end = mouse_position
        selecting = False
    if event == cv2.EVENT_RBUTTONDOWN:
        remove = True
    if event == cv2.EVENT_MOUSEWHEEL:
        mouse_wheel = flags


def main():
    global state
    global mouse_wheel
    global crop_origin
    global crop_end
    global remove

    os.makedirs(file_dir, exist_ok=True)
    image_files = glob.glob(os.path.join(file_dir, '*'))

    if len(image_files) == 0:
        print('imagesに画像を入れてください')
        exit()

    load_state()

    cv2.namedWindow(window_name, cv2.WINDOW_AUTOSIZE)
    cv2.setMouseCallback(window_name, mouse_callback)

    image_counter = 0
    for i in range(len(image_files)):
        image_counter = i
        if image_files[image_counter] not in state.keys():
            break

    while True:
        if image_counter < 0:
            image_counter = image_counter + len(image_files)
        if image_counter >= len(image_files):
            image_counter = image_counter - len(image_files)

        save_state()

        image_file = image_files[image_counter]
        image = cv2.imread(image_file)
        scale = display_size / max(image.shape[0], image.shape[1])

        resized_image = cv2.resize(image,
                                   dsize=None,
                                   fx=scale,
                                   fy=scale,
                                   interpolation=cv2.INTER_AREA)

        if image_file not in state:
            state[image_file] = []

        while True:
            display_image = resized_image.copy()

            for rect in state[image_file]:
                left_top = (int(rect[0] * scale), int(rect[1] * scale))
                right_bottom = (int((rect[0] + rect[2]) * scale), int((rect[1] + rect[3]) * scale))
                display_image = cv2.rectangle(display_image,
                                              left_top,
                                              right_bottom,
                                              (0, 0, 255),
                                              2)

            display_image = cv2.line(display_image,
                                     (mouse_position[0], 0),
                                     (mouse_position[0], display_image.shape[0]),
                                     (255, 0, 0),
                                     2)

            display_image = cv2.line(display_image,
                                     (0, mouse_position[1]),
                                     (display_image.shape[1], mouse_position[1]),
                                     (255, 0, 0),
                                     2)

            if selecting:
                display_image = cv2.rectangle(display_image,
                                              crop_origin,
                                              mouse_position,
                                              (0, 128, 255),
                                              2)

            cv2.imshow(window_name, display_image)

            key = cv2.waitKey(10) & 0xFF

            if crop_origin is not None and crop_end is not None:
                rect_x = min(mouse_position[0], crop_origin[0])
                rect_w = max(mouse_position[0], crop_origin[0]) - rect_x
                rect_y = min(mouse_position[1], crop_origin[1])
                rect_h = max(mouse_position[1], crop_origin[1]) - rect_y
                new_rect = [rect_x / scale, rect_y / scale, rect_w / scale, rect_h / scale]
                state[image_file].append(new_rect)

                crop_origin = None
                crop_end = None

            if remove:
                if len(state[image_file]) > 0:
                    state[image_file].pop(-1)
                remove = False

            if mouse_wheel != 0:
                image_counter += 1 if mouse_wheel > 0 else -1
                mouse_wheel = 0
                break

            if key == ord('q') or key == 27:
                return


if __name__ == '__main__':
    main()
    cv2.destroyAllWindows()
    save_state()
    output()
負例自動作成ツール
make_negative.py
import cv2
import glob
import lzma
import os
import pickle
import random


file_dir = './images'
output_dir = './negatives/'
output_list_file = './bg.dat'
state_file = './data'

def sample_start_point(width, height, positive_rects):
    for i in range(100):
        start_point = [random.randrange(width), random.randrange(height)]

        for rect in positive_rects:
            rect_left   = rect[0]
            rect_right  = rect[0] + rect[2]
            rect_top    = rect[1]
            rect_bottom = rect[1] + rect[3]

            if ((rect_left <= start_point[0] and rect_right  >= start_point[0]) and
                (rect_top  <= start_point[1] and rect_bottom >= start_point[1])):
                break
        else:
            return start_point

    return None

if __name__ == '__main__':
    if not os.path.exists(state_file):
        exit()

    with lzma.open(state_file, 'rb') as f:
        state = pickle.load(f)

    image_counter = 0

    for file_name, positive_rects in state.items():
        if len(positive_rects) == 0:
            continue

        image = cv2.imread(file_name)
        width = image.shape[1]
        height = image.shape[0]

        negative_rects = []

        for i in range(1000):
            start_point = sample_start_point(width, height, positive_rects)
            if start_point is None:
                continue

            negative_rect = [start_point[0], start_point[1], start_point[0], start_point[1]]

            min_x = 0
            max_x = width
            min_y = 0
            max_y = height

            directions = random.sample(['left', 'right', 'up', 'down'], 4)

            for direction in directions:
                for positive_rect in positive_rects:
                    positive_rect_left   = positive_rect[0]
                    positive_rect_right  = positive_rect[0] + positive_rect[2]
                    positive_rect_top    = positive_rect[1]
                    positive_rect_bottom = positive_rect[1] + positive_rect[3]

                    if not (negative_rect[1] > positive_rect_bottom or
                            negative_rect[3] < positive_rect_top):
                        if direction == 'left':
                            if negative_rect[0] > positive_rect_right:
                                min_x = max(min_x, positive_rect_right)
                        if direction == 'right':
                            if negative_rect[2] < positive_rect_left:
                                max_x = min(max_x, positive_rect_left)

                    if not (negative_rect[0] > positive_rect_right or
                            negative_rect[2] < positive_rect_left):
                        if direction == 'up':
                            if negative_rect[1] > positive_rect_bottom:
                                min_y = max(min_y, positive_rect_bottom)
                        if direction == 'down':
                            if negative_rect[3] < positive_rect_top:
                                max_y = min(max_y, positive_rect_top)

                if direction == 'left':
                    negative_rect[0] = min_x
                if direction == 'right':
                    negative_rect[2] = max_x
                if direction == 'up':
                    negative_rect[1] = min_y
                if direction == 'down':
                    negative_rect[3] = max_y

            if negative_rect[0] == negative_rect[2] or negative_rect[1] == negative_rect[3]:
                continue

            negative_rects.append(tuple([int(x) for x in negative_rect]))

        negative_rects = set(negative_rects)

        for negative_rect in negative_rects:
            trimed_image = image[negative_rect[1]:negative_rect[3], negative_rect[0]:negative_rect[2], :]
            os.makedirs(output_dir, exist_ok=True)

            extention = os.path.splitext(file_name)[1]
            output_file_path = os.path.join(output_dir, '{}{}'.format(image_counter, extention))
            cv2.imwrite(output_file_path, trimed_image)
            image_counter += 1

    image_files = glob.glob(os.path.join(output_dir, '*'))
    with open(output_list_file, 'w') as f:
        for image_file in image_files:
            f.write('{}\n'.format(os.path.abspath(image_file)))
