主な内容
#04 はじめてのRailsプロジェクト
#05 ファイル構成をみていこう
アプリケーションを作成する基本的な流れを覚えましょう
#06 Webサーバーを立ち上げよう
作成したWebアプリケーションをどうささせてみましょう
#07 scaffoldを使ってみよう (1)
#08 scaffoldを使ってみよう (2)
DB、Model、View、Controllerの作成、URLの設定をしてみましょう
作ってみる
アプリケーションプロジェクトの作成
カレントディレクトリに移動
$ cd
railsのプロジェクトを管理するディレクトリを作成
$ mkdir railsprojects
作ったディレクトリに移動
$ cd railsprojects
アプリケーションプロジェクトを作成
アプリケーションの動作に必要なファイルなどを作成し、自動生成された.Gemfileに含まれているGemのインストールも行われます。
$ rails new myapp
      create
      create  README.rdoc
      create  Rakefile
      create  config.ru
      create  .gitignore
      create  Gemfile
      create  app
      create  app/assets/images/rails.png
      create  app/assets/javascripts/application.js
      create  app/assets/stylesheets/application.css

〜〜〜〜〜〜〜〜〜〜〜〜〜〜〜〜〜〜〜〜〜
         中略
〜〜〜〜〜〜〜〜〜〜〜〜〜〜〜〜〜〜〜〜〜

Using rdoc 3.12.2
Using thor 0.14.6
Using railties 3.2.3
Using coffee-rails 3.2.2
Using jquery-rails 3.1.0
Using rails 3.2.3
Using sass 3.3.0
Using sass-rails 3.2.6
Using sqlite3 1.3.9
Using uglifier 2.4.0
Your bundle is complete!
Use `bundle show [gemname]` to see where a bundled gem is installed.
作成されたファイル、フォルダ一覧と説明を示します。
── myapp
    ├── Gemfile  ←アプリケーションで使用するGem(ライブラリ)を管理するファイル 追加、削除したらbundle installする
    ├── Gemfile.lock
    ├── README.rdoc
    ├── Rakefile
    ├── app  ←アプリケーションの本体
    │   ├── assets  ←画像、CSS、javascriptを格納するフォルダ
    │   │   ├── images
    │   │   │   └── rails.png
    │   │   ├── javascripts
    │   │   │   └── application.js
    │   │   └── stylesheets
    │   │       └── application.css
    │   ├── controllers  ←Controllerを格納するフォルダ
    │   │   └── application_controller.rb
    │   ├── helpers  ←helperを格納するフォルダ
    │   │   └── application_helper.rb
    │   ├── mailers
    │   ├── models  ←Modelを格納するフォルダ
    │   └── views  ←Viewを格納するフォルダ
    │       └── layouts
    │           └── application.html.erb
    ├── config  ←アプリケーションの設定に関するものを格納するフォルダ
    │   ├── application.rb  ←アプリケーション全体の設定
    │   ├── boot.rb
    │   ├── database.yml  ←データベースに関する設定
    │   ├── environment.rb
    │   ├── environments
    │   │   ├── development.rb
    │   │   ├── production.rb
    │   │   └── test.rb
    │   ├── initializers
    │   │   ├── backtrace_silencers.rb
    │   │   ├── inflections.rb
    │   │   ├── mime_types.rb
    │   │   ├── secret_token.rb
    │   │   ├── session_store.rb
    │   │   └── wrap_parameters.rb
    │   ├── locales  ←国際化(多言語対応)に関する設定を格納するフォルダ

    │   │   └── en.yml
    │   └── routes.rb  ←URLに関する設定
    ├── config.ru
    ├── db  ←データベースに関するものが格納されるフォルダ
    │   └── seeds.rb
    ├── doc
    │   └── README_FOR_APP
    ├── lib
    │   ├── assets
    │   └── tasks
    ├── log
    ├── public  ←Railsサーバが一番最初にみるフォルダ faviconや404、index.htmlなど
    │   ├── 404.html
    │   ├── 422.html
    │   ├── 500.html
    │   ├── favicon.ico
    │   ├── index.html
    │   └── robots.txt
    ├── script
    │   └── rails
    ├── test
    │   ├── fixtures
    │   ├── functional
    │   ├── integration
    │   ├── performance
    │   │   └── browsing_test.rb
    │   ├── test_helper.rb
    │   └── unit
    ├── tmp
    │   └── cache
    │       └── assets
    └── vendor
        ├── assets
        │   ├── javascripts
        │   └── stylesheets
        └── plugins
Webサーバを立ち上げる
アプリケーションプロジェクトのディレクトリに移動
$ cd myapp
Webサーバの起動
rails serverもしくはrails sでサーバを起動させます。どちらも同じ意味です。
$ rails s
=> Booting WEBrick
=> Rails 3.2.3 application starting in development on http://0.0.0.0:3000
=> Call with -d to detach
=> Ctrl-C to shutdown server
        SECURITY WARNING: No secret option provided to Rack::Session::Cookie.
        This poses a security threat. It is strongly recommended that you
        provide a secret to prevent exploits that may be possible from crafted
        cookies. This will not be supported in future versions of Rack, and
        future versions will even invalidate your existing user cookies.

        Called from: /Users/shiraihiroki/.rbenv/versions/1.9.3-p125/lib/ruby/gems/1.9.1/gems/actionpack-3.2.3/lib/action_dispatch/middleware/session/abstract_store.rb:28:in `initialize'.

[2014-03-08 21:25:37] INFO  WEBrick 1.3.1
[2014-03-08 21:25:37] INFO  ruby 1.9.3 (2012-02-16) [x86_64-darwin12.5.0]
[2014-03-08 21:25:37] INFO  WEBrick::HTTPServer#start: pid=56177 port=3000


Started GET "/assets/rails.png" for 127.0.0.1 at 2014-03-08 21:25:48 +0900
Served asset /rails.png - 200 OK (4ms)
ドットインストールではエラーがでていますが、私は出ませんでした。でなければ良いのです。
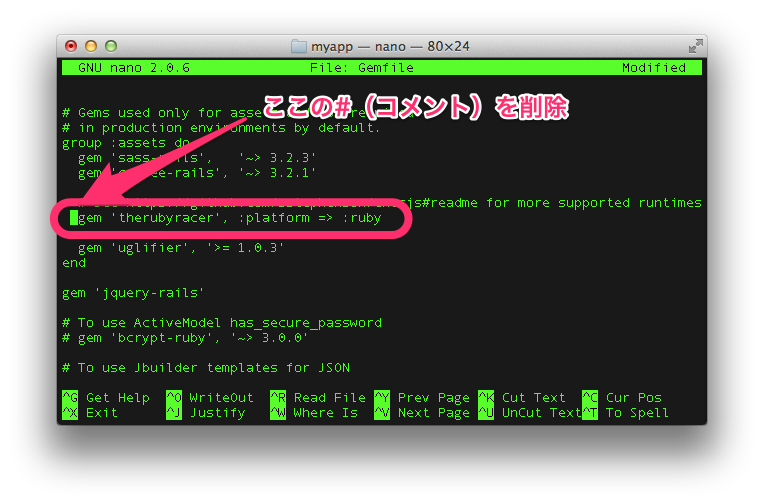
ドットインストールでのエラーはCould not find a JavaScript runtime.(JavaScriptランタイムが見つかりませんでした。)というもので、JavaScriptエンジン(V8)をRubyで利用するめのtherubyracerというGemがインストールされていないことが原因なので、Gemfileのtherubyracerについているコメントを外してbundle installし直すことで解決しています。
しかし、後々JavaScriptは使うので、コメントを外しておきましょう。
$ sudo nano Gemfile
出力されたテキストでmyappが開発モードで
http://0.0.0.0:3000
で動作し始めたことを教えてくれています。
アクセスして動作を確認してみます。
http://127.0.0.1:3000
や
http://localhost:3000
でもいけます。
localhostとは開発中の端末で起動させているサーバの名前(ホスト名)で、ドットインストールではdev.dotinstall.comというホスト名のサーバで動作させています。

ちゃんと動作していることが確認できました。
rails serverを停止させる
動作確認ができたので、いったんrails serverを停止させます。
controlとCを同時に押す
Scaffoldを使う
Railsとrails serverの動作が確認できたので、早速アプリケーションの機能の作成に取りかかります。
ModelやView、Controllerなどを作成していくことになりますが、たくさんの行程があって面倒くさいです。そこでアプリケーションの機能の足場(DB、MVC、URLの設定)を自動作成してくれるRailsの便利な機能「Scaffold」を使ってみます。
ここで、Scaffoldは実際のWebアプリケーション開発ではほとんど使いません。このScaffoldはRailsの概念を簡単に理解するためのチュートリアル的な存在です。ということを知っておくと良いでしょう。
では、名前、e-mail、自己紹介を持つUserを管理する機能を作成してみます。
$ rails generate scaffold User name:string email:string intro:text
        SECURITY WARNING: No secret option provided to Rack::Session::Cookie.
        This poses a security threat. It is strongly recommended that you
        provide a secret to prevent exploits that may be possible from crafted
        cookies. This will not be supported in future versions of Rack, and
        future versions will even invalidate your existing user cookies.

        Called from: /Users/shiraihiroki/.rbenv/versions/1.9.3-p125/lib/ruby/gems/1.9.1/gems/actionpack-3.2.3/lib/action_dispatch/middleware/session/abstract_store.rb:28:in `initialize'.

      invoke  active_record
      create    db/migrate/20140308163856_create_users.rb
      create    app/models/user.rb
      invoke    test_unit
      create      test/unit/user_test.rb
      create      test/fixtures/users.yml
       route  resources :users
      invoke  scaffold_controller
      create    app/controllers/users_controller.rb
      invoke    erb
      create      app/views/users
      create      app/views/users/index.html.erb
      create      app/views/users/edit.html.erb
      create      app/views/users/show.html.erb
      create      app/views/users/new.html.erb
      create      app/views/users/_form.html.erb
      invoke    test_unit
      create      test/functional/users_controller_test.rb
      invoke    helper
      create      app/helpers/users_helper.rb
      invoke      test_unit
      create        test/unit/helpers/users_helper_test.rb
      invoke  assets
      invoke    coffee
      create      app/assets/javascripts/users.js.coffee
      invoke    scss
      create      app/assets/stylesheets/users.css.scss
      invoke  scss
      create    app/assets/stylesheets/scaffolds.css.scss
作成されたファイル、フォルダ一覧を示します。
── myapp
   ├── app
   │   ├── assets
   │   │   ├── javascripts
   │   │   │   └── users.js.coffee  ←usersページのjavascriptをrubyで書けるファイル
   │   │   └── stylesheets
   │   │       ├── scaffolds.css.scss  ←Scaffold共通のスタイル設定(SCSSはCSSより便利なもの、役割は同じ)
   │   │       └── users.css.scss  ←usersページ固有のスタイル設定
   │   ├── controllers
   │   │   └── users_controller.rb  ←usersページの処理のメインを書く
   │   ├── helpers
   │   │   └── users_helper.rb  ←コントローラで何度も使う処理を書く
   │   ├── models
   │   │   └── user.rb  ←usersのデータの規約を書く
   │   └── views
   │       └── users  ←usersのhtmlテンプレート。Controllerで処理したデータをこれに当てはめて表示
   │           ├── _form.html.erb
   │           ├── edit.html.erb  ←Userの編集画面
   │           ├── index.html.erb
   │           ├── new.html.erb  ←Userの新規作成画面
   │           └── show.html.erb
   ├── db
   │   ├── development.sqlite3  ←myappのデータベース
   │   ├── migrate
   │   │   └── 20140308164206_create_users.rb  ←usersに関わるデータベースの設定ファイル
   └── test
       ├── fixtures
       │   └── users.yml
       ├── functional
       │   └── users_controller_test.rb
       ├── integration
       ├── performance
       │   └── browsing_test.rb
       ├── test_helper.rb
       └── unit
           ├── helpers
           │   └── users_helper_test.rb
           └── user_test.rb
rakeコマンドで作成したmigrationファイルをDBに反映する
$ rake db:migrate
==  CreateUsers: migrating ====================================================
-- create_table(:users)
   -> 0.0011s
==  CreateUsers: migrated (0.0011s) ===========================================
Scaffoldで自動設定されたURLを確認
$ rake routes
    users GET    /users(.:format)          users#index
          POST   /users(.:format)          users#create
 new_user GET    /users/new(.:format)      users#new
edit_user GET    /users/:id/edit(.:format) users#edit
     user GET    /users/:id(.:format)      users#show
          PUT    /users/:id(.:format)      users#update
          DELETE /users/:id(.:format)      users#destroy
usersは/usersに設定されたようです。
rails serverを起動して、Scaffoldを確認する
$ rails s
=> Booting WEBrick
=> Rails 3.2.3 application starting in development on http://0.0.0.0:3000
=> Call with -d to detach
=> Ctrl-C to shutdown server
        SECURITY WARNING: No secret option provided to Rack::Session::Cookie.
        This poses a security threat. It is strongly recommended that you
        provide a secret to prevent exploits that may be possible from crafted
        cookies. This will not be supported in future versions of Rack, and
        future versions will even invalidate your existing user cookies.

        Called from: /Users/shiraihiroki/.rbenv/versions/1.9.3-p125/lib/ruby/gems/1.9.1/gems/actionpack-3.2.3/lib/action_dispatch/middleware/session/abstract_store.rb:28:in `initialize'.

[2014-03-09 02:08:42] INFO  WEBrick 1.3.1
[2014-03-09 02:08:42] INFO  ruby 1.9.3 (2012-02-16) [x86_64-darwin12.5.0]
[2014-03-09 02:08:42] INFO  WEBrick::HTTPServer#start: pid=56930 port=3000
自動設定されたUserのURLにアクセスします。
http://localhost:3000/users

userの一覧ページが表示されました。
きちんとName、Rmail、Introが設定されています。
New UserをクリックしてUserを新規登録してみます。

Create User

Back

きちんと登録されていることが確認できました。
もちろん編集も


削除も可能です。


メモ一覧
#01 Ruby on Railsとは何か?
#02 必要となるツールを揃えよう
- Ruby on Railsはこんなものですよ
- 必要な情報はここら辺で集まりますよ
- 必要な知識にはこんなものがありますよ
- 開発環境はこんな感じですよ
- Ruby on RailsはMVCフレームワークですよ
- MVCはこんなものですよ
#04 はじめてのRailsプロジェクト
#05 ファイル構成をみていこう
アプリケーションを作成する基本的な流れを覚えましょう#06 Webサーバーを立ち上げよう
作成したWebアプリケーションをどうささせてみましょう#07 scaffoldを使ってみよう (1)
#08 scaffoldを使ってみよう (2)
DB、Model、View、Controllerの作成、URLの設定をしてみましょう
#09 ブログシステムを作ろう
#10 新しいプロジェクトを作ろう
#11 Postモデルを作ろう
#12 Postsコントローラーを作ろう
#13 ルーティングの設定をしよう
Scaffoldを使わずに、一からブログアプリケーションを作成しよう(実践的)
プロジェクト、Model、Controllerを作成し、ルーティングの設定をしよう
#14 デバッグに使えるコンソールについて
#15 コントローラーのメソッドについて
#16 記事の一覧を表示する (1)
#17 記事の一覧を表示する (2)
#18 リンクを貼ってみよう
#19 HTMLテンプレートを変更しよう
#20 ロゴ画像を表示させてみよう
#21 記事一覧画面をrootにしてみようScaffoldを使わずに、一からブログアプリケーションを作成しよう(実践的)(続き)
rails consoleとか、rails dbconsoleなんかの便利なツールがありますよ
コントローラーのメソッドと、それに対応するViewを作っていきましょうScaffoldでは自動生成してくれたModel、DBの設定、Controller、URL、Controllerのメソッド、Viewを自力で作ります。(まずは1つ)
#22 記事の詳細を表示する (1)
#23 記事の詳細を表示する (2)Scaffoldを使わずに、一からブログアプリケーションを作成しよう(実践的)(続き)
- コントローラーのメソッドと、それに対応するViewを作っていきましょう(続き)
- Scaffoldでは自動生成してくれたModel、DBの設定、Controller、URL、Controllerのメソッド、Viewを自力で作ります。(続き - show)
#24 新しい記事を追加しよう (1)
#25 新しい記事を追加しよう (2)
#26 新しい記事を追加しよう (3)
#27 バリデーションを設定しよう
#28 バリデーションエラーを表示しよう
#29 フラッシュメッセージを表示する
#30 メッセージをjQueryで消す
Scaffoldを使わずに、一からブログアプリケーションを作成しよう(実践的)(続き)
- コントローラーのメソッドと、それに対応するViewを作っていきましょう(続き)
- Scaffoldでは自動生成してくれたModel、DBの設定、Controller、URL、Controllerのメソッド、Viewを自力で作ります。(続き - new,create)
記事のタイトル一覧を表示するindexメソッド、その記事を表示するshowメソッドは完成したので次はその記事を表示するページが欲しいですね。ということでnewメソッド(新規作成フォーム)を作ります。また、フォームから送信されたデータを処理して新しい記事を作成するcreateメソッドも作成します。
バリデーション(検査)の設定をやってみよう(実践的)
#31 記事を更新してみよう (1)
#32 記事を更新してみよう (2)
#33 記事を更新してみよう (3)
Scaffoldを使わずに、一からブログアプリケーションを作成しよう(実践的)(続き)
- コントローラーのメソッドと、それに対応するViewを作っていきましょう(続き)
- Scaffoldでは自動生成してくれたModel、DBの設定、Controller、URL、Controllerのメソッド、Viewを自力で作ります。(続き - edit, update)
記事のタイトル一覧を表示するindexメソッド、その記事を表示するshowメソッド、記事の新規作成フォームを作成するnewメソッド、記事を作成するcreateメソッドは完成したので次はその記事を編集するページが欲しいですね。ということでeditメソッド(記事編集フォーム)を作ります。また、フォームから送信されたデータを処理して記事を上書きするupdateメソッドも作成します。
#34 記事を削除してみよう
#35 削除処理をAjax化しよう (1)
#36 削除処理をAjax化しよう (2)
Scaffoldを使わずに、一からブログアプリケーションを作成しよう(実践的)(続き)
- コントローラーのメソッドと、それに対応するViewを作っていきましょう(続き)
- Scaffoldでは自動生成してくれたModel、DBの設定、Controller、URL、Controllerのメソッド、Viewを自力で作ります。(続き - destroy)
記事のタイトル一覧を表示するindex、その記事を表示するshow、記事の新規作成フォームを作成するnew、記事を作成するcreate、記事を編集するeditは完成したので次はその記事を削除するページが欲しいですね。ということでdestroyを作ります。
#37 Commentモデルを作ろう
#38 Commentsコントローラーを作ろう
#39 コメントを表示させよう
#40 コメントを投稿してみよう (1)
#41 コメントを投稿してみよう (2)
#42 バリデーションを設定しよう
#43 コメントを削除してみよう (1)
#44 コメントを削除してみよう (2)
#45 コメント件数を表示してみよう
#46 Railsを日本語化しよう
Scaffoldを使わずに、一からブログアプリケーションを作成しよう(実践的)(続き)
- 新しい機能(Comment)を追加させましょう
- Scaffoldでは自動生成してくれたModel、DBの設定、Controller、URL、Controllerのメソッド、Viewを自力で作ります。