背景・目的
Swaggerを使用する機会があったので基本的な特徴を簡単にまとめて、ツールを使用してみます。
まとめ
下記に特徴をまとめます。
| 特徴 | 説明 |
|---|---|
| OpenAPI | REST APIのAPI記述形式 |
| OpneAPIにより記述できること | ・利用可能なエンドポイントと各エンドポイントの操作 ・オペレーションパラメータと各オペレーションの入出力パラメータ ・認証方法 |
| Swagger | ・OpenAPI仕様を中心に構築されたオープンソースのツールセット ・設計、構築、ドキュメント、利用に役立つ |
| OpenAPI Specification | ・2015 年に OpenAPI Initiative のもと Linux Foundation に寄贈された ・この仕様では、API に関連するすべてのリソースと操作を効果的にマッピングすることで、API を簡単に開発および使用できるようにする RESTful インターフェイスを作成する |
| Swaggerの主要なツール | ・Swagger Editor ・Swagger UI ・Swagger Codegen ・Swagger Editor Next (beta) ・Swagger Core ・Swagger Parser ・Swagger APIDom |
| Swaggerを利用する理由 | OpenAPI仕様とSwaggerツールにより、様々な方法でAPI開発を進めることができる |
| Swagger Editor | Swagger 仕様で RESTful API を設計、定義、文書化するためのオープン ソース エディター |
| Swagger UI | Swagger Spec で記載された設計からドキュメントを自動生成する |
| Swagger Codegen | Swagger で定義された RESTful API から直接サーバー スタブとクライアント SDK を構築するためのオープン ソース コード ジェネレーター |
概要
OpenAPI Specification
下記を基に整理します。
The World Standard for RESTful APIs
The OpenAPI Specification (OAS) was donated to the Linux Foundation under the OpenAPI Initiative in 2015. The specification creates a RESTful interface for easily developing and consuming an API by effectively mapping all the resources and operations associated with it.
- OpenAPI 仕様 (OAS) は、2015 年に OpenAPI Initiative のもと Linux Foundation に寄贈された
- この仕様では、API に関連するすべてのリソースと操作を効果的にマッピングすることで、API を簡単に開発および使用できるようにする RESTful インターフェイスを作成する
OpenAPI Specification & Swagger Tools
The Swagger tools were developed by the team behind the original "Swagger" Specification. Swagger offers the most powerful and easiest to use tools to take full advantage of the OpenAPI Specification. Explore Tools
- Swagger ツールは、元の「Swagger」仕様の背後にあるチームによって開発され
- Swagger は、OpenAPI 仕様を最大限に活用するための使いやすいツールを提供する
Why OpenAPI Specification?
- Streamline Your Workflow
- API の設計、ドキュメント、実装を常に同期して自動的に更新することで、API のビルド プロセスを合理化する
- Restraint-Free Build
- あらゆる一般的な言語のクライアント ライブラリとサーバー テンプレートを使用して、選択したテクノロジー スタックで API を開発する
- Open & Globally Supported
- OpenAPI 仕様は、Linux Foundation 共同プロジェクトである Open API Initiative 内のコミュニティ主導のオープン仕様
Unlocking the Power of Your APIs with OAS
- Design
- OAS は、コードを 1 行記述する前に API を設計し、リソースと操作を定義するための完全な形式を提供する
- Document
- API の操作を視覚化し、内部の開発者と外部の消費者が API をすぐに採用できるようにする
- Client & Server Generatation
- OAS 定義に基づいて、サーバー スタブとクライアント SDK のスキャフォールディングを生成
- Test
- OAS 定義で成功の応答を定義することにより、テスト ケースの生成を自動化する
- Monitor
- OAS 生成で定義された操作を使用して、API モニターを作成する
- Deploy
- AWS、IBM、Apigee などの主要な API ゲートウェイによってサポート
Open Source tools
下記を基に整理します。
Swagger Editor
- Swagger Editor は、Swagger 仕様で RESTful API を設計、定義、文書化するためのオープン ソース エディター
Swagger UI
Swagger Spec で記載された設計からドキュメントを自動生成するツール
Swagger Codegen
Swagger で定義された RESTful API から直接サーバー スタブとクライアント SDK を構築するためのオープン ソース コード ジェネレーター
What Is OpenAPI?
下記を基に整理します。
OpenAPI Specification (formerly Swagger Specification) is an API description format for REST APIs. An OpenAPI file allows you to describe your entire API, including:
- Available endpoints (/users) and operations on each endpoint (GET /users, POST /users)
- Operation parameters Input and output for each operation
- Authentication methods
- Contact information, license, terms of use and other information.
- OpenAPI は、REST APIのAPI記述形式
- OpenAPI ファイルを使用すると、下記を含む API 全体を記述することができる
- 利用可能なエンドポイントと各エンドポイントの操作
- オペレーションパラメータと各オペレーションの入出力パラメータ
- 認証方法
- 連絡先情報、ライセンス、利用規約とその他情報
API specifications can be written in YAML or JSON. The format is easy to learn and readable to both humans and machines. The complete OpenAPI Specification can be found on GitHub: OpenAPI 3.0 Specification
- API仕様は、YAML or JSONで書くことができる
- 形式は簡単に学べて、人間とマシンの両方に読みやすいもの
What Is Swagger?
Swagger is a set of open-source tools built around the OpenAPI Specification that can help you design, build, document and consume REST APIs. The major Swagger tools include:
- Swagger Editor – browser-based editor where you can write OpenAPI definitions.
- Swagger UI – renders OpenAPI definitions as interactive documentation.
- Swagger Codegen – generates server stubs and client libraries from an OpenAPI definition.
- Swagger Editor Next (beta) – browser-based editor where you can write and review OpenAPI and AsyncAPI definitions.
- Swagger Core – Java-related libraries for creating, consuming, and working with OpenAPI definitions.
- Swagger Parser – standalone library for parsing OpenAPI definitions
- Swagger APIDom – provides a single, unifying structure for describing APIs across various description languages and serialization formats.
- Swaggerは、OpenAPI仕様を中心に構築されたオープンソースのツールセット
- 設計、構築、ドキュメント、利用に役立つ
- 主要なSwaggerツールは下記の通り
- Swagger Editor
- OpenAPI定義を作成できるブラウザベースのエディタ
- Swagger UI
- OpenAPI定義をインタラクティブなドキュメントとしてレンダリングする
- Swagger Codegen
- OpenAPI定義から、サーバスタブとクライアントライブラリを生成する
- Swagger Editor Next (beta)
- OpenAPIとAsyncAPIの定義を作成、確認できるブラウザベースのエディタ
- Swagger Core
- OpenAPI定義を作成、利用、操作するためのJava関連ライブラリ
- Swagger Parser
- OpenAPI定義を解析するためのスタンドアロンライブラリ
- Swagger APIDom
- 様々な記述言語、シリアル化形式にわたりAPIを記述するt前の単一の統一構造を提供
- Swagger Editor
Why Use OpenAPI?
The ability of APIs to describe their own structure is the root of all awesomeness in OpenAPI. Once written, an OpenAPI specification and Swagger tools can drive your API development further in various ways:
- Design-first users: use Swagger Codegen to generate a server stub for your API. The only thing left is to implement the server logic – and your API is ready to go live!
- Use Swagger Codegen to generate client libraries for your API in over 40 languages.
- Use Swagger UI to generate interactive API documentation that lets your users try out the API calls directly in the browser.
- Use the spec to connect API-related tools to your API. For example, import the spec to SoapUI to create automated tests for your API.
- And more! Check out the open-source and commercial tools that integrate with Swagger.
- APIが独自の構造を記述できることが、OpenAPIのすべての素晴らしさの根源
- OpenAPI仕様とSwaggerツールにより、様々な方法でAPI開発を進めることができる
- Swagger Codegenを使用して、APIのサーバスタブを生成する。残りはサーバロジックを実装するのみになる
- Swagger Codegenを使用して、40以上の言語でAPIのクライアントライブラリを生成する
- Swagger UIを使用して、ユーザがブラウザで直接APIの呼び出しを試せるインタラクティブAPIドキュメントを生成する
- この仕様を使用して、API関連ツールをAPIに接続する
- 例)仕様をSoapUIにインポートして、APIの自動テストを生成する
Basic Structure
下記を基に整理します。
YAML、JSONでOpenAPI定義を書くことができます。本書ではYAMLで記述します。
下記にサンプルを載せます。
openapi: 3.0.0
info:
  title: Sample API
  description: Optional multiline or single-line description in [CommonMark](http://commonmark.org/help/) or HTML.
  version: 0.1.9
servers:
  - url: http://api.example.com/v1
    description: Optional server description, e.g. Main (production) server
  - url: http://staging-api.example.com
    description: Optional server description, e.g. Internal staging server for testing
paths:
  /users:
    get:
      summary: Returns a list of users.
      description: Optional extended description in CommonMark or HTML.
      responses:
        '200':    # status code
          description: A JSON array of user names
          content:
            application/json:
              schema:
                type: array
                items:
                  type: string
Metadata
OpenAPIの仕様のバージョンが含まれている必要がある。
openapi: 3.0.0
infoセクションは、下記が含まれる
- タイトル
- API名
- 説明(オプション)
- APIに関する拡張情報
- バージョン
- API のバージョンを指定する任意の文字列
- ファイルのリビジョンや openapi のバージョンではない
info:
  title: Sample API
  description: Optional multiline or single-line description in [CommonMark](http://commonmark.org/help/) or HTML.
  version: 0.1.9
連絡先情報、ライセンス、利用規約、その他の詳細に関する他のキーワードもサポートしている
  termsOfService: http://swagger.io/terms/
  contact:
    email: apiteam@swagger.io
  license:
    name: Apache 2.0
    url: http://www.apache.org/licenses/LICENSE-2.0.html
Servers
サーバーセクションでは、API サーバーとベース URL を指定する。本番サーバーやサンドボックスなど、1 つまたは複数のサーバーを定義できる。
servers:
  - url: http://api.example.com/v1
    description: Optional server description, e.g. Main (production) server
  - url: http://staging-api.example.com
    description: Optional server description, e.g. Internal staging server for testing
すべての API パスはサーバー URL に対する相対パス。
上記の例では、/users は、使用するサーバーに応じて、下記のいずれかを意味する。
Paths
パス セクションでは、API の個々のエンドポイント (パス) と、これらのエンドポイントでサポートされる HTTP メソッド (操作) を定義する。たとえば、GET /users は次のように記述する。
paths:
  /users:
    get:
      summary: Returns a list of users.
      description: Optional extended description in CommonMark or HTML
      responses:
        '200':
          description: A JSON array of user names
          content:
            application/json:
              schema:
                type: array
                items:
                  type: string
操作定義には下記が含まれる
- パラメーター
- Request body (存在する場合)
- Response ステータス コード (200 OK または 404 Not Found など)
- Response の内容が含まれる
Parameters
操作には、下記を含めることができる
- URL パス (/users/{userId})
- クエリ文字列 (/users?role=admin)
- ヘッダー (X-CustomHeader: Value)
- Cookie (Cookie: debug=0) を介して渡されるパラメーター
paths:
  /users/{userId}:
    get:
      summary: Returns a user by ID.
      parameters:
        - name: userId
          in: path
          required: true
          description: Parameter description in CommonMark or HTML.
          schema:
            type : integer
            format: int64
            minimum: 1
      responses:
        '200':
          description: OK
Request Body
オペレーションでリクエスト本文を送信する場合は、requestBody キーワードを使用して本文の内容とメディア タイプを記述する。
paths:
  /users:
    post:
      summary: Creates a user.
      requestBody:
        required: true
        content:
          application/json:
            schema:
              type: object
              properties:
                username:
                  type: string
      responses:
        '201':
          description: Created
Responses
操作ごとに、200 OK や 404 Not Found などの考えられるステータス コードと応答本文のスキーマを定義できる。
スキーマはインラインで定義することも、$ref を介して参照することもできる。
さまざまなコンテンツ タイプに対する応答例を提供することもできる
paths:
  /users/{userId}:
    get:
      summary: Returns a user by ID.
      parameters:
        - name: userId
          in: path
          required: true
          description: The ID of the user to return.
          schema:
            type: integer
            format: int64
            minimum: 1
      responses:
        '200':
          description: A user object.
          content:
            application/json:
              schema:
                type: object
                properties:
                  id:
                    type: integer
                    format: int64
                    example: 4
                  name:
                    type: string
                    example: Jessica Smith
        '400':
          description: The specified user ID is invalid (not a number).
        '404':
          description: A user with the specified ID was not found.
        default:
          description: Unexpected error
応答の HTTP ステータス コードは引用符で囲む必要がある 例)"200"(OpenAPI 2.0 ではこれは必要なし。)
Input and Output Models
グローバル コンポーネント/スキーマ セクションでは、API で使用される一般的なデータ構造を定義できる。
これらは、スキーマが必要なときはいつでも、パラメーター、リクエスト本文、および応答本文で $ref を介して参照できる
たとえば、次の JSON オブジェクトは次のとおり。
{
  "id": 4,
  "name": "Arthur Dent"
}
下記のように表せる。
components:
  schemas:
    User:
      type: object
      properties:
        id:
          type: integer
          example: 4
        name:
          type: string
          example: Arthur Dent
      # Both properties are required
      required:
        - id
        - name
次のようにリクエスト本文のスキーマと応答本文のスキーマで参照される。
paths:
  /users/{userId}:
    get:
      summary: Returns a user by ID.
      parameters:
        - in: path
          name: userId
          required: true
          schema:
            type: integer
            format: int64
            minimum: 1
      responses:
        '200':
          description: OK
          content:
            application/json:
              schema:
                $ref: '#/components/schemas/User'    # <-------
  /users:
    post:
      summary: Creates a new user.
      requestBody:
        required: true
        content:
          application/json:
            schema:
              $ref: '#/components/schemas/User'      # <-------
      responses:
        '201':
          description: Created
Authentication
securitySchemes および security キーワードは、API で使用される認証方法を記述するために使用される。
components:
  securitySchemes:
    BasicAuth:
      type: http
      scheme: basic
security:
  - BasicAuth: []
サポートされている認証方法
- HTTP authentication: Basic, Bearerなど
- API key as a header or query parameter or in cookies
- OAuth 2
- OpenID Connect Discovery
実践
環境準備
前提
- MacOS
- dockerがインストール済み
- VSCodeがインストール済み
Swagger Editor(Docker)
今回のチュートリアルでは、後述するVSCodeのPluginでも問題ありません。
下記を参考に準備します
下記の方法で、Swagger Editorを使用することができます。
| 分類 | Swagger Editor | 説明 |
|---|---|---|
| Web | Web |
https://editor.swagger.io/にアクセスしWeb上で直接コードを書く |
| ローカルマシン | swagger-editor on http-server | GitHub の http-server モジュールをインストールする |
| swagger-editor on docker image | Docker Imageを起動する |
今回は、docker Imageで試してみます。
-
docker pullで swagger-editorをダウンロードします$ docker pull swaggerapi/swagger-editor Using default tag: latest latest: Pulling from swaggerapi/swagger-editor 〜 docker.io/swaggerapi/swagger-editor:latest What's next: View a summary of image vulnerabilities and recommendations → docker scout quickview swaggerapi/swagger-editor $ docker image ls REPOSITORY TAG IMAGE ID CREATED SIZE swaggerapi/swagger-editor latest XXXX 2 months ago 71.4MB $ -
docker runで起動します$ docker run -p 80:8080 swaggerapi/swagger-editor /docker-entrypoint.sh: /docker-entrypoint.d/ is not empty, will attempt to perform configuration /docker-entrypoint.sh: Looking for shell scripts in /docker-entrypoint.d/ /docker-entrypoint.sh: Launching /docker-entrypoint.d/10-listen-on-ipv6-by-default.sh 10-listen-on-ipv6-by-default.sh: info: Getting the checksum of /etc/nginx/conf.d/default.conf 10-listen-on-ipv6-by-default.sh: info: Enabled listen on IPv6 in /etc/nginx/conf.d/default.conf /docker-entrypoint.sh: Sourcing /docker-entrypoint.d/15-local-resolvers.envsh /docker-entrypoint.sh: Launching /docker-entrypoint.d/20-envsubst-on-templates.sh 20-envsubst-on-templates.sh: Running envsubst on /etc/nginx/templates/default.conf.template to /etc/nginx/conf.d/default.conf /docker-entrypoint.sh: Launching /docker-entrypoint.d/30-tune-worker-processes.sh /docker-entrypoint.sh: Launching /docker-entrypoint.d/91-docker-run.sh /docker-entrypoint.sh: Configuration complete; ready for start up -
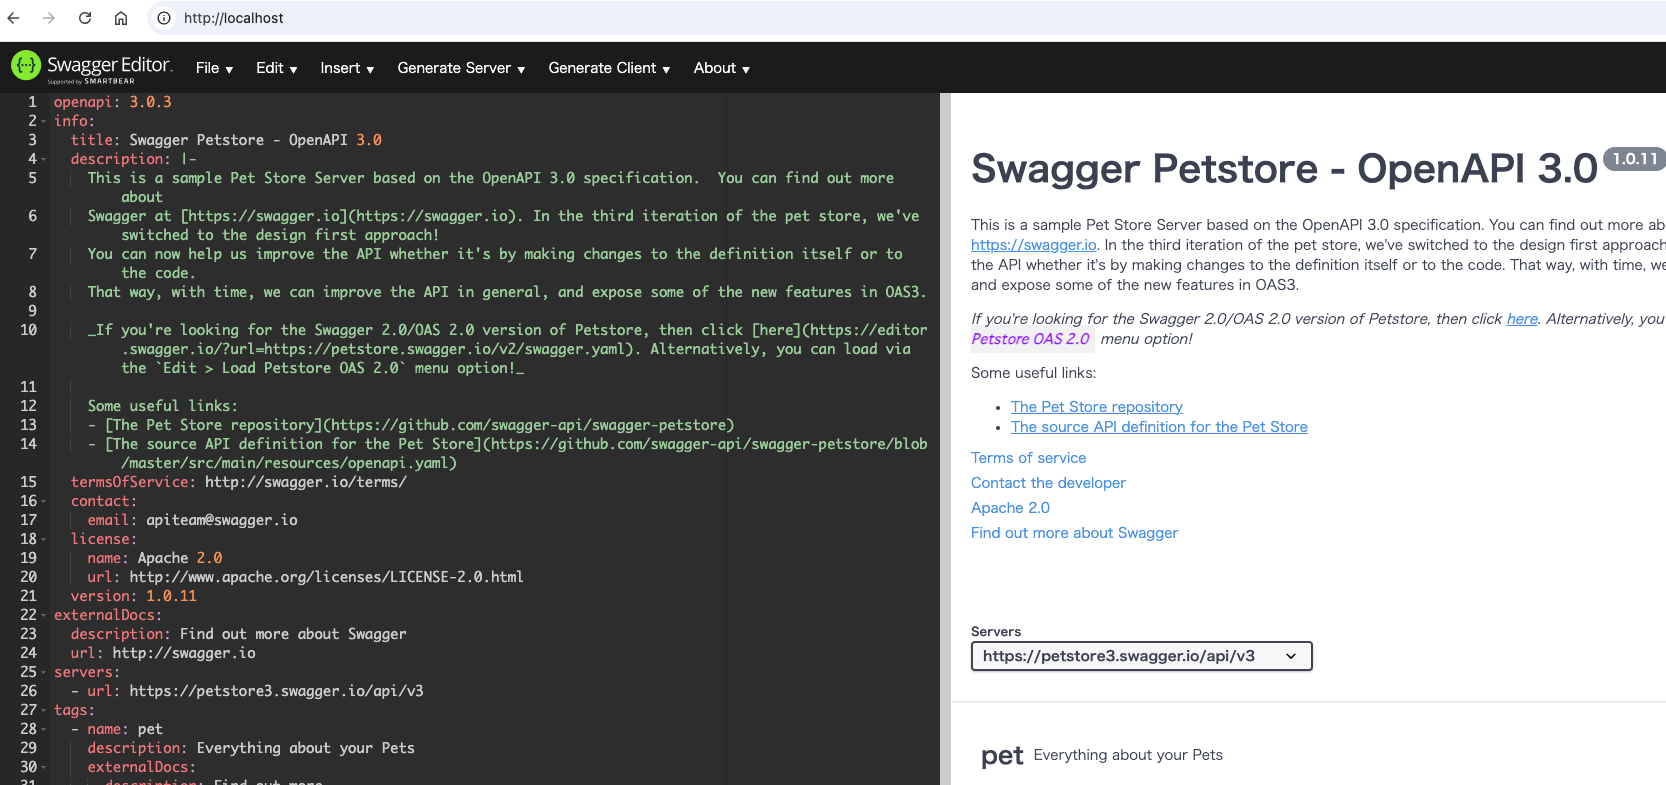
ブラウザに、
localhost:80を入力し画面を確認します。表示されました
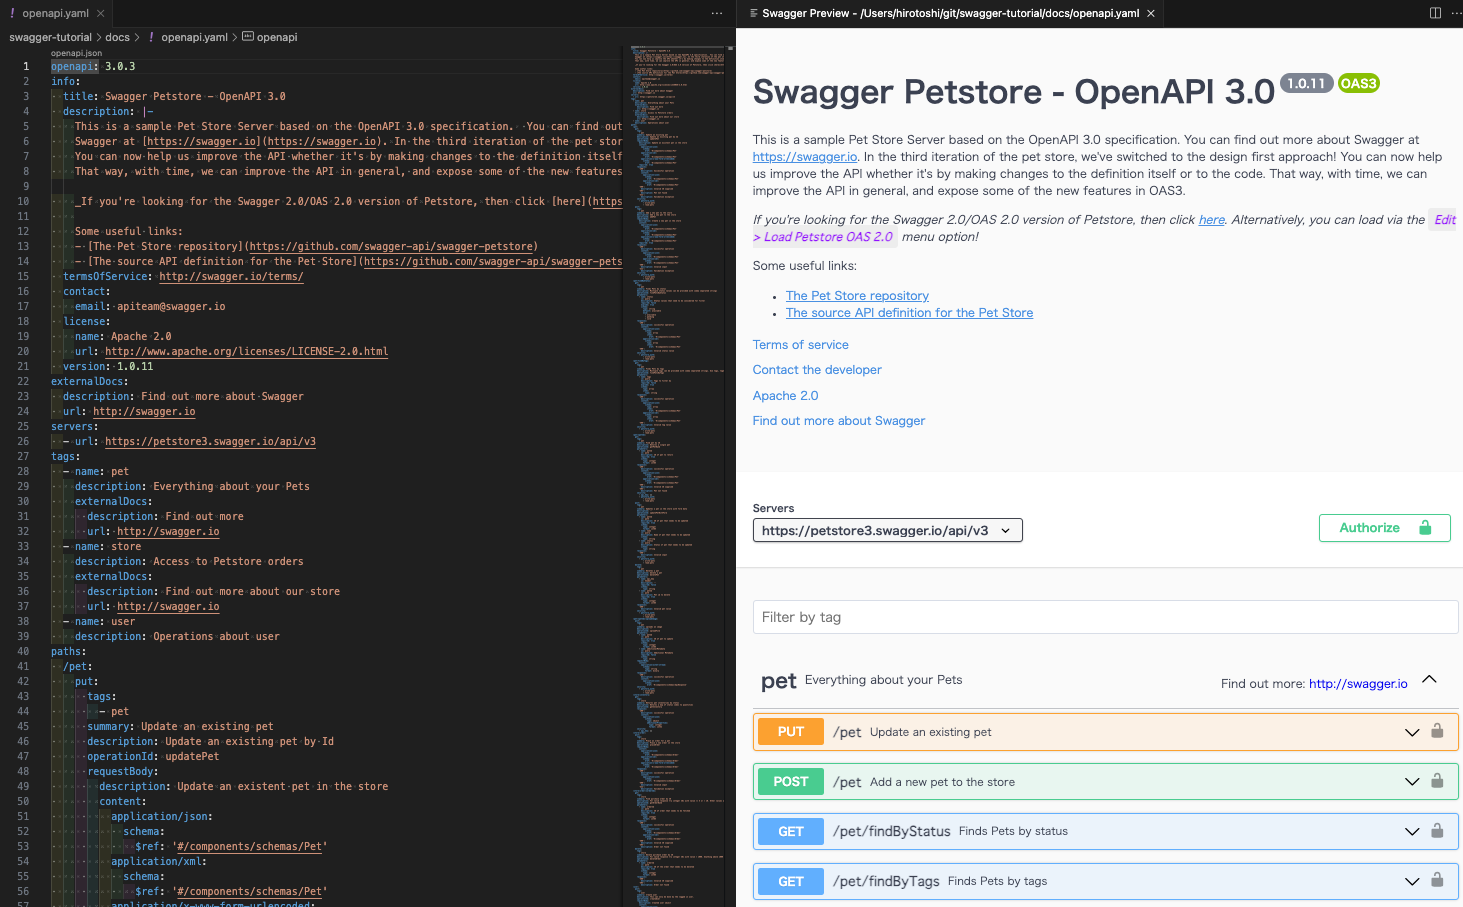
VSCode(Swagger Viewer)
今回のチュートリアルでは、前述のDockerでも問題ありません。
-
VSCodeを開きます
-
拡張機能をクリックします

-
Swagger Viewerで検索し、選択します
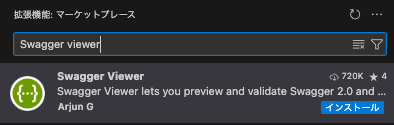
-
Swagger Viewerをインストールします

-
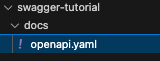
フォルダを作成します
$ mkdir swagger-tutorial -
フォルダをVSCodeのワークスペースに追加します
-
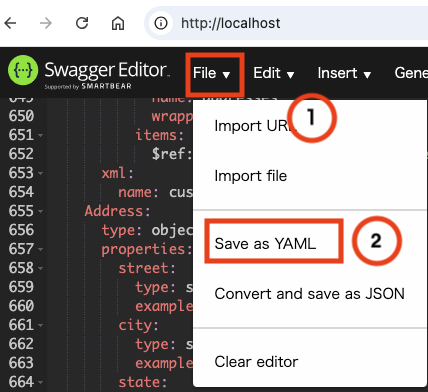
SwaggerEditorを開き、①「File」>②「Save as YAML」をクリックしファイルをダウンロードします
-
ファイルをコピーします
-
Shift + option + pでプレビューを開きます。表示されました
Prism
下記を基にインストールします。
-
yarnでインストールします$ yarn global add @stoplight/prism-cli -
インストールできました
$ prism --version
5.9.0
$
Swagger code-gen
下記を基にインストールします。
-
brewでインストールします$ brew install swagger-codegen -
インストールができました
$ swagger-codegen version
3.0.62
$
OpenAPI 3.0チュートリアル
下記を基に試します。
Create an API
レコードレーベル用のAPIを設計します。レコード レーベルが次の情報を含むアーティストのデータベースを持っていると仮定する。
- Artist name
- Artist genre
- Number of albums published under the label
- Artist username
API を使用すると、消費者はデータベースに保存されているアーティストのリストを取得し、データベースに新しいアーティストを追加できる。
OpenAPI 仕様を使用して定義された API は、3 つの主要なセクションに分割できる。
- Meta information
- Path items (endpoints):
- Parameters
- Request bodies
- Responses
- Reusable components:
- Schemas (data models)
- Parameters
- Responses
- Other components
Meta information
-
まずは、ファイル(swagger-tutorial.yaml)を作成します
-
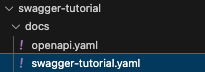
下記を定義します
openapi: 3.0.0 info: version: 1.0.0 title: Simple Artist API description: A simple API to illustrate OpenAPI concepts servers: - url: https://example.io/v1 # Basic authentication components: securitySchemes: BasicAuth: type: http scheme: basic security: - BasicAuth: [] paths: {}- APIタイトル
- バージョン
- サーバURL
- Description
- セキュリティ情報
-
プレビューで見ると下記のようになります
Path items
パス項目は、目的の方法でリソースを操作するための HTTP 同士を指定できる API のエンドポイント。
これらのエンドポイントはサーバー URL (この例では https://example.io/v1) に関連している
- pathsに
artistsを追加しますopenapi: 3.0.0 info: version: 1.0.0 title: Simple Artist API description: A simple API to illustrate OpenAPI concepts servers: - url: https://example.io/v1 # Basic authentication components: securitySchemes: BasicAuth: type: http scheme: basic security: - BasicAuth: [] # ----- 追加 ----- paths: /artists: get: description: Returns a list of artists # ---------------- - プレビューで確認します

Responses
アーティスト エンドポイントの下の GET メソッドを使用すると、API コンシューマーは https://example.io/v1 データベースからアーティストのリストの詳細を取得できる
すべての応答には、消費者が期待する応答の種類を記述するために少なくとも 1 つの HTTP ステータス コードが必要。Descriptionでは、API の応答がどのようなものになるかについて詳しく説明する。
サンプル コードでは、成功したクライアント リクエストである 200 を指定しているが、失敗したリクエストである 400 を指定している。
- 応答が成功すると、アーティスト名、ジャンル、ユーザー名、および録音されたアルバムが返される
- 失敗した要求は 400 HTTP コードで説明され、応答が無効である理由の詳細を示す対応するエラー メッセージが表示される
- descriptions以降に追加します
openapi: 3.0.0 info: version: 1.0.0 title: Simple Artist API description: A simple API to illustrate OpenAPI concepts servers: - url: https://example.io/v1 # Basic authentication components: securitySchemes: BasicAuth: type: http scheme: basic security: - BasicAuth: [] paths: /artists: get: description: Returns a list of artists # ----- Added lines ---------------------------------------- responses: '200': description: Successfully returend a list of artists content: application/json: schema: type: array items: type: object required: - username properties: artist_name: type: string artist_genre: type: string albums: type: integer username: type: string '400': description: Invalid request content: application/json: schema: type: object properties: message: type: string # ------------------------------------------------------------ - プレビューで確認します

Parameters
RESTful パラメーターは、ユーザーが操作するリソースの可変部分を指定する。
Query parameters
クエリ パラメータは、最も一般的なタイプのパラメータ。これらは、URL の末尾の疑問符に続いて表示される。
クエリ パラメータはオプションであり、一意ではないため、URL 内で複数回指定できる。
この例では、クライアントがデータベースからアーティストのリスト全体を返すのではなく、必要な情報を制限する。これにより、サーバーに不必要な負荷がかかります。
クライアントは、次のようにページ番号 (オフセット) とページ上の情報量 (制限) を記述することができる。
GET https://example.io/v1/artists?limit=20&offset=3
これらの変数は、OpenAPI 定義のパラメータ オブジェクトの下で定義される。
-
parametersを追加しますopenapi: 3.0.0 info: version: 1.0.0 title: Simple Artist API description: A simple API to illustrate OpenAPI concepts servers: - url: https://example.io/v1 # Basic authentication components: securitySchemes: BasicAuth: type: http scheme: basic security: - BasicAuth: [] paths: /artists: get: description: Returns a list of artists # ----- Added lines ---------------------------------------- parameters: - name: limit in: query description: Limits the number of items on a page schema: type: integer - name: offset in: query description: Specifies the page number of the artists to be displayed schema: type: integer # ------------------------------------------------------------ responses: '200': description: Successfully returend a list of artists content: application/json: schema: type: array items: type: object required: - username properties: artist_name: type: string artist_genre: type: string albums: type: integer username: type: string '400': description: Invalid request content: application/json: schema: type: object properties: message: type: string - プレビューで確認します

Request body
通常、POST、PUT、および PATCH リクエストにはリクエスト本文が含まれる。リクエストボディは、requestBody オブジェクトを使用して定義される。この API では、ユーザーがデータベースにアーティストを投稿できる機能を追加する。これは /artists リソースの下にある
- 下記の
postを追加しますopenapi: 3.0.0 info: version: 1.0.0 title: Simple Artist API description: A simple API to illustrate OpenAPI concepts servers: - url: https://example.io/v1 # Basic authentication components: securitySchemes: BasicAuth: type: http scheme: basic security: - BasicAuth: [] paths: /artists: get: description: Returns a list of artists parameters: - name: limit in: query description: Limits the number of items on a page schema: type: integer - name: offset in: query description: Specifies the page number of the artists to be displayed schema: type: integer responses: '200': description: Successfully returend a list of artists content: application/json: schema: type: array items: type: object required: - username properties: artist_name: type: string artist_genre: type: string albums_recorded: type: integer username: type: string '400': description: Invalid request content: application/json: schema: type: object properties: message: type: string # ----- Added lines ---------------------------------------- post: description: Lets a user post a new artist requestBody: required: true content: application/json: schema: type: object required: - username properties: artist_name: type: string artist_genre: type: string albums_recorded: type: integer username: type: string responses: '200': description: Successfully created a new artist '400': description: Invalid request content: application/json: schema: type: object properties: message: type: string # ----------------------------------------------------------- - プレビューで確認します

Path parameters
パス パラメーターを使用すると、クライアントが操作しているデータの特定のコンポーネント (例: https://example.io/v1/artists/{username}) を分離できる。パス パラメーターは URL の階層コンポーネントの一部であるため、順番に積み重ねられる。
提供されたユーザー名に基づいて特定のアーティストの情報を返す新しいエンドポイントを作成する。
- ここでの path パラメーターは、情報が必要なアーティストのユーザー名になる
- パス パラメーター (この場合はユーザー名) は、メソッドの下のパラメーター オブジェクトに必ず記述する必要がある
-
{artists/{username}を追加しますopenapi: 3.0.0 info: version: 1.0.0 title: Simple Artist API description: A simple API to illustrate OpenAPI concepts servers: - url: https://example.io/v1 # Basic authentication components: securitySchemes: BasicAuth: type: http scheme: basic security: - BasicAuth: [] paths: /artists: get: description: Returns a list of artists parameters: - name: limit in: query description: Limits the number of items on a page schema: type: integer - name: offset in: query description: Specifies the page number of the artists to be displayed schema: type: integer responses: '200': description: Successfully returend a list of artists content: application/json: schema: type: array items: type: object required: - username properties: artist_name: type: string artist_genre: type: string albums_recorded: type: integer username: type: string '400': description: Invalid request content: application/json: schema: type: object properties: message: type: string post: description: Lets a user post a new artist requestBody: required: true content: application/json: schema: type: object required: - username properties: artist_name: type: string artist_genre: type: string albums_recorded: type: integer username: type: string responses: '200': description: Successfully created a new artist '400': description: Invalid request content: application/json: schema: type: object properties: message: type: string # ----- Added lines ---------------------------------------- /artists/{username}: get: description: Obtain information about an artist from his or her unique username parameters: - name: username in: path required: true schema: type: string responses: '200': description: Successfully returned an artist content: application/json: schema: type: object properties: artist_name: type: string artist_genre: type: string albums_recorded: type: integer '400': description: Invalid request content: application/json: schema: type: object properties: message: type: string # ------------------------------------------------------------ ここでは、パスパラメータとしてユーザー名を指定した
- 注意すべき点は、仕様が有効であるためには、パス パラメーターに true プロパティが必須パラメーターに設定されている必要がある
-
プレビューで確認します

Reusable components
上記では、2 つのエンドポイントと 3 つのアクション。これは約 130 行の仕様であり、API が大きくなるにつれて仕様はさらに長くなる。
200 および 400 の応答で繰り返される同じアーティスト スキーマ (アーティスト名、ジャンル、ユーザー名、公開されたアルバム) があった。
より大きな API には、多くの同じ仕様の書き換えと再利用が含まれるため、より複雑な API を記述するのは退屈な作業になる
- OpenAPI 仕様には、同じ API 内の複数のエンドポイント間で使用できる再利用可能なコンポーネントというソリューションがある
- これらのコンポーネントはグローバル コンポーネント セクションで定義され、個々のエンドポイントで参照される
- この仕様では、さまざまなタイプの再利用可能なコンポーネントが定義される
Schemas
グローバル コンポーネント セクションのスキーマ サブセクションには、API によって消費および返されるさまざまなデータ モデルを含めることができる。
ここでは、コンポーネントを使用して HTTP 200 OK 応答のスキーマを保存する方法を示す。
API 定義には、securitySchemes を含むコンポーネント セクションがすでにあったが、コンポーネントを一番下に移動し、スキーマ サブセクションを追加する。
-
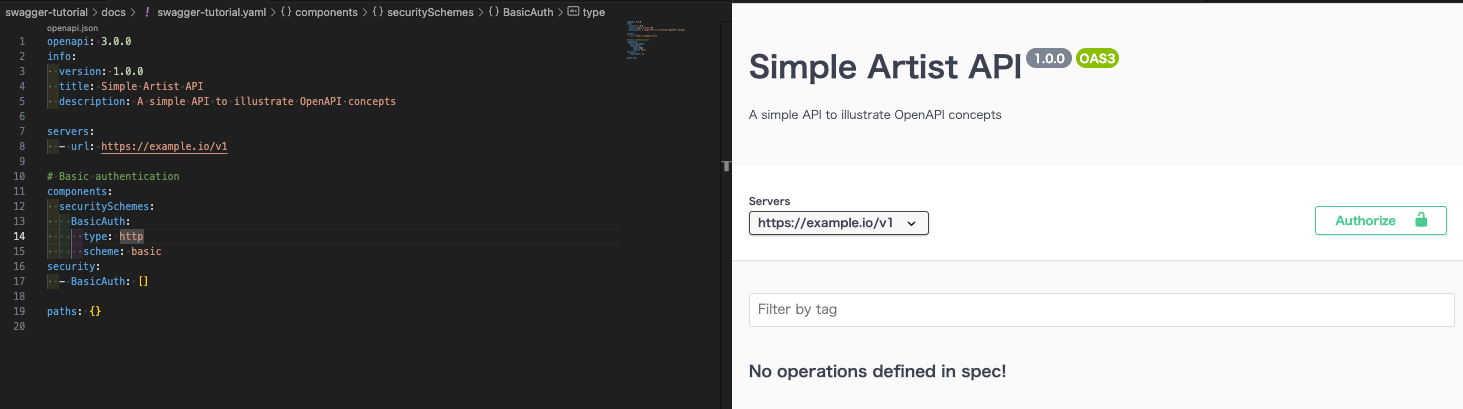
下記のコードを追加します
openapi: 3.0.0 info: version: 1.0.0 title: Simple Artist API description: A simple API to illustrate OpenAPI concepts servers: - url: https://example.io/v1 # Basic authentication components: securitySchemes: BasicAuth: type: http scheme: basic # ----- Added lines ---------------------------------------- schemas: Artist: type: object required: - username properties: artist_name: type: string artist_genre: type: string albums_recorded: type: integer username: type: string # ----------------------------------------------------------- security: - BasicAuth: [] paths: /artists: get: description: Returns a list of artists parameters: - name: limit in: query description: Limits the number of items on a page schema: type: integer - name: offset in: query description: Specifies the page number of the artists to be displayed schema: type: integer responses: '200': description: Successfully returend a list of artists content: application/json: schema: type: array items: # ----- Modified ---------------------------------------- $ref: '#/components/schemas/Artist' # -------------------------------------------------------- '400': description: Invalid request content: application/json: schema: type: object properties: message: type: string post: description: Lets a user post a new artist requestBody: required: true content: application/json: schema: # ----- Modified ---------------------------------------- $ref: '#/components/schemas/Artist' # -------------------------------------------------------- responses: '200': description: Successfully created a new artist '400': description: Invalid request content: application/json: schema: type: object properties: message: type: string /artists/{username}: get: description: Obtain information about an artist from his or her unique username parameters: - name: username in: path required: true schema: type: string responses: '200': description: Successfully returned an artist content: application/json: schema: type: object properties: artist_name: type: string artist_genre: type: string albums_recorded: type: integer '400': description: Invalid request content: application/json: schema: type: object properties: message: type: string- 仕様は短く、同じスキーマを持つ新しいエンドポイントが必要なときはいつでも、設計者はその部分の作成に時間を費やす必要がない
-
プレビューで確認します
Parameters and Responses
コンポーネント セクションには、再利用可能なパラメータと応答を保存するためのサブセクションもある。
以下の仕様では、再利用可能なクエリ パラメーターのオフセットと制限を定義し、/artists エンドポイントでそれらを参照する。
また、再利用可能な 400Error 応答も定義し、すべてのエンドポイントから参照します。
- 下記のコードを追加します
openapi: 3.0.0
info:
  version: 1.0.0
  title: Simple Artist API
  description: A simple API to illustrate OpenAPI concepts

servers:
  - url: https://example.io/v1

# Basic authentication
components:
  securitySchemes:
    BasicAuth:
      type: http
      scheme: basic
  schemas:
    Artist:
      type: object
      required:
        - username
      properties:
        artist_name:
          type: string
        artist_genre:
          type: string
        albums_recorded:
          type: integer
        username:
          type: string
#  ----- Added lines  -------------------------------------
  parameters:
    PageLimit:
      name: limit
      in: query
      description: Limits the number of items on a page
      schema:
        type: integer

    PageOffset:
      name: offset
      in: query
      description: Specifies the page number of the artists to be displayed
      schema:
        type: integer

  responses:
    400Error:
      description: Invalid request
      content:
        application/json:
          schema:
            type: object
            properties:
              message:
                type: string
#  --------------------------------------------------------
security:
  - BasicAuth: []

paths:
  /artists:
    get:
      description: Returns a list of artists
      parameters:
#  ----- Modified  ----------------------------------------
        - $ref: '#/components/parameters/PageLimit'
        - $ref: '#/components/parameters/PageOffset'
#  --------------------------------------------------------
      responses:
        '200':
          description: Successfully returend a list of artists
          content:
            application/json:
              schema:
                type: array
                items:
                  $ref: '#/components/schemas/Artist'
        '400':
#  ----- Modified  ----------------------------------------
          $ref: '#/components/responses/400Error'
#  --------------------------------------------------------
    post:
      description: Lets a user post a new artist
      requestBody:
        required: true
        content:
          application/json:
            schema:
              $ref: '#/components/schemas/Artist'
      responses:
        '200':
          description: Successfully created a new artist

        '400':
#  ----- Modified  ----------------------------------------
          $ref: '#/components/responses/400Error'
#  --------------------------------------------------------
  /artists/{username}:
    get:
      description: Obtain information about an artist from his or her unique username
      parameters:
        - name: username
          in: path
          required: true
          schema:
            type: string
      responses:
        '200':
          description: Successfully returned an artist
          content:
            application/json:
              schema:
                type: object
                properties:
                  artist_name:
                    type: string
                  artist_genre:
                    type: string
                  albums_recorded:
                    type: integer
        '400':
#  ----- Modified  ----------------------------------------
          $ref: '#/components/responses/400Error'
#  --------------------------------------------------------
モックで確認する
下記を参考にさせていただきました。感謝いたします。
- Prism は、OpenAPI v2 (旧称 Swagger) および OpenAPI v3.x を使用した API モックおよびコントラクト テスト用のパッケージ セットです
- Prism は以下を提供します:
- モック サーバー: あらゆる API 仕様ドキュメントからの実物そっくりのモック サーバー
- 検証プロキシ: API コンシューマーおよび開発者向けのコントラクト テスト
-
prism mockで作成したファイルを読み込みます$ prism mock swagger-tutorial.yaml [17:20:58] › [CLI] … awaiting Starting Prism… [17:20:58] › [CLI] ℹ info GET http://127.0.0.1:4010/artists?limit=227&offset=758 [17:20:58] › [CLI] ℹ info POST http://127.0.0.1:4010/artists [17:20:58] › [CLI] ℹ info GET http://127.0.0.1:4010/artists/sed [17:20:58] › [CLI] ▶ start Prism is listening on http://127.0.0.1:4010 -
localhost:4010/artistsでアクセスしてみます。各項目が返されました

Exampleを返す
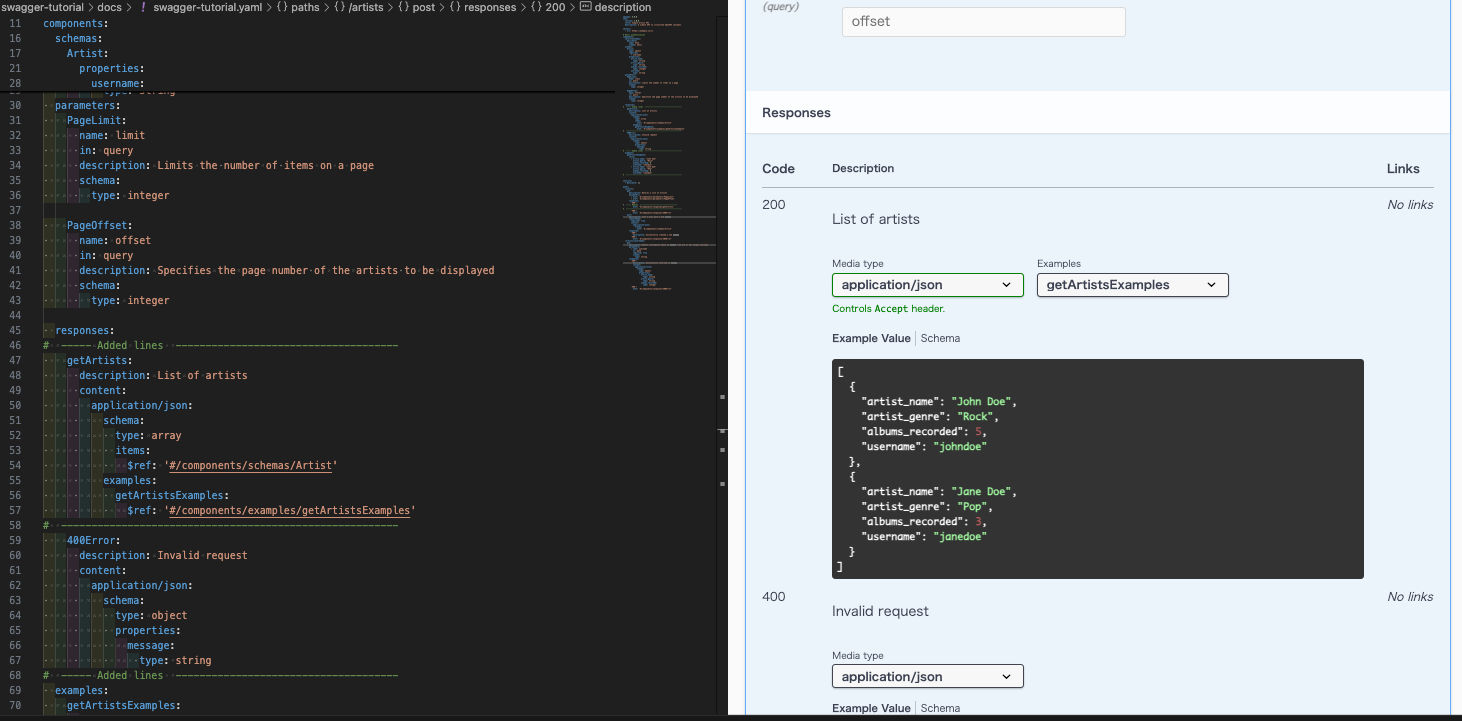
上記で、スキーマはわかりますがもう少しリアリティを持たせたいです。
examplesを使用して定義します。
-
下記のコードを定義します
openapi: 3.0.0 info: version: 1.0.0 title: Simple Artist API description: A simple API to illustrate OpenAPI concepts servers: - url: https://example.io/v1 # Basic authentication components: securitySchemes: BasicAuth: type: http scheme: basic schemas: Artist: type: object required: - username properties: artist_name: type: string artist_genre: type: string albums_recorded: type: integer username: type: string parameters: PageLimit: name: limit in: query description: Limits the number of items on a page schema: type: integer PageOffset: name: offset in: query description: Specifies the page number of the artists to be displayed schema: type: integer responses: # ----- Added lines ------------------------------------- getArtists: description: List of artists content: application/json: schema: type: array items: $ref: '#/components/schemas/Artist' examples: getArtistsExamples: $ref: '#/components/examples/getArtistsExamples' # -------------------------------------------------------- 400Error: description: Invalid request content: application/json: schema: type: object properties: message: type: string # ----- Added lines ------------------------------------- examples: getArtistsExamples: value: - artist_name: "John Doe" artist_genre: "Rock" albums_recorded: 5 username: "johndoe" - artist_name: "Jane Doe" artist_genre: "Pop" albums_recorded: 3 username: "janedoe" # -------------------------------------------------------- security: - BasicAuth: [] paths: /artists: get: description: Returns a list of artists parameters: - $ref: '#/components/parameters/PageLimit' - $ref: '#/components/parameters/PageOffset' responses: '200': # ----- Modify ------------------------------------- $ref: '#/components/responses/getArtists' # -------------------------------------------------------- '400': $ref: '#/components/responses/400Error' post: description: Lets a user post a new artist requestBody: required: true content: application/json: schema: $ref: '#/components/schemas/Artist' responses: '200': description: Successfully created a new artist '400': $ref: '#/components/responses/400Error' /artists/{username}: get: description: Obtain information about an artist from his or her unique username parameters: - name: username in: path required: true schema: type: string responses: '200': description: Successfully returned an artist content: application/json: schema: type: object properties: artist_name: type: string artist_genre: type: string albums_recorded: type: integer '400': $ref: '#/components/responses/400Error'- componentに下記を追加
- response
- example
- pathから、追加したresponseを参照
- componentに下記を追加
-
プレビューで確認します。サンプルデータが表示されました
-
あらためて、prismで読み込みます
$ prism mock swagger-tutorial.yaml [17:45:46] › [CLI] … awaiting Starting Prism… [17:45:47] › [CLI] ℹ info GET http://127.0.0.1:4010/artists?limit=684&offset=684 [17:45:47] › [CLI] ℹ info POST http://127.0.0.1:4010/artists [17:45:47] › [CLI] ℹ info GET http://127.0.0.1:4010/artists/provident [17:45:47] › [CLI] ▶ start Prism is listening on http://127.0.0.1:4010 -
サンプルデータが返されました

Code Generator
- Goで生成してみます
$ pwd /Users/XXXXX/git/swagger-tutorial/docs $ swagger-codegen generate -i swagger-tutorial.yaml -l go -o ../src/ - できました

考察
今回は、OpenAPIとSwaggerについて特徴を整理し、簡単に動作確認してみました。今後は、コード生成からAPI Gatewayまでのデプロイまでの流れを試してみます。
参考