背景・目的
先日、Glue for Ray(プレビュー)が発表されましたので、特徴などを整理し、手を動かしてみようとおもいます。
まとめ
- 2022/12/9時点でプレビューです。
- Glue Studioは未対応
- RayジョブはAWS Gravitonで実行されます。
- Sparkを新たに学習することになく、Pythonワークロードをスケールアップできる
概要
- OSSの分散フレームワーク
- Ray2.0を使用できる
What is AWS Glue on Ray?
- 並列分散のPythonスクリプトを実行できる
- Rayジョブとインタラクティブセッションで、pandasなどのPythonライブラリが使用できる
- Rayは負荷に応じて、リアルタイムで再構成するマシンのクラスタ全体に処理を分散することで、Pythonコードのスケーリングを自動化する。
- 特定のワークロードの1ドルあたりのパフォーマンスが向上する可能性がある。
- RayジョブはAWS Gravitonで実行される
AWS Glue on Ray and other engines
- Sparkを新たに学習することになく、Pythonワークロードをスケールアップできる
AWS Glue for Ray consists of two major components:
-
Rayは2つの主要コンポーネントで構成されている
- Ray Core
- 分散コンピューティングフレームワーク
- Ray Dataset
- Apache Arrowに基づく分散フレームワーク
- Ray Core
-
Rayジョブを実行すると、GlueがRayクラスタをプロビジョニングし、これらの分散Pythonジョブをサーバレスのオートスケールインフラで実行する
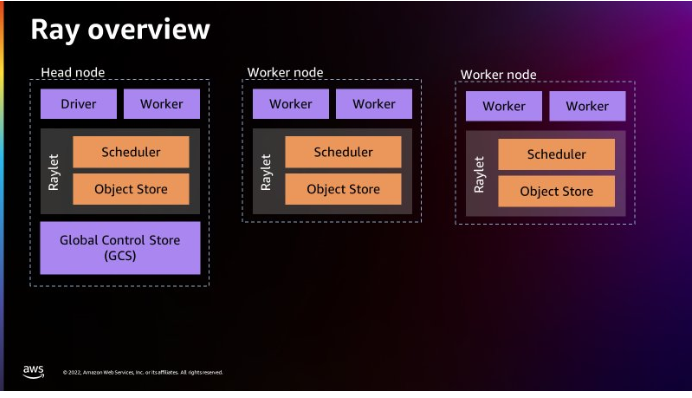
- Glue for Rayクラスタは、1つのヘッドノードと1つ以上のワーカーノードで構成される。
- ヘッドノード
- クラスタ管理用のシングルトンプロセスとRayドライバプロセスを実行することを除き、他のワーカーノードと同じ
- ドライバーはRayジョブを開始する最上位アプリケーションをPythonで実行するヘッドノードの特別なワーカープロセス
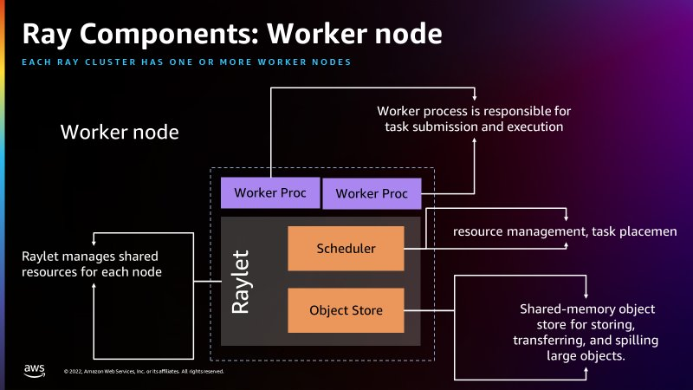
- ワーカーノード
- タスクの送信と実行を担当するプロセス
-
以下は、Rayのアーキテクチャ。(出典:Introducing AWS Glue for Ray: Scaling your data integration workloads using Python)

- 全ノード
- Rayletプロセスがローンチされている。他のノードとのスケジュールを担っているようだ。
- Workerプロセスがローンチされている
- Head node
- Driverプロセスが存在する。これはHead Nodeだけ
- 個別の各マシンをノードとして扱う。
- Global Control Storeが存在する
- 全ノード
- Rayletはノード毎の共有リソースを管理する
- RayletのSchedulerにはリソース管理と、タスク配置を行う。
- Object Storeは、largeオブジェクトを格納・転送するための共有オブジェクトストア
- Workerプロセスは、タスクの実行と送信に責任を持つ
AWS Glue for Ray
- 他のAWSサービスへのシームレスな分散統合のため、Ray Core、Ray Dataset、Modin(分散pandas)、AWS SDK for pandas(Modin上)に含まれている
- Ray Core
- Rayの基盤。Pythonの関数とクラスを配布するための基本的なフレームワーク
- Ray Dataset
- Apache Arrowに基づく分散フレームワーク
- Modin
- Pandasアプリケーションを変更せずにRayクラスター全体に配布するように設計されたライブラリ
- Rayデータセットと互換性がある
- AWS SDK for pandas
- Modin上にある抽象化レイヤー
- S3、Redshift、DyanmoDB、OpenSearchなどの多くのソースからpandasデータフレームを作成できるようにする。
Why use AWS Glue for Ray?
- 使い慣れたスキル、パラダイム、フレームワーク、ライブラリをGlueに導入し、最小限のコード変更で大規模なデータセットを処理できるようにスケーリングできる
- マルチノードクラスタでPythonスクリプトを分散実行できる
- 以下の目的で設計されている
- タスクの並列アプリケーション
- Pythonワークロードの高速化
- 何百ものデータソースでワークロードを実行
- データのML取り込みと並列バッチ推論
実践
- Amazonカスタマーレビューのデータセットを使用して、Parquetファイル形式でS3に書き戻す。
Configure Amazon S3
- バケットを作成します。
Set up a Jupyter notebook with an AWS Glue interactive session
- Jupyterノートブックを起動してコードを実行する
Run your code using Ray in a Jupyter notebook
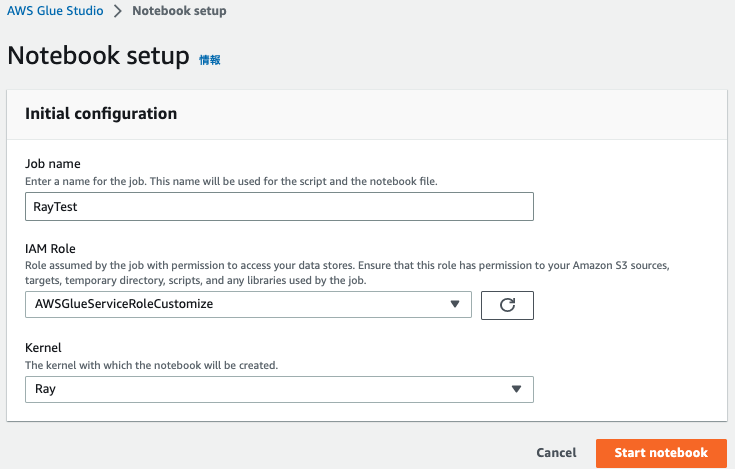
-
以下を入力してCreateをクリックする
-
以下を入力しRayエンジンとして実行&ライブラリを読み込む。
%glue_ray import ray import pandas import pyarrow from ray import data import time from ray.data import ActorPoolStrategy -
Rayクラスタを初期化する
ray.init('auto') -
Amazonカスタマレビューのデータセットを読み込む
start = time.time() ds = ray.data.read_parquet("s3://amazon-reviews-pds/parquet/product_category=Wireless/") end = time.time() print(f"Reading the data to dataframe: {end - start} seconds") -
カウントする。(このあたりはSparkのDataFrameと同じような使い勝手)
ds.count() -
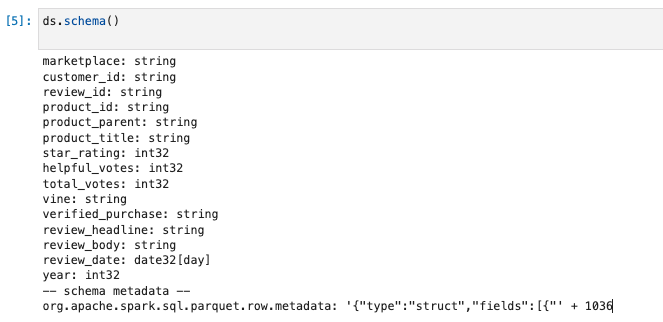
スキーマを確認する。(このあたりはSparkのDataFrameと同じような使い勝手)
ds.schema() -
データセットの合計サイズを確認する。
ds.size_bytes() -
サンプルレコードを確認する。
start = time.time()
ds.show(1)
end = time.time()
print(f"Time taken to show the data from dataframe : {end - start} seconds")
Applying dataset transformations with Ray
- 変換する。
-
新しい列を追加し、変換を掛けている。最後にデータを表示。
start = time.time() ds = ds.add_column( "helpful_votes_ratio", lambda df: df["helpful_votes"] / df["total_votes"]) end = time.time() print(f"Time taken to Add a new columns : {end - start} seconds") ds.show(1) -
「total_votes」カラムでソートを実行。
start = time.time() ds =ds.sort("total_votes") end = time.time() print(f"Time taken for sort operation : {end - start} seconds") ds.show(3) -
Python UDF関数を作成する。(投票票数が100未満の製品を見つける。)
# UDF as a function on pandas DataFrame - To Find products with total_votes < 100
def low_rated_products(df: pandas.DataFrame) -> pandas.DataFrame:
    return df[(df["total_votes"] < 100)]

#Calculate the number of products which are rated low in terms of low votes i.e. less than 100
# This technique is called Batch inference processing with Ray tasks (the default compute strategy).
ds = ds.map_batches(low_rated_products)

#See sample records for the products which are rated low in terms of low votes i.e. less than 100
ds.show(1)
#Count total number of products which are rated low ds.count()- 件数が減っている事がわかる。(9,038,249 → 9,030,017)
-
データ処理により多くのリソースを必要とする複雑な変換がある場合は、適用可能な変換で追加の構成を使用して Ray アクターを利用する。
# Batch inference processing with Ray actors. Autoscale the actors between 2 and 4. class LowRatedProducts: def __init__(self): self._model = low_rated_products def __call__(self, batch: pandas.DataFrame) -> pandas.DataFrame: return self._model(batch) start = time.time() predicted = ds.map_batches( LowRatedProducts, compute=ActorPoolStrategy(2, 4), batch_size=4) end = time.time() -
最終的な結果の Ray データセットを書き込む前に、map_batches() 変換を適用して、特定の製品に対する総投票数が 0 より大きく、レビューが「米国」マーケットプレイスのみに属するカスタマーレビューデータのみとしています。
# Filter our records with total_votes == 0 ds = ds.map_batches(lambda df: df[df["total_votes"] > 0]) # Filter and select records with marketplace equals US only ds = ds.map_batches(lambda df: df[df["marketplace"] == 'US']) ds.count() -
書き込みます。
ds.write_parquet("s3://{バケット名}/manta/Output/Raydemo/")
考察
PySparkと似ていると感じましたが、Rayのほうが書きやすいと感じました。あとは、Sparkとどちらが速いか気になったので速度の比較をしてみたいと思います。
参考


