背景・目的
Spring Bootでデータを保存する-その1では、H2データベースを使用して、データの登録を試しました。
今回は、保存されたデータの更新や削除を試します。
実践
Spring Boot 3 プログラミング入門の内容を参考に試してみます
前提
環境構築やコードは、上記のページの状態から始めます
データの初期化
- コントローラークラスに下記を追記します
@PostConstruct public void init() { Person p1 = new Person(); p1.setFirstName("Ichiro"); p1.setLastName("Suzuki"); repository.saveAndFlush(p1); Person p2 = new Person(); p2.setFirstName("Taro"); p2.setLastName("Yamada"); repository.saveAndFlush(p2); Person p3 = new Person(); p3.setFirstName("Hanako"); p3.setLastName("Yamada"); repository.saveAndFlush(p3); }-
@PostConstruct- コンストラクタ
- インスタンスが生成された後に、最初に一度だけ呼び出される
-
- ビルドと実行します
$ mvn package $ java -jar target/rest-db-0.0.1-SNAPSHOT.jar - localhost:8080で、初期登録されているかを確認します。

更新処理の追加
テンプレートの追加
-
templates配下にedit.htmlを用意します
-
下記のコードを追加します
<!DOCTYPE html> <html> <head> <title>top page</title> <meta http-equiv="Content-Type" content="text/html; charset=UTF-8"> <link rel="stylesheet" href="https://cdn.jsdelivr.net/npm/bootstrap@5.0.2/dist/css/bootstrap.min.css"> </head> <body class="container"> <h1 class="display-4 mb-4" th:text="${title}"></h1> <p th:text="${message}"></p> <form method="post" action="/edit" th:object="${formModel}"> <input type="hidden" name="id" th:value="*{id}" /> <div class="mb-3"> <label for="name" class="form-label">FirstName</label> <input type="text" class="form-control" name="firstName" th:value="*{firstName}" /> </div> <div class="mb-3"> <label for="name" class="form-label"></label>LastName</label> <input type="text" class="form-control" name="lastName" th:value="*{lastName}" /> </div> <div class="mb-3"> <input type="submit" class="btn btn-primary" value="Create" /> </div> </form> <table class="table"> <thread> <tr> <th>firstName</th> <th>lastName</th> </tr> </thread> <tbody> <tr th:each="person : ${people}"> <td th:text="${person.firstName}"></td> <td th:text="${person.lastName}"></td> </tr> </tbody> </table> </body> </html> -
以前作成していたindex.htmlの変更点は下記のとおりです
- actionを
/editに変更 - hiddenを追加
$ diff ./src/main/resources/templates/index.html ./src/main/resources/templates/edit.html 11c11,13 < <form method="post" action="/" th:object="${formModel}"> --- > > <form method="post" action="/edit" th:object="${formModel}"> > <input type="hidden" name="id" th:value="*{id}" /> $ - actionを
Repositoryにメソッドを追加
IDでエンティティを検索し、取り出す処理の追加
- PersonRepositoryにメソッドを追加します
public Optional<Person> findById (Long id);- Optional
- Nullかもしれないオブジェクトをラップするクラス
- findByIdにより、Personオブジェクトを取得するが、見つからない可能性があり、その場合はNullとなる
- 見つからない場合は、必ずOptionalインスタンスが返される
- Optional
リクエストハンドラの作成
edit用のリクエストハンドラを作成します。
- GETアクセス用に、editメソッド
- POSTアクセス用に、updateメソッド
- WebControllerクラスに下記のメソッドを追加します
@RequestMapping(value = "/edit/{id}", method=RequestMethod.GET) public ModelAndView edit(@ModelAttribute Person person ,@PathVariable int id,ModelAndView mav) { mav.setViewName("edit"); mav.addObject("title","edit page"); Optional<Person> data = repository.findById((long)id); mav.addObject("formModel", data.get()); return mav; } @RequestMapping(value = "/edit", method=RequestMethod.POST) @Transactional public ModelAndView update(@ModelAttribute Person person, ModelAndView mav) { repository.saveAndFlush(person); return new ModelAndView("redirect:/"); } - ビルドとSpring Bootを実行します
$ mvn package
$ java -jar target/rest-db-0.0.1-SNAPSHOT.jar
動作確認
-
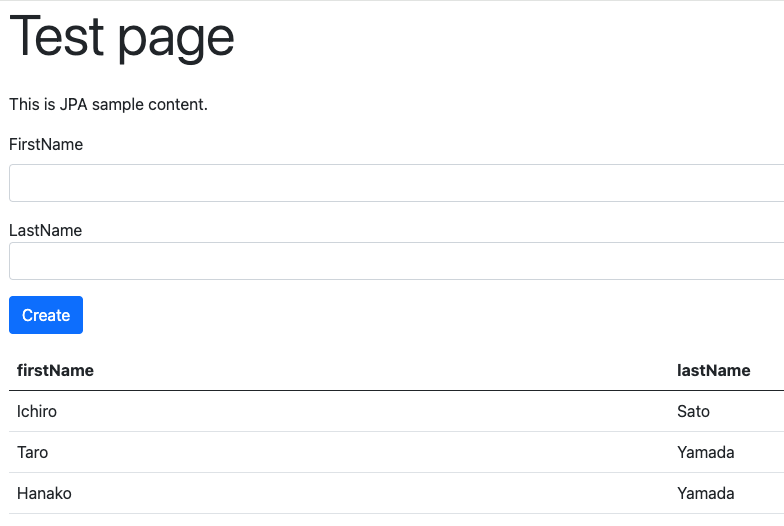
localhost:8080にアクセス。上記の通り、初期値が登録されている

-
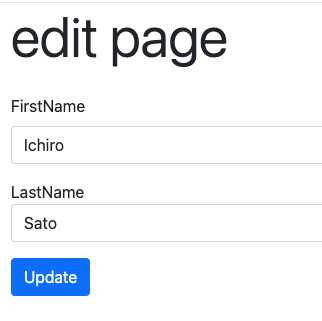
localost:8080/edit/1にアクセスすると、登録されているIchiro Suzukiが表示されます

-
LastNameをSuzuki→Satoに変更し、Updateをクリックします
-
登録されました
削除処理の追加
テンプレートの作成
-
delete.htmlを追加します
-
下記のコードを追加します
<!DOCTYPE html>
<html>
<head>
    <title>top page</title>
    <meta http-equiv="Content-Type" content="text/html; charset=UTF-8">
    <link rel="stylesheet" href="https://cdn.jsdelivr.net/npm/bootstrap@5.0.2/dist/css/bootstrap.min.css">
</head>
<body class="container">
  <h1 class="display-4 mb-4" th:text="${title}"></h1>
  <p th:text="${message}"></p>

  <form method="post" action="/delete" th:object="${formModel}">
    <input type="hidden" name="id" th:value="*{id}" />
    <div class="mb-3">
      <label for="name" class="form-label">FirstName</label>
      <input type="text" class="form-control" name="firstName" th:value="*{firstName}" />
    </div>
    <div class="mb-3">
      <label for="name" class="form-label"></label>LastName</label>
      <input type="text" class="form-control" name="lastName" th:value="*{lastName}" />
    </div>
    <input type="submit" class="btn btn-primary" value="Delete" />
  </form>
</body>
</html>
リクエストハンドラの作成
- 下記のメソッドを追加します
@RequestMapping(value = "/delete/{id}", method=RequestMethod.GET) public ModelAndView delete(@PathVariable int id, ModelAndView mav) { mav.setViewName("delete"); mav.addObject("title", "Delete Page"); mav.addObject("message", "Are you sure you want to delete it?"); Optional<Person> data = repository.findById((long)id); mav.addObject("formModel", data.get()); return mav; } @RequestMapping(value = "/delete", method=RequestMethod.POST) @Transactional public ModelAndView remove(@RequestParam long id, ModelAndView mav) { repository.deleteById(id); return new ModelAndView("redirect:/"); } - ビルドとSpring Bootを起動します
$ mvn package
$ java -jar target/rest-db-0.0.1-SNAPSHOT.jar
動作確認
-
localhost:8080にアクセス。上記の通り、初期値が登録されている

-
localhost:8080/delete/1にアクセスします
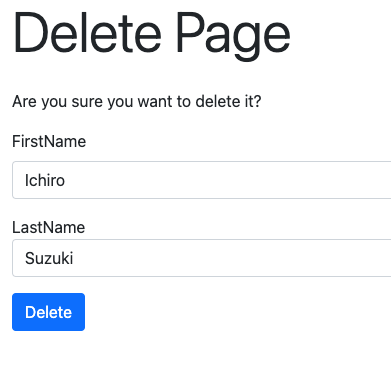
-
Deleteをクリックします。消えたようです

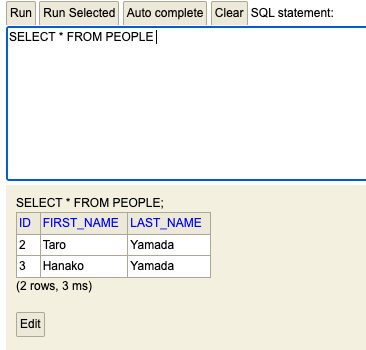
-
H2コンソールでも確認します。確かに消えています
考察
今回は、更新と削除をSpring Boot JPAを使用して試してみました。引き続き理解を深めたいと思います。
参考