0. Introduction
This document explains the integration of TinyViewPlus with RotorHazard. If everything works as expected, connecting FPVTrackside should be straightforward since it only requires linking with RotorHazard.
While the practical operation of this setup is still uncertain, I hope you find this experiment useful.
1. TinyViewPlus
TinyViewPlus is a software that measures lap times by recognizing arUco markers placed on the track. It is available under the MIT license and runs on both Windows and Mac, making it widely used in indoor Whoop racing events in Japan.
For single races, it offers all the necessary features, but for large-scale events, it may lack some functionalities. Therefore, TinyViewPlus supports OSC (Open Sound Control), allowing it to send and receive information such as pilot names and lap times with other race management software.
When organizing major races, event hosts often develop custom race management software tailored to their unique race formats.
2. FPVTrackside
FPVTrackside functions more as race management software rather than a timing system. It integrates with various timing systems, including ImmersionRC LAP RF, RotorHazard, and Chorus. (It does not directly connect with TinyViewPlus, which is the primary goal of this integration.) Some notable features of FPVTrackside include:
- Support for various race formats – It has evolved by incorporating numerous user-requested features.
- Pilot registration and race heat management – Unlike TinyViewPlus, which only handles individual races, FPVTrackside enables full-scale event management, including qualifying rounds and finals.
- Video recording capabilities – This allows monitoring VTX feeds of each pilot during the race and reviewing footage afterward for verification.
- Lap-time correction during playback – This enables adjustments while reviewing recorded footage post-race.
- UI customization – Users can modify FPVTrackside themes to create a personalized interface.
- WebSocket integration with OBS – Allows streaming and overlay functionality.
However, for users accustomed to TinyViewPlus, there are some challenges:
- US keyboard layout – Some special characters may be entered incorrectly.
- Japanese input issues – Text needs to be entered in an external editor and pasted into FPVTrackside.
- Limited customization of audio output
- Unclear race-start settings – The “3, 2, 1 START!” configuration can be difficult to adjust.
3. Main Objective
If you want to manage races using FPVTrackside, you must use IRC LAP RF or RotorHazard as the timing system. These systems rely on RSSI values from VTX signals to detect gate passage.
However, the goal is to keep using arUco markers for lap measurement while taking advantage of FPVTrackside.
Thus, the proposed solution is to remove the RX5808 module from RotorHazard and instead inject a simulated RSSI signal where RX5808 typically outputs RSSI.
Advantages of this method:
- The simulated RSSI signal (approximately 0–1.1V) is simple to generate, meaning updates or specification changes in FPVTrackside or RotorHazard will not affect the setup.
Drawbacks:
- This method introduces some inefficiencies in both software and hardware.
4. Expected Outcome
Once implemented, the system will simulate receiving a single video feed through three different receivers, making it appear as though three pilots are racing.
Ideally, all three feeds should produce identical lap times, but in reality, minor discrepancies occur due to variations in image flickering and brightness.
Here's a demonstration video showcasing the concept:

5. Required Components
- First Windows PC (Runs TinyViewPlus & RotorHazard)
- Second Windows PC (Runs FPVTrackside)
- VTX receivers (UVC-compatible; Three units needed for a three-pilot race, e.g., Eachine ROTG, SKYDROID, FUAV)
-
HDMI to UVC Converter (Captures video output from the first PC for use in FPVTrackside)
Amazon Link -
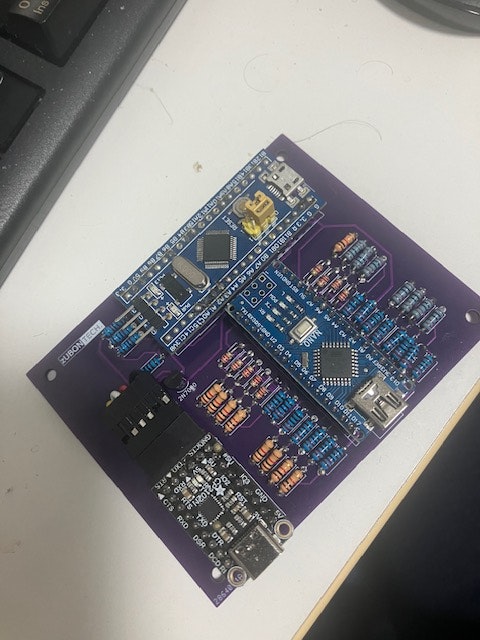
Custom Circuit Board
- Circuit Diagram
-
JLCPCB Manufacturing Files
Currently being ordered—updates will follow after validation.
Required Components:
- 2KΩ resistors (24 units, 2.2KΩ may be used as an alternative)
- 1KΩ resistors (17 units)
- 10KΩ resistors (7 units)
-
Arduino Nano (Preferably ATmega328P-based standard Nano)
Firmware -
STM32C8T6-based Bluepill + STLINKV2 (C6T6 version lacks sufficient memory)
Firmware
STM32CubeProgrammer - Pin headers/sockets (For easy module replacement)
-
USB-to-serial converter
Adafruit CP2102N Friend is recommended, but alternatives like Pololu and SwitchScience might also work. - 2N7000 (N-channel MOSFET)
Final assembly example:
6. Software Installation (TinyViewPlus As Sensors / TVPAS)
- Download TinyViewPlusAsSensors.zip from here and extract it.
- Run
TinyViewPlusAsSensors.exefrom thebinfolder. - If execution fails, install Microsoft Visual C++ Redistributable and retry.
- Check the COM port for Arduino Nano and update
settings.xmlin thedatafolder.
This version is formatted in Markdown for easy readability and compatibility. Let me know if you need any adjustments!