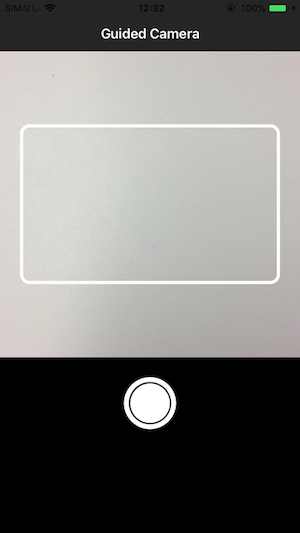
Theres can be some user experience with guided camera which means taking photo with specific
area using AVFoundation. iOS 11 bring cool features, you might want to test or try awesome camera application.
Setting up guided preview and camera.
Step 1:
Import AVFoundation framework.
import AVFoundation
Step 2:
Create instance variables which to access anywhere in the ViewController for capture activity, capture output and core animation layer that can display video as it is being captured.
var croppedImageView = UIImageView()
var cropImageRect = CGRect()
var cropImageRectCorner = UIRectCorner()

var captureSession: AVCaptureSession!
var stillImageOutput: AVCapturePhotoOutput!
var videoPreviewLayer: AVCaptureVideoPreviewLayer!
Step 3:
Initialize AVCaptureSession variable and customize the quality level or bitrate of the output to sessionPreset. In my example, set AVCaptureSessionPresetHigh value for high quality video and audio output and there can be different on requirements.
captureSession = AVCaptureSession()
captureSession.sessionPreset = .high
Step 4:
Add input device(AVCaptureDevice) for capture sessions. This will serve as a middle man to attach our input device to capture device. This method can be write within viewDidAppear.
    override func viewDidAppear(_ animated: Bool) {
        super.viewDidAppear(animated)

        captureSession = AVCaptureSession()
        captureSession.sessionPreset = .high
        guard let backCamera = AVCaptureDevice.default(for: AVMediaType.video)
            else {
                print("Unable to access back camera")
                return
        }
        do {
            let input = try AVCaptureDeviceInput(device: backCamera)
            stillImageOutput = AVCapturePhotoOutput()
            stillImageOutput.isHighResolutionCaptureEnabled = true

            if captureSession.canAddInput(input) && captureSession.canAddOutput(stillImageOutput) {
                captureSession.addInput(input)
                captureSession.addOutput(stillImageOutput)
                setupCameraPreview()
            }
        }
        catch let error  {
            print("Error Unable to initialize back camera:  \(error.localizedDescription)")
        }
    }
Step 5:
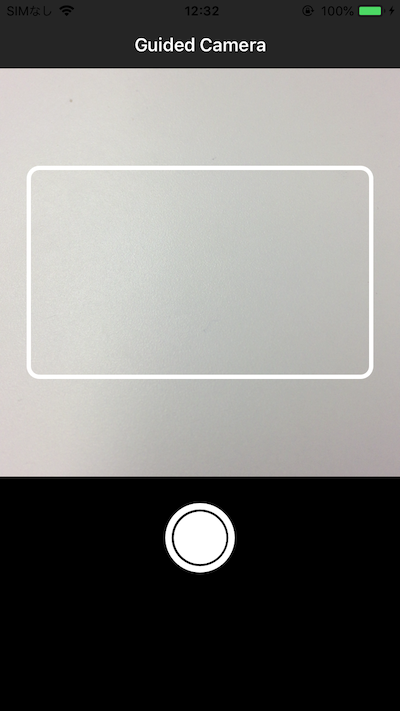
To show guided area inside video preview layer like this one.
Create image set inside Assets.xcassets like following image.
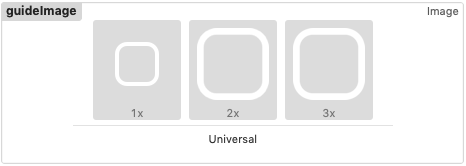
stretch guide line image to full fill with screen and rounded all corners.
        let resizableImage = (UIImage(named: "guideImage")?.resizableImage(withCapInsets: edgeInsets, resizingMode: .stretch))!
        let imageSize = CGSize(width: previewView.frame.size.width-50, height: 200)
        cropImageRectCorner = [.allCorners]
this is a complete part of setupGuideLineArea method.
    func setupGuideLineArea() -> UIImageView {

        let edgeInsets:UIEdgeInsets = UIEdgeInsets.init(top: 22, left: 22, bottom: 22, right: 22)

        let resizableImage = (UIImage(named: "guideImage")?.resizableImage(withCapInsets: edgeInsets, resizingMode: .stretch))!
        let imageSize = CGSize(width: previewView.frame.size.width-50, height: 200)
        cropImageRectCorner = [.allCorners]

        let imageView = UIImageView(image: resizableImage)
        imageView.frame.size = imageSize
        imageView.center = CGPoint(x: previewView.bounds.midX, y: previewView.bounds.midY);
        return imageView
    }
After creating guide line area image view and next step is to create video preview layer(AVCaptureVideoPreviewLayer) and add guide line area image as subview to video preview layer.
And then, finally we can start capture session using following code for video capturing
with guided preview.
        DispatchQueue.global(qos: .userInitiated).async {
            self.captureSession.startRunning()
            DispatchQueue.main.async {
                self.videoPreviewLayer.frame = self.previewView.bounds
            }
        }
This is the complete part setupCameraPreview method.
    func setupCameraPreview() {

        let imageView = setupGuideLineArea()
        videoPreviewLayer = AVCaptureVideoPreviewLayer(session: captureSession)
        videoPreviewLayer.videoGravity = .resizeAspectFill
        videoPreviewLayer.connection?.videoOrientation = .portrait
        previewView.layer.addSublayer(videoPreviewLayer)
        previewView.addSubview(imageView)
        cropImageRect = imageView.frame

        DispatchQueue.global(qos: .userInitiated).async {
            self.captureSession.startRunning()
            DispatchQueue.main.async {
                self.videoPreviewLayer.frame = self.previewView.bounds
            }
        }
    }
Let`s take picture and save.
Step 1:
Create image set for camera button inside Assets.xcassets like following image.
Configure photo setting instance variable(AVCapturePhotoSettings).
 var photoSettings: AVCapturePhotoSettings

        photoSettings = AVCapturePhotoSettings.init(format: [AVVideoCodecKey: AVVideoCodecType.jpeg])
        photoSettings.isAutoStillImageStabilizationEnabled = true
        photoSettings.flashMode = .auto
And then, use AVCapturePhotoCaptureDelegate method.
stillImageOutput.capturePhoto(with: photoSettings, delegate: self)
Combine photo capturing process and add it to IBAction function.
    @IBAction func actionCameraCapture(_ sender: AnyObject) {

        // Istance of AVCapturePhotoSettings class
        var photoSettings: AVCapturePhotoSettings

        photoSettings = AVCapturePhotoSettings.init(format: [AVVideoCodecKey: AVVideoCodecType.jpeg])
        photoSettings.isAutoStillImageStabilizationEnabled = true
        photoSettings.flashMode = .auto

        // AVCapturePhotoCaptureDelegate
        stillImageOutput.capturePhoto(with: photoSettings, delegate: self)
    }
Step 2:
Then, let's create last delegate method (didFinishProcessingPhoto)to retrieve captured image from camera.
func photoOutput(_ output: AVCapturePhotoOutput, didFinishProcessingPhoto photo: AVCapturePhoto, error: Error?) {

        guard error == nil else {
            print("Fail to capture photo: \(String(describing: error))")
            return
        }

        // Check if the pixel buffer could be converted to image data
        guard let imageData = photo.fileDataRepresentation() else {
            print("Fail to convert pixel buffer")
            return
        }

        let orgImage : UIImage = UIImage(data: imageData)!
        capturedImageView.image = orgImage
        let originalSize: CGSize
        let visibleLayerFrame = cropImageRect

        // Calculate the fractional size that is shown in the preview
        let metaRect = (videoPreviewLayer?.metadataOutputRectConverted(fromLayerRect: visibleLayerFrame )) ?? CGRect.zero

        if (orgImage.imageOrientation == UIImageOrientation.left || orgImage.imageOrientation == UIImageOrientation.right) {
            originalSize = CGSize(width: orgImage.size.height, height: orgImage.size.width)
        } else {
            originalSize = orgImage.size
        }
        let cropRect: CGRect = CGRect(x: metaRect.origin.x * originalSize.width, y: metaRect.origin.y * originalSize.height, width: metaRect.size.width * originalSize.width, height: metaRect.size.height * originalSize.height).integral

        if let finalCgImage = orgImage.cgImage?.cropping(to: cropRect) {
            let image = UIImage(cgImage: finalCgImage, scale: 1.0, orientation: orgImage.imageOrientation)
            previewViewLayerMode(image: image, isCameraMode: false)
        }
    }
Optionally, it is one more thing which is to create image view to appear after taking picture.
    func previewViewLayerMode(image: UIImage?, isCameraMode: Bool) {
        if isCameraMode {
            self.captureSession.startRunning()

            cameraActionView.isHidden = false
            choosePhotoActionView.isHidden = true

            previewView.isHidden = false
            capturedImageView.isHidden = true
        } else {
            self.captureSession.stopRunning()
            cameraActionView.isHidden = true
            choosePhotoActionView.isHidden = false

            previewView.isHidden = true
            capturedImageView.isHidden = false

            // Original image to blureffect
            let blurEffect = UIBlurEffect(style: .light)
            let blurView = UIVisualEffectView(effect: blurEffect)
            blurView.frame = capturedImageView.bounds
            capturedImageView.addSubview(blurView)

            // Crop guide Image
            croppedImageView = UIImageView(image: image!)
            croppedImageView.center = CGPoint(x:capturedImageView.frame.width/2, y:capturedImageView.frame.height/2)
            croppedImageView.frame = cropImageRect
            croppedImageView.roundCorners(cropImageRectCorner, radius: 10)
            capturedImageView.addSubview(croppedImageView)
        }
    }
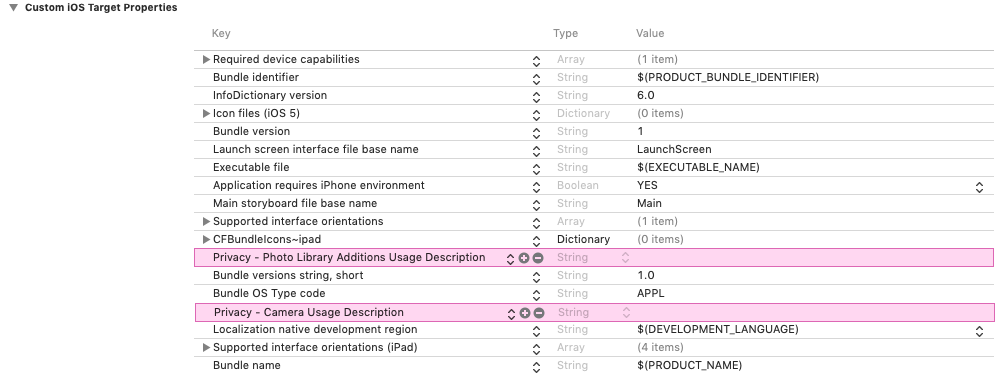
Step 3:
Before running from Xcode, It is necessary to add privacy permission to info.plist.
When you take picture, the result is...ooh !!!

This is Github repo