概要
- Vue.jsとFirebaseを使って簡単なWebアプリを作るやり方の備忘録です。
完成したもの
- このチュートリアルで作成し、デプロイしたWebアプリのリンクです。(2つとも中身は同じです)
https://vue-firebase-example-5340b.web.app/
https://vue-firebase-example-5340b.firebaseapp.com/
- ソースコードはここです。
https://github.com/zono345/vue-firebase-example
環境
Windows11
Node.js: 16.14.2
Vue CLI: 5.0.8
firebase-tools: 11.16.0
Visual Studio Code: 1.73.1
前提条件
Vue CLIのインストール
- Vue CLIをインストールします
- 【補足説明】
-
公式ドキュメントによると、新しいプロジェクトはVue CLIではなく、Viteの
npm init vue@latestで開始するのが推奨されています。 - 今回はVue CLIを使う方法を紹介します。
- Vue.js 3 - 基本的な使い方 - インストール も参照のこと。
-
公式ドキュメントによると、新しいプロジェクトはVue CLIではなく、Viteの
npm install -g @vue/cli
Vue.jsのプロジェクト作成
- プロジェクトファイルを作成したいフォルダに移動
cd C:\Users\hogetaro\VisualStudioCodeProjects
- 今回は簡単なアプリなので、シンプルな機能のみにするので、以下の方針です。
- バージョン > Vue3
- vue-router追加
-
vue createでプロジェクトを作成開始します。
vue create project-name
-
? Please pick a preset>Manually select features-
vue-routerを追加したいので、Manually select featuresを選択します。 - ちなみに
Defaultで作成して後からnpm install vue-routerで追加も可能です。
-
Vue CLI v5.0.8
? Please pick a preset: (Use arrow keys)
> Default ([Vue 3] babel, eslint)
  Default ([Vue 2] babel, eslint)
  Manually select features
-
? Check the features needed for your project>Babel&Router&Linter / Formatter-
Babel(JavaScriptのコードを古いブラウザ対応に対応するための置換ツール)とLinter / Formatter(コード整形ツール)がデフォルト選択されていますので、その2つはとりあえずは選択のままでOK。 -
Routerを選択し、Enter。
-
? Check the features needed for your project: (Press <space> to select, <a> to toggle all, <i> to invert selection, and <enter> to proceed)
>(*) Babel
 ( ) TypeScript
 ( ) Progressive Web App (PWA) Support
 ( ) Router
 ( ) Vuex
 ( ) CSS Pre-processors
 (*) Linter / Formatter
 ( ) Unit Testing
 ( ) E2E Testing
-
? Choose a version of Vue.js that you want to start the project with>3.x- vueのバージョンは
3.xを選択。 - 特に理由がない場合は、新規プロジェクトは
3.xで開始を推奨します。
- vueのバージョンは
? Choose a version of Vue.js that you want to start the project with (Use arrow keys)
> 3.x
  2.x
-
Use history mode for router?>Y- routerの
history modeを使うかを選択。 - 今回はYesを選択。
- Vue Router- history modeの公式ドキュメントも参照のこと。
- routerの
? Use history mode for router? (Requires proper server setup for index fallback in production) (Y/n)
-
? Pick a linter / formatter config>ESLint with error prevention only-
linter / formatterの種類を選択する。 - 今回はエラー防止のみでOKなので、
ESLint with error prevention onlyを選択します。
-
? Pick a linter / formatter config: (Use arrow keys)
> ESLint with error prevention only
  ESLint + Airbnb config
  ESLint + Standard config
  ESLint + Prettier
-
? Pick additional lint features>Lint on save- Lintの設定を選択
- 今回は、ファイル保存時にLintを実行すればいいので、
Lint on saveを選択します。
? Pick additional lint features: (Press <space> to select, <a> to toggle all, <i> to invert selection, and <enter> to proceed)
>(*) Lint on save
 ( ) Lint and fix on commit
-
? Where do you prefer placing config for Babel, ESLint, etc.?>In dedicated config files- Babel、ESlintの設定ファイルの保存場所を選択する。
- 今回は、
In dedicated config filesを選択し、それぞれ専用のconfig fileを作ることにします。
? Where do you prefer placing config for Babel, ESLint, etc.? (Use arrow keys)
> In dedicated config files
  In package.json
-
? Save this as a preset for future projects?>N- 次回プロジェクトでも、入力した設定をpresetするかを選択します。
- 今回はNoを選択します。
? Save this as a preset for future projects? (y/N)
- vueプロジェクトの作成が開始されますので、しばらく待ちます。
Vue CLI v5.0.8
✨  Creating project in C:\Users\hogetaro\VisualStudioCodeProjects\vue-firebase-example.
🗃  Initializing git repository...
⚙️  Installing CLI plugins. This might take a while...
- 無事、プロジェクト作成に成功すると、
Successfully created project XXXXXが表示されます。
🎉  Successfully created project vue-firebase-example.
👉  Get started with the following commands:

 $ cd vue-firebase-example
 $ npm run serve

PS C:\Users\hogetaro\VisualStudioCodeProjects>
- コメントの記載に従って、プロジェクトフォルダへ移動します。
- このサンプルでは
cd vue-firebase-exampleです。
- このサンプルでは
cd XXXXX(project-name)
-
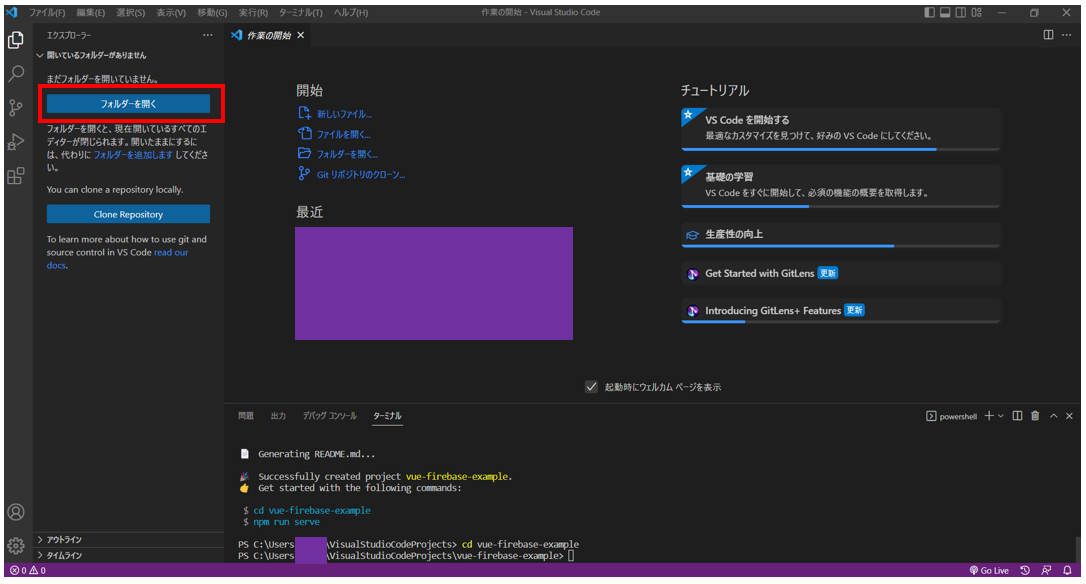
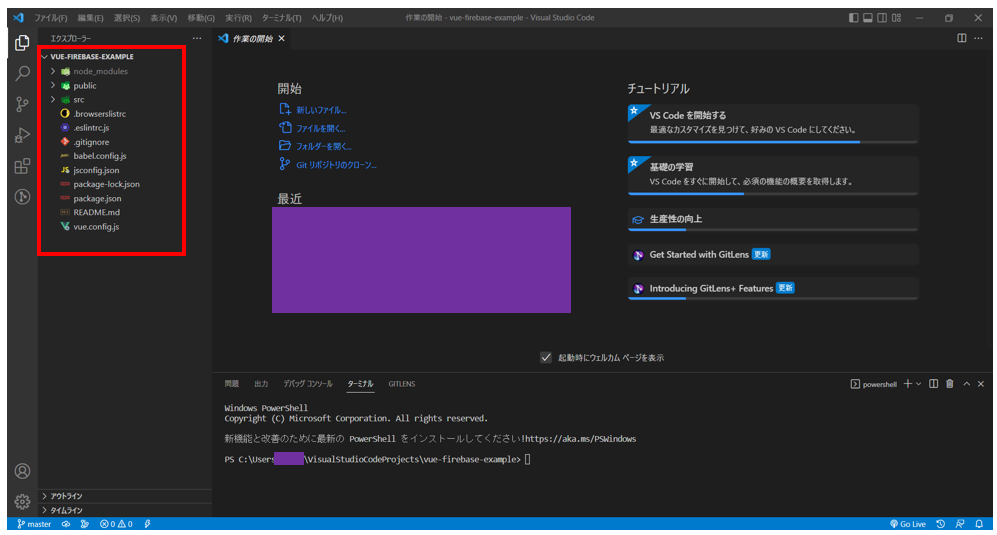
作成したプロジェクトフォルダをVSCodeで開きます。
-
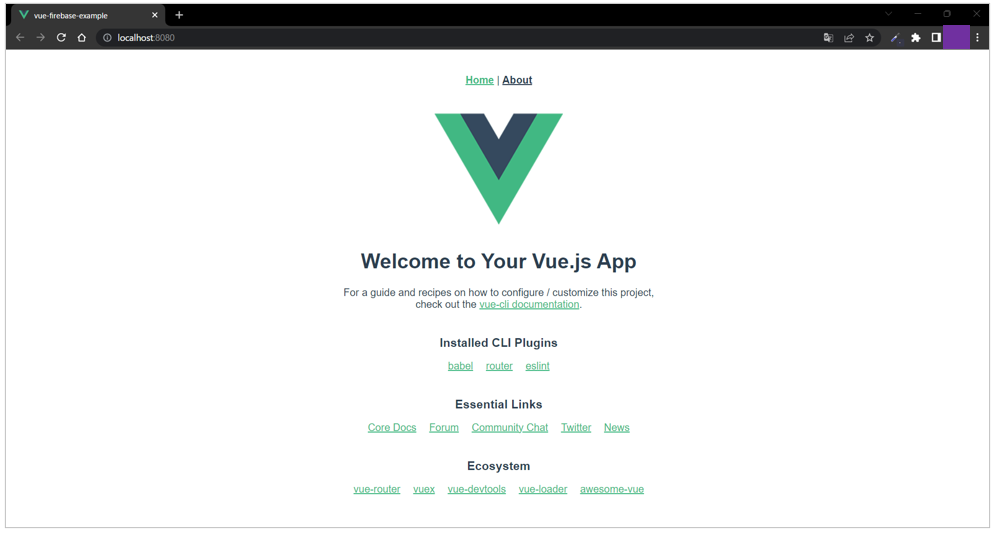
ここで、一旦作成したプロジェクトをローカル環境で開発サーバーの起動をして、ブラウザ画面の確認をします。(Vue CLI Serviceの公式ドキュメントも参照のこと。)
npm run serve
-
http://localhost:8080/を、Ctrl+クリックでブラウザ起動。
 DONE  Compiled successfully in 8239ms
  App running at:
  - Local:   http://localhost:8080/
  - Network: http://192.168.68.67:8080/

  Note that the development build is not optimized.
  To create a production build, run npm run build.
-
これで、Vueのデフォルトプロジェクトの作成が完了です。
-
ちなみに、
npm run serveで起動したローカル開発サーバーの停止方法は、ターミナル > Ctrl+C > 『バッチジョブを終了しますか (Y/N)』 > Yです。
バッチ ジョブを終了しますか (Y/N)?
Firebaseのプロジェクト作成
-
次にFirebaseのプロジェクトを作成します。
-
Firebase > 『コンソールへ移動』をクリック

-
プロジェクト名を入力 > 続行
-
Googleアナリティクスを有効にするかを選択 > 続行
-
Googleアナリティクスアカウントを選択 > プロジェクトを作成
-
プロジェクトを作成が開始されます。
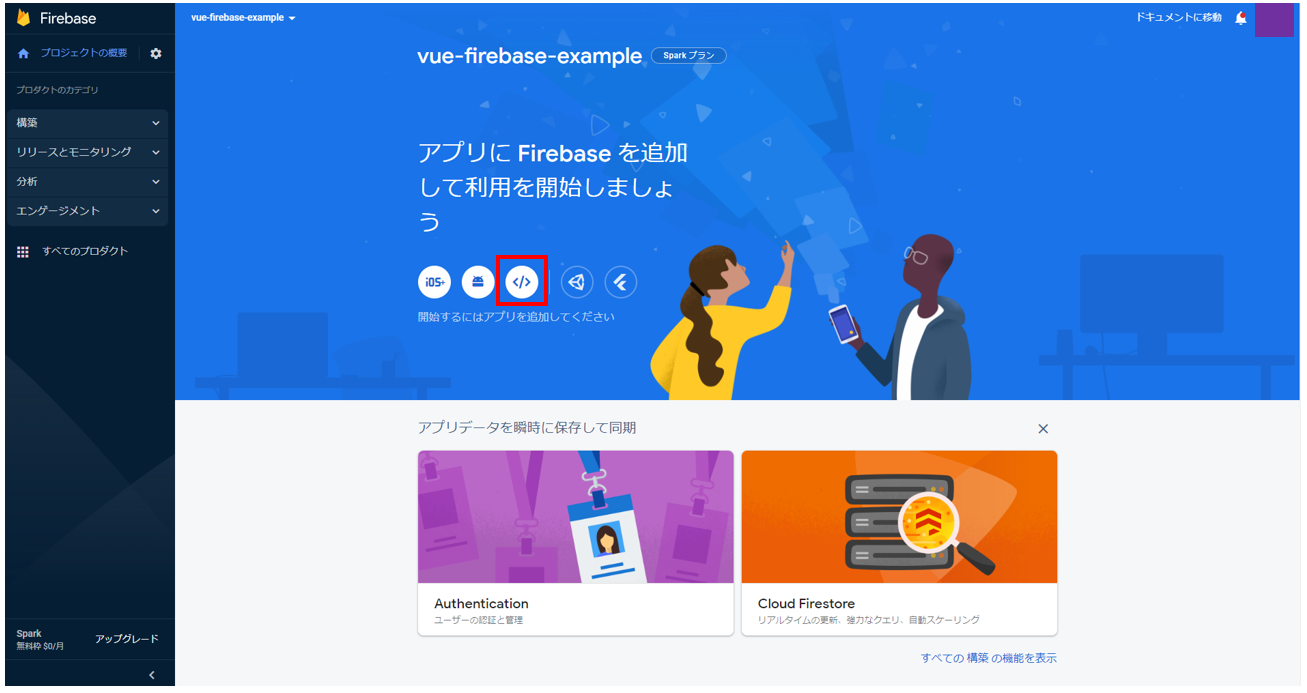
WebアプリにFirebaseを導入する
-
アプリのニックネームを入力。
- これはFirebaseコンソール上で見分けるためだけのニックネームなので、何でもOK
-
『このアプリの Firebase Hosting も設定します。』をチェックする。
- Hostingもまとめて設定するためです。
-
指示に従い、FirebaseのSDKをインストールします。
npm install firebase
- apiKeyなどは後で使うので、コピーしてメモ帳などに保存しておきます。
// Import the functions you need from the SDKs you need
import { initializeApp } from "firebase/app";
import { getAnalytics } from "firebase/analytics";
// TODO: Add SDKs for Firebase products that you want to use
// https://firebase.google.com/docs/web/setup#available-libraries

// Your web app's Firebase configuration
// For Firebase JS SDK v7.20.0 and later, measurementId is optional
const firebaseConfig = {
  apiKey: "XXXXXXXXXXXXXXXXXXXXXXXXXXXXXXXXXXX",
  authDomain: "vue-firebase-example.firebaseapp.com",
  projectId: "vue-firebase-example",
  storageBucket: "vue-firebase-example.appspot.com",
  messagingSenderId: "9999999999",
  appId: "1:9999999999:web:XXXXXXXXXXXXXXXXXXXXXX",
  measurementId: "XXXXXXXXXXXXXXXXXX"
};

// Initialize Firebase
const app = initializeApp(firebaseConfig);
const analytics = getAnalytics(app);
npm install -g firebase-tools
firebase login
- すでにログイン済みの場合は、
Already logged in as XXXXX@gmail.comとターミナルに表示されます。
PS C:\Users\hogetaro\VisualStudioCodeProjects\vue-firebase-example> firebase login
Already logged in as XXXXX@gmail.com
- プロジェクトを開始します。これはプロジェクトのルートディレクトリから実行することが必要です。
firebase init
-
Are you ready to proceed?>Y- Firebaseプロジェクトの初期化を進めていいか聞かれるので、Yを入力
     ######## #### ########  ######## ########     ###     ######  ########
     ##        ##  ##     ## ##       ##     ##  ##   ##  ##       ##
     ######    ##  ########  ######   ########  #########  ######  ######
     ##        ##  ##    ##  ##       ##     ## ##     ##       ## ##
     ##       #### ##     ## ######## ########  ##     ##  ######  ########

You're about to initialize a Firebase project in this directory:

  C:\Users\hogetaro\VisualStudioCodeProjects\vue-firebase-example

? Are you ready to proceed? (Y/n)
- このディレクトリでsetupしたい機能を聞かれるので、必要なものを選択します。
- 今回はHostingのみsetupしたいので、
Hosting: Configure files for Firebase Hosting and (optionally) set up GitHub Action deploysのみ選択します。
- 今回はHostingのみsetupしたいので、
? Which Firebase features do you want to set up for this directory? Press Space to select features, then Enter to confirm your choices. (Press <space> to select, <a> to toggle all, <i> to invert selection, and <enter> to proceed)
>( ) Realtime Database: Configure a security rules file for Realtime Database and (optionally) provision default instance
 ( ) Firestore: Configure security rules and indexes files for Firestore
 ( ) Functions: Configure a Cloud Functions directory and its files
 ( ) Hosting: Configure files for Firebase Hosting and (optionally) set up GitHub Action deploys
 ( ) Hosting: Set up GitHub Action deploys
 ( ) Storage: Configure a security rules file for Cloud Storage
 ( ) Emulators: Set up local emulators for Firebase products
(Move up and down to reveal more choices)
- このプロジェクトディレクトリ(=ローカルファイル)をどのFirebaseプロジェクトに関連付けるか聞かれるので、状況に応じて適切なものを選択します。
- 今回は、すでにFirebaseコンソールでFirebaseプロジェクトを作成済みなので、
Use an existing projectを選択します。
- 今回は、すでにFirebaseコンソールでFirebaseプロジェクトを作成済みなので、
=== Project Setup

First, let's associate this project directory with a Firebase project.
You can create multiple project aliases by running firebase use --add,
but for now we'll just set up a default project.

? Please select an option: (Use arrow keys)
> Use an existing project
  Create a new project
  Add Firebase to an existing Google Cloud Platform project
  Don't set up a default project
- ログイン済みのFirebaseアカウントに紐づいた、Firebaseプロジェクト一覧が表示されますので、先ほど作成したプロジェクトを選択します。
? Select a default Firebase project for this directory: (Use arrow keys)
> XXXXXXXX (XXXXXXXX)
  YYYYYYYY (YYYYYYYY)
  ZZZZZZZZ (ZZZZZZZZ)
  vue-firebase-example-5340b (vue-firebase-example)
- Hostingで公開するファイルのディレクトリを聞かれるので、必要に応じて設定します。
- この写真では文末(カッコ)内の
publicフォルダがHosting公開ディレクトリでいいか?と聞いています。 - Vueでは、
npm run buildすると作成されるファイルはdistに格納されるので、distに変更する必要があります。修正の方法は、(public)を(dist)などに上書き修正 > Enter 入力します。 - 今回は、一旦
publicのままで進めて、後でdistに修正するやり方を勉強します。なので、このままで、Enter入力します。
- この写真では文末(カッコ)内の
=== Hosting Setup

Your public directory is the folder (relative to your project directory) that
will contain Hosting assets to be uploaded with firebase deploy. If you
have a build process for your assets, use your build's output directory.

? What do you want to use as your public directory? (public)
- SinglePageAppかを聞かれるので、状況に応じて適切な方を選択。
- 今回はVueでSPAを作成するので、yesにします。
? Configure as a single-page app (rewrite all urls to /index.html)? (y/N)
- 自動ビルド&デプロイについて聞かれますが、今回は行わないので、Noを選択。
? Set up automatic builds and deploys with GitHub? (y/N)
- publicディレクトリの
index.htmlを上書きするか聞かれるので、Noを選択します。- ここでYesにすると、Firebase Hostingの初期画面に上書きされてしましますのでご注意ください。
? File public/index.html already exists. Overwrite? (y/N)
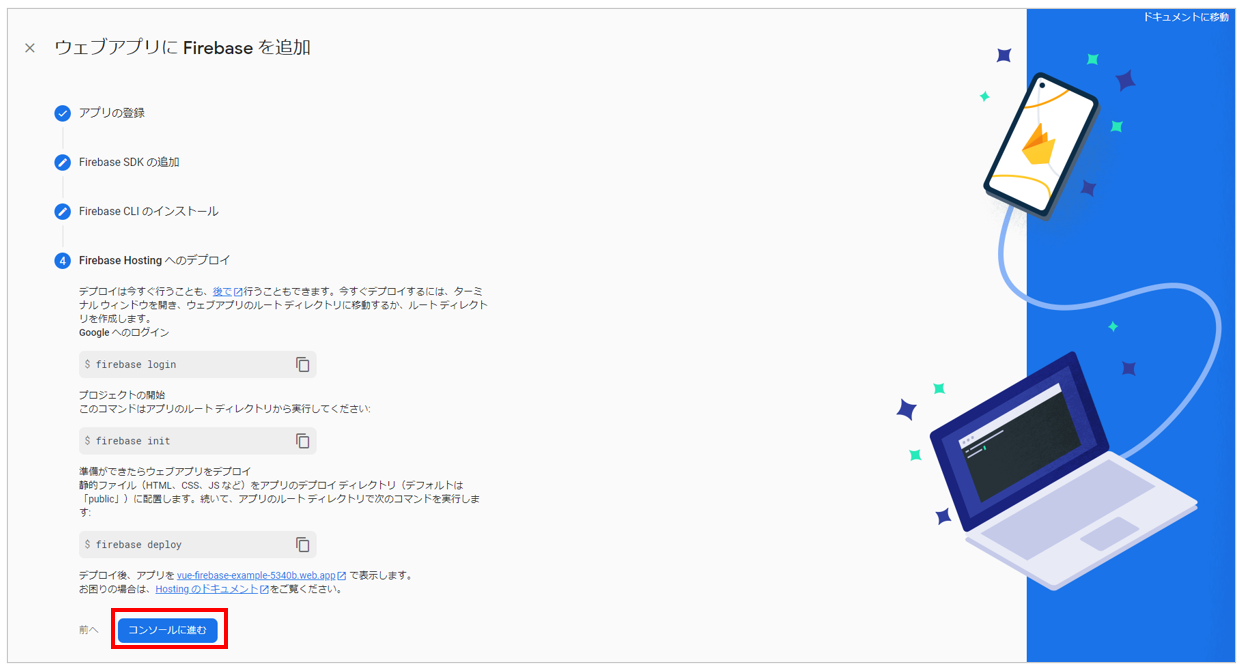
- 無事、Firebaseの初期化が完了しました。
i  Skipping write of public/index.html

i  Writing configuration info to firebase.json...
i  Writing project information to .firebaserc...

+  Firebase initialization complete!
- ここで、ブラウザへ戻り、『コンソールに進む』をクリックします。
一旦Hostingしてみる
- vue ファイルをbuildします。
npm run build
- buildが成功すると、以下のように表示されます。deploy用ファイルが、
distフォルダにbuildされましたことが分かります。
 DONE  Build complete. The dist directory is ready to be deployed.
 INFO  Check out deployment instructions at https://cli.vuejs.org/guide/deployment.html
- Firebase Hostingするディレクトリを
distに変更します。- やり方は、firebase.jsonの中身を修正すればOKです。
- "public": "public" -> "public": "dist" へ修正。
{
  "hosting": {
    "public": "dist",
    "ignore": [
      "firebase.json",
      "**/.*",
      "**/node_modules/**"
    ],
    "rewrites": [
      {
        "source": "**",
        "destination": "/index.html"
      }
    ]
  }
}
- 準備ができたので、Hostingします。ターミナルからコマンド入力します。
- 公式ドキュメントも参照のこと。
firebase deploy --only hosting
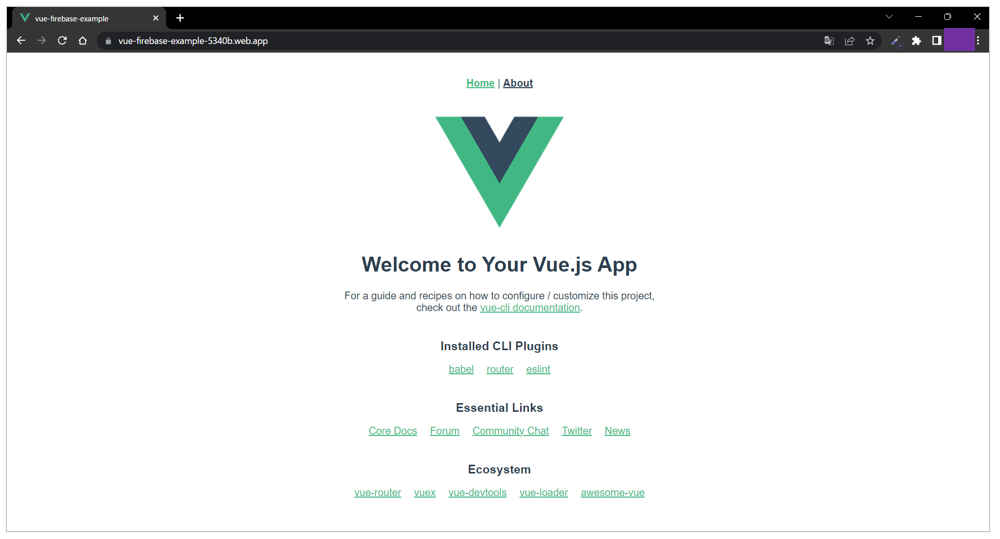
- deployが成功すると、Hosting URLが表示されるので、そこにアクセスして確認します。
+  Deploy complete!

Project Console: https://console.firebase.google.com/project/vue-firebase-example-5340b/overview
Hosting URL: https://vue-firebase-example-5340b.web.app
Webアプリの構想
-
料金プラン
- 無料プラン(Sparkプラン)の範囲にする。(なので、CloudFunctionsは使わない)
-
作る機能
- ログイン機能 (Firebase Authentication)
- CRUD機能 (Cloud Firestore)
- vue-router機能で、URLに
/about/userなどを表示する。 - ページ遷移時にログインステータスを確認し、未ログイン時は
/login画面に強制的に画面遷移させる。
-
作らない機能
- アカウント作成機能
-
画面イメージ
-
DBイメージ
- userDataコレクションの中にユーザーuidのドキュメントを作成します。
Firestore
    ∟userData
        ├ {uid}
        │   └ - food
        │     - timestamp
    	│
    	└ {uid}
            └ - food
              - timestamp
Authenticationの設定、アカウント作成
-
ログインやユーザー認証に必要な、Authenticationの設定をします。
-
Authenticationの公式ドキュメントも参照のこと。
-
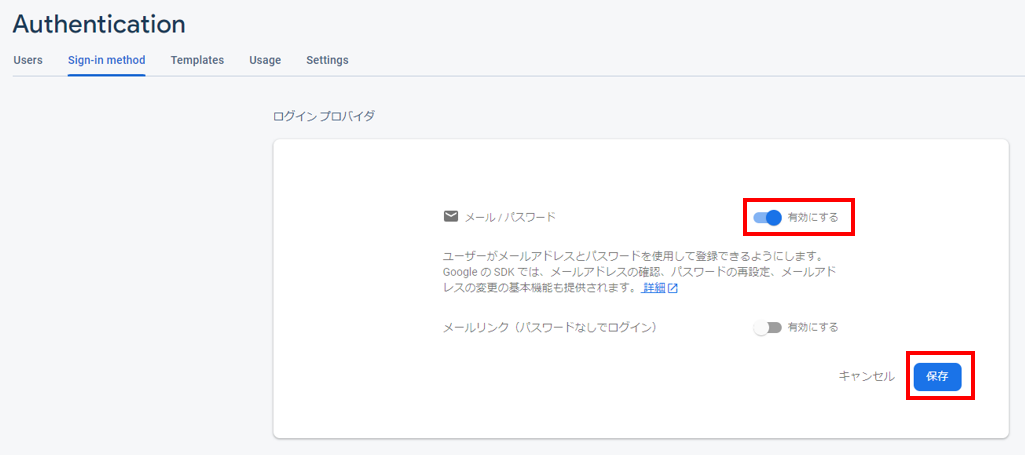
Sign-in methodタブ > ネイティブのプロバイダ >
メール / パスワードをクリック -
ログイン プロバイダのメール / パスワードが有効になっていることが確認できます。
-
次に、ログインアカウントを作成します。
-
メールとパスワードを入力し、ユーザーを追加をクリック -
追加したユーザーが確認できます。
-
今回は2つのアカウントを作成します。
hoge_taro_9999@gmail.comhoge_hanako_9999@gmail.com
-
これでアカウント作成は完了です。
CloudFirestoreの設定
-
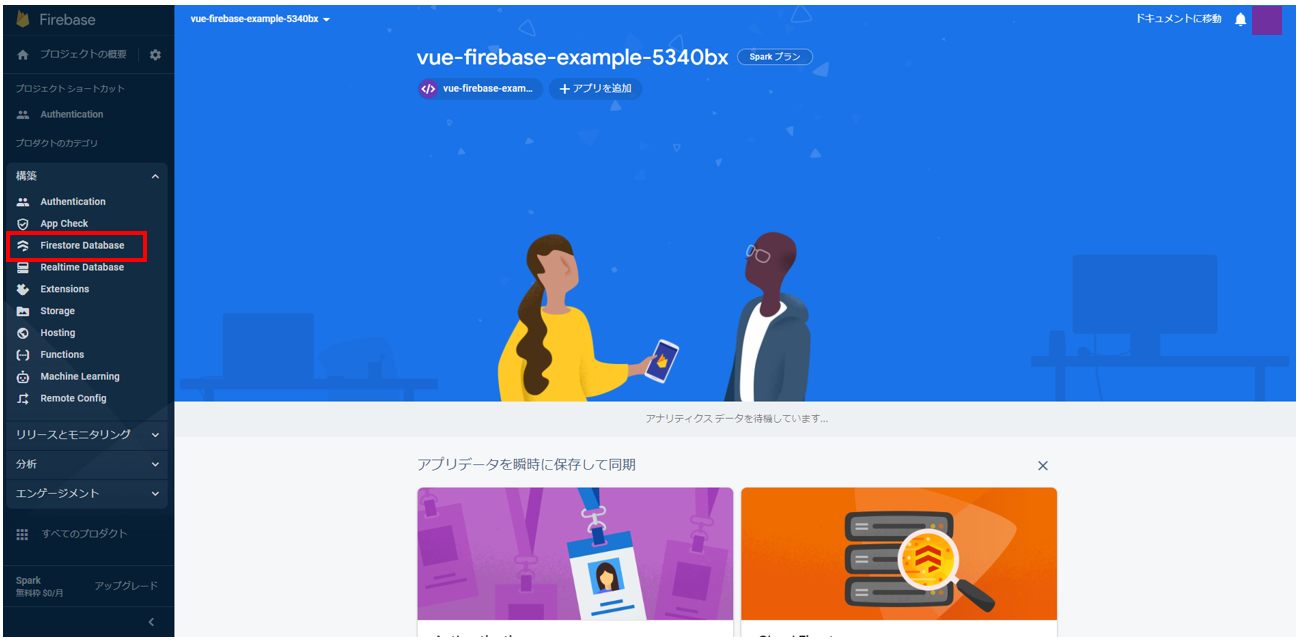
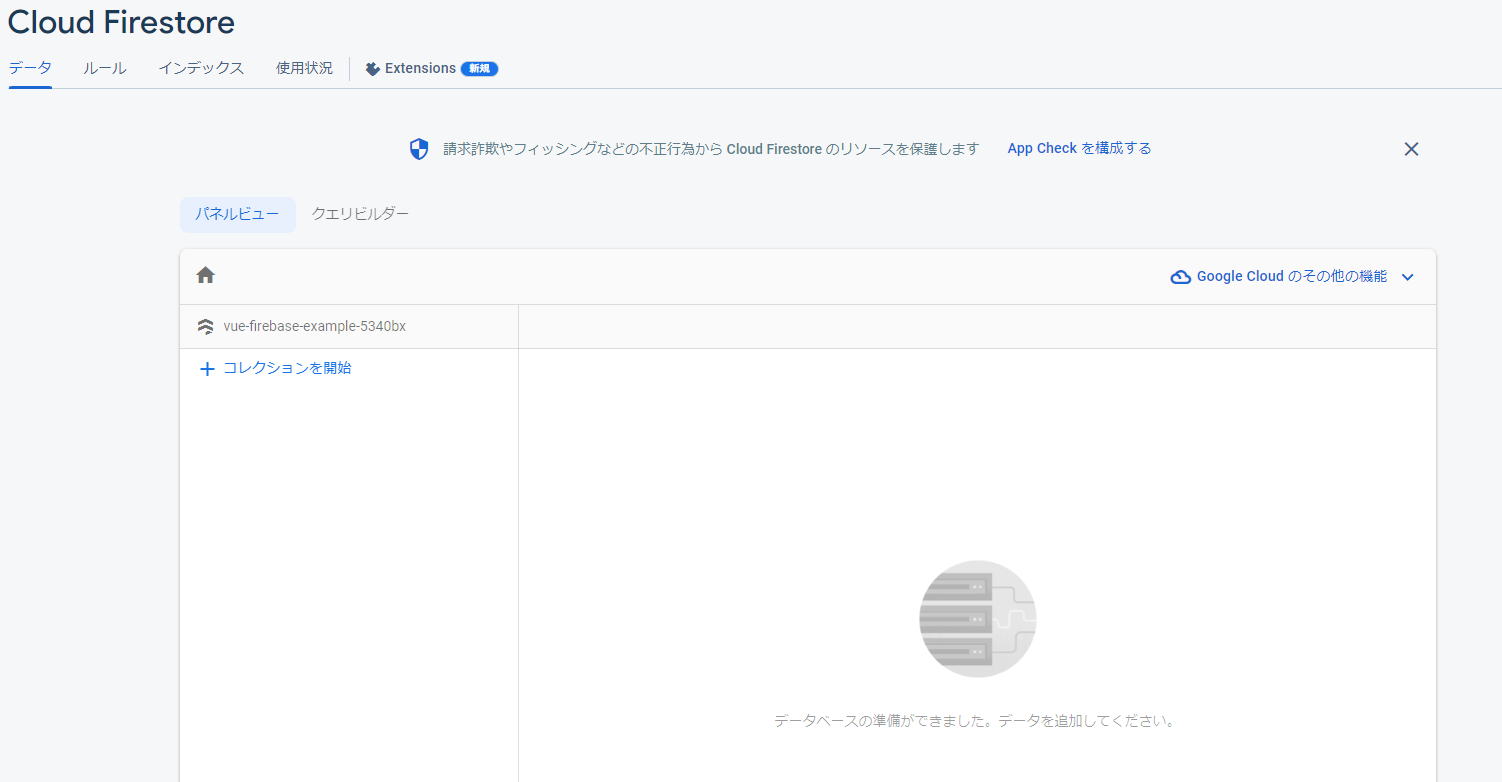
DBのFirestoreの設定をします。
-
Firestoreのセキュリティルールを選択します。
-
Firestoreのロケーションを選択します。
-
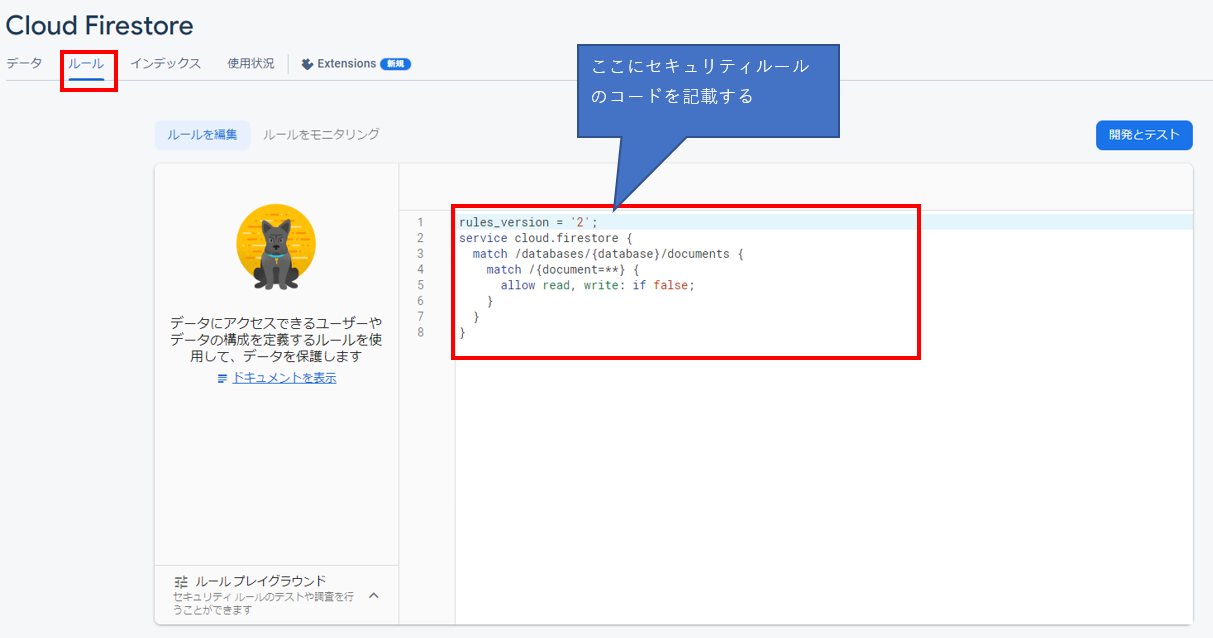
次に、Firestore内のデータへのアクセスを制御するセキュリティルールを設定します。
- Firestoreはクライアント側から直接アクセスできるDBなので、ここで設定するセキュリティルールが非常に重要です。
rules_version = '2';
service cloud.firestore {
  match /databases/{database}/documents {
    match /{document=**} {
      allow read, write: if false;
    }
  }
}
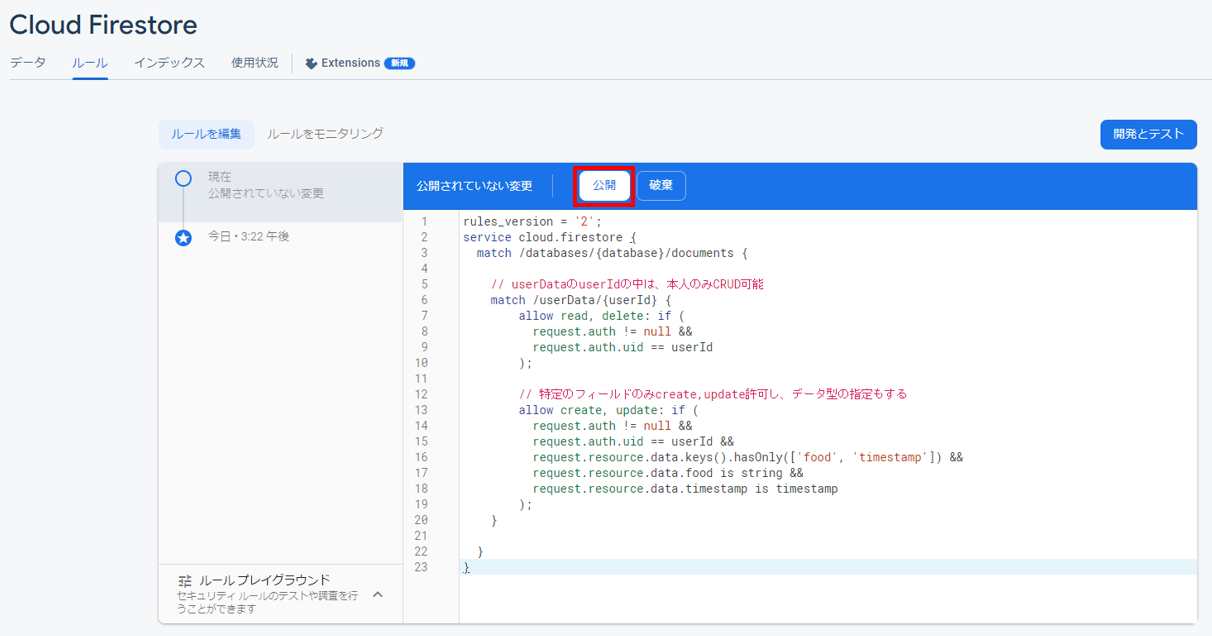
- セキュリティルールを修正します。ポイントは以下の通りです。
- ログインしている自分のデータしか読み書きできないようにする。
-
food(好きな食べ物)とtimestamp(データ更新時刻)以外のデータフィールドは許可しない。 - データ型を指定する。
-
food-> string型 -
timestamp-> timestamp型
-
- Firestoreのセキュリティルールの公式ドキュメントも参照のこと。
rules_version = '2';
service cloud.firestore {
  match /databases/{database}/documents {

    // userDataのuserIdの中は、本人のみCRUD可能
    match /userData/{userId} {
        allow read, delete: if (
            request.auth != null &&
            request.auth.uid == userId
        );

        // 特定のフィールドのみcreate,update許可し、データ型の指定もする
        allow create, update: if (
            request.auth != null &&
            request.auth.uid == userId &&
            request.resource.data.keys().hasOnly(['food', 'timestamp']) &&
            request.resource.data.food is string &&
            request.resource.data.timestamp is timestamp
        );
    }

  }
}
Firebaseの設定値ファイル作成
- 複数の.vueファイルからFirebaseの設定値を記載する必要があるのですが、全ファイルに記載するのは面倒なので、Firebaseの設定値ファイルを作成します。
-
srcフォルダ内にfirebase_settingsフォルダを作成し、その中にindex.jsを作成します。 - 先ほどコピーして保存しておいた、FirebaseのAPIキーを貼り付けます。
// Import the functions you need from the SDKs you need
import { initializeApp } from "firebase/app";
import { getAnalytics } from "firebase/analytics";
// TODO: Add SDKs for Firebase products that you want to use
// https://firebase.google.com/docs/web/setup#available-libraries

// Your web app's Firebase configuration
// For Firebase JS SDK v7.20.0 and later, measurementId is optional
const firebaseConfig = {
  apiKey: "XXXXXXXXXXXXXXXXXXXXXXXXXXXXXXXXXXX",
  authDomain: "vue-firebase-example.firebaseapp.com",
  projectId: "vue-firebase-example",
  storageBucket: "vue-firebase-example.appspot.com",
  messagingSenderId: "9999999999",
  appId: "1:9999999999:web:XXXXXXXXXXXXXXXXXXXXXX",
  measurementId: "XXXXXXXXXXXXXXXXXX"
};

// Initialize Firebase
const app = initializeApp(firebaseConfig);
const analytics = getAnalytics(app);
-
ちなみに、APIキーはコピペし忘れていても大丈夫です。コンソールから確認できます。
-
AuthenticationとFirestoreのimport文を追記します。
-
export default { analytics, db, auth }と追記し、他の.vueファイルから参照できるようにします。
// Import the functions you need from the SDKs you need
import { initializeApp } from "firebase/app";
import { getAnalytics } from "firebase/analytics";
import { getFirestore } from "firebase/firestore";
import { getAuth } from "firebase/auth";
// TODO: Add SDKs for Firebase products that you want to use
// https://firebase.google.com/docs/web/setup#available-libraries

// Your web app's Firebase configuration
// For Firebase JS SDK v7.20.0 and later, measurementId is optional
const firebaseConfig = {
  apiKey: "XXXXXXXXXXXXXXXXXXXXXXXXXXXXXXXXXXX",
  authDomain: "vue-firebase-example.firebaseapp.com",
  projectId: "vue-firebase-example",
  storageBucket: "vue-firebase-example.appspot.com",
  messagingSenderId: "9999999999",
  appId: "1:9999999999:web:XXXXXXXXXXXXXXXXXXXXXX",
  measurementId: "XXXXXXXXXXXXXXXXXX"
};

// Initialize Firebase
const app = initializeApp(firebaseConfig);
const analytics = getAnalytics(app);

// Initialize Cloud Firestore and get a reference to the service
const db = getFirestore(app);
// Initialize Authentication
const auth = getAuth()

export default { analytics, db, auth };
単一ファイルコンポーネント『XXX.vue』ファイル作成
-
src/viewsディレクトリ内に、画面ごとの.vueファイルを作成します。- 作るのは3ファイルです。
-
HomeView.vue(Home画面) ※既存ファイル流用 -
LoginView.vue(ログイン画面) ※新規ファイル作成 -
FoodView.vue(好きな食べ物画面) ※新規ファイル作成
- デフォルトで作成されている
src\views\HomeView.vueのコードを、新規作成したLoginView.vueHomeView.vueFoodView.vueへコピペして、不要なコードを削除します。また、<style scoped></style>タグを追記します。 - 単一ファイルコンポーネントの公式ドキュメントも参照のこと。
<template>
    <div>

    </div>
</template>

<script>

export default {

    components: {

    }
}

</script>

<style scoped>

</style>
- 各タグの説明は以下の通りです。
-
<template></template>-> ここにHTMLを書きます。-
<template>タグ内は、単一ルートにしなければいけないので、がないとエラーになります。
-
-
<script></script>-> ここにJavaScriptを書きます。 -
<style></style>-> ここにCSSを書きます。-
<style scoped></style>とした場合は、CSSの適用範囲がこのXXX.vueファイル内のみに限定されます。基本は<style scoped></style>の書き方を推奨します。 - アプリ全体への共通CSSは
my-project/src/App.vueに設定します。
-
-
vue-routerの設定の修正
- ルーティング設定をするために、
vue-routerの設定をします。- ルーティングとは、
//home/home/aboutなどの画面遷移および、遷移先のURL表示のことです。 - Vue Router - Getting Started も参照のこと。
- ルーティングとは、
-
my-project/src/router/index.jsを修正します。
import { createRouter, createWebHistory } from 'vue-router'
import HomeView from '../views/HomeView.vue'

const routes = [
  {
    path: '/',
    name: 'home',
    component: HomeView
  },
  {
    path: '/about',
    name: 'about',
    // route level code-splitting
    // this generates a separate chunk (about.[hash].js) for this route
    // which is lazy-loaded when the route is visited.
    component: () => import(/* webpackChunkName: "about" */ '../views/AboutView.vue')
  }
]

const router = createRouter({
  history: createWebHistory(process.env.BASE_URL),
  routes
})

export default router
import { createRouter, createWebHistory } from 'vue-router'
import HomeView from '../views/HomeView.vue'
import LoginView from '../views/LoginView.vue'
import FoodView from '../views/FoodView.vue'

const routes = [
  {
    path: '/',
    name: 'home',
    component: HomeView
  },
  {
    path: '/login',
    name: 'login',
    component: LoginView
  },
  {
    path: '/food',
    name: 'food',
    component: FoodView
  },
]

const router = createRouter({
  history: createWebHistory(process.env.BASE_URL),
  routes
})

export default router
不要ファイルの削除
- 不要なファイルを削除します。
- 削除するファイル
my-project/src/views/AboutView.vuemy-project/src/components/HelloWorld.vue
画面のコーディング(HTML,CSS,JavaScript)
- まずは
my-project/src/App.vueを修正します。- 不要な
router-linkを削除 - 不要なCSSを削除
-
margin: 0;padding: 0;を設定
- 不要な
<template>
  <nav>
    <router-link to="/">Home</router-link> |
    <router-link to="/about">About</router-link>
  </nav>
  <router-view/>
</template>

<style>
#app {
  font-family: Avenir, Helvetica, Arial, sans-serif;
  -webkit-font-smoothing: antialiased;
  -moz-osx-font-smoothing: grayscale;
  text-align: center;
  color: #2c3e50;
}

nav {
  padding: 30px;
}

nav a {
  font-weight: bold;
  color: #2c3e50;
}

nav a.router-link-exact-active {
  color: #42b983;
}
</style>
<template>
  <router-view/>
</template>

<style>
#app {
  font-family: Avenir, Helvetica, Arial, sans-serif;
  -webkit-font-smoothing: antialiased;
  -moz-osx-font-smoothing: grayscale;
  text-align: center;
  color: #2c3e50;
}

* {
  margin: 0;
  padding: 0;
}
</style>
- 次に、viewsディレクトリ内のファイルを修正していきます。
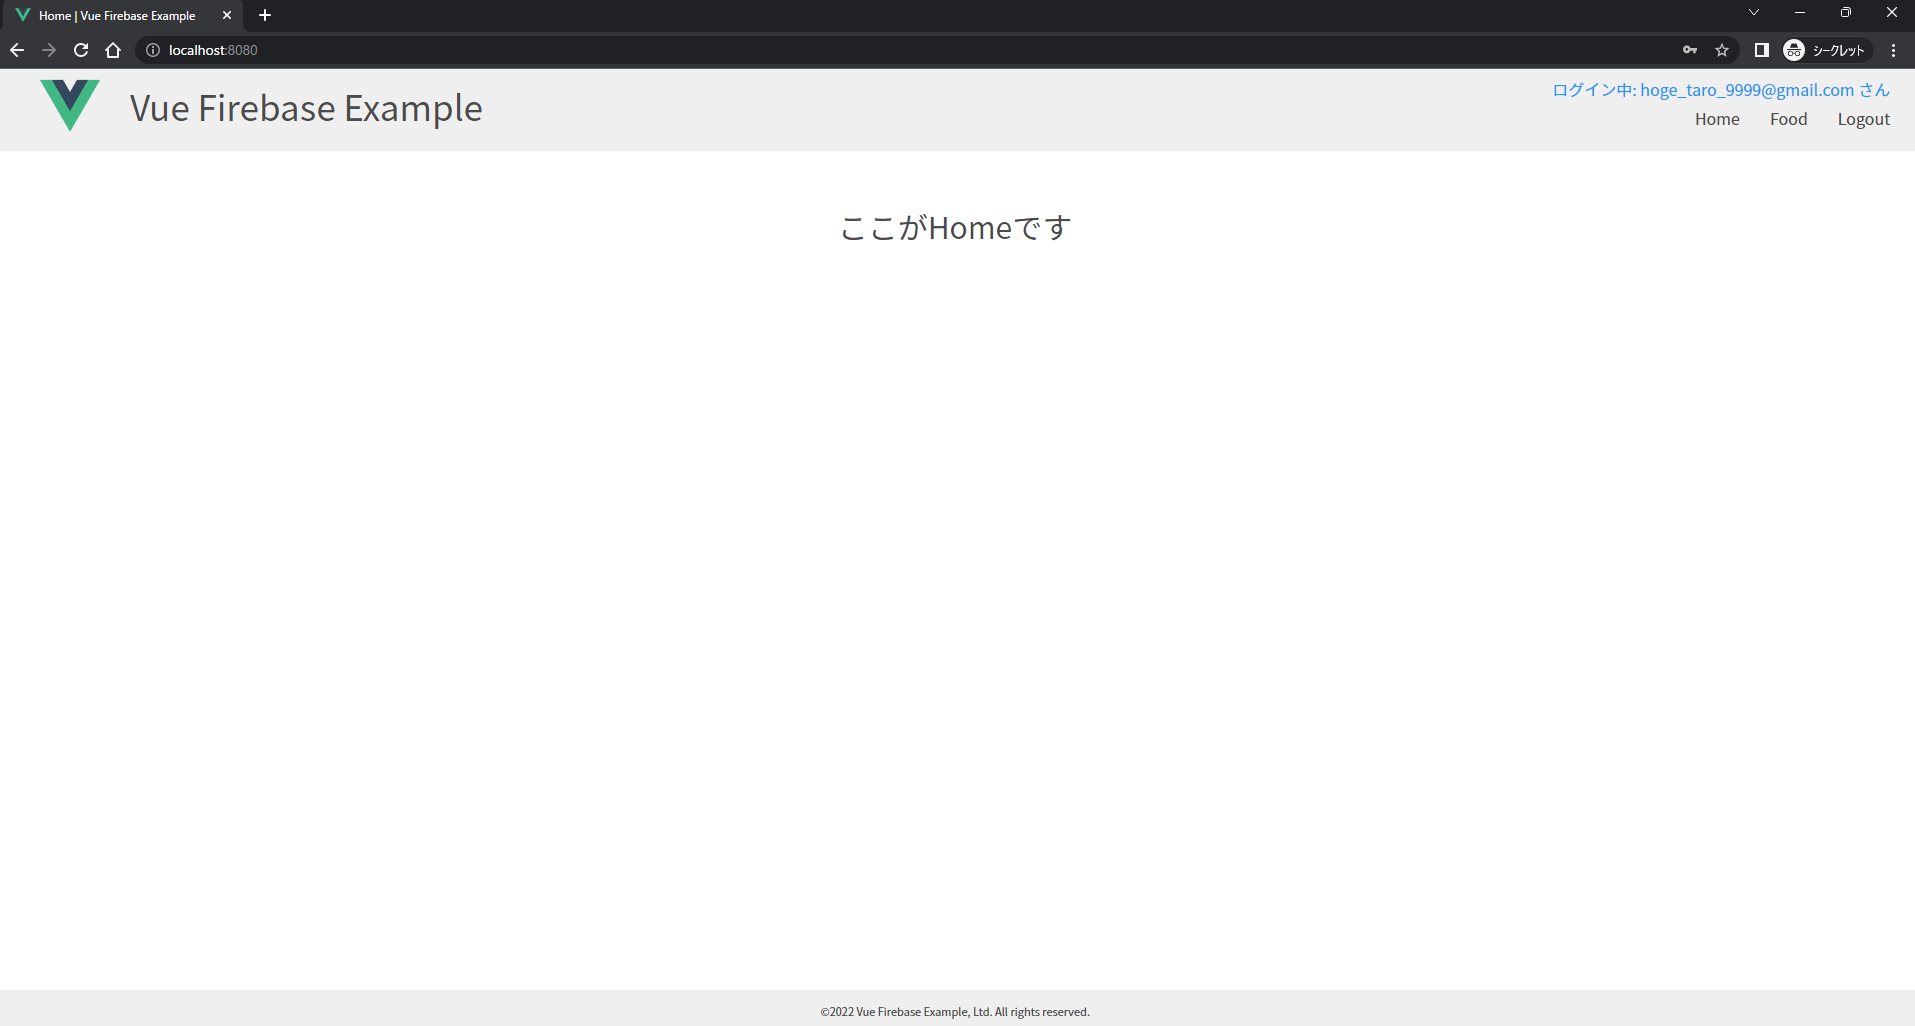
- まずは、Home画面を以下のように修正します。
<template>
<body>
<header>
<div class="header_container">
<div class="header_logo">
<div class="img_container">
<img src="../assets/logo.png" alt="logo">
</div>
<p>Vue Firebase Example</p>
</div>
<div>
<div class="login_name blue"> {{ login_name }}</div>
<div class="header_menu">
<div class="menu_item" v-on:click="goToHome">Home</div>
<div class="menu_item" v-on:click="goToFood">Food</div>
<div class="menu_item" v-on:click="confirmLogout">Logout</div>
</div>
</div>
</div>
</header>
<main>
<p class="contents">ここがHomeです</p>
</main>
<footer>
<div class="copyright">©2022 Vue Firebase Example, Ltd. All rights reserved.</div>
</footer>
</body>
</template>
<script>
// Firebase関連のインポート
import { signOut, onAuthStateChanged } from "firebase/auth";
import Firebase from "../firebase_settings/index.js"
const auth = Firebase.auth
export default {
components: {
},
data() {
return {
// ログイン中のアカウントのemail
login_name: "",
}
},
methods: {
// ログアウトの確認ダイアログ
confirmLogout() {
const result = confirm('ログアウトしますか?')
if(!result) { return }
this.logOut()
},
// ログアウト処理
logOut() {
// ユーザー情報とイベント内容をログに記録
signOut(auth).then(() => {
// Sign-out successful.
this.$router.push('/login')
console.log("ログアウト成功")
alert('ログアウトしました')
}).catch((error) => {
// An error happened.
console.log('ログアウトエラー: error ->'+error)
alert('ログアウト処理でエラーが発生しました')
});
},
// ログインアカウントのemailを表示する
showLoginEmail() {
onAuthStateChanged(auth, (user) => {
if (user) {
// User is signed in, see docs for a list of available properties
// https://firebase.google.com/docs/reference/js/firebase.User
const email = user.email;
this.login_name = 'ログイン中: '+email+' さん'
} else {
// User is signed out
this.login_name = '未ログイン: ゲストユーザーさん'
}
});
},
// Homeへ画面遷移
goToHome() {
const nowRoute = this.$route.path
if(nowRoute != '/') {
this.$router.push('/')
} else {
window.location.reload()
}
},
// Foodへ画面遷移
goToFood() {
const nowRoute = this.$route.path
if(nowRoute != '/food') {
this.$router.push('/food')
} else {
window.location.reload()
}
},
},
mounted() {
// mounted時(=ページ読み込み時)に下記のメソッド実行する
this.showLoginEmail()
},
}
</script>
<style scoped>
/* ///////////////////////////////////////// */
/* ヘッダー関連 */
/* ///////////////////////////////////////// */
.header_container {
display: flex;
justify-content: space-between;
padding: 7px 25px 15px 25px;
height: 60px;
width: auto;
background: #efefef;
}
.header_logo {
display: flex;
width: fit-content;
}
.header_logo p {
font-size: 35px;
padding: 0 0 0 10px;
}
.img_container {
width: 100px;
}
img {
width: 100%;
height: 100%;
object-fit: contain;
}
.login_name {
text-align: right;
}
.header_menu {
display: flex;
justify-content: right;
padding: 2px 0 5px 0;
margin: 0 0 0 10px;
}
.menu_item {
width: max-content;
margin-left: 30px;
}
.menu_item:hover {
cursor: pointer;
color: #2296f3;
border-bottom: solid 3px #2296f3;
}
/* ///////////////////////////////////////// */
/* フッター関連 */
/* ///////////////////////////////////////// */
footer .copyright {
font-size: 11px;
margin: 12px auto 0 auto;
}
/* ///////////////////////////////////////// */
/* コンテンツ関連 */
/* ///////////////////////////////////////// */
body {
min-height: calc(100vh - 40px);
position: relative;
box-sizing: border-box;
}
.contents {
font-size: 30px;
margin: 50px 0 0 0;
}
/* ///////////////////////////////////////// */
/* 後でApp.vueへ移す設定 */
/* ///////////////////////////////////////// */
/* 青色の文字(ログインネームなど) */
.blue {
color: #2296f3;
}
header {
background: #efefef;
width: auto;
}
footer {
background: #efefef;
width: 100%;
position: absolute;
bottom: -40px;
height: 40px;
}
body {
min-height: calc(100vh - 40px);
position: relative;
box-sizing: border-box;
}
</style>
-
ヘッダーとフッターは
FoodView.vueでも同じデザインにしますので、そのままコピペしてもいいのですが、vueの特性を活かすため、別ファイルにcomponent化します。- Componentの公式ドキュメントも参照のこと。
-
componentsフォルダにHeader.vueFooter.vueを作成し、LoginView.vueから不要なヘッダー、フッターのコード削除し、componentをimportします。 -
また、
App.vueを修正します。- 修正1: 各画面共通CSSを追記する。
- 修正2: フォントをNotoSansに変更。(必須ではないですが、見栄えがいいので変更)
-
修正後のコードは以下の通りです。
<template>
    <body>
        <HeaderComponent></HeaderComponent>

        <main>
            <p class="contents">ここがHomeです</p>
        </main>

        <FooterComponent></FooterComponent>
    </body>
</template>

<script>
import HeaderComponent from '../components/HeaderComponent.vue'
import FooterComponent from '../components/FooterComponent.vue'

export default {

    components: {
        HeaderComponent,
        FooterComponent,
    },

    data() {
        return {

        }
    },

    methods: {

    },

    mounted() {

    },

}


</script>

<style scoped>

/* ///////////////////////////////////////// */
/* コンテンツ関連 */
/* ///////////////////////////////////////// */

.contents {
    font-size: 30px;
    margin: 50px 0 0 0;
}

</style>
<template>
<div class="header_container">
<div class="header_logo">
<div class="img_container">
<img src="../assets/logo.png" alt="logo">
</div>
<p>Vue Firebase Example</p>
</div>
<div>
<div class="login_name blue"> {{ login_name }}</div>
<div class="header_menu">
<div class="menu_item" v-on:click="goToHome">Home</div>
<div class="menu_item" v-on:click="goToFood">Food</div>
<div class="menu_item" v-on:click="confirmLogout">Logout</div>
</div>
</div>
</div>
</template>
<script>
// Firebase関連のインポート
import { signOut, onAuthStateChanged } from "firebase/auth";
import Firebase from "../firebase_settings/index.js"
const auth = Firebase.auth
export default {
components: {
},
data() {
return {
// ログイン中のアカウントのemail
login_name: "",
}
},
methods: {
// ログアウトの確認ダイアログ
confirmLogout() {
const result = confirm('ログアウトしますか?')
if(!result) { return }
this.logOut()
},
// ログアウト処理
logOut() {
// ユーザー情報とイベント内容をログに記録
signOut(auth).then(() => {
// Sign-out successful.
this.$router.push('/login')
console.log("ログアウト成功")
alert('ログアウトしました')
}).catch((error) => {
// An error happened.
console.log('ログアウトエラー: error ->'+error)
alert('ログアウト処理でエラーが発生しました')
});
},
// ログインアカウントのemailを表示する
showLoginEmail() {
onAuthStateChanged(auth, (user) => {
if (user) {
// User is signed in, see docs for a list of available properties
// https://firebase.google.com/docs/reference/js/firebase.User
const email = user.email;
this.login_name = 'ログイン中: '+email+' さん'
} else {
// User is signed out
this.login_name = '未ログイン: ゲストユーザーさん'
}
});
},
// Homeへ画面遷移
goToHome() {
const nowRoute = this.$route.path
if(nowRoute != '/') {
this.$router.push('/')
} else {
window.location.reload()
}
},
// Foodへ画面遷移
goToFood() {
const nowRoute = this.$route.path
if(nowRoute != '/food') {
this.$router.push('/food')
} else {
window.location.reload()
}
},
},
mounted() {
// mounted時(=ページ読み込み時)に下記のメソッド実行する
this.showLoginEmail()
},
}
</script>
<style scoped>
/* ///////////////////////////////////////// */
/* ヘッダー関連 */
/* ///////////////////////////////////////// */
.header_container {
display: flex;
justify-content: space-between;
padding: 7px 25px 15px 25px;
height: 60px;
width: auto;
background: #efefef;
}
.header_logo {
display: flex;
width: fit-content;
}
.header_logo p {
font-size: 35px;
padding: 0 0 0 10px;
}
.img_container {
width: 100px;
}
img {
width: 100%;
height: 100%;
object-fit: contain;
}
.login_name {
text-align: right;
}
.header_menu {
display: flex;
justify-content: right;
padding: 2px 0 5px 0;
margin: 0 0 0 10px;
}
.menu_item {
width: max-content;
margin-left: 30px;
}
.menu_item:hover {
cursor: pointer;
color: #2296f3;
border-bottom: solid 3px #2296f3;
}
</style>
<template>
    <footer>
        <div class="copyright">©2022 Vue Firebase Example, Ltd. All rights reserved.</div>
    </footer>
</template>

<script>

export default {

    components: {

    },

    data() {
        return {

        }
    },

    methods: {

    },

    mounted() {

    },

}
</script>

<style scoped>

/* ///////////////////////////////////////// */
/* フッター関連 */
/* ///////////////////////////////////////// */

footer .copyright {
    font-size: 11px;
    margin: 12px auto 0 auto;
}

</style>
<template>
    <router-view/>
</template>

<style>
/* このアプリの指定フォント:Noto Sans JPをGoogleのサイトからインポートする。ここで設定すればPJT全体に適用できる */
@import url('https://fonts.googleapis.com/css2?family=Noto+Sans+JP:wght@300;400;700&display=swap');

#app {
    background: #ffffff;
    text-align: center;
}

* {
    font-family: "Noto Sans JP", "Hiragino Kaku Gothic ProN", "Meiryo", sans-serif;
    font-size: 16px;
    line-height: 1.7;
    color: #4a4a4a;
    margin: 0;
    padding: 0;
}

header {
    background: #efefef;
    width: auto;
}

footer {
    background: #efefef;
    width: 100%;
    position: absolute;
    bottom: -40px;
    height: 40px;
}

body {
    min-height: calc(100vh - 40px);
    position: relative;
    box-sizing: border-box;
}

/* //////////////////////////////////////////////////////////////////////////////// */
/* button関係 */
/* //////////////////////////////////////////////////////////////////////////////// */
button {
    border-radius: 10px;
    padding: 6px 20px 8px;
    width: auto;
    height: auto;
    cursor: pointer;
}
button:active {
    transform: translate(0,2px);
}
/* 通常のボタン */
.btn_standard {
    background: #fff176;
    border: 3px solid #fff176;
}
.btn_standard:hover {
    background: #ffcf00;
    border: 3px solid #ffcf00;
}

/* //////////////////////////////////////////////////////////////////////////////// */
/* input関係 */
/* //////////////////////////////////////////////////////////////////////////////// */
input {
    height: 40px;
    text-indent: 1em;
}


/* //////////////////////////////////////////////////////////////////////////////// */
/* その他 */
/* //////////////////////////////////////////////////////////////////////////////// */
/* 赤色の文字(エラーメッセージなど) */
.red {
    color: #f54337;
}
/* 青色の文字(ログインネームなど) */
.blue {
    color: #2296f3;
}

</style>
- 次に、
LoginView.vueFoodView.vueの画面、機能を作成します。 - また、データ通信中のアニメーションのcomponent
LoadingAnimationComponent.vueも作成します。 - 作成ファイルは以下の通りです。
<template>
<body>
<header>
<div class="title">Vue Firebase Example</div>
</header>
<main>
<div class="container">
<p>ID(メールアドレス)</p>
<input type="email" v-model="inputValueId">
<!-- この下の<p></p>はテキストボックスを中央に配置するために必要な疑似要素です -->
<p></p>
</div>
<div class="container">
<p>パスワード</p>
<input type="password" v-model="inputValuePassword">
<!-- この下の<p></p>はテキストボックスを中央に配置するために必要な疑似要素です -->
<p></p>
</div>
<div class="message">
<p class="red">{{ errorMessage }} </p>
</div>
<div>
<button class="btn_standard" type="submit" v-on:click="logIn">ログインする</button>
</div>
<!-- ローディングアニメーション -->
<div class="loading_animation_container">
<div class="loading_animation" v-if="this.isLoading">
<LoadingAnimationComponent></LoadingAnimationComponent>
</div>
</div>
<div class="login_info_container">
<div class="login_info">
<p>LoginIDとパスワードは以下の通りです</p>
<br>
<p>ID: hoge_taro_9999@gmail.com</p>
<p>Pass: hoge_taro_9999</p>
<br>
<p>ID: hoge_hanako_9999@gmail.com</p>
<p>Pass: hoge_hanako_9999</p>
</div>
</div>
</main>
<FooterComponent></FooterComponent>
</body>
</template>
<script>
import FooterComponent from '../components/FooterComponent.vue'
import LoadingAnimationComponent from '../components/LoadingAnimationComponent.vue'
// Firebase関連のインポート
import { signInWithEmailAndPassword } from "firebase/auth";
import Firebase from "../firebase_settings/index.js"
const auth = Firebase.auth
export default {
components: {
FooterComponent,
LoadingAnimationComponent,
},
methods: {
// Home画面へ遷移
goToHome() {
this.$router.push('/')
},
// ログイン
logIn() {
// IDとパスワードの未入力チェック
if(this.inputValueId === undefined || this.inputValueId === "" || this.inputValuePassword === undefined || this.inputValuePassword === "") {
this.errorMessage = 'IDまたはパスワードが未入力です'
return
}
// エラーメッセージの消去
this.errorMessage = ""
// ローディングアニメーション
this.isLoading = true
// id,passを取得
const mId = this.inputValueId
const mPass = this.inputValuePassword
// 連続クリックを防ぐためにパスワード欄を空欄にする
this.inputValuePassword = ""
// サインインメソッド
signInWithEmailAndPassword(auth, mId, mPass)
// サインイン成功時
.then((userCredential) => {
const user = userCredential.user;
console.log("ログイン成功 "+user.email)
this.goToHome()
})
// サインイン失敗時
.catch((error) => {
const errorCode = error.code;
const errorMessage = error.message;
console.log('ログインエラー: errorCode -> '+errorCode+', errorMessage -> '+errorMessage)
this.JudgeErrorCode(errorCode)
// ローディングアニメーション
this.isLoading = false
});
},
// FirebaseAuthから受け取ったエラーコードを判定しエラーメッセージを表示する
JudgeErrorCode(mError) {
const errorCode = String(mError)
if(errorCode === 'auth/wrong-password' || errorCode === 'auth/invalid-email' || errorCode === 'auth/user-not-found') {
this.errorMessage = "ログインに失敗しました。IDまたはパスワードが間違っています"
} else {
this.errorMessage = "ログインに失敗しました。予期せぬエラーが発生しました。"
}
},
},
data() {
return {
// ローディングアニメーション
isLoading: false,
// エラーメッセージ
errorMessage: '',
// 入力欄
inputValueId: "",
inputValuePassword: "",
}
},
computed: {
},
}
</script>
<style scoped>
header {
height: 120px;
}
header .title {
font-size: 40px;
padding: 20px 0 0;
}
main {
padding: 30px auto;
}
.container {
display: flex;
justify-content: center;
margin: 30px 0 0;
}
.container input {
width: 400px;
}
.container p {
width: 200px;
text-align: left;
margin-top: 8px;
}
.login_info_container {
display: flex;
justify-content: center;
margin-top: 10px;
}
.login_info {
text-align: left;
background-color: #efefef;
padding: 20px 100px;
border-radius: 20px;
}
.loading_animation_container {
height: 15px;
margin-top: 10px;
}
</style>
<template>
<body>
<HeaderComponent></HeaderComponent>
<main>
<!-- <p class="contents">ここがFoodです</p> -->
<div class="all_container">
<div class="row_container">
<div class="container_left">
<p>好きな食べ物</p>
</div>
<div class="container_right">
<p>{{ food }} </p>
<p>{{ timestamp }} </p>
</div>
</div>
<div class="row_container">
<div class="container_left">
</div>
<div class="container_right">
<input type="text" v-model="inputFood">
</div>
</div>
<div class="row_container">
<div class="container_left">
</div>
<div class="container_right">
<button class="btn_standard" v-on:click="registerFood">好きな食べ物を登録</button>
<p class="red">{{ errorMessage }} </p>
<!-- ローディングアニメーション -->
<div class="loading_animation" v-if="this.isLoading">
<LoadingAnimationComponent></LoadingAnimationComponent>
</div>
</div>
</div>
</div>
</main>
<FooterComponent></FooterComponent>
</body>
</template>
<script>
import HeaderComponent from '../components/HeaderComponent.vue'
import FooterComponent from '../components/FooterComponent.vue'
import LoadingAnimationComponent from '../components/LoadingAnimationComponent.vue'
// Firebase関連のインポート
import Firebase from "../firebase_settings/index.js"
import { doc, getDoc, setDoc, serverTimestamp } from "firebase/firestore"
import { onAuthStateChanged } from "firebase/auth";
const auth = Firebase.auth
const db = Firebase.db
export default {
components: {
HeaderComponent,
FooterComponent,
LoadingAnimationComponent,
},
data() {
return {
errorMessage: "",
isLoading: false,
food: "",
uid: "",
inputFood: "",
timestamp: "",
}
},
methods: {
// DBから好きな食べ物のデータを取得する
async getFavoriteFood() {
// 変数を初期化
this.food = ""
// DBからデータ取得
try {
const docRef = doc(db, "userData", this.uid)
const docSnap = await getDoc(docRef)
if (!docSnap.exists()) {
this.food = "データ未登録"
this.timeStamp = ""
return
}
this.food = docSnap.get('food')
this.timestamp = "更新日時: "+docSnap.get('timestamp').toDate().toLocaleString()
} catch(error) {
this.food = "データ取得に失敗しました"
console.log(error)
}
},
// DBへ好きな食べ物を登録する
async registerFood() {
// データ書き込み処理ステータスをチェック
if(this.isLoading) { return }
// inputの入力値チェック
const mFood = this.inputFood.trim()
if(mFood==="") {
this.errorMessage = "好きな食べ物が入力されていません"
return
}
// エラーメッセージ消去
this.errorMessage = ""
const result = confirm('好きな食べ物を登録しますか?')
if(!result) { return }
// 書き込み開始
this.isLoading = true
const docRef = doc(db, "userData", this.uid)
try {
await setDoc(docRef, {
food: mFood,
timestamp: serverTimestamp(),
},
{ merge: true })
} catch(error) {
console.log(error)
alert("エラーが発生しました")
}
// データ再取得
this.getFavoriteFood()
// 書き込み終了
this.isLoading = false
}
},
mounted() {
onAuthStateChanged(auth, (user) => {
if (user) {
// User is signed in, see docs for a list of available properties
// https://firebase.google.com/docs/reference/js/firebase.User
this.uid = user.uid;
this.getFavoriteFood()
} else {
// User is signed out
this.uid = ""
}
});
},
}
</script>
<style scoped>
/* ///////////////////////////////////////// */
/* コンテンツ関連 */
/* ///////////////////////////////////////// */
.all_container {
margin: 50px 0 0 0;
}
.row_container {
display: flex;
justify-content: center;
margin-bottom: 20px;
}
.container_left {
width: 200px;
}
.container_right {
width: 400px;
}
input {
width: 300px;
}
.loading_animation {
justify-content: left;
}
</style>
<template>
    <div class="dot-pulse-container">
        <div class="dot-pulse">
            <div class="dot-pulse__dot"></div>
        </div>
    </div>
</template>

<script>
    export default {

    }
</script>

<style scoped>
.dot-pulse-container {
    display: flex;
    justify-content: center;
}

.dot-pulse {
    /* --uib-size: 40px; */
    --uib-size: 40px;
    --uib-speed: 1.0s;
    --uib-color: #2296f3;

    position: relative;
    display: flex;
    align-items: center;
    justify-content: space-between;
    width: var(--uib-size);
    height: calc(var(--uib-size) * 0.27);
}

.dot-pulse__dot,
.dot-pulse::before,
.dot-pulse::after {
    content: '';
    display: block;
    height: calc(var(--uib-size) * 0.18);
    width: calc(var(--uib-size) * 0.18);
    border-radius: 50%;
    background-color: var(--uib-color);
    transform: scale(0);
}

.dot-pulse::before {
    animation: pulse var(--uib-speed) ease-in-out infinite;
}

.dot-pulse__dot {
    animation: pulse var(--uib-speed) ease-in-out
    calc(var(--uib-speed) * 0.125) infinite both;
}

.dot-pulse::after {
    animation: pulse var(--uib-speed) ease-in-out
    calc(var(--uib-speed) * 0.25) infinite;
}

@keyframes pulse {
    0%,
    100% {
    transform: scale(0);
    }

    50% {
    transform: scale(1.5);
    }
}

</style>
機能の追加
【追加機能1】画面遷移時にログインステータスチェック
- ユーザーがurlを直接入力して、未ログインなのに、
/や/foodのページを閲覧してほしくないので、画面表示前にログイン状態をチェックして、未ログインステータスの場合は、強制的にログイン画面(/login)に遷移させる機能を追加します。
【追加機能2】ページタイトル表示
-
ブラウザのタブのタイトル表示を付けます。
-
上記2つの機能を追加するため、routerの設定を修正します。
import { createRouter, createWebHistory } from 'vue-router'
import HomeView from '../views/HomeView.vue'
import LoginView from '../views/LoginView.vue'
import FoodView from '../views/FoodView.vue'

// 画面遷移前にログイン済みかを判定するメソッドに必要なFirebaseのメソッド
import { getAuth, onAuthStateChanged } from "firebase/auth";

const routes = [
    {
        path: '/',
        name: 'home',
        component: HomeView,
        meta: { title: 'Home', requiresAuth: true}
    },
    {
        path: '/login',
        name: 'login',
        component: LoginView,
        meta: { title: 'Login', requiresAuth: false}
    },
    {
        path: '/food',
        name: 'food',
        component: FoodView,
        meta: { title: 'Food', requiresAuth: true}
    },
]

const router = createRouter({
    history: createWebHistory(process.env.BASE_URL),
    routes
})

// 画面遷移成功後にページタイトルを設定
router.afterEach((titleString) => {
    document.title = titleString.meta.title + ' | Vue Firebase Example'
});

// 画面遷移前にログイン済みかをチェックして、未ログイン時はログイン画面に強制遷移させる
let onAuthStateChangedUnsubscribe
router.beforeEach((to, from, next) => {
    const auth = getAuth()

    if (!to.matched.some(record => record.meta.requiresAuth)) {
        next()
    } else {
        if (auth.currentUser) {
            next()
            return
        } else {
            if (typeof onAuthStateChangedUnsubscribe === 'function') {
                onAuthStateChangedUnsubscribe()
            }
            onAuthStateChanged(auth, (user) => {
                if (user) {
                    next()
                } else {
                    next({ name: 'login' })
                }
            })
        }
    }
})

export default router
確認してみる
Hostingへデプロイ
- 最後に、buildしてデプロイします。
npm run build
firebase deploy --only hosting
- お疲れ様でした。これで、Vue.jsとFirebaseを使った簡単なWebアプリの作成完了です。

