試しにVultrのVPSを使ってみているので、その導入メモ。
インスタンスは、デフォルトのCentOS 7を選択して作成した。
nginxのインストール
nginx.repoファイルを作成してyumのリポジトリを追加する。
$ sudo vi /etc/yum.repos.d/nginx.repo
[nginx]
name=nginx repo
baseurl=http://nginx.org/packages/mainline/centos/7/$basearch/
gpgcheck=0
enabled=1
yumを使ってnginxをインストール。
$ sudo yum install nginx
起動時にnginxが自動で立ち上がるように設定。
$ sudo systemctl enable nginx
nginxの起動。
$ sudo systemctl start nginx
CentOSのファイアウォールの設定
CentOS 7系のファイアウォールはデフォルトでfirewalldになっているので、ここにhttp(80番)とhttps(443番)を許可するように設定を追加する。
まずファイアウォールが有効であることを確認。
$ sudo systemctl status firewalld
...
Active: active (exited)
...
が返ってくればOK。起動していない場合は下記のコマンドで起動する。
$ sudo systemctl start firewalld
publicゾーンに設定されているサービスを調べる。
$ sudo firewall-cmd --list-services --zone=public --permanent`
dhcpv6-client ssh
初期状態だとdhcpv6-clientとsshが含まれている。
ここにhttpとhttpsを追加する。
$ sudo firewall-cmd --add-service=http --zone=public --permanent`
$ sudo firewall-cmd --add-service=https --zone=public --permanent`
結果を確認。
$ sudo firewall-cmd --list-services --zone=public --permanent
dhcpv6-client ssh http https
80番や443番以外のポートを使う場合は、/usr/lib/firewalld/services/ にあるhttp.xmlやhttps.xmlを/etc/firewalld/services/にコピーし、中身のポート番号を変更すればよい。
設定できたらfirewalldをリロードする。
$ sudo systemctl reload firewalld'
Vultrのファイアウォールの設定
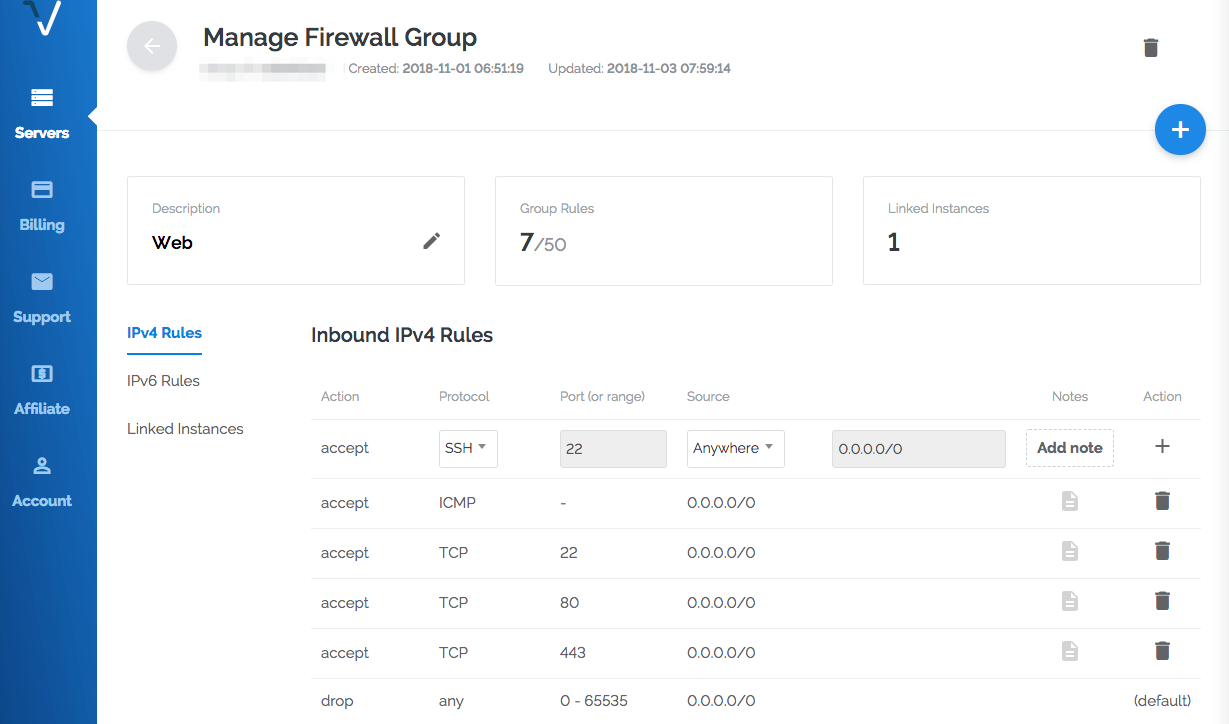
続いてVultr側のファイアウォールを設定する。ファイアウォールの設定は、Webコンソールの[Servers]-[Firewall]の画面で行う。まだグループを作っていない場合は、[Add Firewall Group]で任意の名前のグループを作成できる。
Web用に80番と445番、SSH用に22番、それとping用にICMPプロトコルを許可した例は次のような感じ。その他のポートへのアクセスは全て拒否する。IPv6を使っている場合は、左のタブからIPv6 Rulesを選んで同様に設定する。
サーバにこのファイアウォールグループを適用する。[Servers]からサーバを選んで、上部メニューで[Settings]を選ぶと、次のように左に一覧が出てくるので、[Firewall]を選ぶと次の画面になる。ここで作成したファイアウォールグループを選んで[Update Firewall Group]を押せば適用される。
ブラウザで確認
Webブラウザから http://サーバのIPアドレス にアクセスして、デフォルトページが表示されれば完了。


