目次
1. 背景
業務ではコーディングや、AWSに触れる機会が一切ないので、勉強がてらAWSで何かしようと思い、日々のマイニング収益を定期的に通知するシステムをAWS上に構築してみました。
※こちらの投稿は、以前に投稿した「①NiceHashマイニング収益をAWS Lambda×SNSでメール通知する」の通知方法を変更したものです。
2. 構成/構築手順
システム構成は、AWS Lambdaを中心とした基本的なサーバレスアーキテクチャです。
処理の流れ
1. EventBridge(CroudWatch Event)の日次実行cronがトリガーとなり、Lambda関数をキック
2. Lambdaでは、外部APIからマイニング収益情報を取得
3. S3バケットへ残高情報を書き込み、前日の残高情報を取得、残高の増減を算出
4. LambdaからPOSTメソッドで通知メッセージがLINE Notifyへ渡され、スマホへLINE上で通知

2-1.Lambdaの構築
2-1-1.IAMロールの作成
AWSサービス間を連携するために新規IAMロールを作成し必要なポリシーをアタッチする
・IAMを起動し、ユースケースLambdaを選択し「次のステップ」をクリック
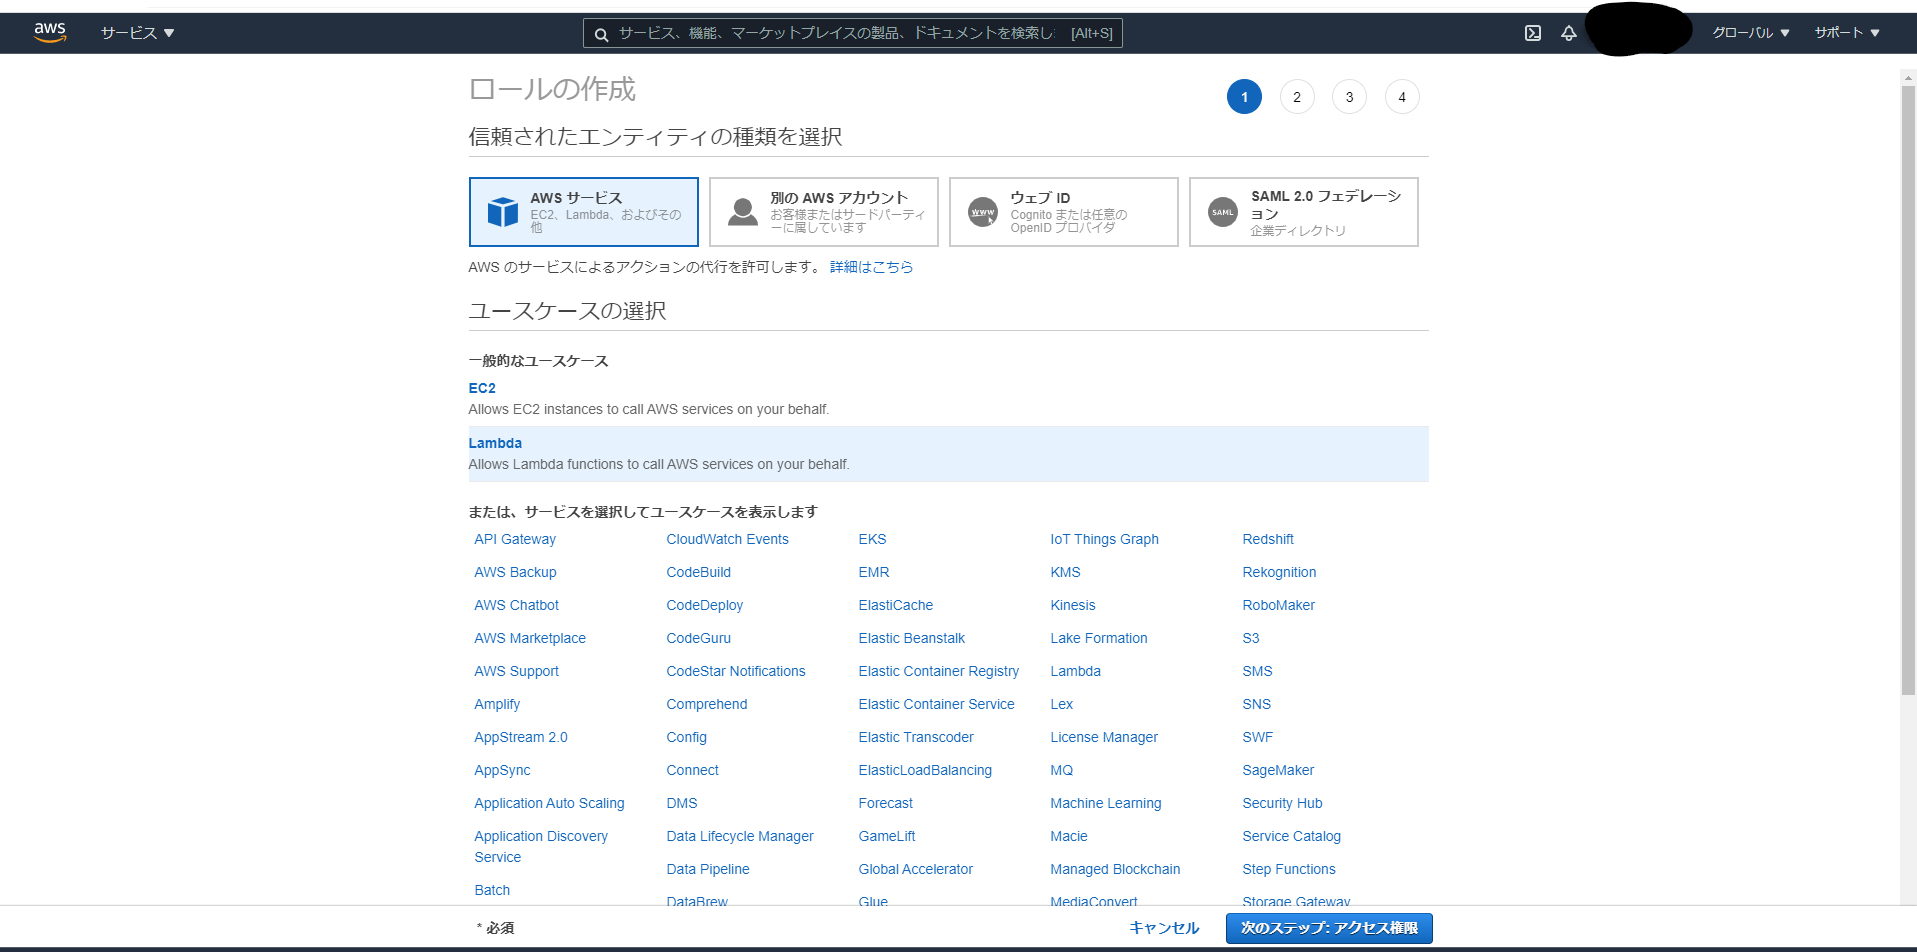
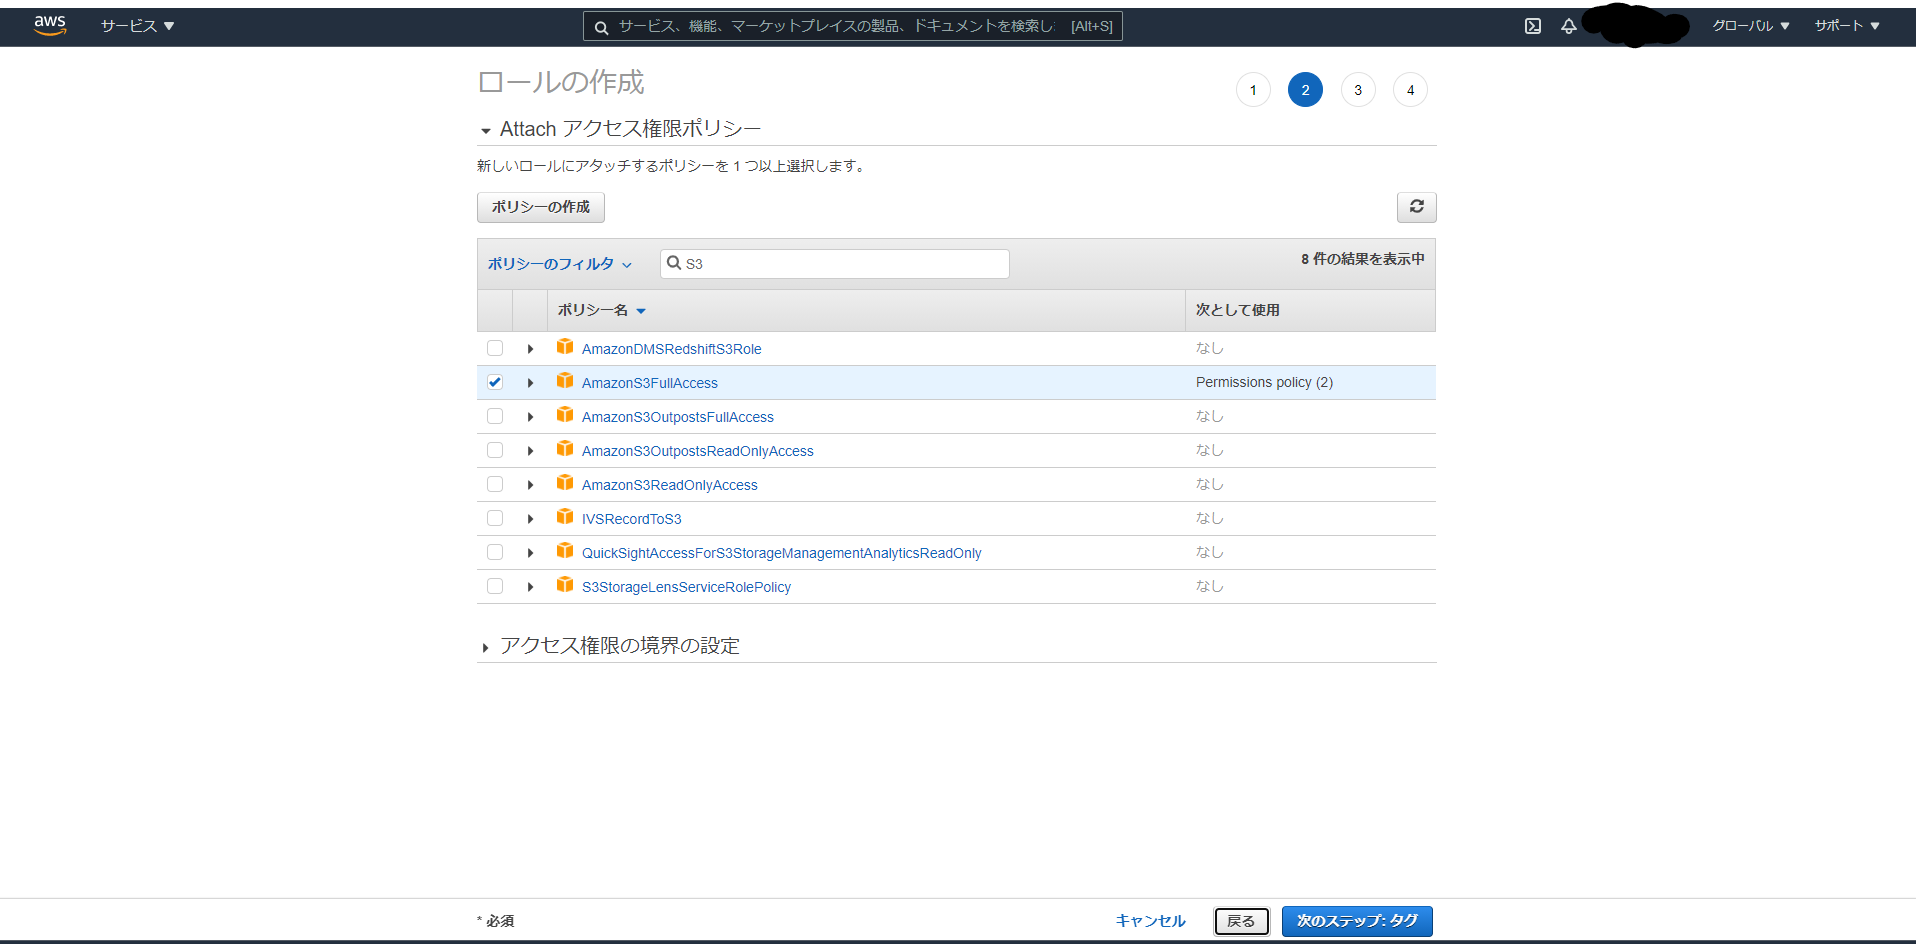
・S3バケットへ残高情報を読み書きするためにAmazonS3FullAccessポリシーをロールにアタッチし「次のステップ」をクリック
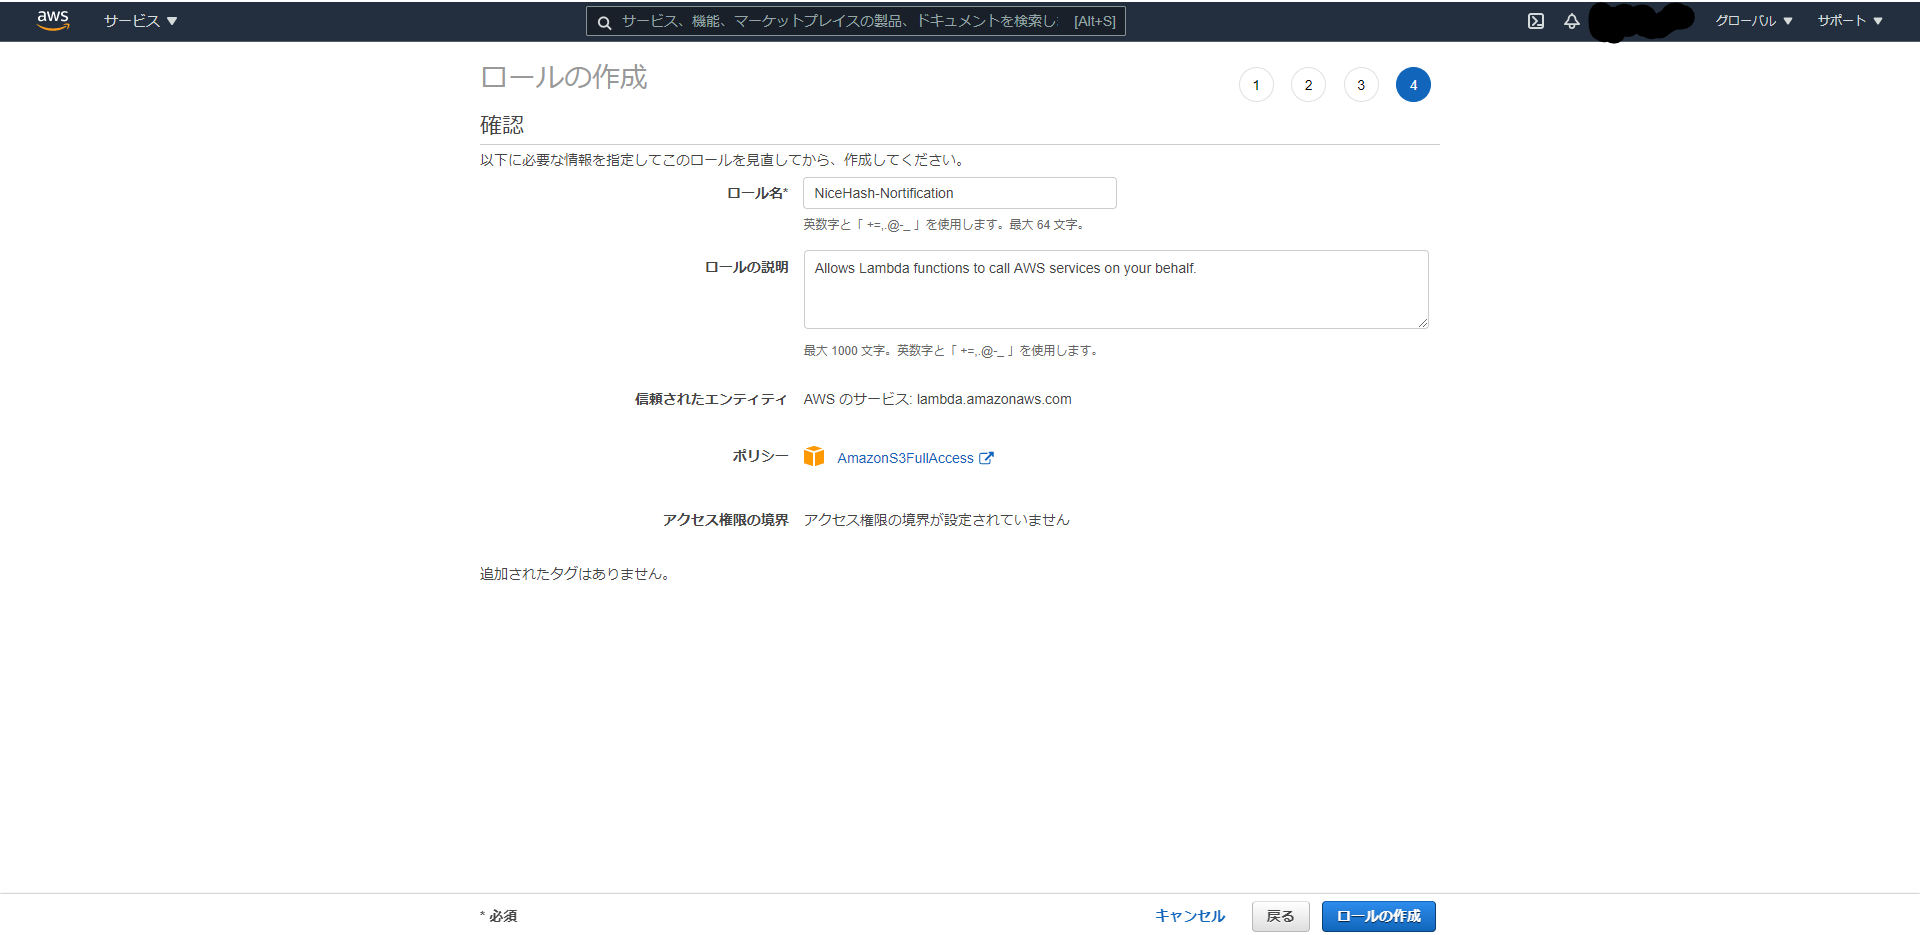
・タグの追加は不要なので何も記入せず「次のステップ」をクリック
・ロール名は適当にNiceHash-Nortificationとして「ロールの作成」をクリック
2-1-2.Lambda関数の作成
呼び出されるLambda関数本体を作成する
・サービスからLambdaを起動し、以下のように入力し「関数の作成」をクリック
 関数名:「NiceHash-Nortification-LINE」
 ランタイム:「Python 3.6」#Python3系ならたぶんOK
 アクセス権限:「NiceHash-Nortification」#作成したIAMロール

2-1-3.ソースコードのデプロイ
Lambdaで実行するプログラムをデプロイする
・以下4つのpythonファイルを新規に作成してコードをデプロイ
NiceHash-Nortification-LINE/
├ lambda_function.py
├ nicehash.py
├ marketrate.py
└ s3inout.py
Lambdaで呼び出されるメインプログラム
import os
import requests
import json
import datetime
import boto3

import nicehash
import marketrate
import s3inout
# Function kicked by AWS Lambda
def lambda_handler(event, context):
    #LINE Notify API
    LINE_NOTIFY_ACCESS_TOKEN = os.environ["LINE_NOTIFY_ACCESS_TOKEN"]
    HEADERS = {"Authorization": "Bearer %s" % LINE_NOTIFY_ACCESS_TOKEN}
    URL = "https://notify-api.line.me/api/notify"
    msg = create_message()
    data = {'message': msg}
    #Send a notification message to LINE with POST method
    requests.post(URL, headers=HEADERS, data=data)

# Function to get a nortification message
def create_message():
    #NiceHash API
    host = 'https://api2.nicehash.com'
    organisation_id = 'xxxxxxx-xxxx-xxxx-xxxx-xxxxxxxxxx' # hogehoge
    key = 'xxxxxxx-xxxx-xxxx-xxxx-xxxxxxxxxx' # API Key Code
    secret = 'xxxxxxx-xxxx-xxxx-xxxx-xxxxxxxxxx' # API Secret Key Code
    market='BTC'

    #S3 bucket
    bucket_name = '[bucket_name]'#hogehoge
    key_name = '[balance_filename]'#hogehoge

    #Get mining information from NiceHash API
    PrivateApi = nicehash.private_api(host, organisation_id, key, secret)
    accounts_info = PrivateApi.get_accounts_for_currency(market)
    balance_row = float(accounts_info['totalBalance'])

    #Get currency_to_JPY_rate from CoinGecko API
    TradeTable = marketrate.trade_table(market)
    rate = TradeTable.get_rate()
    balance_jpy = int(balance_row*rate)

    #S3 dealer
    S3dealer = s3inout.s3_dealer(bucket = bucket_name, key = key_name)
    pre_balance = int(S3dealer.read_from_s3_bucket())
    diff = balance_jpy - pre_balance
    S3dealer.write_to_s3_bucket(str(balance_jpy))

    #Nortification message
    time_text = "時刻: " + str(datetime.datetime.now(datetime.timezone(datetime.timedelta(hours=9))))[:19]
    market_text = "仮想通貨: " + market
    rate_text = "単位仮想通貨価値: " + str(rate) + "円"
    balance_text = "現在の残高: " + str(balance_jpy) + "円"
    pre_balance_text = "昨日の残高: " + str(pre_balance) + "円"
    symbol = "+" if diff > 0 else ""
    diff_txt = "【日次収益: " + str(symbol) + str(diff) + "円】"
    mon_revenue = "推定月次収益: " + str(diff*30) + "円"
    ann_revenue = "推定年次収益: " + str(diff*365) + "円"
    msg = '\n'.join([time_text,market_text,rate_text,balance_text,pre_balance_text,diff_txt,mon_revenue,ann_revenue])
    return msg
NiceHash API (2-2で説明)
from datetime import datetime
from time import mktime
import uuid
import hmac
import requests
import json
from hashlib import sha256
import optparse
import sys
class private_api:
  def __init__(self, host, organisation_id, key, secret, verbose=False):
      self.key = key
      self.secret = secret
      self.organisation_id = organisation_id
      self.host = host
      self.verbose = verbose
  def request(self, method, path, query, body):
      xtime = self.get_epoch_ms_from_now()
      xnonce = str(uuid.uuid4())
      message = bytearray(self.key, 'utf-8')
      message += bytearray('\x00', 'utf-8')
      message += bytearray(str(xtime), 'utf-8')
      message += bytearray('\x00', 'utf-8')
      message += bytearray(xnonce, 'utf-8')
      message += bytearray('\x00', 'utf-8')
      message += bytearray('\x00', 'utf-8')
      message += bytearray(self.organisation_id, 'utf-8')
      message += bytearray('\x00', 'utf-8')
      message += bytearray('\x00', 'utf-8')
      message += bytearray(method, 'utf-8')
      message += bytearray('\x00', 'utf-8')
      message += bytearray(path, 'utf-8')
      message += bytearray('\x00', 'utf-8')
      message += bytearray(query, 'utf-8')
      if body:
          body_json = json.dumps(body)
          message += bytearray('\x00', 'utf-8')
          message += bytearray(body_json, 'utf-8')
      digest = hmac.new(bytearray(self.secret, 'utf-8'), message, sha256).hexdigest()
      xauth = self.key + ":" + digest
      headers = {
          'X-Time': str(xtime),
          'X-Nonce': xnonce,
          'X-Auth': xauth,
          'Content-Type': 'application/json',
          'X-Organization-Id': self.organisation_id,
          'X-Request-Id': str(uuid.uuid4())
      }
      s = requests.Session()
      s.headers = headers
      url = self.host + path
      if query:
          url += '?' + query
      if self.verbose:
          print(method, url)
      if body:
          response = s.request(method, url, data=body_json)
      else:
          response = s.request(method, url)
      if response.status_code == 200:
          return response.json()
      elif response.content:
          raise Exception(str(response.status_code) + ": " + response.reason + ": " + str(response.content))
      else:
          raise Exception(str(response.status_code) + ": " + response.reason)

  def get_epoch_ms_from_now(self):
      now = datetime.now()
      now_ec_since_epoch = mktime(now.timetuple()) + now.microsecond / 1000000.0
      return int(now_ec_since_epoch * 1000)
CoinGecko API (2-2で説明)
import requests
import json
class trade_table:
    def __init__(self, market="BTC"):
        #currency-name conversion table
        self.currency_rename_table = {'BTC':'Bitcoin','ETH':'Ethereum','LTC':'Litecoin',
                                      'XRP':'XRP','RVN':'Ravencoin','MATIC':'Polygon',
                                      'BCH':'Bitcoin Cash','XLM':'Stellar','XMR':'Monero','DASH':'Dash'}
        self.market = self.currency_rename_table[market]

    def get_rate(self):
        body = requests.get('https://api.coingecko.com/api/v3/coins/markets?vs_currency=jpy')
        coingecko = json.loads(body.text)
        idx = 0
        while coingecko[idx]['name'] != self.market:
            idx += 1
            #Escape of illegal market_currency name
            if idx > 100:
                return "trade_table_err"
        #market-currency_to_JPY_rate
        else:
            return int(coingecko[idx]['current_price'])
S3バケットへの収益情報の読み込み・書き出し(2-3で説明)
import boto3
class s3_dealer:
  def __init__(self, bucket = 'nice-hash-balance', key = 'balance_latest.txt'):
    self.bucket = bucket
    self.key = key

  #Get balance of the previous day
  def read_from_s3_bucket(self):
    S3 = boto3.client('s3')
    res = S3.get_object(Bucket=self.bucket, Key=self.key)
    body = res['Body'].read()
    return body.decode('utf-8')

  #Export balance
  def write_to_s3_bucket(self, balance):
    S3 = boto3.resource('s3')
    obj = S3.Object(self.bucket, self.key)
    obj.put(Body=balance)
2-1-4.レイヤー作成
必要なモジュールをLambdaのレイヤーに取り込む
・2-1-3 記載のソースをデプロイしただけで実行するとrequestsモジュールが読み込めず以下エラーが発生してしまうため、外部モジュールをLayersへ定義する
{
  "errorMessage": "Unable to import module 'lambda_function': No module named 'requests'",
  "errorType": "Runtime.ImportModuleError"
}
・レイヤーファイルを作成するために、EC2でAmazon Linux AMIから新規インスタンスを作成する
・2-1-1の手順で、EC2のロールに対してS3のアクセスポリシーをアタッチ
※インターネット環境に接続されたWSLやUbuntu等のUNIXマシンであれば何でもOK
・EC2インスタンスへコンソール接続し、以下CLIコマンドを打鍵してレイヤーファイルを作成する
[ec2-user@ip-xxx-xx-xx-xxx ~]$ su -
[root@ip-xxx-xx-xx-xxx ~]# mkdir layer/
[root@ip-xxx-xx-xx-xxx ~]# cd layer
[root@ip-xxx-xx-xx-xxx ~]# yum -y install gcc gcc-c++ kernel-devel python-devel libxslt-devel libffi-devel openssl-devel
[root@ip-xxx-xx-xx-xxx ~]# yum -y install python-pip
[root@ip-xxx-xx-xx-xxx ~]# pip install -t ./ requests
[root@ip-xxx-xx-xx-xxx ~]# cd ../
[root@ip-xxx-xx-xx-xxx ~]# zip -r Layer.zip layer/
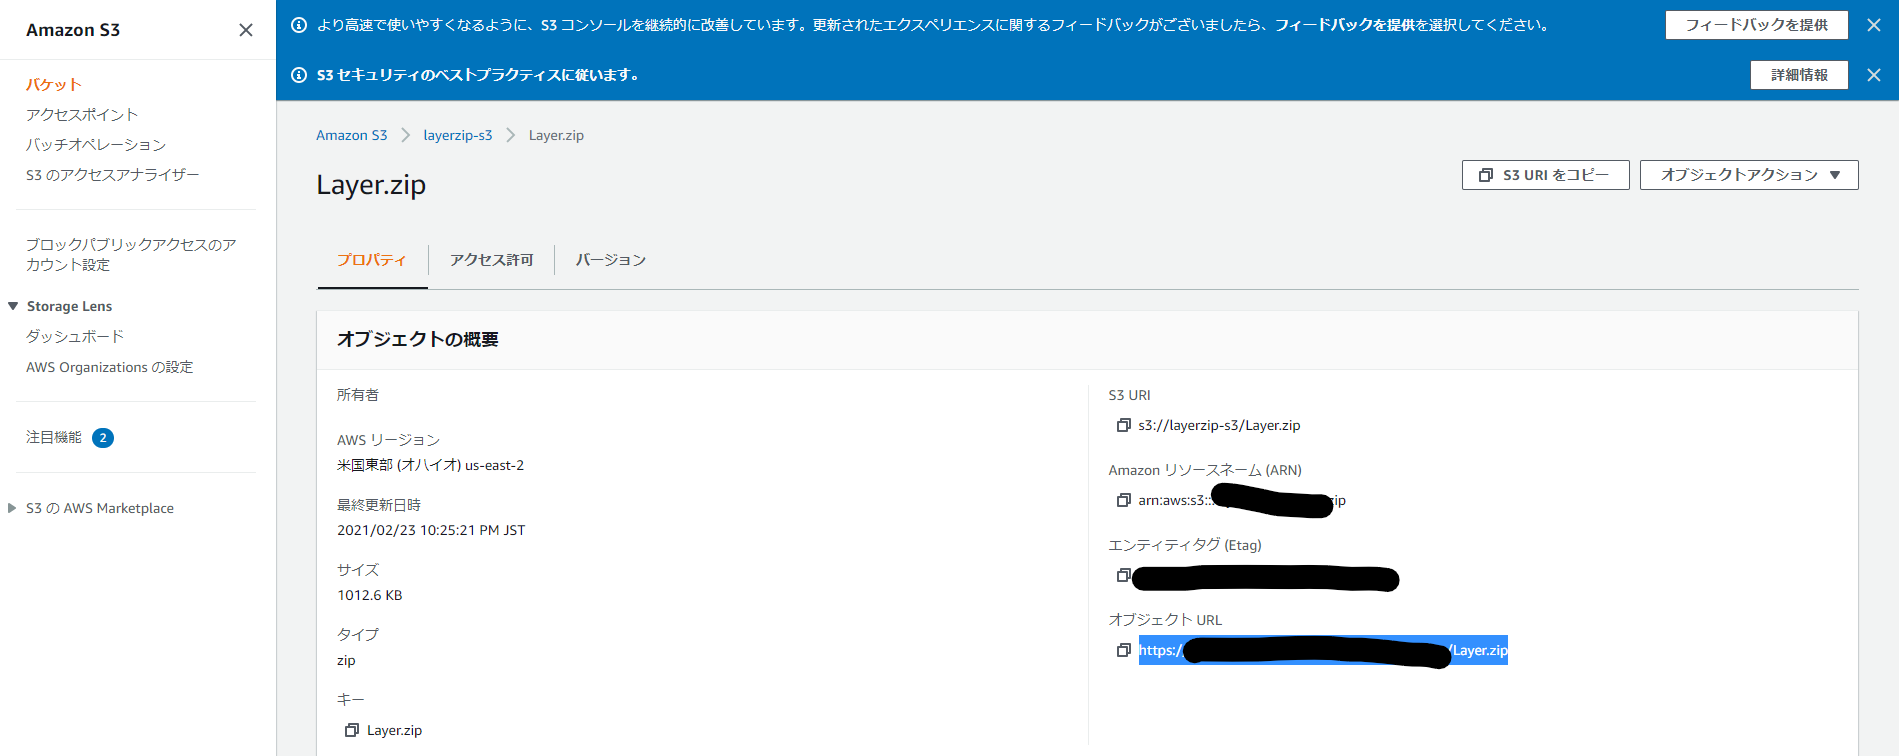
・レイヤーファイルを、S3バケットへアップロード
[root@ip-xxx-xx-xx-xxx ~]# chmod 777 Layer.zip
[root@ip-xxx-xx-xx-xxx ~]# aws s3 cp Layer.zip s3://layerzip-s3
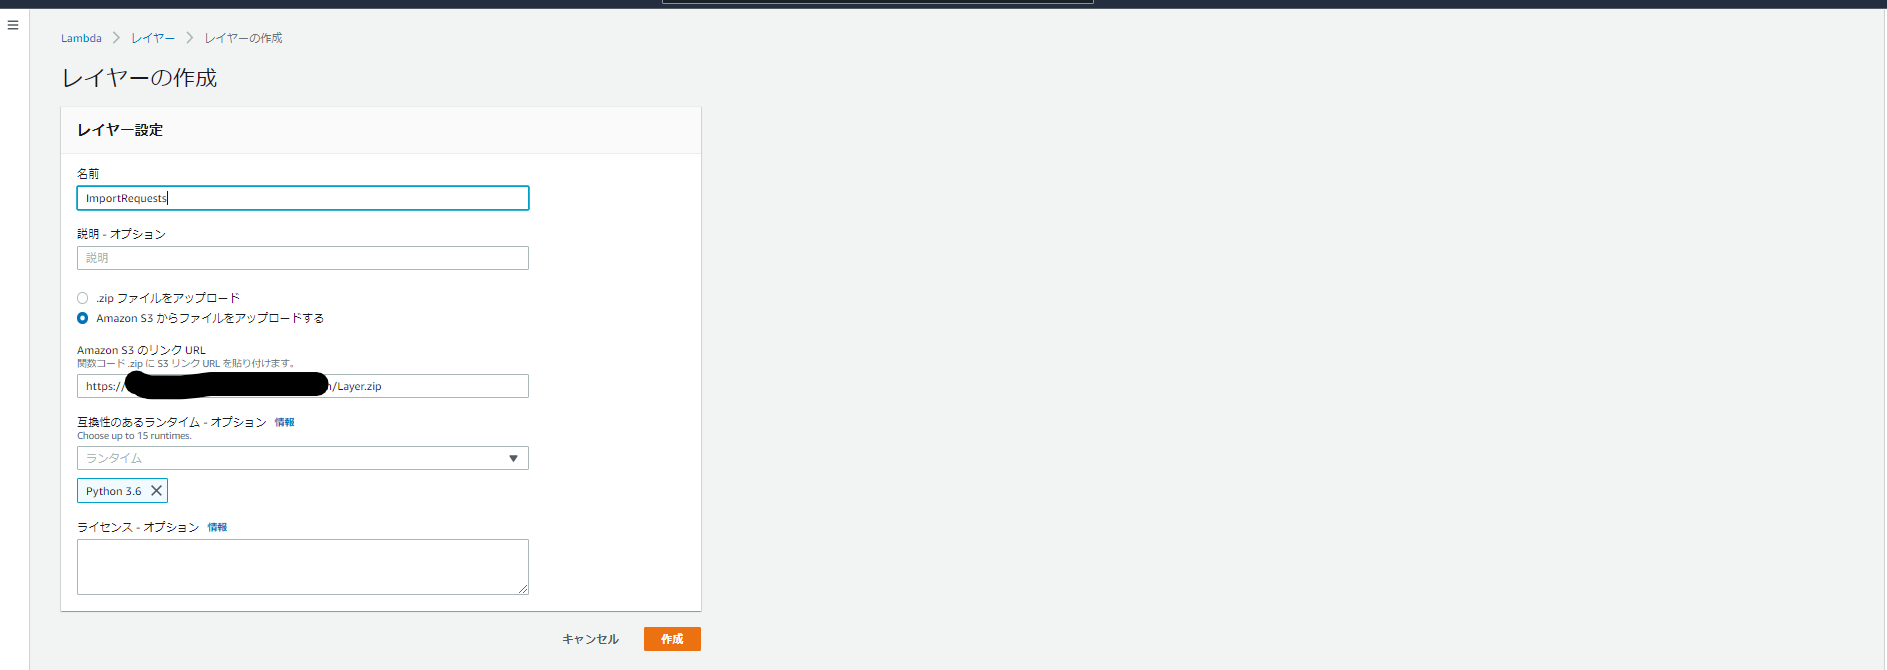
・S3でEC2からアップロードしたレイヤーファイルのオブジェクトURLを取得
・LambdaでS3のオブジェクトURLから名前を適当にImportRequestsとしてレイヤーを作成
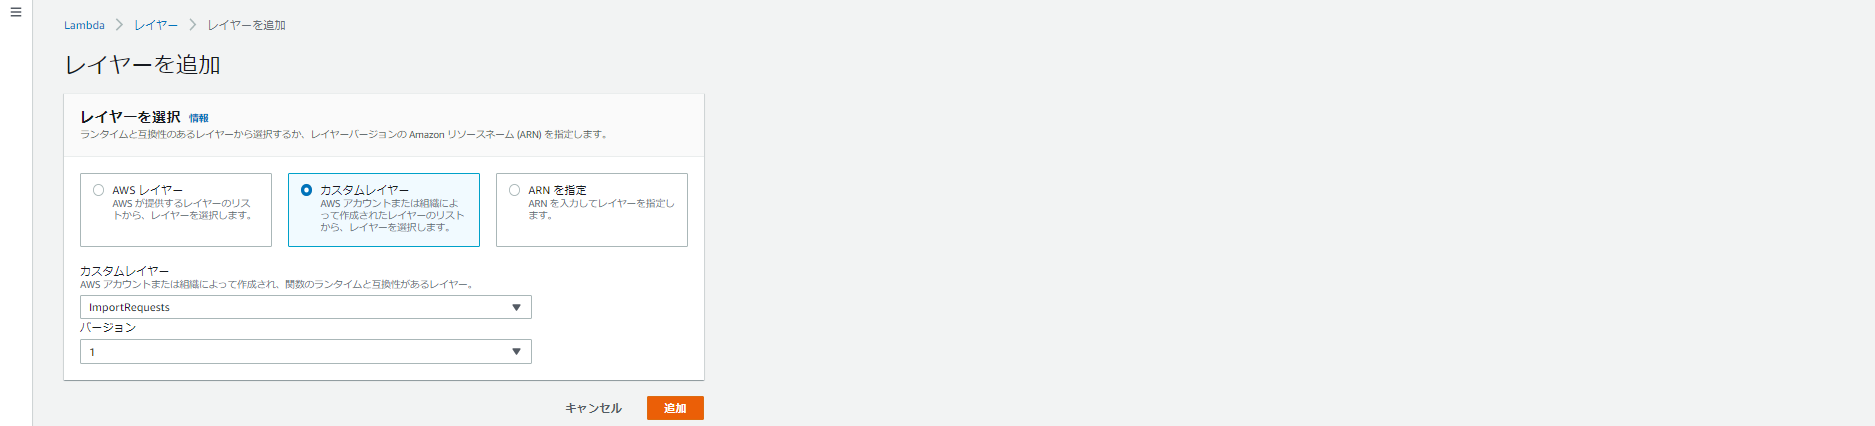
・Lambdaで「レイヤーの追加」をクリック

・カスタムレイヤーから作成したImportRequestsを読み込む
2-1-5.タイムアウト値の延長
タイムアウトエラーを回避するためにタイムアウト値を変更する
・Lambdaはデフォルトだと、メモリ:128MB、タイムアウト:3秒になっているため、タイムアウトのみ「3秒 ⇒ 5秒」へ変更する

2-2.APIによる収益情報取得
外部APIからマイニング収益情報を取得する
・LambdaとNiceHash APIを連携するために、NiceHashへログインしてMySettingsからAPI Keysを発行する
・NiceHash API(nicehash.py)で収益情報を取得するために、lambda_function.pyの対象箇所に発行したAPI Keys、組織IDを入力する
# NiceHash API
host = 'https://api2.nicehash.com'
organisation_id = 'xxxxxxx-xxxx-xxxx-xxxx-xxxxxxxxxx' # hogehoge
key = 'xxxxxxx-xxxx-xxxx-xxxx-xxxxxxxxxx' # API Key Code
secret = 'xxxxxxx-xxxx-xxxx-xxxx-xxxxxxxxxx' # API Secret Key Code
・NiceHash APIのみでは、円相場の情報は取得できないため、別の外部API CoinGecko API(marketrate.py)を呼び出して、各仮想通貨市場の日本円相場を取得する。
2-3.EventBridgeによるトリガー定義
日次ジョブとしてLambdaをキックするためのトリガーを定義する
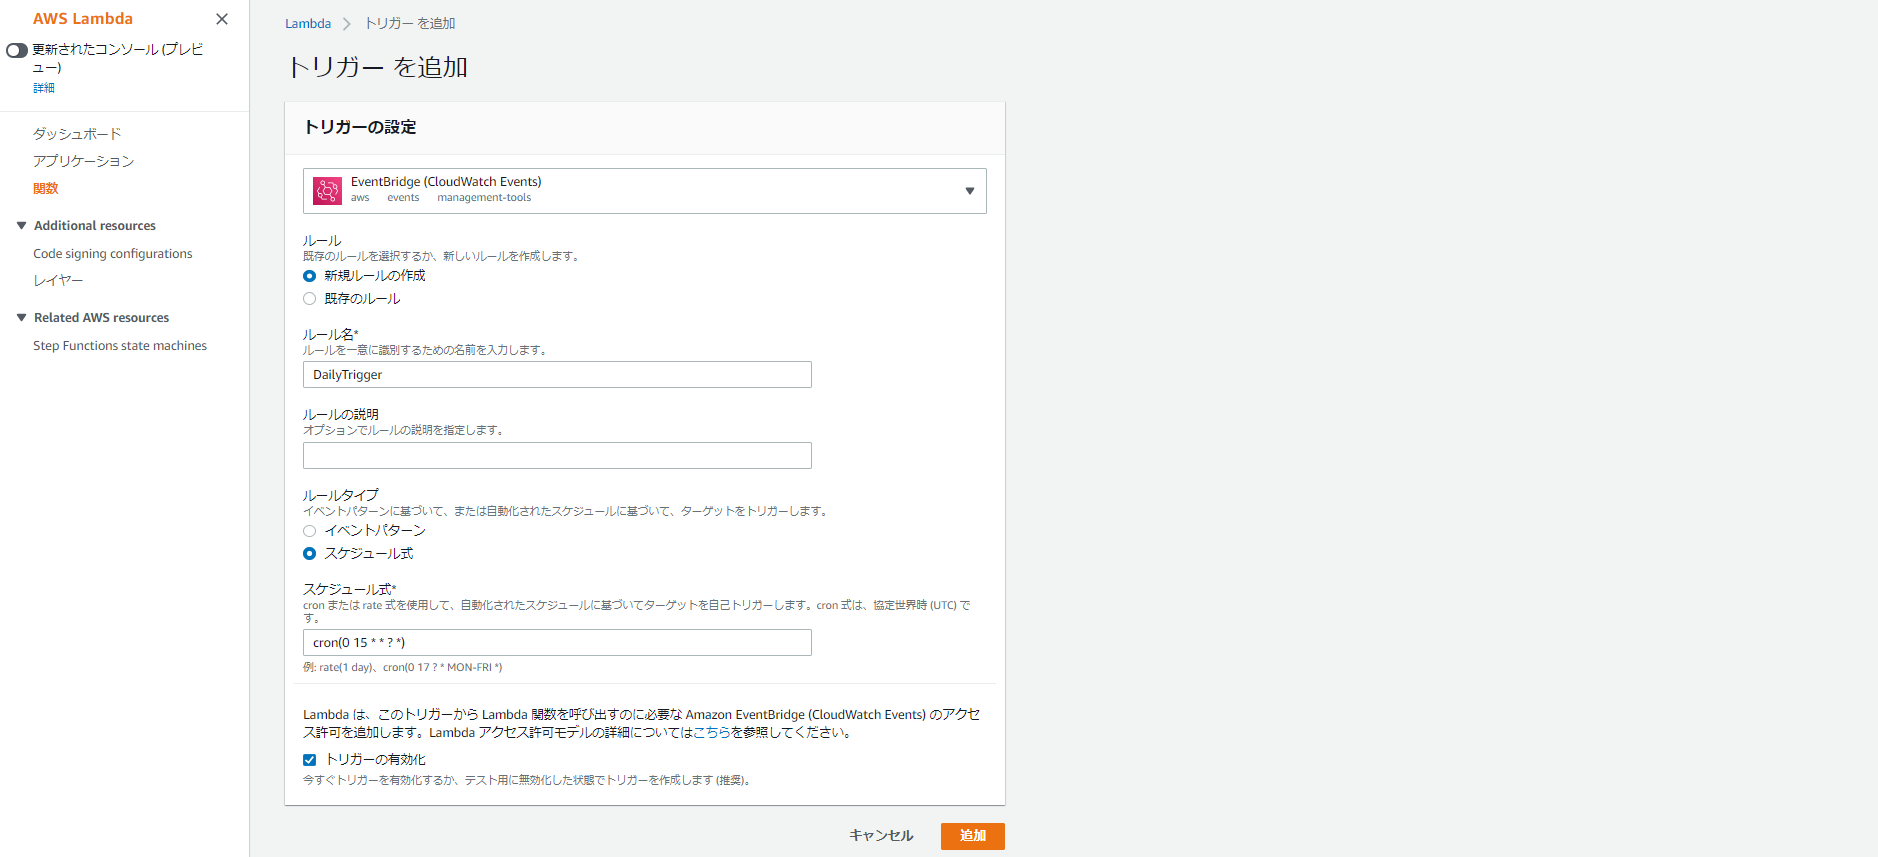
・Lambdaから「トリガーの追加」をクリック
・EventBridgeを選択し、以下のように入力し「追加」をクリック
※AWSでcronを定義する際は、crontabとの違いや時差を考慮する必要があるため注意する 1
ルール:「新規ルールの作成」
ルール名:DailyTrigger
ルールタイプ:スケジュール式
スケジュール式:cron(0 15 * * ? *) # 毎日0:00に実行するcron
2-4.S3バケットへの書き出し・読み込み
前日の収益との比較を行うため、S3バケットのファイルに対して書き出し・読み込みを行う
・S3バケットbucket_nameを作成して、前日の残高(円)を整数で記載したダミーファイルbalance_filename.csvを予め格納しておく
28583
・LambdaとS3のサービス間で連携するために、lambda_function.pyの対象箇所を編集する
# NiceHash API
# S3 bucket
bucket_name = '[bucket_name]' # S3バケット名
key_name = '[balance_filename.csv]' # 残高情報が記載されたファイル名
2-5.LINE NotifyによるLINE通知
2-5-1.LINE Notify アクセストークンの発行
AWSへLINE Nortifyを連携するために必要なトークンを発行する
・LINE Notifyのトップページへアクセス、所有するLINEアカウントでログインして本人確認を行う
・以下のようにログインできればOK

・右上に記載されている自分の名前をクリックし、マイページへ移動
・トークンを発行するをクリック
・トークン名を適当にNiceHash日次収益通知として、1:1でLINE Notifyから通知を受け取るを選択し、発行するをクリック

・発行されたトークンをコピー

・以下のように連携中サービスが追加されていればOK

2-5-2.環境変数の設定
LambdaとLINE Nortifyサービス間を連携するために環境変数を設定する
・Lambdaサービスから環境変数→設定→編集をクリック

・環境変数を以下のように入力して「保存」をクリック
キー:LINE_NOTIFY_ACCESS_TOKEN
値:(2-5-1で取得したトークン)

3. 実行結果
・毎日0:00になるとEventBridgeがLambdaをキックして、日次でLINE通知が来るようになりました。

(BTCの円相場 変動が激しすぎて、収益のばらつきがめちゃめちゃでかい…)
4. 終わりに
・LINEの連携はとても簡単で、気軽に触れるようシンプルで分かりやすく作りこまれていました。他にも何か通知する仕組みを作ってみたいと思います。
5. 更新履歴
ver. 1.0 初版投稿 2021/03/06