はじめに
Spring Batchの二つステップの種類に実現方法を検証します。今回はJava のアノテーションで実現します。
ステップの種類
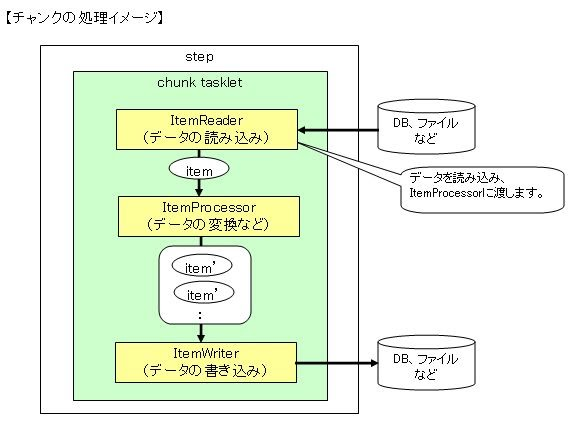
ステップには主に2つの種類があります。
「taskletのみのステップ」と「チャンクによるステップ」です。
以下ではそれぞれについて簡単に見ていきます。
環境
Windows 10
JDK 1.8.0_251
STS 4.6.2
プロジェクトの作成
「Spring スターター・プロジェクト」を作成します。プロジェクトを作成する時、依存関係の時、「Spring Batch」しか選択しません。
※プロジェクトを作成した後、pom.xmlに「hsqldb」の依存を手動で追記します。dependenciesブロックに下記ソースを追記します。
        <dependency>
			<groupId>org.hsqldb</groupId>
			<artifactId>hsqldb</artifactId>
			<scope>runtime</scope>
        </dependency>
chunk stepサンプルソースの説明
■起動Main方法
@SpringBootApplication
public class BatchTestAppApplication {

	public static void main(String[] args) {
		SpringApplication.run(BatchTestAppApplication.class, args);
	}

}
■テーブル作成用SQL
DROP TABLE people IF EXISTS;

CREATE TABLE people  (
    person_id BIGINT IDENTITY NOT NULL PRIMARY KEY,
    first_name VARCHAR(20),
    last_name VARCHAR(20)
);
■インプットCSVファイル
Jill,Doe
Joe,Doe
Justin,Doe
Jane,Doe
John,Doe
■DTOクラス
public class Person {

	private String lastName;
	private String firstName;

	public Person() {
	}

	public Person(String firstName, String lastName) {
		this.firstName = firstName;
		this.lastName = lastName;
	}

	public void setFirstName(String firstName) {
		this.firstName = firstName;
	}

	public String getFirstName() {
		return firstName;
	}

	public String getLastName() {
		return lastName;
	}

	public void setLastName(String lastName) {
		this.lastName = lastName;
	}

	@Override
	public String toString() {
		return "firstName: " + firstName + ", lastName: " + lastName;
	}

}
■ItemProcessorインタフェースの実装クラス
public class PersonItemProcessor implements ItemProcessor<Person, Person> {

	private static final Logger log = LoggerFactory.getLogger(PersonItemProcessor.class);

	@Override
	public Person process(final Person person) throws Exception {
		final String firstName = person.getFirstName().toUpperCase();
		final String lastName = person.getLastName().toUpperCase();

		final Person transformedPerson = new Person(firstName, lastName);

		log.info("Converting (" + person + ") into (" + transformedPerson + ")");

		return transformedPerson;
	}

}
説明:
processメソッドを実装します。簡単な名前を大文字に変更します。実行履歴確認のため、infoログを出力します。
■リスナークラス
ジョブ実行結果を確認するために、JobExecutionListenerSupportのafterJobメソッドを実装します。
@Component
public class JobCompletionNotificationListener extends JobExecutionListenerSupport {

	private static final Logger log = LoggerFactory.getLogger(JobCompletionNotificationListener.class);

	private final JdbcTemplate jdbcTemplate;

	@Autowired
	public JobCompletionNotificationListener(JdbcTemplate jdbcTemplate) {
		this.jdbcTemplate = jdbcTemplate;
	}

	@Override
	public void afterJob(JobExecution jobExecution) {
		if (jobExecution.getStatus() == BatchStatus.COMPLETED) {
			log.info("!!! JOB FINISHED! Time to verify the results");

			jdbcTemplate
					.query("SELECT first_name, last_name FROM people",
							(rs, row) -> new Person(rs.getString(1), rs.getString(2)))
					.forEach(person -> log.info("Found <" + person + "> in the database."));
		}
	}
}
■Batchの各Bean定義クラス
@Configuration
@EnableBatchProcessing
public class BatchConfiguration {

	private static final Logger log = LoggerFactory.getLogger(BatchConfiguration.class);

	@Autowired
	public JobBuilderFactory jobBuilderFactory;

	@Autowired
	public StepBuilderFactory stepBuilderFactory;

	@Bean
	public FlatFileItemReader<Person> reader() {
		return new FlatFileItemReaderBuilder<Person>().name("personItemReader")
				.resource(new ClassPathResource("sample-data.csv")).delimited()
				.names(new String[] { "firstName", "lastName" })
				.fieldSetMapper(new BeanWrapperFieldSetMapper<Person>() {
					{
						setTargetType(Person.class);
					}
				}).build();
	}

	@Bean
	public PersonItemProcessor processor() {
		return new PersonItemProcessor();
	}

	@Bean
	public JdbcBatchItemWriter<Person> writer(DataSource dataSource) {
		return new JdbcBatchItemWriterBuilder<Person>()
				.itemSqlParameterSourceProvider(new BeanPropertyItemSqlParameterSourceProvider<>())
				.sql("INSERT INTO people (first_name, last_name) VALUES (:firstName, :lastName)").dataSource(dataSource)
				.build();
	}

	@Bean
	public Job importUserJob(JobCompletionNotificationListener listener, Step step1) {
		return jobBuilderFactory.get("importUserJob").incrementer(new RunIdIncrementer()).listener(listener).flow(step1)
				.end()
				.build();
	}

	@Bean
	public Step step1(JdbcBatchItemWriter<Person> writer) {
		return stepBuilderFactory.get("step1").<Person, Person>chunk(10).reader(reader()).processor(processor())
				.writer(writer).build();
	}
}
説明:
-
reader
FlatFileItemReaderをItemReaderとしてを戻ります。入力CSVファイルのデータを読み込んで、Person DTO Beanに格納すします。
-
processor
PersonItemProcessorをItemProcessorとしてを戻ります。
-
writer
JdbcBatchItemWriterをItemWriterとして戻ります。ItemProcessorの処理結果をDBに格納します。
-
step1
StepBuilderFactoryでFlatFileItemReader、PersonItemProcessorとJdbcBatchItemWriterをリンクして、Spring Batchのchunk step Beanを生成します。
-
importUserJob
カスタマイズしたJobCompletionNotificationListener Beanとstep1で生成したchunk step Beanを利用して、Spring BatchのJobを生成します。該当バッチを起動すると、このメソッドで生成したJobを実行できます。
tasklet stepサンプルソースの説明
上記のプロジェクトを活用して、BatchConfigurationを改修して、tasklet stepサンプルを実装します。該当tasklet stepはOSのコマンドを実行します。
■BatchConfigurationの改修
- tasklet Beanの生成
	@Bean
	public Tasklet copyFile() {
		log.info("Start FileCopy");
		SystemCommandTasklet tasklet = new SystemCommandTasklet();
		tasklet.setCommand("cmd /C copy C:\\data\\test.txt C:\\data\\test2.txt");
		tasklet.setTimeout(3000);
		return tasklet;
	}
※SystemCommandTaskletの各属性の説明はJavadocで確認ください。
- step Beanの生成
	@Bean
	public Step step2() {
		return stepBuilderFactory.get("step2").tasklet(copyFile()).build();
	}
- Jobの生成
	@Bean
	public Job cmdJob(JobCompletionNotificationListener listener, Step step1, Step step2, Step step3) {
		return jobBuilderFactory.get("cmdJob").incrementer(new RunIdIncrementer()).listener(listener).
				flow(step2)
				.end()
				.build();
	}
参考
Creating a Batch Service
[Java][Spring Boot] Spring BatchでTaskletを使ってみる

