はじめに
ブラウザでの自動テストは、よくSeleniumを聞く気がしますが、これ以外にも、Selenide、Gebといったものもあります。この記事では、この3つでの違いや強みそもそもどんなツールがあるのかなどを紹介します。
Selenium
Selemiunは、Webブラウザの自動操作を行うライブラリです。自動テストライブラリでは、ないです。公式では、以下のような一文があります(和訳は間違ってるかもです)。
Selenium automates browsers. That's it! What you do with that power is entirely up to you.
Seleniumはブラウザをオートメーション化します。Seleniumで何をするかはあなた次第です。
といった感じで、自動テストでもWebスクレイピングでも、何をするかはSeleniumの利用者次第のようです。
WebDriver
ブラウザを外部ソフトウェアから操作したり情報の取得などを行ってくれるものです。ブラウザといってもChrome、Safari、Firefox、Opera、Edge、IEといろいろあります。Selenium3.0からWebDriverはブラウザのベンダがそれぞれのWebDriverをサポートしています。2018年6月5日に、WebDriverがW3C勧告に移行したことが発表されました1。これによって、これまでSeleniumが開発していたWebDriverが標準技術としてW3Cに取り込まれるようです。
言語対応
Seleniumは、Java、C#、Ruby、Python、Javascript(Node)の5つの言語をサポートしています。これらの言語からWebDriverを通じてブラウザの操作ができます。
モバイル対応
Selenium2.39.0未満のときは、AndroidDriverとiPhoneDriverが有りました。最新のSeleniumでは、削除されています。とはいえモバイルが見捨てられたわけではなく、モバイルアプリ向けテストフレームワークとしてAppium、AndroidDriverの代わりにSelendroid、iPhoneDriverの代わりにios-driverがあります。この中だとAppiumがかなりメジャー。
Selenium IDE
Seleniumで実行する操作(テストケース)を自動生成してくれるブラウザのアドオンです。Selenium IDEは少し前までFirefoxにしかアドオンがありませんでした。が、FirefoxのアドオンアーキテクチャがWebExtensionsへの移行が55くらいから始まりこの影響でSelenium IDEがFirefox55から動かなくなりました。この時期(2017/8以降)に動かすには、Firefoxの自動アップデートをoffにし、ダウングレードしないと使えない状況でした。2017年12月に最新のSelenium IDEがChromeとFirefoxのアドオンで公開されました。現在、公開当初は旧バージョンと比べればだいぶ機能が少ない感じでしたが徐々に増えてきているようです。詳しくはリリースノート参照
新バージョンを起動するとこんな感じです(Chrome)。
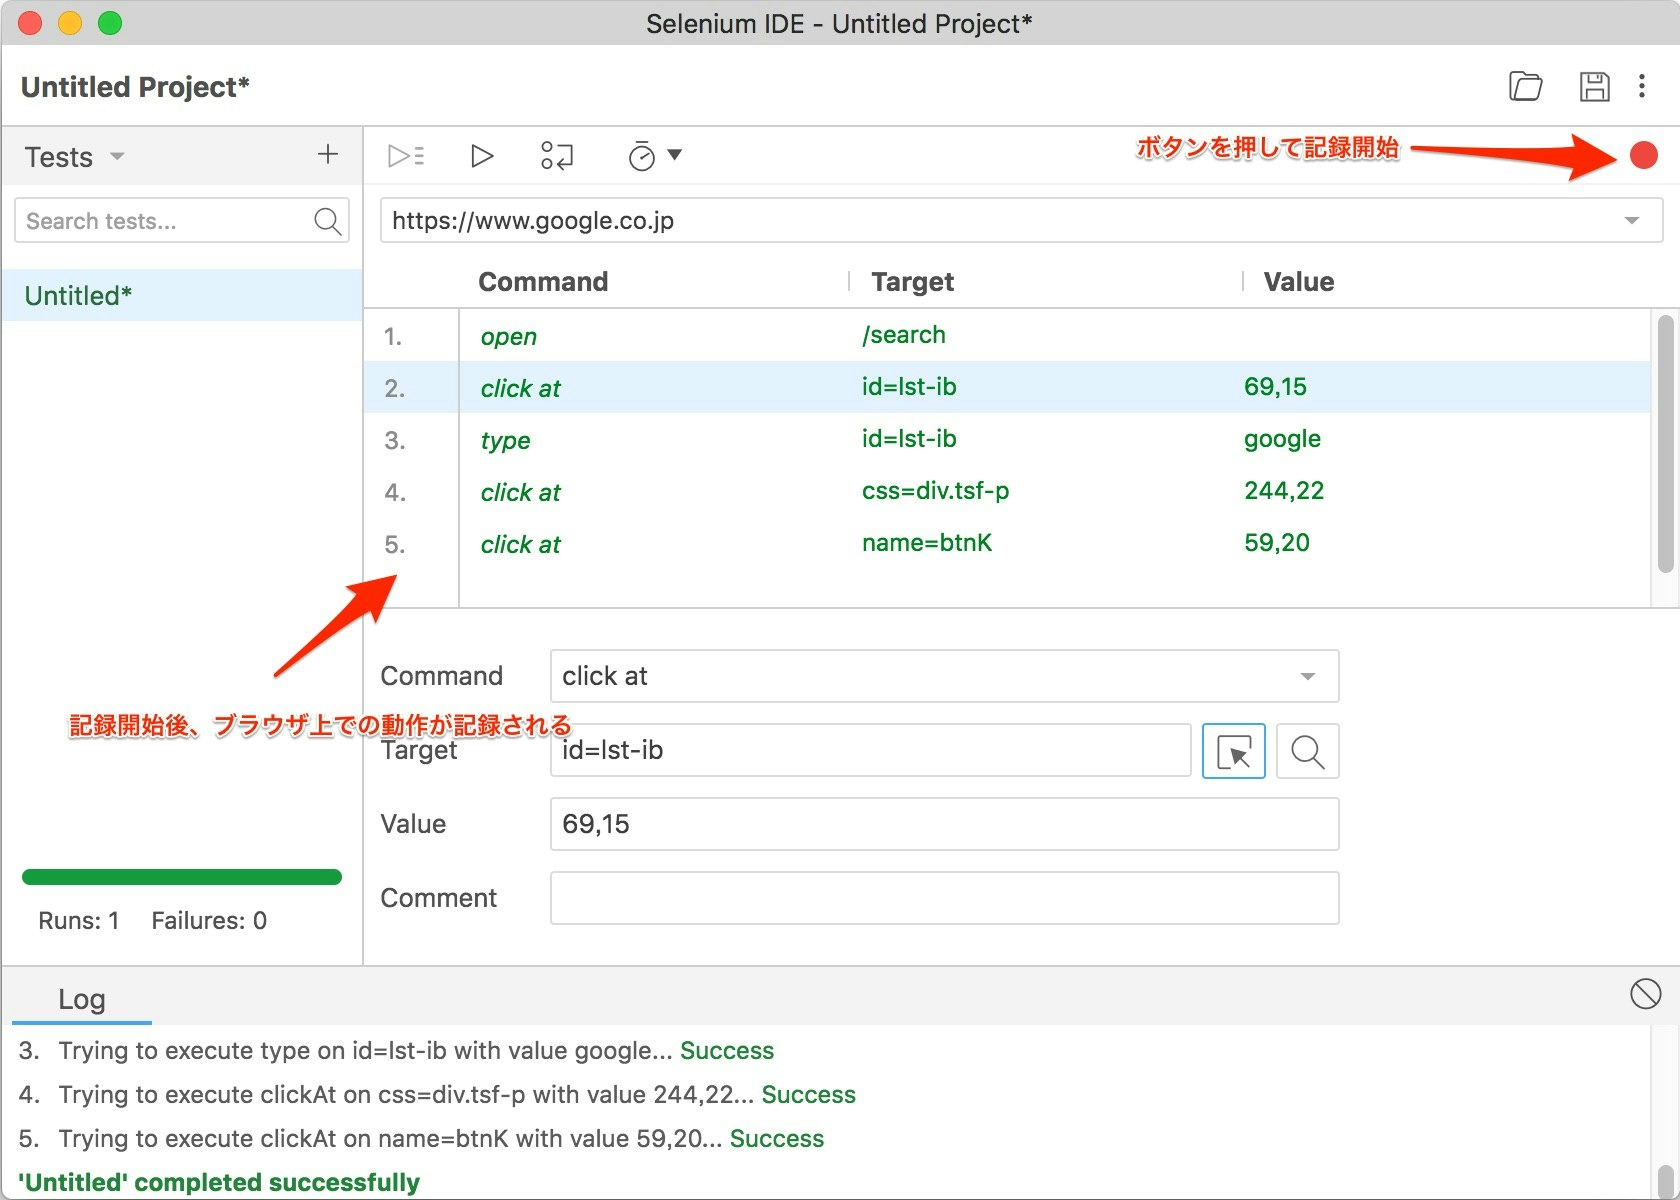
操作は、簡単で右上の記録ボタンを押して、あとは、ブラウザ上で操作するだけでSeleniumIDEに操作が記録されていきます。バージョン3.0.3では記録した操作は*.side形式でしかまだ保存はできません。旧バージョンだとhtml形式やJavaコードでエクスポート可能でしたが、新バージョンだとまだのようです。
Selenium Grid
大抵のWebアプリは複数のブラウザ、ブラウザの各バージョン、モバイルに対応することが必要とされていると思います。これらに対してテストをするとなると、いくらSeleniumの力で自動化できてもそれなりの時間がかかります。これを解決してくれるのがSelenium Gridです。Selenium Gridは、複数のSeleniumの実行環境を管理し、テストを並列実行してくれるツールです。1つのテストスクリプトを複数環境で並行実行でしてくれるので、実行時間を大幅に短くできます。
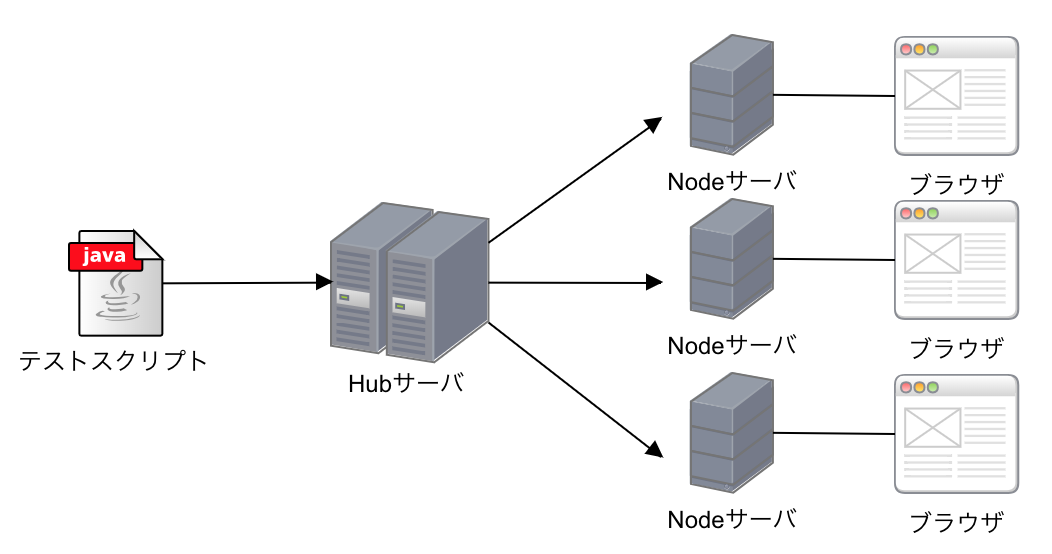
構成
Selenium Gridは、Hubサーバというテストスクリプトを受けるサーバーとNodeというテストを実行する環境で構成されてます。Hubサーバは管理サーバであり、NodeサーバがOSやブラウザ持つサーバになります。動作としては、Hubサーバーに、OSとブラウザーを指定してテストスクリプトを送ることで、テスト条件に合うOSとブラウザを持つNodeサーバに接続し、処理を振り分けて並列実行してくれます。
Docker Selenium
Selenium Gridでは、Nodeサーバが増えるとその分、VMで環境構築し、メンテナンスコストも上がります。そこで、Dockerで環境構築実行するSeleniumが作られました。それがDocker Selenium。と言ってもDockerイメージが配布されているだけです。
| Dockerイメージ | 内容 |
|---|---|
| selenium/base | JREとSelenium Serverのjarファイルがあるベースイメージ |
| selenium/hub | Selenium Grid のHubサーバを実行するイメージ |
| selenium/node-base | 仮想デスクトップ環境があるNodeサーバのイメージ |
| selenium/node-chrome | ChromeがインストールされているNodeサーバイメージ(Hubに繋ぐ必要あり) |
| selenium/node-firefox | FirefoxがインストールされているNodeサーバイメージ(Hubに繋ぐ必要あり) |
| selenium/node-chrome-debug | ChromeがインストールされているNodeサーバとVNCサーバのイメージ(Hubに繋ぐ必要あり) |
| selenium/node-firefox-debug | FirefoxがインストールされているNodeサーバとVNCサーバのイメージ(Hubに繋ぐ必要あり) |
| selenium/standalone-chrome | Chromeが入ったのSelenium Standalone |
| selenium/standalone-firefox | Firefoxが入ったSelenium Standalone |
| selenium/standalone-chrome-debug | Chromeが入ったのSelenium StandaloneとVNCサーバのイメージ |
| selenium/standalone-firefox-debug | Firefoxが入ったSelenium StandaloneとVNCサーバのイメージ |
動かしてみる
試しにDockerでHubサーバとNodeサーバを立ててみます。管理をしやすくするためにdocker-composeでymlファイルに設定を書いていきます。
version: "3.3"

services:
  selenium-hub:
    image: selenium/hub:3.12.0
    ports:
      - "4444:4444"
    networks: [selenium-grid]

  chrome-node:
    image: selenium/node-chrome-debug:3.12.0
    ports:
      - "5900:5900"
    environment:
      HUB_PORT_4444_TCP_ADDR: selenium-hub
      HUB_PORT_4444_TCP_PORT: 4444
    volumes:
      - ./hub:/dev/random
    networks: [selenium-grid]
    links:
      - selenium-hub:selenium-hub
    depends_on:
      - selenium-hub

networks:
  selenium-grid:
    driver: bridge
うまく立ち上がればこんな感じでコンテナがいるはずです。
$ docker ps
CONTAINER ID        IMAGE                               COMMAND                  CREATED             STATUS              PORTS                    NAMES
691d0da636cb        selenium/node-chrome-debug:3.12.0   "/opt/bin/entry_poin…"   9 minutes ago       Up 9 minutes        0.0.0.0:5900->5900/tcp   docker-selenium-grid_chrome-node_1
7a34769fd3b2        selenium/hub:3.12.0                 "/opt/bin/entry_poin…"   9 minutes ago       Up 9 minutes        0.0.0.0:4444->4444/tcp   docker-selenium-grid_selenium-hub_1
Hubサーバには、http://localhost:4444/grid/console で接続ができます。
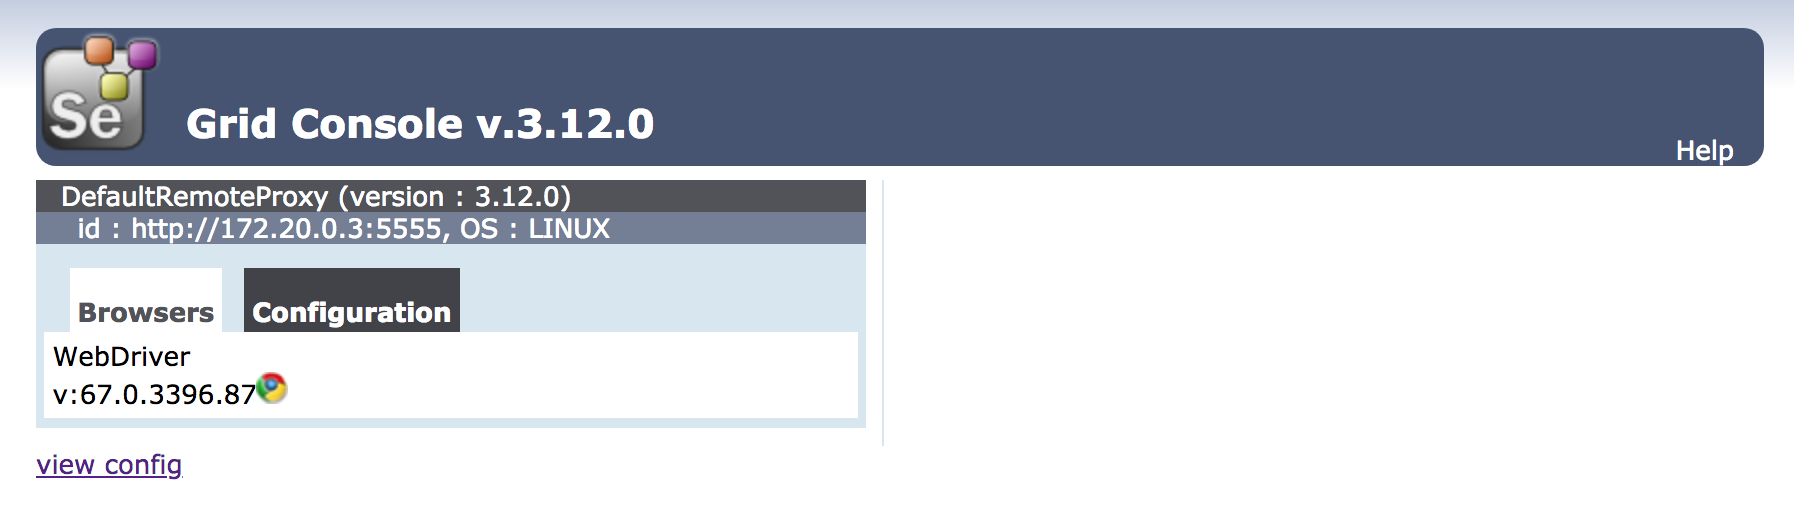
うまく立ち上がっていれば、今回登録したChromeのNodeサーバが見れます。
NodeはVNCで立ち上がっているのでvnc://localhost:5900で接続できます。パスワードが求められるのでデフォルトのsecretを入力。
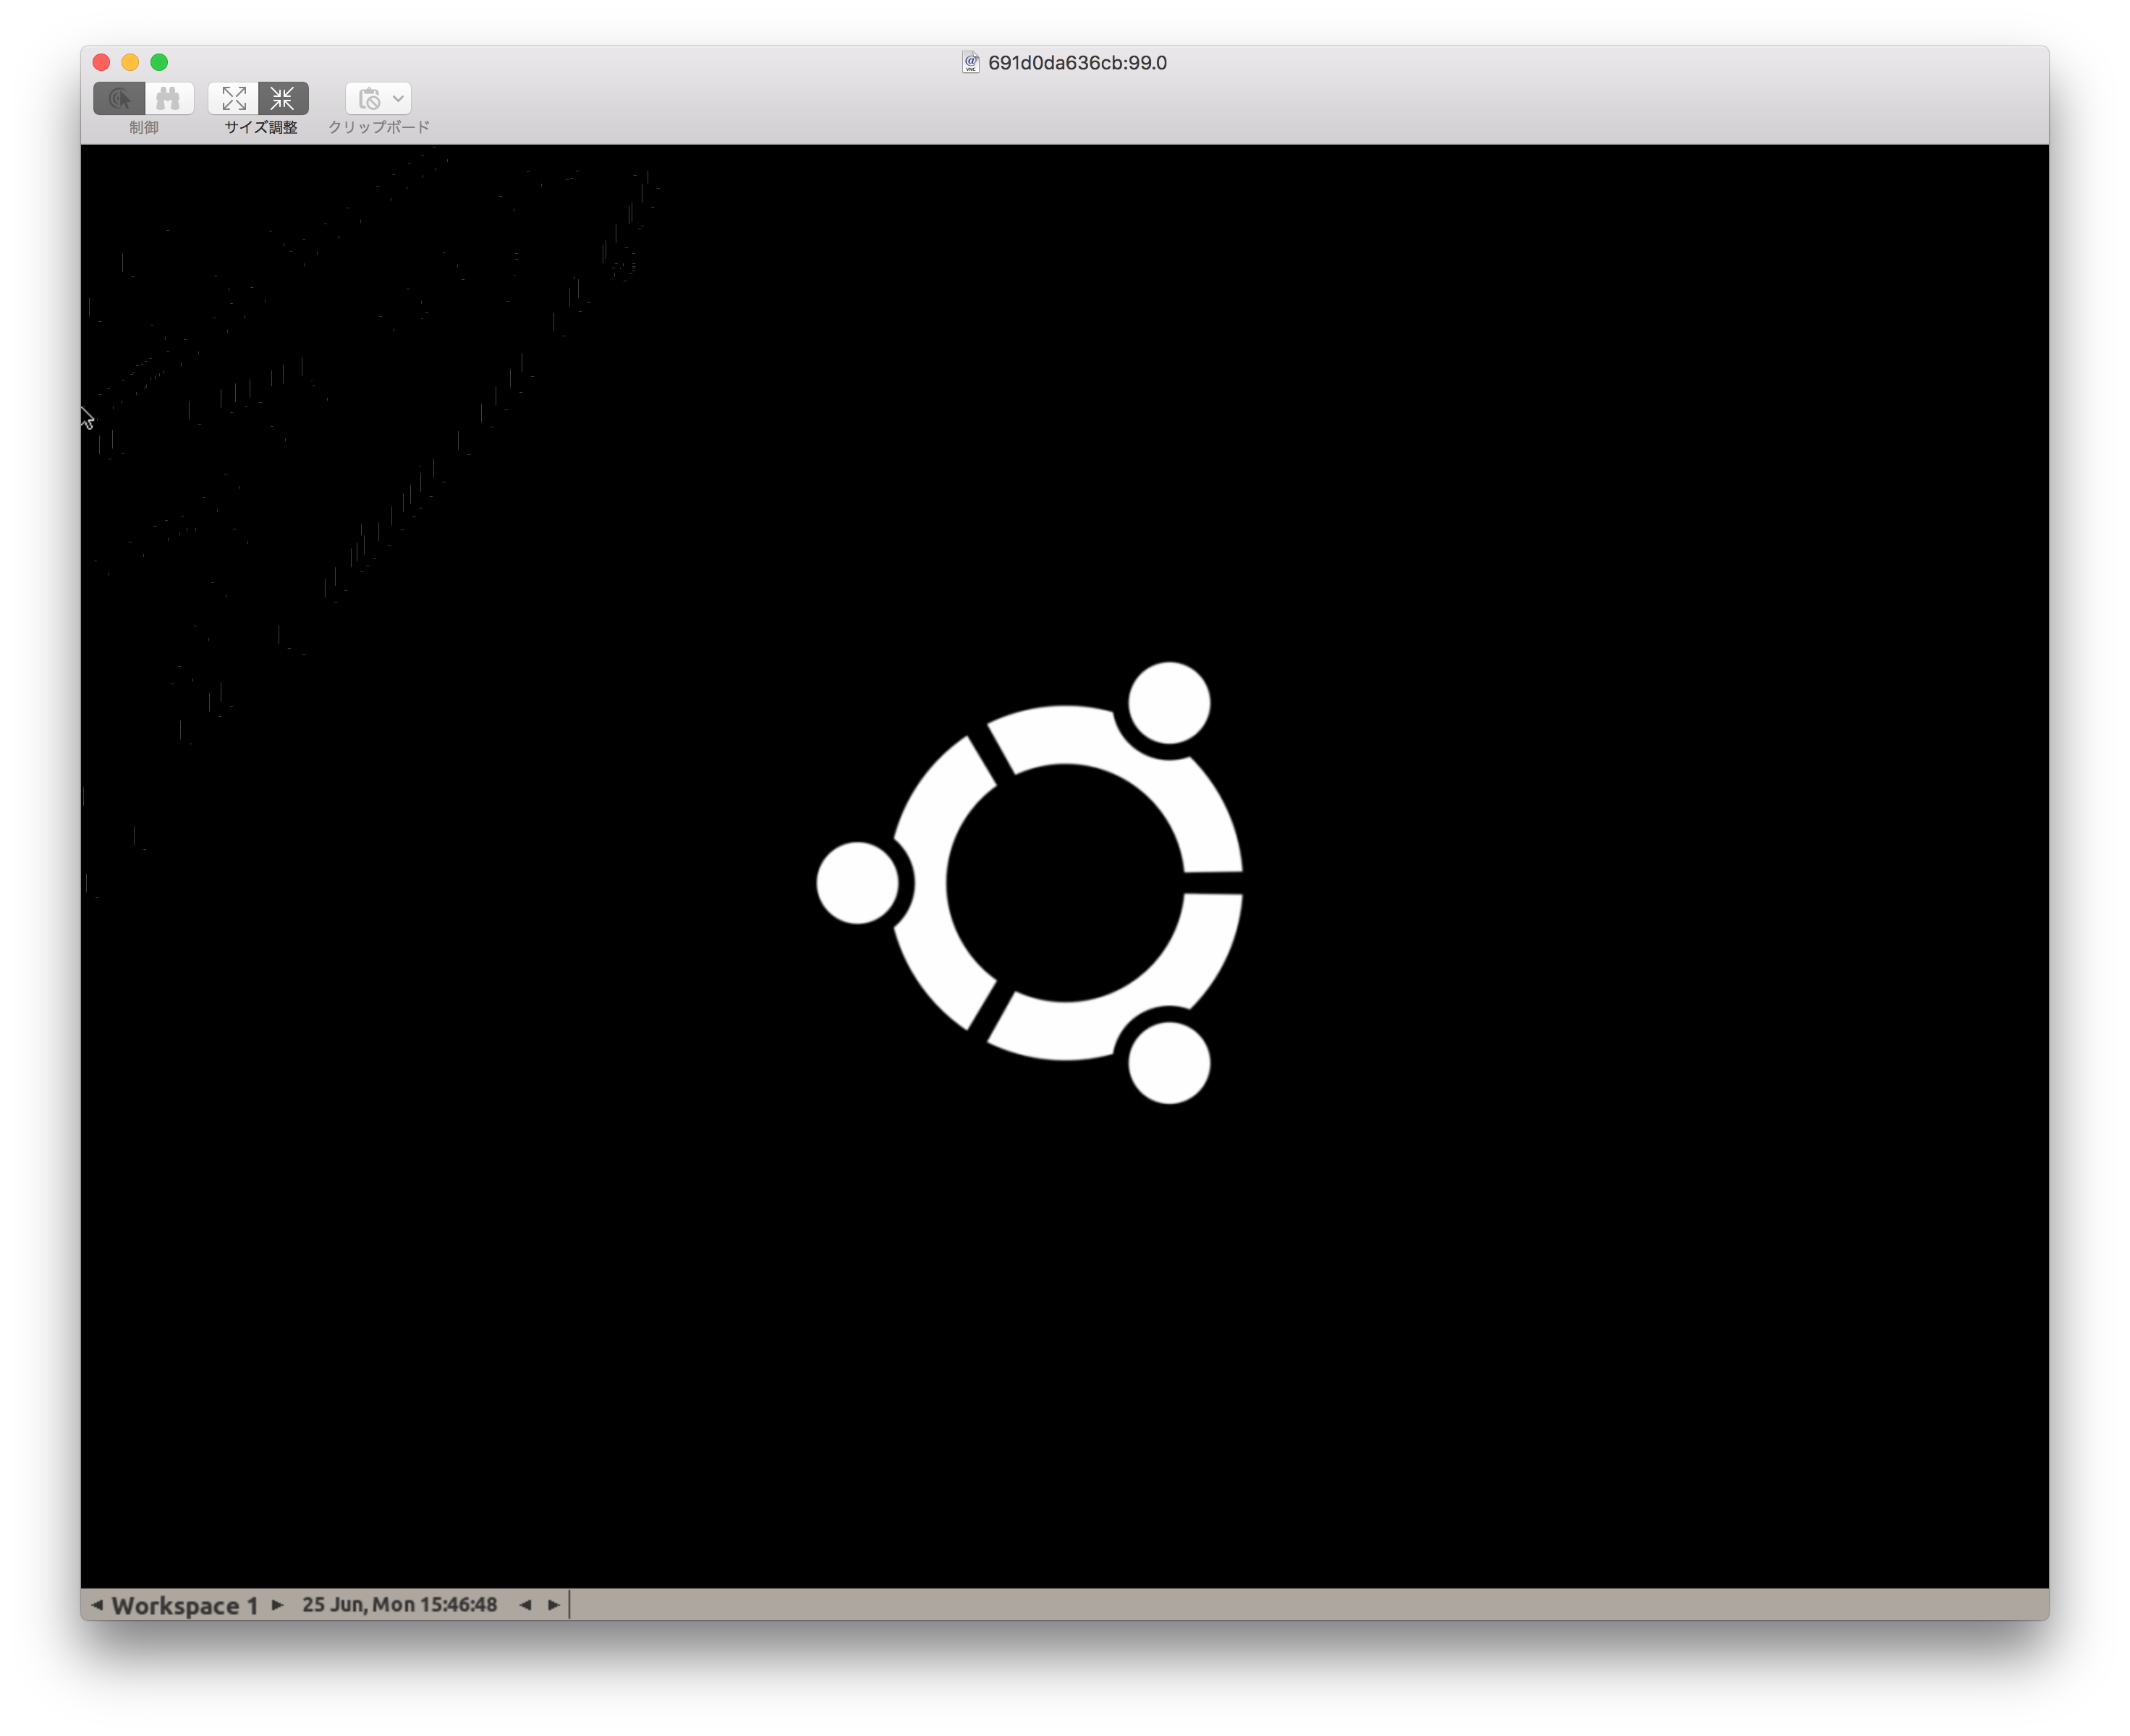
接続ができたらこんな感じです。あとはテストコードを流せば実行されます(ここではここまで)。
Seleniumを動かす
準備
Gradleプロジェクトで作成してみる。
plugins {
    id 'java'
}

group 'selenium-practice-java'
version '1.0-SNAPSHOT'

sourceCompatibility = 1.8

repositories {
    mavenCentral()
}

dependencies {
    testCompile group: 'junit', name: 'junit', version: '4.12'
    compile group: 'org.seleniumhq.selenium', name: 'selenium-java', version: '3.13.0'
    compile group: 'commons-io', name: 'commons-io', version: '2.6'
}
WebDriverの準備も必要なので、http://chromedriver.chromium.org/downloads から入手します。
コーディング
import org.apache.commons.io.FileUtils;
import org.junit.Test;
import org.openqa.selenium.*;
import org.openqa.selenium.chrome.ChromeDriver;

import java.io.File;
import java.time.LocalDateTime;

public class SeleniumSampleTest {

    @Test
    public void testGoogleSearch() throws Exception {
        System.setProperty("webdriver.chrome.driver", "./webdriver/chromedriver");
        WebDriver driver = new ChromeDriver();

        driver.get("http://www.google.com");

        takeSnapShot(driver);

        WebElement searchBox = driver.findElement(By.name("q"));

        searchBox.sendKeys("ChromeDriver");
        takeSnapShot(driver);

        searchBox.submit();
        takeSnapShot(driver);

        driver.quit();
    }

    public static void takeSnapShot(WebDriver webdriver) throws Exception {
        String fileName = System.getProperty("user.dir") + "/snapshot/" + LocalDateTime.now().toString()+".png";
        File srcFile = ((TakesScreenshot) webdriver).getScreenshotAs(OutputType.FILE);
        File destFile = new File( fileName);

        FileUtils.copyFile(srcFile, destFile);

    }
}
準備段階で入手したChromeWebDriverを、System.setPropertyの第二引数で指定します。
これで実行すると、ブラウザが立ち上がり、テストが実行されます。エビデンスはプロジェクト直下にsnapshotディレクトリが作られ、その中にpngファイルが作られます。
Selenium Gridで動かしてみる
先程作成した、Selenium Grid環境を立ち上げます。次に、Javaのコードを一部書き換えます。
System.setProperty("webdriver.chrome.driver", "./webdriver/chromedriver");
WebDriver driver = new ChromeDriver();
この部分を以下のように変更します。
Capabilities chromeCapabilities = DesiredCapabilities.chrome();
WebDriver driver = new RemoteWebDriver(new URL("http://127.0.0.1:4444/wd/hub"), chromeCapabilities);
これで、このテストの実行環境がDockerに移り、Selenium Grid内で実行されます。実行するとわかりますが、ブラウザは立ち上がらずに実行されます。
コード変更後
import org.apache.commons.io.FileUtils;
import org.junit.Test;
import org.openqa.selenium.*;
import org.openqa.selenium.remote.DesiredCapabilities;
import org.openqa.selenium.remote.RemoteWebDriver;

import java.io.File;
import java.net.URL;
import java.time.LocalDateTime;

public class SeleniumSampleTest {

    @Test
    public void testGoogleSearch() throws Exception {
        Capabilities chromeCapabilities = DesiredCapabilities.chrome();
        WebDriver driver = new RemoteWebDriver(new URL("http://127.0.0.1:4444/wd/hub"), chromeCapabilities);

        driver.get("http://www.google.com");

        takeSnapShot(driver);

        WebElement searchBox = driver.findElement(By.name("q"));

        searchBox.sendKeys("ChromeDriver");
        takeSnapShot(driver);

        searchBox.submit();
        takeSnapShot(driver);

        driver.quit();
    }

    public static void takeSnapShot(WebDriver webdriver) throws Exception {
        String fileName = System.getProperty("user.dir") + "/snapshot/" + LocalDateTime.now().toString()+".png";
        File srcFile = ((TakesScreenshot) webdriver).getScreenshotAs(OutputType.FILE);
        File destFile = new File( fileName);

        FileUtils.copyFile(srcFile, destFile);

    }
}
Selenide
Selenideは、Selenium WebDriverのJava実装のラッパーでJavaのテスト自動化のフレームワークです。テスト自動化フレームワークと言い切られています。
そのため、内部も大きく異なります。APIがjQueryライクな感じになっており、jQueryの書き方が分かる人であればSeleniumより書きやすいと感じると思います。また、SeleniumではAjax関連のことを書きませんでしたが、SeleniumでのAjax(非同期)関連の画面を操作するのは簡単ではありません。というのもAjaxはリンクなどと異なり、非同期であるゆえに、すぐにレスポンスが来るとは限りません。Seleniumでは、非同期な画面の操作する際には、レスポンスが戻って来るまでコード上で待ってあげる必要があります。sleepして待つ方法もありますが、あまりいいコードではありません。そのため、以下のようにWebDriverWaitクラスを使いタイムアウト時間を指定して、処理を記述する必要があります。
(new WebDriverWait(driver, 10))
    .until(webDriver -> webDriver.findElement(By.className("hoge")).getAttribute("id").equals("test"));
Selenideでは、このような処理を記述する必要はまったくなく、フレームワークが自動でタイムアウト(デフォルト4秒)まで待って処理をしてくれます。
この他にも、テストに失敗したときに、自動でスクリーンショットと失敗した画面のHtmlを取得してくれます。デフォルトでは失敗時にbuild/repots/testsというディレクトリを作成し、そこにエビデンスを格納してくれます。Selenideは、テスト自動化のフレームワークであるため、DSLも備わってます。
$(".class").shouldHave(text("hoge"));
shouldHaveでセレクタで指定した.classがテキストhogeを持っているか判定してくれます。
Selenideを動かす
準備
plugins {
    id 'java'
}

group 'selenium-practice'
version '1.0-SNAPSHOT'

sourceCompatibility = 1.8

repositories {
    mavenCentral()
}

dependencies {
    testCompile group: 'junit', name: 'junit', version: '4.12'
    testCompile 'com.codeborne:selenide:4.12.2'
}
コーディング
Seleniumで書いたコードをSelenideで書いてみます。
import com.codeborne.selenide.Configuration;
import org.junit.BeforeClass;
import org.junit.Test;
import org.openqa.selenium.remote.BrowserType;

import java.time.LocalDateTime;

import static com.codeborne.selenide.Screenshots.takeScreenShot;
import static com.codeborne.selenide.Selenide.$;
import static com.codeborne.selenide.Selenide.open;

public class SelenideSampleTest {

    @BeforeClass
    public static void beforeClass() {
        Configuration.browser = BrowserType.CHROME;
    }

    @Test
    public void testGoogleSearch() {
        String fileName = LocalDateTime.now().toString();

        open("http://google.com");
        $("[name=q]").val("ChromeDriver").submit();
        takeScreenShot(fileName);
    }

}
Selenideよりもだいぶスマートで読みやすいコードになった気がします。SelenideにはScreenshots#takeScreenShotというスクリーンショットを取るクラスが用意されており、Seleniumにはないものが数多く存在します。takeScreenShotに関しては、pngでスクリーンショットを取り、追加でその画面のhtmlを取得してくれます。また、SeleniumのときにはWebDriverをダウンロードして指定する必要が有りましたが、SelenideではConfiguration.browser = BrowserType.CHROMEこれだけですみます。スクリーンショットの場所を変更する場合は、Configuration.reportsFolderという変数が有り、これに代入するだけです。
@BeforeClass
public static void beforeClass() {
    Configuration.browser = BrowserType.CHROME;
    Configuration.reportsFolder = System.getProperty("user.dir") + "/snapshot/";
}
Selenium Gridで動かしてみる
Seleniumのときと同じように、Selenium Grid環境を立ち上げます。次に、Javaのコードを一部書き換えます。
@BeforeClass
public static void beforeClass() {
    Configuration.browser = BrowserType.CHROME;
    Configuration.reportsFolder = System.getProperty("user.dir") + "/snapshot/";
    Configuration.remote = "http://127.0.0.1:4444/wd/hub";
}
Configuration.remoteでリモート環境のURLを指定するだけです。Seleniumのときとは違い、追加のみです。
Geb
GebはSeleniumと同じく、ブラウザのオートメーションツールです。実装はGroovyで、Seleniumのラッパーライブラリとなってます。
Gebを動かす
準備
plugins {
    id 'groovy'
}

group 'selenium-practice'
version '1.0-SNAPSHOT'

repositories {
    mavenCentral()
}

ext {
    drivers = ["chrome"]
}

dependencies {
    compile 'org.codehaus.groovy:groovy-all:2.4.9'
    testCompile("org.seleniumhq.selenium:selenium-chrome-driver:3.6.0")
    testCompile("org.seleniumhq.selenium:selenium-support:3.6.0")
    testCompile group: 'org.gebish', name: 'geb-core', version: '2.0'
    testCompile group: 'org.gebish', name: 'geb-spock', version: '2.0'
    testCompile group: 'org.spockframework', name: 'spock-core', version: '1.1-groovy-2.4'
}
今回は、GroovyなのでJUnitではなくSpockを使います。
WebDriverの準備も必要なので、http://chromedriver.chromium.org/downloads から入手します。
import org.openqa.selenium.chrome.ChromeDriver

System.setProperty("webdriver.chrome.driver", "webdriver/chromedriver")

reportsDir = "./snapshot"


waiting {
    timeout = 2
}

environments {
    chrome {
        driver = { new ChromeDriver() }
    }
}
GebConfigはGebの設定ファイルで、ここで使うWebDriverの設定やスクリーンショットのディレクトリ指定などを行います。
コーディング
import geb.spock.GebSpec
import org.openqa.selenium.Keys

class GebSampleTest extends GebSpec {

    def testGoogleSearch() {
        when:
        go "http://google.com"
        report("google search")

        and:
        def element = $("[name=q]")
        element .value("ChromeDriver")
        report("input search key word")
        $("[name=btnK]")  << Keys.ENTER
        report("search results")

        then: true //ホントはちゃんとやる
    }
}
GebのreportはSelenideと同じようにpngとその画面のHtmlを取得してくれます。
Selenium Gridで動かしてみる
Seleniumのときと同じように、Selenium Grid環境を立ち上げます。次に、GebConfigにremote用の設定を追加します。
import org.openqa.selenium.Capabilities
import org.openqa.selenium.chrome.ChromeDriver
import org.openqa.selenium.remote.DesiredCapabilities
import org.openqa.selenium.remote.RemoteWebDriver

System.setProperty("webdriver.chrome.driver", "webdriver/chromedriver")

Capabilities chromeCapabilities = DesiredCapabilities.chrome();

reportsDir = "./snapshot"

waiting {
    timeout = 2
}

environments {
    chrome {
        driver = { new ChromeDriver() }
    }
    remote {
        driver = {
            new RemoteWebDriver(new URL("http://127.0.0.1:4444/wd/hub"), chromeCapabilities)
        }
    }
}
build.gradleにもremote用の設定を追加します
ext {
    drivers = ["chrome", "remote"]
}
この設定を追加する事によって、chromeとremoteの両方で実行してくれます。
まとめ
Selenium、Selenide、Gebでそれぞれ簡単なコードを書いてローカルとDockerで実行しました。個人的にSelenideとGebは、jQueryに近い感じで記述できるため、覚えやすいと思います。ただ、GebはGroovyなので演算子のオーバーロードがあり、なれるまで黒魔術のようなコードに思えます。また、動的型付け言語であるため、実行されるまで結果がわからない点がはじめのうちはきつい気がしました。その点だと、SeleniumとSelenideはJavaでかけるのでJavaエンジニア的には楽に思えます。コードの生産量で考えるとSelenideが一番書きやすく思えます。ただ、設定をアクセサなしに代入する点がキモい。Javaで書きたいならSelenide。GroovyがいいならGeb。他の言語がいい人はSeleniumという感じがいいのかも?しれません。