概要
Teraform は、インフラのコード化(Infrastructure as code)を実現すべく、インフラの構築・変更・バージョン管理を、安全かつ効率的に行うためのツール。Vagrant、Serf、Consul 等を提供する HashiCorp がオープンソースで提供している。
本稿は、Teraform がサポートしている事業者(provider)の1つである Amazon Web Services (AWS)のうち、EC2 のセキュリティグループ(Security Groups) の追加・削除を行うためのチュートリアルである。
本チュートリアルを通し、Terraform を使ったインフラのコード化に対する理解を深める事を目的とする。
- 参考:Terraform入門 日本語訳 - Qiita
- http://qiita.com/zembutsu/items/84f5478701c5391df537
なお、S3 を使ったバケットの作成・削除を行うチュートリアルを別途用意している。シンプルに Terraform を AWS で使う事を目的とする場合は、以下のチュートリアルの利用を推奨する。
- TerraformでAWS S3バケットを操作 - Qiita
- http://qiita.com/zembutsu/items/8a8f2b6b8d74e7b8fee5
作業の流れ
- Terraform の、セキュリティグループ用のリソースファイルを作成
- セキュリティグループを Terraform で作成
- AWS マネジメント・コンソールで確認
- セキュリティグループの変更
- セキュリティグループの削除
Terraform を使うにあたり、既存のインフラ環境に対して何ら設定を加える必要は無い。Terraform は、既存の設定を読み込むものではなく、あくまで現状に対する変更しか管理しない。
AWS とリージョンの指定
Terraform の実行時、カレントディレクトリにある拡張子 *.tf のファイルを読み込む。AWS に接続するにあたり、まずアクセスキーと、シークレットキーを記述したファイルを用意する。エディタ等で vi aws_region_tokyo.tf ファイル(例)を作成する。
provider "aws" {
    access_key = "自分のアクセスキー"
    secret_key = "自分のシークレットキー"
    region = "ap-northeast-1"
    #region = "us-east-1"
}
provider は Teraform が取り扱うことのできるサービス提供者(事業者)=プロバイダの指定である。provider "aws" とは、事業者としての AWS を使う事を明示している。`version 0.1.0 で提供されているのは、AWS、CloudFlare、Consul、DigialOcean、DNSimple、Heroku である。これらはプラグイン形式で拡張可能であり、IRC や issue では、OpenStack や VMware 対応が議論されている 。
なお、ここでは東京リージョン(ap-northeast-1)を利用するため、region の指定は ap-northeast-1 とした。ここは任意のリージョンを指定できるので、us-east-1 等を指定できる。なお、# を付けるとコメント扱いとなる。
セキュリティグループの定義ファイルを作成
次に aws_security_group.tf など、拡張子が .tf で Terraform が設定ファイルであると識別できるファイルを作成する。
resource "aws_security_group" "allow_all" {
    name = "allow_all"
    ingress {
        from_port = 0
        to_port = 65535
        protocol = "tcp"
        cidr_blocks = ["0.0.0.0/0"]
    }
    description = "full open ><;"
}
これは、resourceリソースとして、aws_security_group(EC2のセキュリティグループ)を指定し、リソース名称が allow_allである事を示す。そして内容は以下の通りである。
-
name= AWS 上の実際のセキュリティグループ名称 -
ingress= inbound 側のセキュリティ指定 -
from_port= 開始ポート -
to_port= 終了ポート -
protocol= プロトコル -
cidr_blocks= 許可する CIDR -
description= 説明分
上記のように、Terraform を実行するのに必要なのは、provider (プロバイダ) と resoruce (リソース)の指定である。ここでは、AWS というプロバイダと、セキュリティグループのの各リソースを指定した。
Terraform の build でセキュリティグループ作成
plan (計画)
次に、実際にセキュリティグループを作成する。Terraform では、実行(インフラに対する適用 apply ) の前に、計画 plan を行い、変更内容を確認する事ができる(plan を行わず apply をすることも可能だが、作業前の確認という意味では、 plan を実行すべきだろう)。
先の aws_region_tokyo.tf と aws_security_group.tf が展開されているディレクトリで、コマンド terraform planを実行する。
$ ./terraform plan
Refreshing Terraform state prior to plan...


The Terraform execution plan has been generated and is shown below.
Resources are shown in alphabetical order for quick scanning. Green resources
will be created (or destroyed and then created if an existing resource
exists), yellow resources are being changed in-place, and red resources
will be destroyed.

Note: You didn't specify an "-out" parameter to save this plan, so when
"apply" is called, Terraform can't guarantee this is what will execute.

+ aws_security_group.allow_all
    description:             "" => "full open ><;"
    ingress.#:               "" => "1"
    ingress.0.cidr_blocks.#: "" => "1"
    ingress.0.cidr_blocks.0: "" => "0.0.0.0/0"
    ingress.0.from_port:     "" => "0"
    ingress.0.protocol:      "" => "tcp"
    ingress.0.to_port:       "" => "65535"
    name:                    "" => "allow_all"
    owner_id:                "" => "<computed>"
    vpc_id:                  "" => "<computed>"
実行すると + (リソースの追加) として、aws_security_group リソースの、リソース名称 allow_allを指定している事が分かる。この段階では plan なので、変更の"計画"を意味しており、実際の処理は行われていない。description: 以下の行は作業内容であり、"" (空白の項目) => 変更後の内容 を意味している。今回は初回実行時なので、"" => "新規項目" が並んでいる。
なお、繰り返しとなるが、Terraform が指定するのは「変更を行いたい内容」だけである。そのため、既存のセキュリティグループの取り込み作業や、既存のセキュリティグループの定義を行う必要はない。
apply (適用)
変更内容が想定通りであれば、terraform apply を実行して設定を適用する。なお、コマンドを入力した瞬間、即座に処理が進行する。以下は allow_all というセキュリティグループを作成(apply)している例である。
aws_security_group.allow_all: Creating...
  description:             "" => "full open ><;"
  ingress.#:               "" => "1"
  ingress.0.cidr_blocks.#: "" => "1"
  ingress.0.cidr_blocks.0: "" => "0.0.0.0/0"
  ingress.0.from_port:     "" => "0"
  ingress.0.protocol:      "" => "tcp"
  ingress.0.to_port:       "" => "65535"
  name:                    "" => "allow_all"
aws_security_group.allow_all: Creation complete

Apply complete! Resources: 1 added, 0 changed, 0 destroyed.

The state of your infrastructure has been saved to the path
below. This state is required to modify and destroy your
infrastructure, so keep it safe. To inspect the complete state
use the `terraform show` command.
注目すべきは Apply complete! (適用完了)と、1 added と表示されている点である。ここでは1つのセキュリティグループを追加することができた。
この時点で、ブラウザから AWS マネジメントコンソールにアクセスすると、指定したセキュリティグループが作成されている事が確認できる。EC2 Dashborad の Security Gropus を確認する。
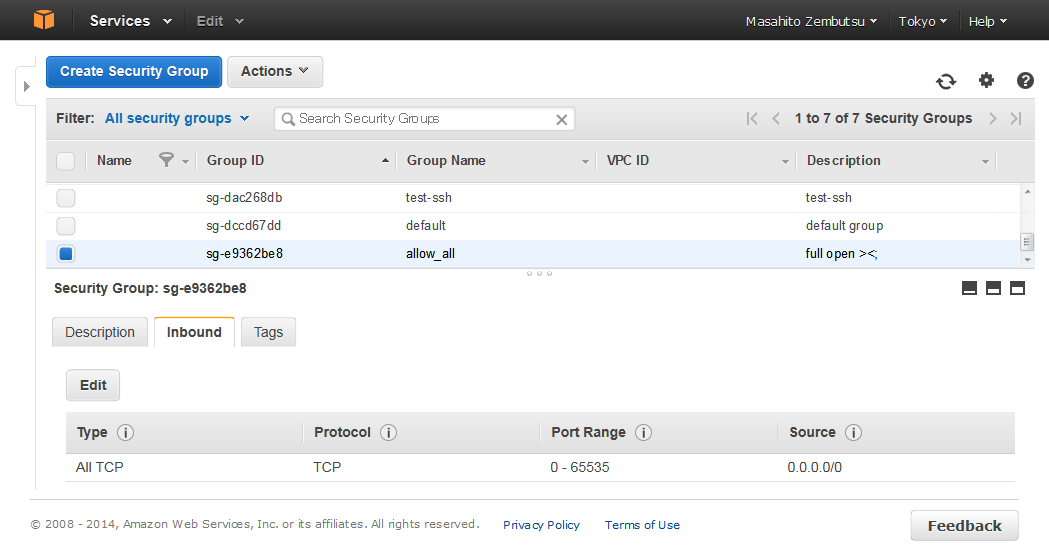
上図ように show_all という名称のセキュリティグループが作成される。
また、ブラウザにアクセスしなくても、どのような処理を進行したかは show コマンドを使って確認できる。
$ ./terraform show ./terraform.tfstate
aws_security_group.allow_all:
  id = sg-e9362be8
  description = full open ><;
  ingress.# = 1
  ingress.0.cidr_blocks.# = 1
  ingress.0.cidr_blocks.0 = 0.0.0.0/0
  ingress.0.from_port = 0
  ingress.0.protocol = tcp
  ingress.0.to_port = 65535
  name = allow_all
  owner_id = 091177877630
  vpc_id =
ここで、owner_id など、先ほどは "<computed>" となっていた場所に具体的な数値が入っている事が分かる。これが EC2 インスタンスの作成であれば、IP アドレスなど、動的に割り当てられる情報が反映されるので、インスタンス起動後に、ブラウザで確認する手順を省くことが出来る。
リソース(セキュリティグループ)の削除
リソースを削除するには2つの方法がある。aws_security_group.tf.tf のファイルを消すか、aws_security_group.tf.tf の内容を更新することである。
ここでは、aws_security_group.tf.tf を aws_security_group.tf.bakup と名称変更する。terraform が認識できるのは、aws_region_tokyo.tf のみとなり、セキュリティグループに対するリソース情報は(Terraform の設定ファイル上)存在しなくなる。
$ mv aws_security_group.tf aws_security_group.tf.bakup
この状態を確認するためには、terraform plan を実行する。
$ ./terraform plan
Refreshing Terraform state prior to plan...

aws_security_group.allow_all: Refreshing state... (ID: sg-e9362be8)

The Terraform execution plan has been generated and is shown below.
Resources are shown in alphabetical order for quick scanning. Green resources
will be created (or destroyed and then created if an existing resource
exists), yellow resources are being changed in-place, and red resources
will be destroyed.

Note: You didn't specify an "-out" parameter to save this plan, so when
"apply" is called, Terraform can't guarantee this is what will execute.

- aws_security_group.allow_all
これは、現在の AWS 上のリソースと、手元の terraform が処理した内容を比較して、リソース差分として aws_security_group.allow_all というリソースを - (削除) する事を意味している(実際には、複数のリソースの追加・削除を同時に行う事ができる。また処理の優先付けを行う事も可能。詳しくはドキュメント参照)。
リソース削除を適用するには terraform apply を実行する。
aws_security_group.allow_all: Refreshing state... (ID: sg-e9362be8)
aws_security_group.allow_all: Destroying...
aws_security_group.allow_all: Destruction complete

Apply complete! Resources: 0 added, 0 changed, 1 destroyed.
このように 1 destroyed と表示され、対象リソース、今回の例では1つのセキュリティグループが破棄されたことが分かる。
ここで再びマネジメント・コンソールを確認すると、対象となるセキュリティグループが削除されている事がわかる。
あるいは、show コマンドを使っても、同様にリソースが存在していない事が確認出来る。
$ ./terraform show ./terraform.tfstate
The state file is empty. No resources are represented.
リソースの再設定と変更
リソースファイルがあれば、他のリージョンであったり、あるいは別の AWS アカウントでも、同様にセキュリティグループを追加出来る。設定を復旧させるには、先ほど名称変更したファイルを元に差し戻す。
$ mv aws_security_group.tf.bakup aws_security_group.tf
それから plan apply を実行すると、再びセキュリティグループの設定が復帰している。この情報は AWS マネジメントコンソールからも確認出来る。
$ ./terraform plan
$ ./terraform apply
このように Terraform を使えば、設定の適用・変更が簡単に行える。また本番環境で実行する前に、テスト環境での適用試験も、比較的簡単に行えると言えるだろう。
次に、セキュリティグループの設定変更を試みる。現在のポリシーは全てのポートを解放するものであり、セキュリティが懸念される。
これを SSH (TCP:22) と HTTP (TCP:80) のみに変更する。aws_security_group.tf ファイルを開き、次のように書き換える。
resource "aws_security_group" "allow_all" {
    name = "allow_ssh_and_tcp"
    ingress {
        from_port = 22
        to_port = 22
        protocol = "tcp"
        cidr_blocks = ["0.0.0.0/0"]
    }
    ingress {
        from_port = 80
        to_port = 80
        protocol = "tcp"
        cidr_blocks = ["0.0.0.0/0"]
    }
    description = "allow tcp 22 and 80"
}
対象となるセキュリティグループ名は allow_all のままだが、ingress という inbound 側のセキュリティルールを書き換えている。また、グループ名称 name を書き換えると、terraform はリソースに対する更新を行うのではなく、リソースの削除・再追加を行っているので注意する。
Terraform で設定を適用する前に、例によって terraform plan コマンドで、変更内容を事前確認する。
$ ./terraform plan
Refreshing Terraform state prior to plan...

aws_security_group.allow_all: Refreshing state... (ID: sg-25302d24)

The Terraform execution plan has been generated and is shown below.
Resources are shown in alphabetical order for quick scanning. Green resources
will be created (or destroyed and then created if an existing resource
exists), yellow resources are being changed in-place, and red resources
will be destroyed.

Note: You didn't specify an "-out" parameter to save this plan, so when
"apply" is called, Terraform can't guarantee this is what will execute.

-/+ aws_security_group.allow_all
    description:             "full open ><;" => "allow tcp 22 and 80"
    ingress.#:               "1" => "2"
    ingress.0.from_port:     "0" => "22"
    ingress.0.to_port:       "65535" => "22"
    ingress.1.cidr_blocks.#: "" => "1"
    ingress.1.cidr_blocks.0: "" => "0.0.0.0/0"
    ingress.1.from_port:     "" => "80"
    ingress.1.protocol:      "" => "tcp"
    ingress.1.to_port:       "" => "80"
    name:                    "allow_all" => "allow_ssh_and_http" (forces new resource)
    owner_id:                "091177877630" => "<computed>"
    vpc_id:                  "" => "<computed>"
今度は、Terraform のリソースaws_security_group.allow_all に対し、 -(削除) と +(追加) を計画している変更を行おうとすると、(force new resource) と表示され、対象リソースに対する設定変更を行うのではなく、Terraform は、セキュリティグループの削除・追加を実施していると表示されているので注意する。
内容に問題が無ければ、実際に設定を反映(apply)する。
$ ./terraform apply
aws_security_group.allow_all: Refreshing state... (ID: sg-25302d24)
aws_security_group.allow_all: Destroying...
aws_security_group.allow_all: Destruction complete
aws_security_group.allow_all: Modifying...
  description:             "full open ><;" => "allow tcp 22 and 80"
  ingress.#:               "1" => "2"
  ingress.0.from_port:     "0" => "22"
  ingress.0.to_port:       "65535" => "22"
  ingress.1.cidr_blocks.#: "" => "1"
  ingress.1.cidr_blocks.0: "" => "0.0.0.0/0"
  ingress.1.from_port:     "" => "80"
  ingress.1.protocol:      "" => "tcp"
  ingress.1.to_port:       "" => "80"
  name:                    "allow_all" => "allow_ssh_and_http"
aws_security_group.allow_all: Modifications complete

Apply complete! Resources: 0 added, 1 changed, 1 destroyed.

The state of your infrastructure has been saved to the path
below. This state is required to modify and destroy your
infrastructure, so keep it safe. To inspect the complete state
use the `terraform show` command.

State path: terraform.tfstate
これでブラウザを確認すると、古いセキュリティグループは削除され、新たにセキュリティグループが追加されていることが分かる。
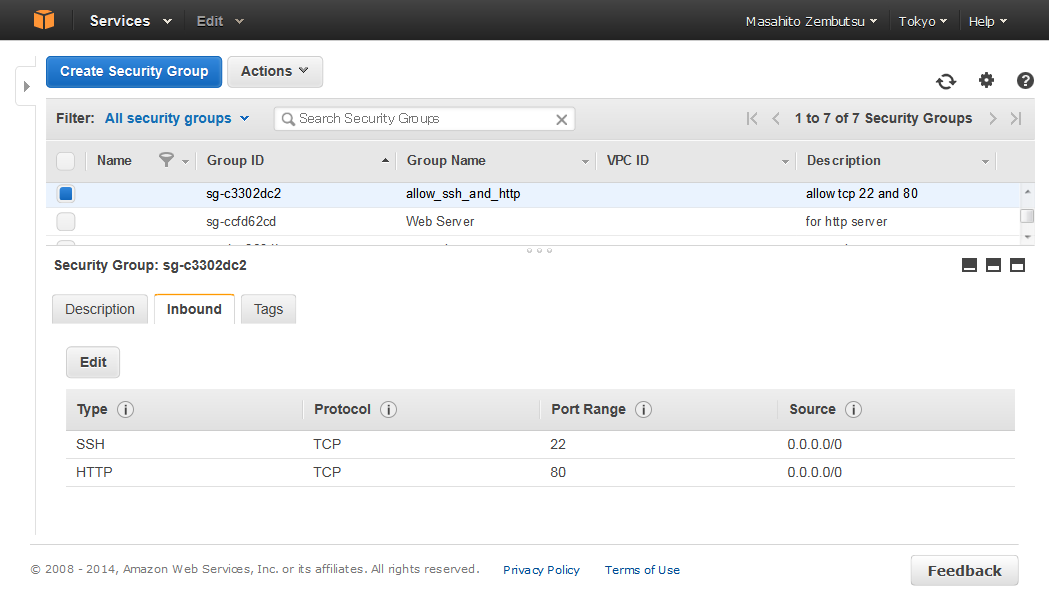
また、コンソール上で確認できる変更内容や、Group ID は、terraform show コマンドで確認が可能である。
$ ./terraform show ./terraform.tfstate
aws_security_group.allow_all:
  id = sg-c3302dc2
  description = allow tcp 22 and 80
  ingress.# = 2
  ingress.0.cidr_blocks.# = 1
  ingress.0.cidr_blocks.0 = 0.0.0.0/0
  ingress.0.from_port = 22
  ingress.0.protocol = tcp
  ingress.0.to_port = 22
  ingress.1.cidr_blocks.# = 1
  ingress.1.cidr_blocks.0 = 0.0.0.0/0
  ingress.1.from_port = 80
  ingress.1.protocol = tcp
  ingress.1.to_port = 80
  name = allow_ssh_and_http
  owner_id = 091177877630
  vpc_id =
なお、Terraform の機能として、リソースの更新をサポートしている。しかし、現時点の AWS プラグインでは、セキュリティグループのリソース変更(inboundルールの変更)には対応していない。
補足
Teffarom が行うのは、あくまでインフラに関する定義と処理であり、高度な操作を行う事ができない。そのような処理を行いたい場合は、CLI や API 使った操作を推奨する。加えて、現時点は開発中のバージョンのため、未実装の項目も多く、全ての作業を Terrafrom が行えるわけではない。それでも、環境構築やテストにおいて、Terraform を使える場所があるのではないかと思われる。
参考
-
Provider: AWS - Terraform
-
AWS: aws_security_group - Terraform
-
http://www.terraform.io/docs/providers/aws/r/security_group.html