はじめに
WebSocketおよびSocket.IOの初学者向けの記事になります。
ReactとTypeScriptと、WebSocketによる双方向通信が簡単に記述できるSocket.IOを用いて、簡易的なアプリを実装しました。
公式サイト
It requires almost no basic prior knowledge of Node.JS or Socket.IO, so it’s ideal for users of all knowledge levels.
事前知識がなくてもできると公式にはありますが、知識としては知っておいても損はないです。本記事ではアプリの実装だけでなく、冒頭に事前知識の説明もしていきます。
目次
WebSocketとは?
Web上でサーバとクライアント間を常時接続にしておき、双方向の通信を低コストで実現するための通信プロトコルです。リロード無しでリアルタイムに更新されるようなチャットアプリなどに適しています。
聞きなじみのあるであろうHTTPは、クライアントが何らかのリクエストを送らないとサーバはレスポンスを返せないプロトコルです。そのため、基本的には双方向の通信と実現することができません。
HTTTPのコネクションを張りっぱなしにしておき、クライアントから一定間隔でサーバに問い合わせをすることで、疑似的に双方向通信をすることはできます。
しかしながらこの方法では実装を行うと、以下のような理由で無駄や通信量が多いといった問題点が発生します。
- ブラウザのHTTPのコネクションにはタイムアウトがあるため、接続し直す処理を実装する必要がある
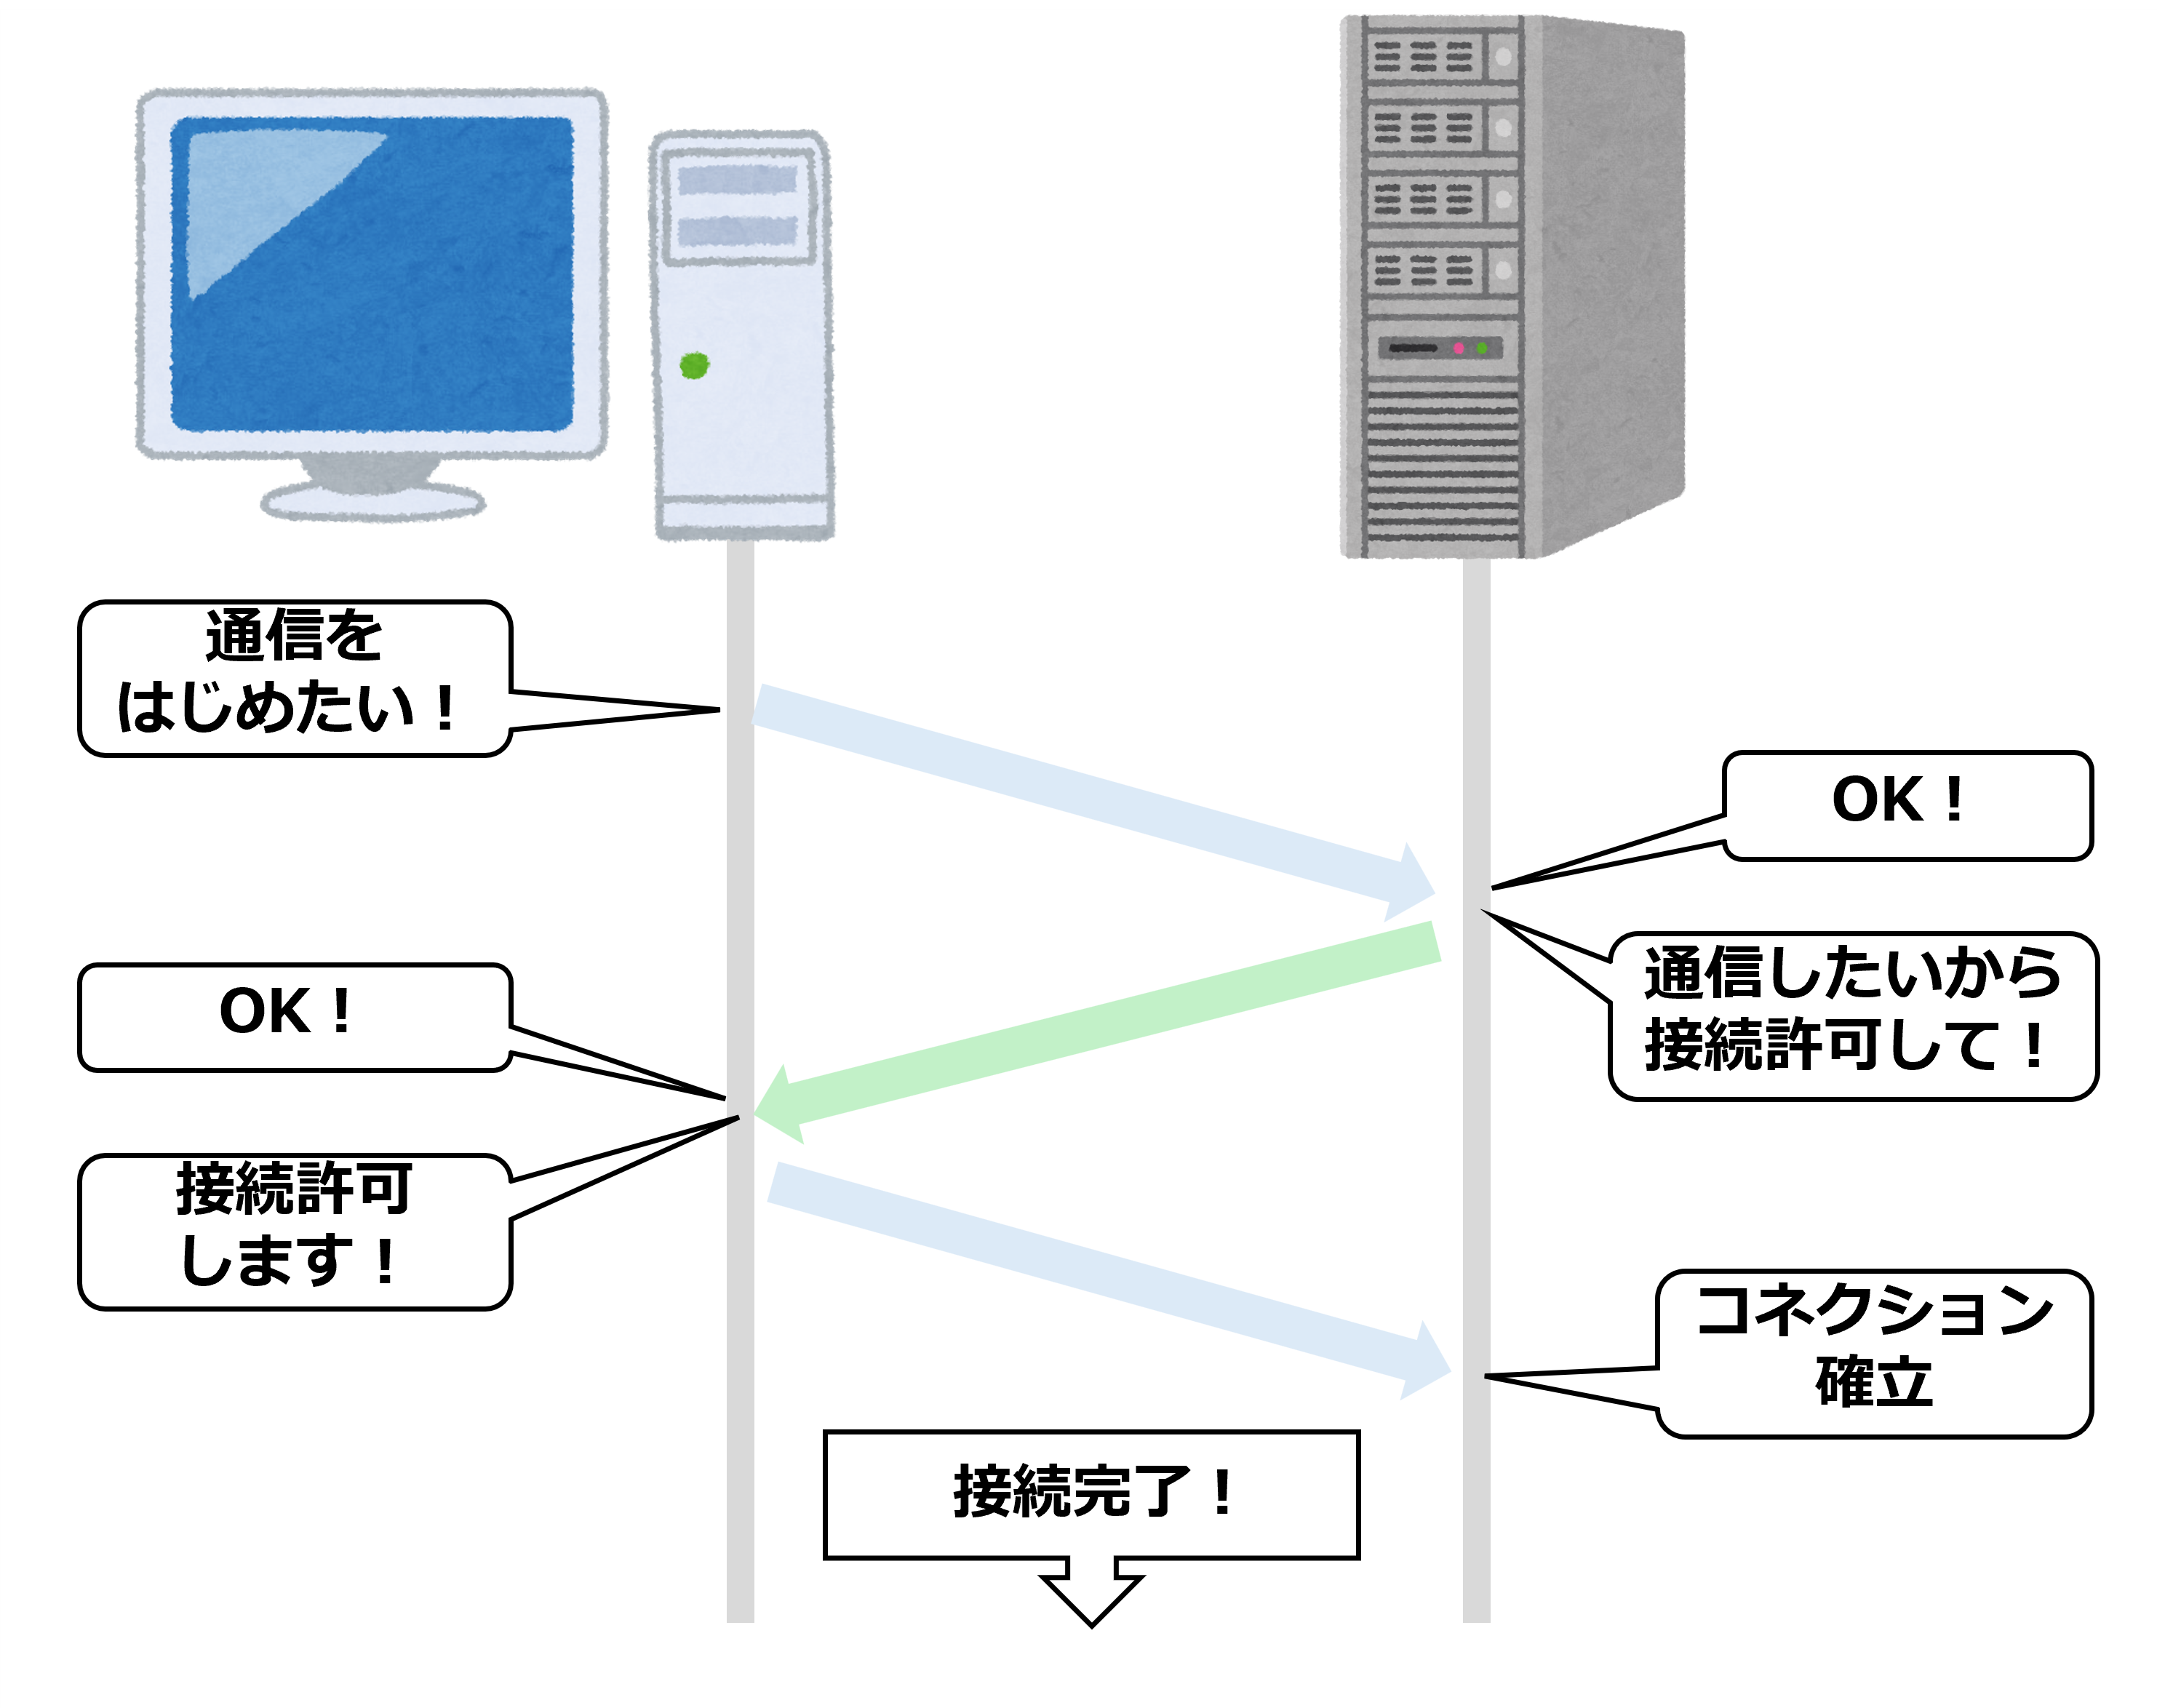
- データ転送を行う前のコネクションの確立を、通信発生の度に行う必要がある
- HTTPのコネクションを張りっぱなしにするため、その間他のアプリケーションの動作に影響を及ぼす可能性がある
WebSocketは、サーバとクライアントが一度コネクションの確立をした後は、必要な通信をすべてその確立したコネクションを用いる特徴をもつため、HTTPの問題を解決することができます。
Socket.IOとは?
基本的にWebSocketを使いますが、WebSocketがサポートされていない場合でも上記のような他の転送メカニズムが自動で行われることで、双方向の通信を実現するJavaScriptライブラリのことです。
チャットアプリ作成
事前準備
Node.jsのインストール
Node.jsの公式サイトよりインストーラーをダウンロードして、インストールしてください
環境構築
プロジェクトフォルダ作成
今回はビルド・モジュールバンドラーにviteを用います。
npm create vite@latest
開発の場としてのプロジェクトフォルダ指定する必要があります。名前は自由ですが、今回はprojectとしておきます。
frameworkにはReactを、variantにはTypeScript + SWCを選択します。
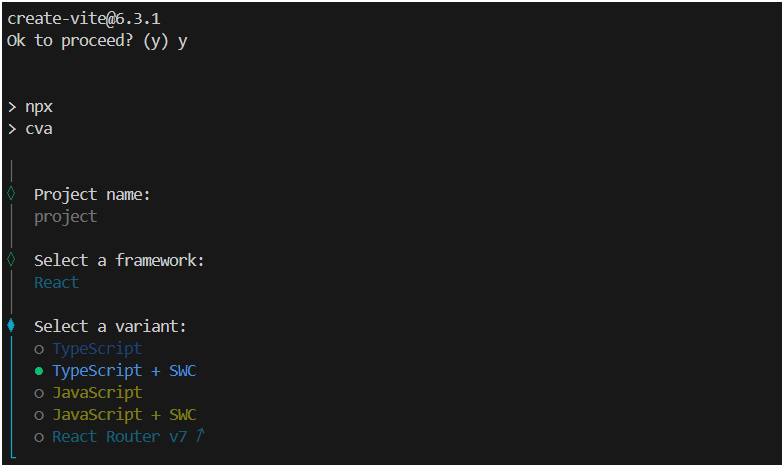
Done.と表示された場合、ビルド成功です。
Socket.IO利用に必要なライブラリのインストール
以下のコマンドを実行します。
npm install express socket.io socket.io-client ts-node
npm install @types/express
ライブラリの利用用途については以下の通りです。
- express:サーバとして機能させるために利用
- socket.io:今回の主役その1、サーバー側の双方向通信に必要
- socket.io-client:今回の主役その2、クライアント側の双方向通信に必要
- ts-node:TypeScriptのままテスト実行するために利用
サーバ構築
server/index.ts
Socket.IOのドキュメントの例を参考にexpressとhttpを組み合わせ、scrディレクトリ配下にserver/index.tsを作成
import { createServer } from "http";
import { Server } from "socket.io";
import express from "express";

const app = express();
const PORT = 3000;
const httpServer = createServer(app);
const io = new Server(httpServer, {path: "/socket/"});

io.on("connection", (socket) => {
    // ...
});

httpServer.listen(PORT, () => {
    console.log(`Chat server listening on port ${PORT}`)
});
tsconfig.json
以下のように変更する。
{
  "files": [],
  "references": [
    { "path": "./tsconfig.app.json" },
    { "path": "./tsconfig.node.json" }
  ],
+ "compilerOptions": {
+   "forceConsistentCasingInFileNames": true,
+   "strict": true,
+   "esModuleInterop": true,
+ }
}
package.json
-
"type": "module"を削除する -
"scripts"に以下を追加
{
-   "type": "module",
    "scripts": {
+       "server": "ts-node ./src/server/index.ts",
    }
}
ターミナルでnpm run serverを実行し、Chat server listening on port 3000が出力されればサーバ構築が成功しています。
クライアント側との接続前準備
クライアント側と接続する上で一点問題があります。
それは、クライアントとサーバ側で異なるオリジンを設定すると、CORSエラーが発生してしまいクライアントとサーバ間の通信をすることができなくなることです。
オリジン・CORS (Cross-origin resource sharing)とは?
オリジンとは以下のことを指します。
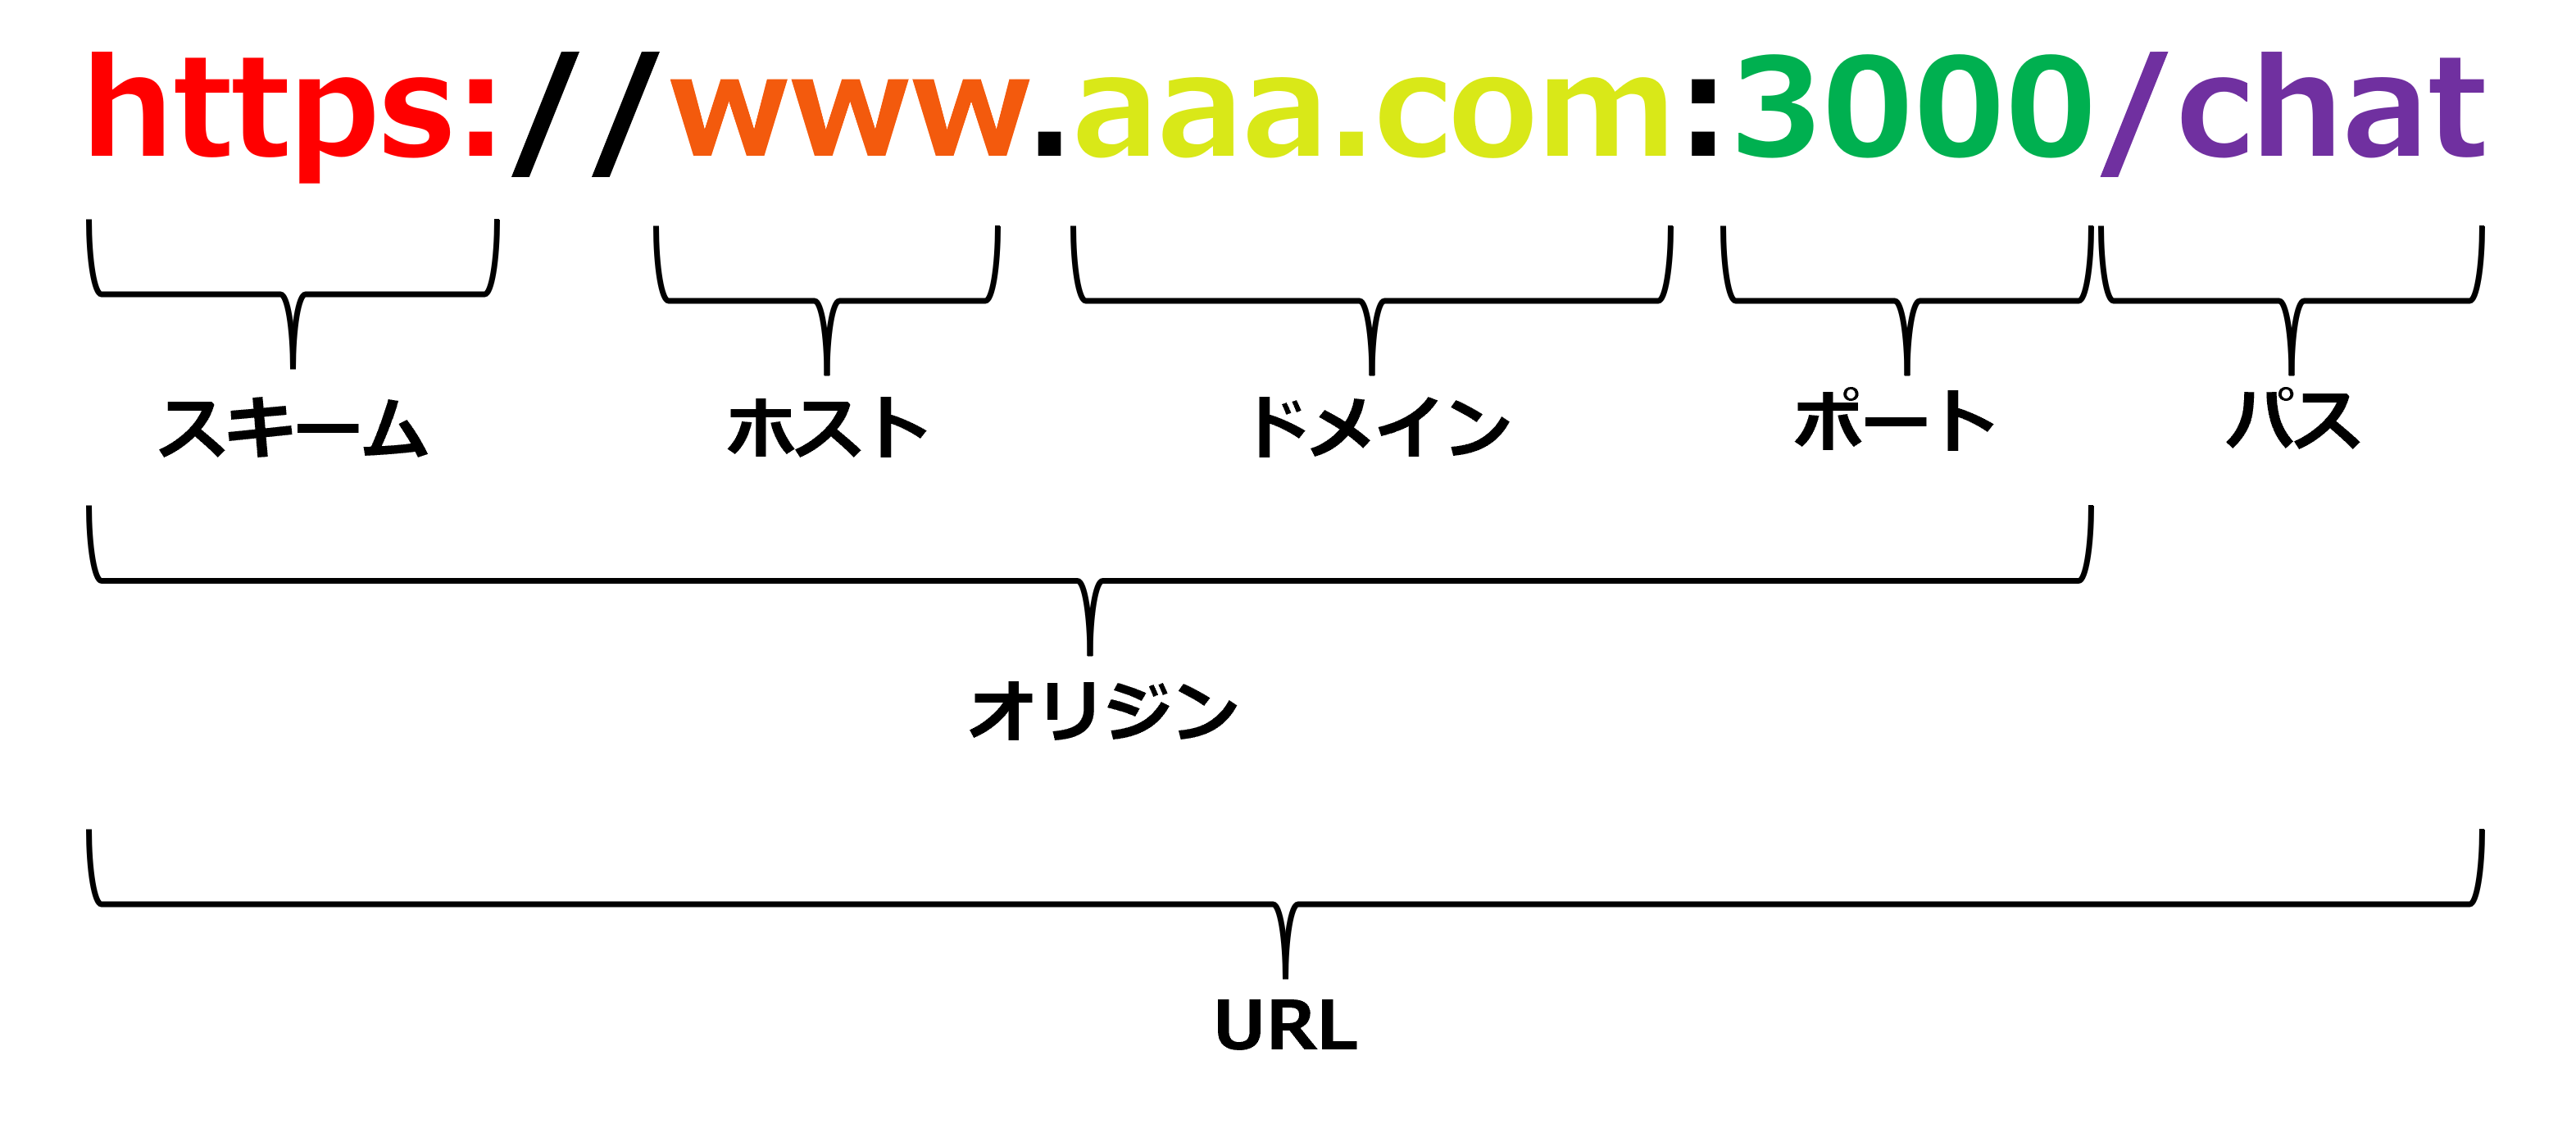
オリジンには同一オリジンポリシーとよばれる、リソースは別のオリジンからはアクセスできず、同一のオリジンのみがアクセスできる決まりがあります。
これがCORSエラーとして出ます。
この 「同一オリジンポリシー」という制限を無くして、異なるオリジンでもリソースへアクセスできるようにする仕組みのことをCORSと呼びます。
対処法
以下コマンドを実行します。
npm install @types/cors
次に、server/index.tsを以下のように修正します。
import { createServer } from "http";
import { Server } from "socket.io";
import express from "express";
+ import cors from "cors";

const app = express();
const PORT = 3000;
+ app.use(cors());
const httpServer = createServer(app);
const io = new Server(httpServer, {path: "/socket/",
+   cors: {
+       origin: "*"
+   }
});

io.on("connection", (socket) => {
    // ...
});

httpServer.listen(PORT, () => {
    console.log(`Chat server listening on port ${PORT}`)
});
クライアントアプリの作成
デザインライブラリであるMUIを用いた実装を行うため、以下コマンドを実行します。
npm install @mui/material @mui/icons-material @emotion/react @emotion/styled
src/App.tsx
projectフォルダ内のsrc/App.tsxを以下のように書き換えます。
import {
  Box,
  Button,
  Input,
  ListItem,
  ListItemText,
  Modal,
  Typography,
} from "@mui/material";
import React, { useEffect, useState } from "react";
import { io } from "socket.io-client";

// サーバとの接続に必要
const socket = io("http://localhost:3000", { path: "/socket/" });

socket.on("connect", () => {
  console.log(`サーバとの接続確認:`);
  console.log(socket.connect());
});

interface MessageWithTime {
  message: string;
  time: string;
  userName: string;
  sender: "self" | "other";
};

const style = {
  position: "absolute" as "absolute",
  top: "50%",
  left: "50%",
  transform: "translate(-50%, -50%)",
  width: 400,
  bgcolor: "background.paper",
  border: "2px solid #000",
  boxShadow: 24,
  p: 4,
};

function App() {
  const [messageList, setMessageList] = useState<MessageWithTime[]>([]);
  const [message, setMessage] = useState("");
  const [userName, setUserName] = useState<string>("匿名");
  const [modalOpen, setModalOpen] = useState(true);

  useEffect(() => {
    const handleChatMessage = (msg: MessageWithTime) => {
      setMessageList((prevList) => [...prevList, { ...msg, sender: "other" }]);
    };

    socket.on("chat", handleChatMessage);

    return () => {
      socket.off("chat", handleChatMessage);
    };
  }, [userName]);

  const onChangeMessage = (e: React.ChangeEvent<HTMLInputElement>) => {
    setMessage(e.target.value);
  };

  const onClick = (e: React.MouseEvent<HTMLButtonElement, MouseEvent>) => {
    e.preventDefault();

    const currentTime = new Date().toLocaleTimeString();

    const newMessageWithTime: MessageWithTime = {
      message: message,
      time: currentTime,
      userName: userName,
      sender: "self",
    };

    socket.emit("chat message", newMessageWithTime);

    setMessageList((prevList) => [...prevList, newMessageWithTime]);
    setMessage("");
  };

  const onReset = (e: React.MouseEvent<HTMLButtonElement, MouseEvent>) => {
    e.preventDefault();
    setMessageList([]);
  };

  const handleUserNameSubmit = () => {
    setModalOpen(false);
  };

  return (
    <div className="App">

    {/* ユーザ名作成モーダルの表示 */}
      <Modal open={modalOpen} onClose={() => setModalOpen(false)}>
        <Box sx={style}>
          <Typography variant="h6" component={"h2"}>
            ログイン名を入力してください
          </Typography>
          <Input
            placeholder="ユーザ名"
            value={userName}
            onChange={(e) => setUserName(e.target.value)}
          />
          <Button onClick={handleUserNameSubmit}>OK</Button>
        </Box>
      </Modal>

      {/*
          チャットスペースの作成
          送信元と受信元でメッセージ位置が変わるようにする
      */}
      <>
        {messageList.map((item, index) => (
          <ListItem
            key={index}
            sx={{
              justifyContent:
                item.sender === "self" ? "flex-end" : "flex-start",
            }}
          >
            <ListItemText
              primary={`${item.time} ${item.userName}:${item.message}`}
              sx={{
                textAlign: item.sender === "self" ? "right" : "left",
                margin: item.sender === "self" ? "0 0 0 auto" : "0 auto 0 0",
              }}
            />
          </ListItem>
        ))}

        <Input
          placeholder="文字を入力してください"
          value={message}
          onChange={onChangeMessage}
        />
        <Button onClick={onClick}>送る</Button>
        <Button onClick={onReset}>リセット</Button>
      </>
    </div>
  );
}

export default App;
server/index.ts
クライアントとの接続の中身を以下のように記述する。
import express from "express";
import { createServer } from "http";
import { Server } from "socket.io";
import cors from "cors";

const app = express();
const PORT = 3000;
app.use(cors());
const httpServer = createServer(app);
const io = new Server(httpServer, {path: "/socket/",
    cors: {
        origin: "*"
    }
});

io.on("connection", (socket) => {
+   console.log("connected!");
+   socket.on("disconnect", () => {
+       console.log("disconnected!");
+   });
+
+   // 送信元以外の全クライアントに送信
+   socket.on("chat message", (msg) => {
+       socket.broadcast.emit("chat", msg)
+   })
});

httpServer.listen(PORT, () => {
    console.log(`Chat server listening on port ${PORT}`)
});
アプリケーションの起動
ターミナルにて、npm run serverでサーバを起動した後に、npm run devでクライアントアプリを起動してください。
Viteのデフォルトポートは5173なので、http://localhost:5173/にアクセスします。
その後、サーバ側のターミナルを確認してみましょう。connected!が表示されていれば接続ができています。
別タブで同じURLにアクセスし、双方向のメッセージ送信・受信ができるかをためしてみましょう!
送信側が右に、受信側が左にメッセージが表示されていれば成功です!
最後に
今回は『WebSocketやHTTPに詳しくないけど、チャットアプリを作成したい』初学者向けの解説と、アプリの実装を紹介しました。解説ではあえて言及しませんでしたが、WebSocketとHTTPの話にはTCP/IPが密接に関係しています。TCP/IPの話をすると記事が長くなりそうなので、ここで締めさせていただきますが、興味が出てきた方は調べてみると新たな気づきを得るかもしれませんね。