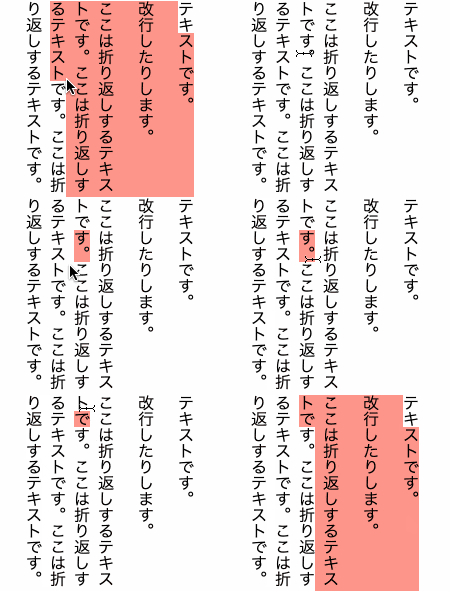
通常、テキストを選択するとデフォルト機能でハイライト表示されますが、要件によってはそれは使わずにオリジナルの DOM を使って表現したいときがあります。単に見た目を装飾したいだけなら CSS の ::selection セレクタを使えばできますが DOM にしたいのです。というわけでサンプルソースです。
(一部まだ描画が甘い部分はありますが、ベースこれで行けると思います)
動作イメージ
このような感じで DIV を3つ用意し、それぞれで選択範囲を表現します。

サンプルソースコード
とりあえず雑に全ソースを掲載します。サンプルは縦書き用にしていますが、横書きでも座標計算を調整すればできると思います。また、描画のために Proxy を利用していますが、この部分は本質じゃないのであまり気にしないでください。
<!DOCTYPE html>
<html>
  <head>
    <meta charset="utf-8">
    <title></title>
    <style type="text/css">
    body {
      writing-mode: vertical-rl;
    }
    #container {
      position: relative;
      width: 300px;
      height: 200px;
    }
    #editable {
      position: absolute;
      top: 0px;
      left: 0px;
      z-index: 2;
    }
    p::selection {
      background: transparent;
    }
    .selection {
      position: absolute;
      background: #f00;
      opacity: 0.5;
      z-index: 1;
    }
    </style>
  </head>
  <body>
    <div id="container">
      <div id="editable"><p>テキストです。</p><p>改行したりします。</p><p>ここは折り返しするテキストです。ここは折り返しするテキストです。ここは折り返しするテキストです。</p></div>
      <div id="first" class="selection"></div>
      <div id="middle" class="selection"></div>
      <div id="last" class="selection"></div>
    </div>
    <script>
    const selectionDOM = {
      first: document.getElementById('first'),
      middle: document.getElementById('middle'),
      last: document.getElementById('last'),
    }
    const style = {
      first: {
        width: 0,
        height: 0,
        top: 0,
        left: 0
      },
      middle: {
        width: 0,
        height: 0,
        top: 0,
        left: 0
      },
      last: {
        width: 0,
        height: 0,
        top: 0,
        left: 0
      }
    }
    const handler = {
      get: (target, prop) => {
        if (typeof target[prop] === 'object' && target[prop] !== null) {
          target[prop].name = prop
          return new Proxy(target[prop], handler)
        }
        return target[prop]
      },
      set: (target, prop, value) => {
        selectionDOM[target.name].style[prop] = `${value}px`
        target[prop] = value
        return true
      }
    }
    const styleProxy = new Proxy(style, handler)

    const resetMiddleAndLast = () => {
      styleProxy.middle.width = 0
      styleProxy.middle.height = 0
      styleProxy.middle.top = 0
      styleProxy.middle.left = 0
      styleProxy.last.width = 0
      styleProxy.last.height = 0
      styleProxy.last.top = 0
      styleProxy.last.left = 0
    }
    const selection = () => {
      const sel = window.getSelection()
      const range = sel.getRangeAt(0)
      const rect = range.getBoundingClientRect()
      const parentRect = document.getElementById('container').getBoundingClientRect()

      if (styleProxy.first.width === 0) {
        styleProxy.first.width = rect.width
      }

      const textRange = document.createRange()
      if (range.startOffset + 1 <= range.startContainer.textContent.length) {
        textRange.setStart(range.startContainer, range.startOffset)
        textRange.setEnd(range.startContainer, range.startOffset + 1)
        const textRect = textRange.getBoundingClientRect()
        styleProxy.first.top = textRect.top - parentRect.top
        styleProxy.first.left = textRect.left - parentRect.left
      }
      if (range.endOffset > 0) {
        textRange.setStart(range.endContainer, range.endOffset - 1)
        textRange.setEnd(range.endContainer, range.endOffset)
        const textRect = textRange.getBoundingClientRect()
        styleProxy.first.height = textRect.top - parentRect.top - styleProxy.first.top + textRect.height
      }

      if (styleProxy.first.width < rect.width) {
        styleProxy.first.height = rect.height - styleProxy.first.top

        if (range.endOffset > 0) {
          styleProxy.last.width = styleProxy.first.width
          styleProxy.last.left = rect.left - parentRect.left
          styleProxy.last.top = rect.top - parentRect.top
          textRange.setStart(range.endContainer, range.endOffset - 1)
          textRange.setEnd(range.endContainer, range.endOffset)
          const textRect = textRange.getBoundingClientRect()
          styleProxy.last.height = textRect.y - parentRect.top + textRect.height
        }

        styleProxy.middle.width = rect.width - styleProxy.first.width - styleProxy.last.width
        styleProxy.middle.height = rect.height
        styleProxy.middle.top = rect.top - parentRect.top
        styleProxy.middle.left = rect.left - parentRect.left + styleProxy.first.width
      } else {
        resetMiddleAndLast()
      }

      textRange.detach()
    }
    document.addEventListener('selectionchange', selection)
    </script>
  </body>
</html>
解説
選択文字の座標取得
テキストを選択するということは Range オブジェクトが使えます。Range オブジェクトの座標は getBoundingClientRect で取得できます。
window.getSelection().getRangeAt(0).getBoundingClientRect()
これで行けそうな予感がありますが、複数行またいだ選択をしている場合はだめです。単なる短形になるため選択範囲の最大の大きさになってしまいます。そこで、最初に選択した文字の位置と、最後に選択した文字の位置単位で座標を取得する必要があります。
最初に選択した文字の座標
Range オブジェクトまるごとじゃなく TextNode 単位でも座標は取得できます。つまり createRange で指定の TextNode の Range オブジェクトを生成してしまえば文字単位での座標が手に入るということになります。
const textRange = document.createRange()
textRange.setStart(range.startContainer, range.startOffset)
textRange.setEnd(range.startContainer, range.startOffset + 1)
const textRect = textRange.getBoundingClientRect()
この最初の文字選択した範囲を DIV の一つに任せます。
最後に選択した文字の座標
同様に最後に選択した文字も取得できます。最後の文字は endContainer の endOffset になるので以下のようになります。
const textRange = document.createRange()
textRange.setStart(range.endContainer, range.endOffset - 1)
textRange.setEnd(range.endContainer, range.endOffset)
const textRect = textRange.getBoundingClientRect()
あとは最初と最後の間を補完する中間の DOM を作れば完成です。
