概要
ポートフォリオの作成でSorceryを使ったTwitterログイン認証を実装しました。
rails側は基本的には公式のwikiに沿って進めれば問題ないのですが、ポイントで変更が必要で、Twitter Develpersの申請周りが変化していたので、2022年12月時点で成功した方法をキャプチャーを交えて記録します。
実行環境
この記事は以下環境で動作を確認しました。
Ruby 3.1.2
Rails 6.1.7
完成版のイメージ

ログイン後にプロフィールを確認するとTwitterのメールアドレス(email)、名前(name)、自己紹介(description)が取得できている状態をゴールとしました。

GitHub
Twitter developerでの設定
APPの作成
Twitter developerツールにログインします。
ログイン後右上の「Create an App」を押します。

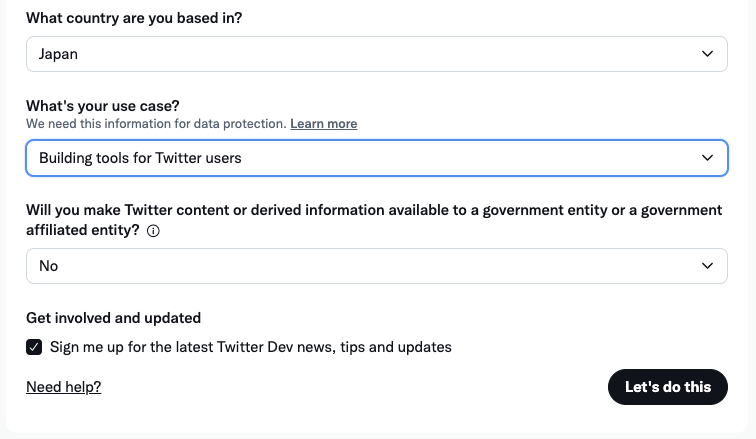
次画面の選択項目はキャプチャーの通りに選択しました。
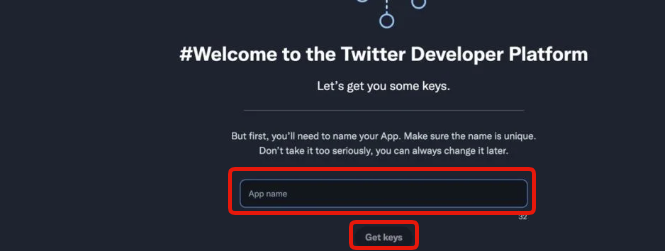
App nameにはアプリ名を入力します。Get Keyボタンを押すとAPIキーとAPIシークレットキーが取得できます。後ほどrails側に設定するので控えて次に進みます。
User authentication settingsの編集
ダッシュボード画面からAPPの設定ボタンを押します。

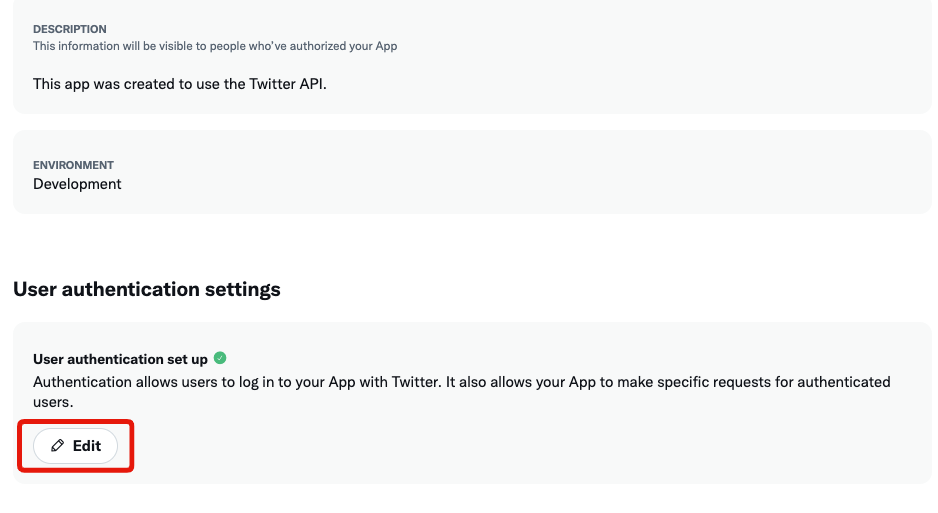
ページ下の方にあるUser authentication settingsのEditを押します。
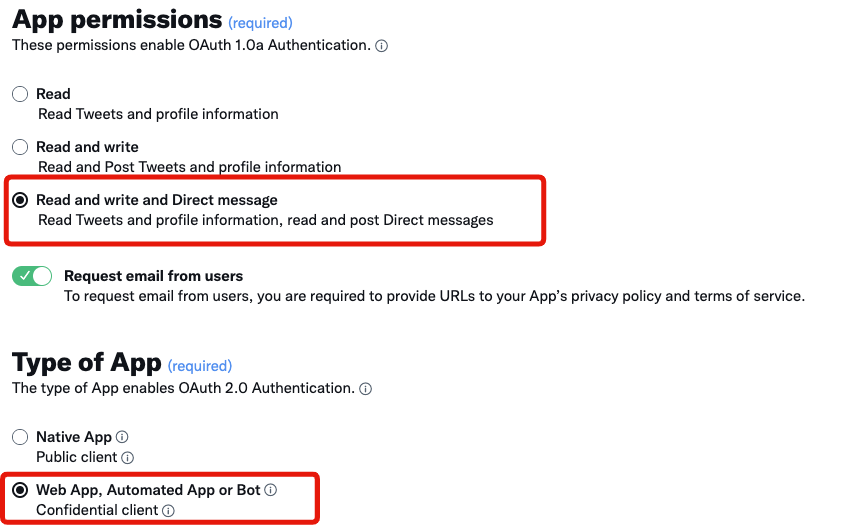
選択項目はキャプチャーの通りに選択しました。
Callback URI/URLはローカルと開発環境でそれぞれ設定します。
ローカル環境でのアクセスはlocalhost:3000ではなく127.0.0.1:3000でアクセスしないと401 Authorization Requiredとなります。Twitterログイン 401 Authorization Required
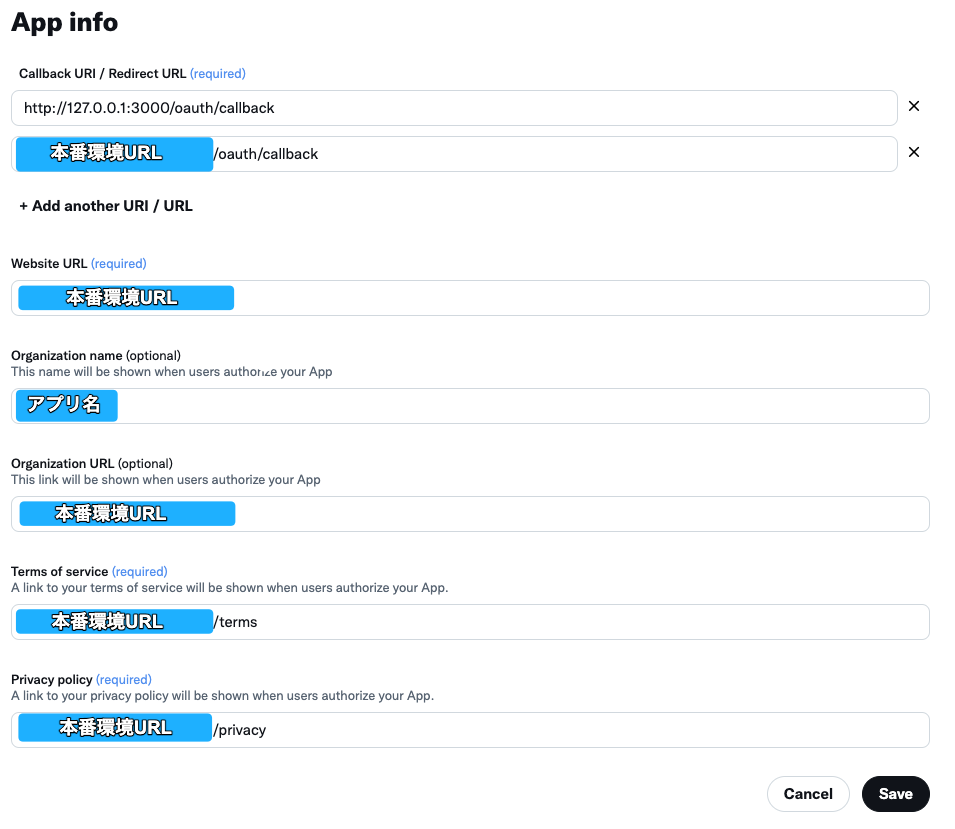
Elevated accessの申請
Elevatedを申請しないと「エラーコード453」が発生したので申請をします。
TweepyライブラリにはTwitter API v1.1が含まれており、Elevated accessを申し込む必要があるようです。
下記にアクセスする
https://developer.twitter.com/en/portal/products/elevated
Do you need Elevated access for your Project?の「Apply」をクリックして
各項目を埋めてNextをクリック
-
What country are you based in?
- 居住国を選択します
-
What's your current coding skill level?
- 自分のスキルレベルを選択します
-
Want updates?
- アップデート情報が必要な場合はチェックしてください
再度各項目を埋めてNextをクリック(英語で)
DeepLで翻訳すると楽です
-
How will you use the Twitter API or Twitter Data?
- TwitterのAPIやデータをどのように使用するかを200文字で記入します
- APIを使用して解消したい課題やユーザーストーリなど大目的を詳細に記入します
-
Are you planning to analyze Twitter data?
- 取得したデータを分析する場合はYESを選択します
- 分析する内容と手法または技術を100文字で詳細に記入します
-
Will your App use Tweet, Retweet, Like, Follow, or Direct Message functionality?
- ツイート、リツイート、いいね,フォロー、DMを使用する場合はYESを選択します
- 何にどのような操作を行うのかを100文字で詳細に記入します
-
Do you plan to display Tweets or aggregate data about Twitter content outside Twitter?
- 政府機関関係でデータを表示する場合はYESを選択します
- 表示する予定の政府機関をすべて記入します
入力した内容を確認して、「Next」をクリック
利用規約を読み、チェックを入れて、「Submit」をクリック
Twitter Developerの登録、設定が完了しました!おつかれさまです!👏
続いてrails側を実装します。
authenticationsテーブルを作成
Sorceryのwikiにチュートリアルがあるので、基本的にはそれに従っていきます。
$ rails g sorcery:install external --only-submodules
        gsub  config/initializers/sorcery.rb
      insert  app/models/user.rb
      create  db/migrate/20221104011735_sorcery_external.rb
コマンドを打つと、外部認証に必要なauthenticationsテーブルを作成するためのマイグレーションファイルが作られます。
user_idにindexを貼る記述を追加してマイグレーションを実行します。
class SorceryExternal < ActiveRecord::Migration
  def change
    create_table :authentications do |t|
      t.integer :user_id, :null => false
      t.string :provider, :uid, :null => false

      t.timestamps
    end

    add_index :authentications, [:provider, :uid]
    add_index :authentications, :user_id # 追加
  end
end
rails db:migrate
Authenticationモデルの設定
先ほど既にマイグレーションファイルは作成しているので、--migration=falseオプションを付けています。
rails g model Authentication --migration=false
class Authentication < ActiveRecord::Base
  belongs_to :user
end
class User < ApplicationRecord
  authenticates_with_sorcery!
  has_many :authentications, dependent: :destroy
  accepts_nested_attributes_for :authentications # has_many :authenticationsより下に書く
end
sorcery.rbの設定
Rails.application.config.sorcery.submodules = [:external]
config.external_providers = [:twitter]
config.twitter.key = ENV['twitter_key']
config.twitter.secret = ENV['twitter_secret_key']
config.twitter.callback_url = Settings.sorcery[:callback_url]
config.twitter.user_info_path = "/1.1/account/verify_credentials.json?include_email=true"
config.twitter.user_info_mapping = {
email: 'email',
name: 'name',
introduction: 'description',
}
user.authentications_class = Authentication
- config.twitter.callback_url
環境ごとにurlが異なるのでgemのconfigを入れて環境毎に設定します。
sorcery:
  callback_url: "http://127.0.0.1:3000/oauth/callback?
sorcery:
  callback_url: "本番環境のURL"/oauth/callback?
- config.twitter.key & config.twitter.secret
Twitter Developer ページのアプリ内「Keys and tokens」にある
「API key」と「API secret key」はgemのdotenv-railsを導入して環境変数として設定しました。
twitter_key='Twitter Developer ページのAPI key'
twitter_secret_key='Twitter Developer ページのAPI secret key'
- config.twitter.user_info_mapping
取得したい値はメールアドレス、名前、自己紹介なので以下を設定しました。
email: 'email',
name: 'name',
introduction: 'description'
Oauth処理を行うコントローラを作成
class OauthsController < ApplicationController
  skip_before_action :require_login
  def oauth
    login_at(auth_params[:provider])
  end

  def callback
    provider = auth_params[:provider]

    if auth_params[:denied].present?
      redirect_to root_path, success: ('Twitterアカウントでのアカウント作成に成功しました')
      return
    end

    begin
      create_user_from(provider) unless (@user = login_from(provider))
      redirect_to root_path, success: ('Twitterアカウントでのログインに成功しました')

    rescue StandardError
      redirect_to root_path, danger: ('Twitterアカウントでログインに失敗しました')
    end
  end

  private

  def auth_params
    params.permit(:code, :provider, :denied)
  end

  def create_user_from(provider)
    @user = create_from(provider)
    reset_session
    auto_login(@user)
  end
end
ルーティングの追加
post "oauth/callback", to: "oauths#callback"
get "oauth/callback", to: "oauths#callback"
get "oauth/:provider", to: "oauths#oauth", as: :auth_at_provider
ログイン画面の追加
<%= link_to auth_at_provider_path(provider: :twitter), class: 'btn w-100 twitter' do %>
   <i class="bi bi-twitter"></i> Twitterでログイン
<% end %>
以上でrails側の実装も終わりです!