Ansible全然わからん
はじめに
仕事でAnsibleを使ってサーバ構築を自動化する機会があり、1から覚え直しをしたので、PlaybookやInventoryなどの書き方・ディレクトリ構成などをまとめてみました。
モジュールの細かい説明はやってません。
これが正解というものではなくて、こんな感じに作るとこう動くよ、という内容を、順を追って説明してます。
環境
- CentOS 7.6 1810
- 1台でもできるけど、Ansible実行用と処理対象用の複数台あるとわかりやすい
- Ansible 2.6 (最新は2.8)
参考図書
Ansibleインストールと環境設定
VM
検証用であればVirtualBox上にVagrantを使ってAnsible検証環境に特化したVagrantを使ったVM構築 - 複数VM・VM間ssh公開鍵認証設定・共有フォルダの通りやれば、最低限必要な環境は簡単に作れる。
yumインストール
特に設定をいじっていないCentOS 7.6にyum install ansibleすると、バージョン2.4のAnsibleがインストールされる。
ただし、centos-release-ansible26パッケージをインストールすることで2.6用のリポジトリが追加され、yumでAnsible 2.6がインストールできるので、こちらを使ってインストールした。
[root@ansible-controller ~]# yum install centos-release-ansible26
するとこんなファイルができる
/etc/yum.repos.d/CentOS-ANSIBLE.repo
これでyum install ansibleすると、2.6バージョンがインストールされる。
[root@ansible-controller ~]# yum install ansible
[vagrant@ansible-controller ~]$ ansible --version
ansible 2.6.14
  config file = /etc/ansible/ansible.cfg
  configured module search path = [u'/home/vagrant/.ansible/plugins/modules', u'/usr/share/ansible/plugins/modules']
  ansible python module location = /usr/lib/python2.7/site-packages/ansible
  executable location = /usr/bin/ansible
  python version = 2.7.5 (default, Jun 20 2019, 20:27:34) [GCC 4.8.5 20150623 (Red Hat 4.8.5-36)]
[vagrant@ansible-controller ~]$
AnsibleのインストールはAnsibleを実行するサーバのみでよく、処理対象サーバは何もいらない(sshが動いていること)
ターゲットノードへのsshアクセス
Ansibleを使ってリモートサーバの環境構築を行うには、リモートサーバへパスフレーズなしのssh公開鍵認証ができている必要がある(設定によってそうでもないけど、ansible,ansible-playbook実行時に手間を減らすため、パスフレーズを省略すると操作が簡潔になる)
鍵設定の概要はAnsible検証環境に特化したVagrantを使ったVM構築 - 複数VM・VM間ssh公開鍵認証設定・共有フォルダの通り。
sudo
リモートサーバでroot権限の処理を行う際には、sudoがパスワードなしで実行できるようになっている必要がある。
Vagrantで作成したVMでvagrantユーザであれば不要になっているはず。
構成を図にするとこんな感じ
ansible.cfg
Ansibleの設定ファイル
[defaults]
host_key_checking = False
初めてのssh接続時、known_hostsにsshサーバの設定がないと「このホスト、今まで接続したことないけど繋いでもいいか?」と聞かれるが、これを設定しておくと省略される。
他にはログの出力設定や並列処理数などがある。
読まれる設定ファイルの優先順位は以下の通り
- 環境変数
ANSIBLE_CONFIGで指定されたパスのファイル - カレントディレクトリの
ansible.cfg - 実行ユーザの
~/.ansible.cfg - 実行ホストの
/etc/ansible/ansible.cfg
Ansible Configuration Settings — Ansible Documentation
PlaybookとInventory
Playbook
Playbookは「何をするか」を定義する。YAML形式。
様々なAnsibleモジュールがあり、それらを組み合わせてパッケージインストールや設定ファイル変更などを行う。
Inventory
Inventoryは「処理対象は何か」を定義する。Windowsのini形式に近い。
対象ホストはグルーピングしたり、グループごとにグループ固有の設定用の変数を定義したりできる。
外部ファイルにYAML形式で定義することもできる。
最小構成のPlaybook+Inventory
最小といいつつ、ターゲットが2台あるけど、まぁそれは置いておいて
[ansible_practice]
192.168.244.120
192.168.244.121
Inventoryには、処理対象のVMを記述する。
[ansible_practice]が「グループ名」で、Playbookにはこのグループ名を対象に実行するタスクを記述していく。
グループ名の記述の後に、処理対象のホスト
---
- hosts: ansible_practice
  tasks:
    - ping:
Ansible Playbookの実行
Playbookに記述したTaskを実行するには、ansible-playbookコマンドを使う。
必須の引数はPlaybookのファイル。Inventoryファイルは-i Inventoryファイル名で指定する(指定がないと/etc/ansible/hostsが使われる)
[vagrant@ansible-controller practice]$ ls
inventory.ini  inventory.yml  playbook.yml
[vagrant@ansible-controller practice]$ ansible-playbook -i inventory.ini playbook.yml

PLAY [ansible_practice] ********************************************************
TASK [Gathering Facts] *********************************************************
ok: [192.168.244.121]
ok: [192.168.244.120]

TASK [ping] ********************************************************************
ok: [192.168.244.120]
ok: [192.168.244.121]

PLAY RECAP *********************************************************************
192.168.244.120            : ok=2    changed=0    unreachable=0    failed=0
192.168.244.121            : ok=2    changed=0    unreachable=0    failed=0

[vagrant@ansible-controller practice]$
実行結果サマリがPLAY RECAPのところに表示される。
| 項目 | 意味 |
|---|---|
| ok | 指定の状態にすでになっているため処理されなかった(冪等性) |
| changed | 指定の状態に変更された |
| unreachable | 接続に失敗した |
| failed | 処理に失敗した |
host名指定
Inventoryにホスト名で指定
[ansible_practice]
ansible-controller
ansible-node01
DNSでも/etc/hostsでも名前解決できれば良いが、そうでない場合は名前解決できずに当然エラーになる……はずだけど、最近のCentOSなのかVagrant環境がそうなのか、ホスト名だけだと.localhostが付加されて(ここまでは/etc/resolv.confのsearchの設定)、さらに同セグメント内に謎DNSサーバが動いててそこが127.0.0.1を返すから想定しない設定で一応動くな…
とはいえ、説明してると横道にそれるので、Inventoryにホスト毎の設定を追加できる「ホスト変数」に、ansible_hostという「接続変数(behavioral inventory parameters)」にIPアドレスを書けばOK
[ansible_practice]
ansible-controller ansible_host=192.168.244.120
ansible-node01     ansible_host=192.168.244.121
これで、Ansibleの実行時においては、「ansible-node01のアドレスは192.168.244.121」として処理される
[vagrant@ansible-controller practice]$ ansible-playbook -i inventory.ini playbook.yml

PLAY [ansible_practice] ********************************************************
TASK [Gathering Facts] *********************************************************
ok: [ansible-node01]
ok: [ansible-controller]

TASK [ping] ********************************************************************
ok: [ansible-controller]
ok: [ansible-node01]

PLAY RECAP *********************************************************************
ansible-controller         : ok=2    changed=0    unreachable=0    failed=0
ansible-node01             : ok=2    changed=0    unreachable=0    failed=0

[vagrant@ansible-controller practice]$
Taskの追加
このplaybook.ymlにタスク(処理)を追加してみる
ディレクトリ作成
fileモジュールでディレクトリを作ってみる
---
- hosts: ansible_practice
  tasks:
    - ping:

    - file:
        path: /tmp/ansible/practice
        state: directory
        owner: vagrant
        mode: 0755
実行
[vagrant@ansible-controller practice]$ ansible-playbook -i inventory.ini playbook.yml

PLAY [ansible_practice] ********************************************************
TASK [Gathering Facts] *********************************************************
ok: [ansible-node01]
ok: [ansible-controller]

TASK [ping] ********************************************************************
ok: [ansible-controller]
ok: [ansible-node01]

TASK [file] ********************************************************************
changed: [ansible-controller]
changed: [ansible-node01]

PLAY RECAP *********************************************************************
ansible-controller         : ok=3    changed=1    unreachable=0    failed=0
ansible-node01             : ok=3    changed=1    unreachable=0    failed=0

[vagrant@ansible-controller practice]$
結果
[vagrant@ansible-controller practice]$ ls -al /tmp/ansible/
total 4
drwxr-xr-x.  3 vagrant vagrant   22 Jul 14 00:45 .
drwxrwxrwt. 10 root    root    4096 Jul 14 00:48 ..
drwxr-xr-x.  2 vagrant vagrant    6 Jul 14 00:45 practice
[vagrant@ansible-controller practice]$ ssh 192.168.244.121 ls -al /tmp/ansible/

total 4
drwxr-xr-x.  3 vagrant vagrant   22 Jul 14 00:45 .
drwxrwxrwt. 10 root    root    4096 Jul 14 00:45 ..
drwxr-xr-x.  2 vagrant vagrant    6 Jul 14 00:45 practice
yumインストールとroot権限
ここから更に、yumでrubyパッケージをインストールしてみる。
---
# - hosts: ansible_host=192.168.244.121
- hosts: ansible_practice
  tasks:
    - ping:

    - file:
        path: /tmp/ansible/practice
        state: directory
        owner: vagrant
        mode: 0755

    - yum:
        name: ruby
        state: present
カンの良い人なら気付くと思いますが、、、
[vagrant@ansible-controller practice]$ ansible-playbook -i inventory.ini playbo
ok.yml

PLAY [ansible_practice] ********************************************************
TASK [Gathering Facts] *********************************************************
ok: [ansible-node01]
ok: [ansible-controller]

TASK [ping] ********************************************************************
ok: [ansible-controller]
ok: [ansible-node01]

TASK [file] ********************************************************************
ok: [ansible-controller]
ok: [ansible-node01]

TASK [yum] *********************************************************************
fatal: [ansible-node01]: FAILED! => {"changed": false, "msg": "You need to be root to perform this command.\n", "rc": 1, "results": ["Loaded plugins: fastestmirror\n"]}
fatal: [ansible-controller]: FAILED! => {"changed": false, "msg": "You need to be root to perform this command.\n", "rc": 1, "results": ["Loaded plugins: fastestmirror\n"]}
        to retry, use: --limit @/ansible/practice/playbook.retry

PLAY RECAP *********************************************************************
ansible-controller         : ok=3    changed=0    unreachable=0    failed=1
ansible-node01             : ok=3    changed=0    unreachable=0    failed=1

[vagrant@ansible-controller practice]$
root権限がないため、失敗している。
ついでに、前段のfileによるディレクトリ作成、changedでなくok(すでにその状態になっているため処理が行われていない)になっている。冪等性。
rootで実行するには、becomeを指定する(デフォルトはfalse)。
becomeをtrueにすると、デフォルトでroot実行となる。
becomeでroot権限で実行するには、そのホスト上でsudo su -がパスワードなしでrootでシェル起動できる設定になっている必要がある。
---
- hosts: ansible_practice
  become: true
  tasks:
    - ping:

    - file:
        path: /tmp/ansible/practice
        state: directory
        owner: vagrant
        mode: 0755

    - yum:
        name: ruby
        state: present
[vagrant@ansible-controller practice]$ ansible-playbook -i inventory.ini playbook.yml

PLAY [ansible_practice] ********************************************************
TASK [Gathering Facts] *********************************************************
ok: [ansible-node01]
ok: [ansible-controller]

TASK [ping] ********************************************************************
ok: [ansible-controller]
ok: [ansible-node01]

TASK [file] ********************************************************************
ok: [ansible-controller]
ok: [ansible-node01]

TASK [yum] *********************************************************************
changed: [ansible-node01]
changed: [ansible-controller]

PLAY RECAP *********************************************************************
ansible-controller         : ok=4    changed=1    unreachable=0    failed=0
ansible-node01             : ok=4    changed=1    unreachable=0    failed=0

[vagrant@ansible-controller practice]$
rubyがインストールされた。
[vagrant@ansible-controller practice]$ ruby --version
ruby 2.0.0p648 (2015-12-16) [x86_64-linux]
[vagrant@ansible-controller practice]$ ssh 192.168.244.121 ruby --version
ruby 2.0.0p648 (2015-12-16) [x86_64-linux]
[vagrant@ansible-controller practice]$
nameによるタスクの説明
ansible-playbook実行時に、fileとかyumとか、使用しているモジュール名が出力されるだけで、具体的に何をやっているかわかりづらいので、実行時に簡単に確認できるように、nameでタスクの内容を簡潔に記述しておく。
    - name: create directory
      file:
        path: /tmp/ansible/practice
        state: directory
        owner: vagrant
        mode: 0755

    - name: install ruby package
      yum:
        name: ruby
        state: present
出力
TASK [create directory] ********************************************************
ok: [ansible-controller]
ok: [ansible-node01]

TASK [install ruby package] ****************************************************
ok: [ansible-node01]
ok: [ansible-controller]

PLAY RECAP *********************************************************************
ansible-controller         : ok=4    changed=0    unreachable=0    failed=0
ansible-node01             : ok=4    changed=0    unreachable=0    failed=0
Apacheのインストールとポート番号の変更・サービス有効化
割とありがちなちょっとした例
- hosts: ansible_practice
  become: true
  tasks:
    - name: install httpd server
      yum:
        name: httpd
        state: present

    - name: configure httpd server
      replace:
        path: /etc/httpd/conf/httpd.conf
        regexp: ^#?Listen 80$
        replace: Listen 8080

    - name: enable httpd service
      systemd:
        name: httpd
        state: restarted
        enabled: yes
replaceなど正規表現を使ったファイル編集の注意点
    - name: configure httpd server
      replace:
        path: /etc/httpd/conf/httpd.conf
        regexp: Listen 80
        replace: Listen 8080
もしこのように書いてしまうと…
1回目の実行で
- Listen 80
+ Listen 8080
に更新されるが、2度目の実行でもregexp: Listen 80はこの行にマッチするため、今度は
- Listen 8080
+ Listen 808080
となってしまう。
繰り返し実行する際に対象外となるように気を付ける必要がある。
(この例であれば^・$を使って、行頭・行末を明示する、など)
Inventoryファイルの設定
グループ
ここまでの例は[ansible_practice]グループしか使っていなかったけど、当然複数グループ定義できるし、あるノード(処理対象ホスト)を複数のグループに設定することもできる。
[ansible_practice]
ansible-controller ansible_host=192.168.244.120
ansible-node01     ansible_host=192.168.244.121

[php-server]
ansible-node01
こう書けば、[ansible_practice]グループにはansible-controllerとansible-node01が対象となり、[php-server]グループには、ansible-node01のみが含まれる。
ansible-node01は[ansible_practice]と[php-server]の両方に含まれる。
つまり、Playbookでhostsにansible_practiceと指定すればansible-controllerとansible-node01に対して処理され、php-serverと指定すれば、ansible-node01のみ処理される。
ちなみに、ansible_hostを使ったIPアドレス指定は、最初の1回のみで良いみたい。
Inventory変数
Ansibleで行う処理の内容は基本的にPlaybookへ記述するが、環境ごとに複数のInventoryファイルを作成し、環境ごとに設定が異なる場合・・・例えば環境Aではwebサーバは8080/TCPで動かすが、環境Bでは8888/TCPで動かす、など・・・、環境ごとにPlaybookを用意してもいいけど、ポート番号以外のTaskの中身は同じなので、ポート番号を変数としてInventoryファイルに書けたら便利ですよね。(よね?)
Playbookは共通で、Inventoryの中に以下のように[グループ名:vars]という記述のあとに変数定義する。
[ansible_practice]
ansible-controller ansible_host=192.168.244.120
ansible-node01     ansible_host=192.168.244.121

[ansible_practice:vars]
http_port=8080
[ansible_practice]
ansible-controller ansible_host=172.16.10.10
ansible-node01     ansible_host=172.16.10.11

[ansible_practice:vars]
http_port=8888
[ansible_practice:vars]と記述することで、グループ[ansible_practice]に対する処理中は、http_portという変数名で値を参照することができる。
この変数を参照するように、前述webサーバのポート番号書き換えの処理のPlaybookを修正すると、こんな感じで環境に依存しない記述にできる。
    - name: configure httpd server
      replace:
        path: /etc/httpd/conf/httpd.conf
        regexp: ^#?Listen [0-9]+$
        replace: Listen {{ http_port }}
これで、Playbookにハードコーディングしていた設定値を、Inventory変数へ外だしできたので、環境Aの場合はinventory-a.iniを、環境Bの場合はinventory-b.iniを使ってansible-playbookを実行すればそれぞれの環境が構築できる。
ちなみに、グループ名でなく[all:vars]に書くことで、グループに関係なく参照できる値を定義することもできる。いわゆるグローバル変数。
Inventory変数の外部ファイル化
前述通りiniファイルへkey=value形式でInventory変数を定義できるので、単発の設定であれば問題ないが、リスト(配列)やマップ(ハッシュ・ディクショナリ)形式では表現できない。
例えば、「/etc/hostsへ設定するホストとIPアドレスの一覧(件数不定)」とか「iptablesで許可する--dportで指定するポート番号一覧」とか「DHCPサーバで特定のクライアントに対して固定のアドレスを設定したいときのMACアドレスとIPアドレスのセット」とか。。
そういう場合は、PlaybookかInventoryファイルと同じディレクトリにgroup_vars/グループ名.ymlファイルを作成し、そこへYAML形式で任意の設定を記述することで、Playbookから参照できる。
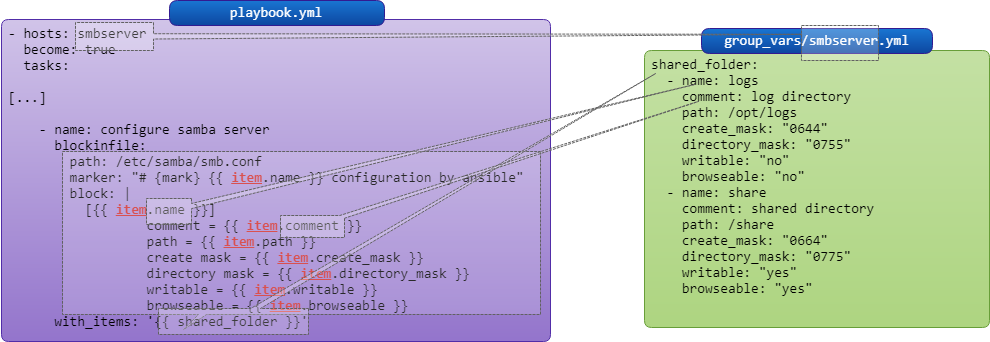
with_itemsとYAML形式のInventory変数を使ったループ処理
[smbserver]
ansible-node01
Inventoryファイルに記述したグループ名と同名のYAMLファイルをgroup_varsディレクトリ以下に作成
---
shared_folder:
  - name: logs
    comment: log directory
    path: /opt/logs
    create_mask: "0644"
    directory_mask: "0755"
    writable: "no"
    browseable: "no"
  - name: share
    comment: shared directory
    path: /share
    create_mask: "0664"
    directory_mask: "0775"
    writable: "yes"
    browseable: "yes"
このInventoryファイルがある状態で、次のようにPlaybookを定義。
- hosts: smbserver
  become: true
  tasks:
    - name: install samba server
      yum:
        name: samba
        state: present

    - name: configure samba server
      blockinfile:
        path: /etc/samba/smb.conf
        marker: "# {mark} {{ item.name }} configuration by ansible"
        block: |
          [{{ item.name }}]
                  comment = {{ item.comment }}
                  path = {{ item.path }}
                  create mask = {{ item.create_mask }}
                  directory mask = {{ item.directory_mask }}
                  writable = {{ item.writable }}
                  browseable = {{ item.browseable }}
      with_items: '{{ shared_folder }}'
これでansible-playbookを実行すると、/etc/samba/smb.confの該当部分は以下の通り。
# BEGIN logs configuration by ansible
[logs]
        comment = log directory
        path = /opt/logs
        create mask = 0660
        directory mask = 0770
        writable = no
        browseable = no
# END logs configuration by ansible
# BEGIN share configuration by ansible
[share]
        comment = shared directory
        path = /share
        create mask = 0644
        directory mask = 0755
        writable = yes
        browseable = yes
# END share configuration by ansible
task内でwith_itemsに配列形式の変数を指定することで、ループ内(with_itemsの上のブロック)で{{ item }}という変数名で参照できる。
プログラミング言語でいうと、foreach(var item in shared_folder) { ... } と動きは同じ。(itemというループ内変数は固定)
上記の設定ではshared_folderの要素はname,comment,...などのマップ形式なので、{{ item.comment }}などで各設定値を参照できる。
with_itemsを使ったループは、Inventory変数で定義した配列参照だけでなく、その場で定義したリストをループ処理もできる。構文はこんな感じ。
      with_items:
        - foo
        - bar
        - baz
これでループのブロック内で{{ item }}と書いた箇所が、ループ毎にfoo,bar,bazとなる。
※ Ansible 2.5以降は、with_itemsなどのwith_Xによるループ処理はloopに置き換わっている
TaskをRoleへ分割
ここまでの例ではPlaybookの内容は以下のようになっている
- ping
- ディレクトリ作成
- rubyのyumインストール
- httpdのyumインストール
- httpd.confの編集
- httpdサービスの有効化
- sambaのyumインストール
- smb.confの設定
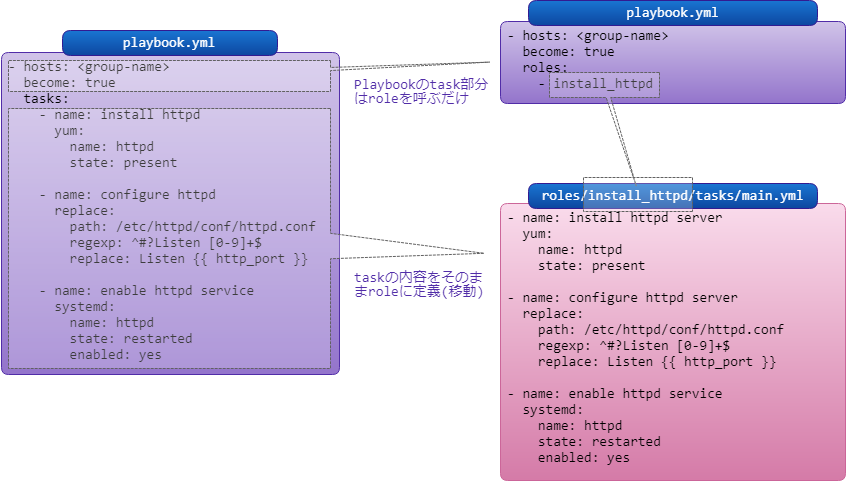
この内容がすべてplaybook.ymlの中に記述されており、プログラミングでいうと、main()関数の中にすべての処理が記述されている状態と同様で、メンテナンス性や可読性が(これからさらに処理内容が増える場合も考えると)とてもよろしくない。
そこで、プログラミングだと処理単位ごとに関数を作ってmain()からそれをコールするように、PlaybookもRoleという
※ main()関数とか別関数化というのは筆者の個人的な感覚・たとえです
図にするとこんな感じ
Roleの作成
httpdのインストール・設定・サービス設定をRoleに分離してみる。
Playbook内のTaskをRoleに作成するファイルはroles/ロール名/tasks/main.yml
---
- name: install httpd server
  yum:
    name: httpd
    state: present

- name: configure httpd server
  replace:
    path: /etc/httpd/conf/httpd.conf
    regexp: ^#?Listen [0-9]+$
    replace: Listen {{ http_port }}

- name: enable httpd service
  systemd:
    name: httpd
    state: restarted
    enabled: yes
同様にsambaインストール
---
- name: install samba server
  yum:
    name: samba
    state: present

- name: configure samba server
  blockinfile:
    path: /etc/samba/smb.conf
    marker: "# {mark} {{ item.name }} configuration by ansible"
    block: |
      [{{ item.name }}]
              comment = {{ item.comment }}
              path = {{ item.path }}
              create mask = {{ item.create_mask }}
              directory mask = {{ item.directory_mask }}
              writable = {{ item.writable }}
              browseable = {{ item.browseable }}
  with_items: '{{ shared_folder }}'

- name: enable samba service
  systemd:
    name: smb
    state: restarted
    enabled: yes
Roleの参照(呼び出し)
作ったRoleをPlaybookから呼び出す。
関数コールみたいな感じ。
- hosts: wwwserver
  become: true
  roles:
    - install_httpd

- hosts: smbserver
  become: true
  roles:
    - install_samba
関数コールと同じように、複数個所から呼ぶことももちろんできる。
例えば上記ではwebサーバとsambaサーバを別グループにしているが「ホットスタンバイ用のサーバを1台用意して、web/sambaを1台で動かす」という場合でも、Roleは同じものを使用して、InventoryとPlaybookを変更して
- hosts: wwwserver
  become: true
  roles:
    - install_httpd

- hosts: smbserver
  become: true
  roles:
    - install_samba

- hosts: standby
  become: true
  roles:
    - install_httpd
    - install_samba
のようにもできる。
この場合、webサーバのポート番号設定をgroup_vars/wwwserver.ymlにはhttp_port: 8080、group_vars/standbyにはhttp_port: 28080とすることで、スタンバイサーバの設定を変更することもできる。
モジュール
Ansibleでは標準でさまざまなモジュールが用意されている。
OSの設定変更、パッケージ管理、設定ファイルの更新など、たいていの操作はモジュールの組み合わせで実現できる。はず。
少しだけ説明
shell
shell – Execute shell commands on targets — Ansible Documentation
Linuxコマンドを実行する。
ただし、冪等性は担保してくれない(実行が不要かどうかは検査されない)ので、実行前に検査用のtaskを入れたり工夫が必要。
実行したいコマンドを実現できるモジュールがないか、まずは探してみましょう。
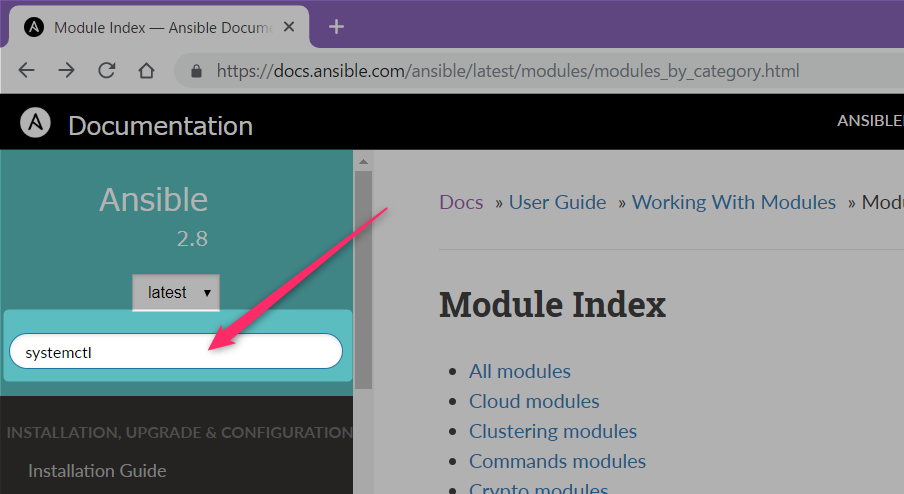
モジュールの探し方としては、カテゴリページから探すのもいいけど、
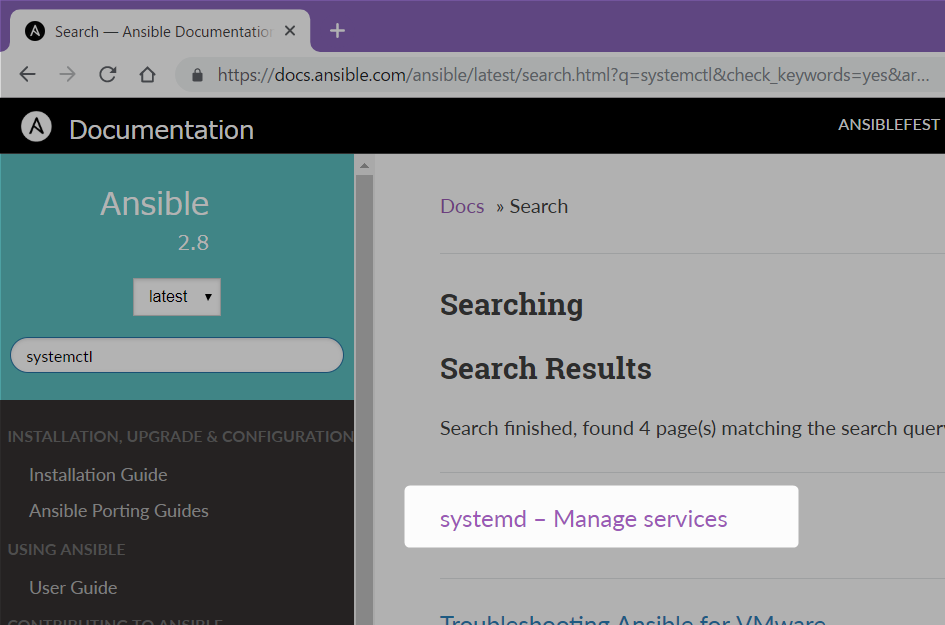
この検索欄にコマンド(うまくヒットしなければ関連キーワード)を入れて検索すると、用意されていれば良い感じのモジュールがヒットする。
ヒットしたら、モジュールの説明ページの「Parameters」と「Examples」を確認すれば、だいたいなんとかなる。(アバウトですみません)
template
Jinja2というPythonのテンプレートエンジンを使って、テンプレートファイルをInventory変数などで定義した変数に置き換えつつ、対象サーバへファイルコピーしてくれる。
replaceやlineinfileなどのファイル変更処理と異なり、冪等性については難しく考えなくて済むので扱いが簡単。
設定ファイル書き換えでも、変更部分が大半で書式が単純なkey-value形式でない場合は、templateを使った方が楽かもしれない。
例としてDHCPサーバ(dhcp-4.2.5-68.el7.centos.1.x86_64)の設定
option domain-name "ansible.practice.localhost";
option domain-name-servers 192.168.244.120;
default-lease-time 3600;
max-lease-time 86400;
ddns-update-style none;
log-facility local7;

subnet 192.168.244.0 netmask 255.255.255.0 {
        option subnet-mask 255.255.255.0;
        option broadcast-address 192.168.244.255;
        option routers 192.168.244.1;
        range 192.168.244.60 192.168.244.99;
}

host client01 {
  hardware ethernet 00:00:5e:00:53:01;
  fixed-address 192.168.244.31;
}
host client02 {
  hardware ethernet 00:00:5e:00:53:02;
  fixed-address 192.168.244.32;
}
こんなファイルを作りたい場合は…
option domain-name "{{ domain_name }}";
option domain-name-servers {{ dns }};
default-lease-time 3600;
max-lease-time 86400;
ddns-update-style none;
log-facility local7;

subnet {{ network_addr }} netmask {{ subnet_mask }} {
        option subnet-mask {{ subnet_mask }};
        option broadcast-address {{ broadcast }};
        option routers {{ gateway }};
        range {{ range_begin }} {{ range_end }};
}

{% for host in hosts_conf %}
host {{ host.name }} {
  hardware ethernet {{ host.hwaddr }};
  fixed-address {{ host.fixedaddr }};
}
{% endfor %}
テンプレートファイルは、tasksディレクトリと同じ階層にtemplatesディレクトリを作り、そこに.j2拡張子を付けて配置。
---
- name: install dhcp server
  yum:
    name: dhcp
    state: present

- name: configure dhcp server
  template:
    src: dhcpd.conf.j2
    dest: /etc/dhcp/dhcpd.conf
    owner: root
    group: root
    mode: "0644"
roleでtemplateモジュールを指定、パラメタのsrcでテンプレートファイル(.j2)を指定する。パスを指定しなければ、templatesディレクトリが基準となる。
---
domain_name: ansible.practice.localhost
dns: "192.168.244.120"

network_addr: "192.168.244.0"
subnet_mask: "255.255.255.0"
broadcast: "192.168.244.255"
gateway: "192.168.244.1"
range_begin: "192.168.244.60"
range_end: "192.168.244.99"

hosts_conf:
  - name: client01
    hwaddr: 00:00:5e:00:53:01
    fixedaddr: "192.168.244.31"
  - name: client02
    hwaddr: 00:00:5e:00:53:02
    fixedaddr: "192.168.244.32"
テンプレートファイルのパラメタとなるInventory変数はこんな感じ。
これでテンプレート(.j2ファイル)の{{ network_addr }}と書いた箇所が192.168.244.0に置き換わる。
リスト定義しているhosts_confは、テンプレートのfor構文でループ処理できる。
{% for host in hosts_conf %}

{% endfor %}
with_itemsがitem固定だったのに対して、テンプレートだとループ内の変数は自由に設定できる(上の例だとhost)
全体のファイル構成
.
├── ansible.cfg
├── group_vars
│   ├── dhcpserver.yml
│   ├── smbserver.yml
│   └── wwwserver.yml
├── inventory.ini
├── playbook.yml
└── roles
    ├── install_dhcpd
    │   ├── tasks
    │   │   └── main.yml
    │   └── templates
    │       └── dhcpd.conf.j2
    ├── install_httpd
    │   └── tasks
    │       └── main.yml
    └── install_samba
        └── tasks
            └── main.yml


