注意!!
本サンプルにはreact-native-elementsを利用していますが、旧執筆時はver0.xでした。が、最新は1.2.xであり、書き方が変わっています(Formが廃止されInputのみに)。最新環境でも動くコードを最後に追記してあります。
本文
React (Native)でのForm操作は悩ましいところです。
Redux-Formが有名みたいですが、Redux必須というのがうーんって感じです。
そこでformikを試してみたいと思います。
formikを利用することで値のハンドリング、バリデーション、Submitボタンの操作などいろいろできます。
書き方としては<Formik>タグを利用する方法とwithFormik()を利用する方法があるようですが、とりあえず<Formik>タグを利用してみます。
また、バリデーションはカスタムで書くか、Yupを利用するか(他のライブラリとも連携可能なようです)ですが、ここではYupを利用してみます。
React系のコーディングは完成形だけみても???って感じになるので冗長ですがSTEP BY STEPで進めていきます。
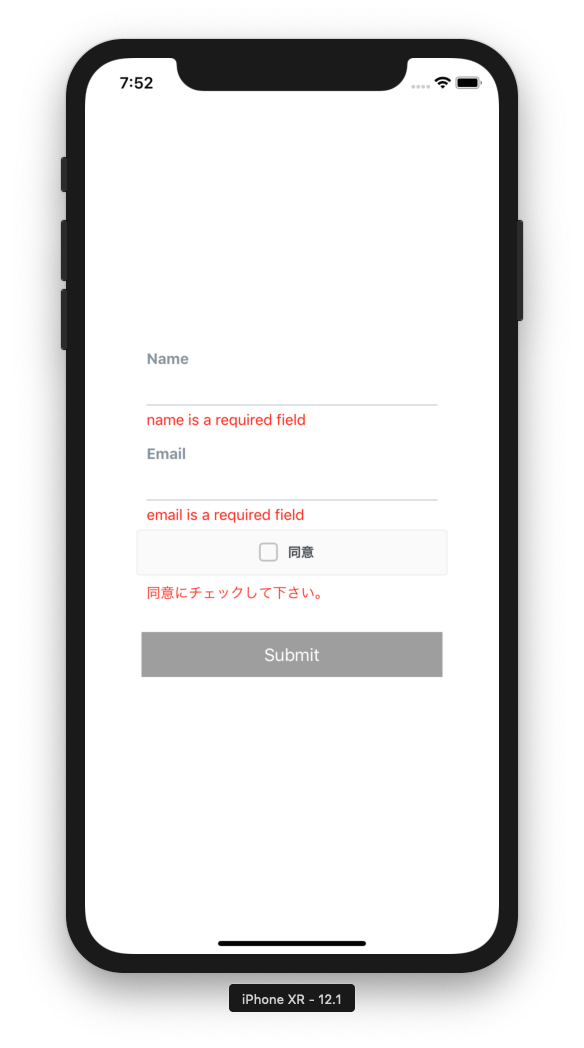
ゴール
最終的には下記のようなバリデーション付きのフォームを作ります。
モジュールのインストール
必要なモジュールをインストールします。
UIのパーツとしてはreact-native-elementsを利用します。
npm install --save formik yup react-native-elements
npm install
STEP1:最低限の雛形を記述する
まず、項目としてNameを表示し、Submitでstateを表示する雛形を作ります。
import React from 'react';
import { StyleSheet, Text, View, Alert } from 'react-native';
import { Formik } from 'formik';
import { Button, FormLabel, FormInput, FormValidationMessage } from 'react-native-elements';

export default class App extends React.Component {
  render() {
    return (
      <View style={{flex:1, alignItems:'center', justifyContent:'center'}}>
        <Formik
          initialValues={{ name: ''}}
          onSubmit={values => Alert.alert(JSON.stringify(values))}
        >
          {
            ({handleChange, handleSubmit, values}) => (
              <View style={{width:'80%'}}>

                <FormLabel>Name</FormLabel>
                <FormInput
                  onChangeText={handleChange('name')}
                  value={values.name}
                />
                <FormValidationMessage>error</FormValidationMessage>

                <Button
                  onPress={handleSubmit}
                  title='Submit'
                  buttonStyle={{marginTop:30}}
                />
              </View>
            )
          }
        </Formik>
      </View>
    );
  }
}
onChangeText={handleChange('name')とすることで、nameに変更を反映してくれます。
また、value={values.name}として、値を表示します。
STEP2:項目を追加してみる
続いてEmailを追加してみます。特に難しいことはありません。
import React from 'react';
import { StyleSheet, Text, View, Alert } from 'react-native';
import { Formik } from 'formik';
import { Button, FormLabel, FormInput, FormValidationMessage } from 'react-native-elements';

export default class App extends React.Component {
  render() {
    return (
      <View style={{ flex: 1, alignItems: 'center', justifyContent: 'center' }}>
        <Formik
+          initialValues={{ name: '', email: '' }}
          onSubmit={values => Alert.alert(JSON.stringify(values))}
        >
          {
            ({ handleChange, handleSubmit, values }) => (
              <View style={{ width: '80%' }}>

                <FormLabel>Name</FormLabel>
                <FormInput
                  onChangeText={handleChange('name')}
                  value={values.name}
                />
                <FormValidationMessage>error</FormValidationMessage>

+                <FormLabel>Email</FormLabel>
+                <FormInput
+                  onChangeText={handleChange('email')}
+                  value={values.email}
+                />
+                <FormValidationMessage>error</FormValidationMessage>

                <Button
                  onPress={handleSubmit}
                  title='Submit'
                  buttonStyle={{ marginTop: 30 }}
                />
              </View>
            )
          }
        </Formik>
      </View>
    );
  }
}
STEP3:Validationの実装1:最低限
ではValidationを実装します。
下記のように記述することで、書くフォームのエラーを制御できるようになります。
import React from 'react';
import { StyleSheet, Text, View, Alert } from 'react-native';
import { Formik } from 'formik';
import { Button, FormLabel, FormInput, FormValidationMessage } from 'react-native-elements';
import * as Yup from 'yup';

export default class App extends React.Component {
  render() {
    return (
      <View style={{ flex: 1, alignItems: 'center', justifyContent: 'center' }}>
        <Formik
          initialValues={{ name: '', email: '' }}
          onSubmit={values => Alert.alert(JSON.stringify(values))}
+          validationSchema={Yup.object().shape({
+            name: Yup.string().required(),
+            email: Yup.string().email().required(),
+          })}
        >
          {
+            ({ handleChange, handleSubmit, values, errors }) => (
              <View style={{ width: '80%' }}>

                <FormLabel>Name</FormLabel>
                <FormInput
                  onChangeText={handleChange('name')}
                  value={values.name}
                />
+                <FormValidationMessage>{errors.name}</FormValidationMessage>

                <FormLabel>Email</FormLabel>
                <FormInput
                  onChangeText={handleChange('email')}
                  value={values.email}
                />
+                <FormValidationMessage>{errors.email}</FormValidationMessage>

                <Button
                  onPress={handleSubmit}
                  title='Submit'
                  buttonStyle={{ marginTop: 30 }}
                />
              </View>
            )
          }
        </Formik>
      </View>
    );
  }
}
下記のようにすることでエラーメッセージをカスタマイズできます。
name: Yup
        .string()
        .required('名前の入力は必須です。'),
STEP4:Validationの実装2:対象の項目を操作するまでエラーを出さない
先述の状態では、どこか1つの項目をいじると、全ての項目についてバリデーションが実行され、エラーが表示されてしまいます。また編集(touch)していない項目についてはエラーを表示しないようにします。
{ (条件) && 表示内容}とすることで、条件により表示の切り替えが可能です。これを利用して、書く項目が編集されたかどうか(touched)で表示を制御します。
import React from 'react';
import { StyleSheet, Text, View, Alert } from 'react-native';
import { Formik } from 'formik';
import { Button, FormLabel, FormInput, FormValidationMessage } from 'react-native-elements';
import * as Yup from 'yup';

export default class App extends React.Component {
  render() {
    return (
      <View style={{ flex: 1, alignItems: 'center', justifyContent: 'center' }}>
        <Formik
          initialValues={{ name: '', email: '' }}
          onSubmit={values => Alert.alert(JSON.stringify(values))}
          validationSchema={Yup.object().shape({
            name: Yup.string().required(),
            email: Yup.string().email().required(),
          })}
        >
          {
+            ({ handleChange, handleSubmit, values, errors, touched }) => (
              <View style={{ width: '80%' }}>

                <FormLabel>Name</FormLabel>
                <FormInput
                  onChangeText={handleChange('name')}
                  value={values.name}
                />
+                {touched.name && <FormValidationMessage>{errors.name}</FormValidationMessage>}

                <FormLabel>Email</FormLabel>
                <FormInput
                  onChangeText={handleChange('email')}
                  value={values.email}
                />
+                {touched.email && <FormValidationMessage>{errors.email}</FormValidationMessage>}

                <Button
                  onPress={handleSubmit}
                  title='Submit'
                  buttonStyle={{ marginTop: 30 }}
                />
              </View>
            )
          }
        </Formik>
      </View>
    );
  }
}
STEP5:Validationの実装3:項目からの移動時(onBlur)にバリデーションする
Submitボタンを押すまでエラーがわからないのは不親切です。
編集項目から移動した際(onBlur)にエラーがあれば表示するようにしてみます。
import React from 'react';
import { StyleSheet, Text, View, Alert } from 'react-native';
import { Formik } from 'formik';
import { Button, FormLabel, FormInput, FormValidationMessage } from 'react-native-elements';
import * as Yup from 'yup';

export default class App extends React.Component {
  render() {
    return (
      <View style={{ flex: 1, alignItems: 'center', justifyContent: 'center' }}>
        <Formik
          initialValues={{ name: '', email: '' }}
          onSubmit={values => Alert.alert(JSON.stringify(values))}
          validationSchema={Yup.object().shape({
            name: Yup.string().required(),
            email: Yup.string().email().required(),
          })}
        >
          {
+            ({ handleChange, handleSubmit, values, errors, touched, handleBlur }) => (
              <View style={{ width: '80%' }}>

                <FormLabel>Name</FormLabel>
                <FormInput
                  onChangeText={handleChange('name')}
+                  onBlur={handleBlur('name')}
                  value={values.name}
                />
                {touched.name && <FormValidationMessage>{errors.name}</FormValidationMessage>}

                <FormLabel>Email</FormLabel>
                <FormInput
                  onChangeText={handleChange('email')}
+                  onBlur={handleBlur('email')}
                  value={values.email}
                />
                {touched.email && <FormValidationMessage>{errors.email}</FormValidationMessage>}

                <Button
                  onPress={handleSubmit}
                  title='Submit'
                  buttonStyle={{ marginTop: 30 }}
                />
              </View>
            )
          }
        </Formik>
      </View>
    );
  }
}
STEP6:Validationの実装4:全ての項目がOKになるまでSubmitボタンをアクティブにしない
場合により、全ての項目のチェックがOKになるまでSubmitボタンをアクティブにしたくない場合もあります。
それを試します。isValidを利用すればバリデーションがOKかNGかが取れるようです。
まあ、実際に適用するかどうかはケースバイケースかなと思います。
import React from 'react';
import { StyleSheet, Text, View, Alert } from 'react-native';
import { Formik } from 'formik';
import { Button, FormLabel, FormInput, FormValidationMessage } from 'react-native-elements';
import * as Yup from 'yup';

export default class App extends React.Component {
  render() {
    return (
      <View style={{ flex: 1, alignItems: 'center', justifyContent: 'center' }}>
        <Formik
          initialValues={{ name: '', email: '' }}
          onSubmit={values => Alert.alert(JSON.stringify(values))}
          validationSchema={Yup.object().shape({
            name: Yup.string().required(),
            email: Yup.string().email().required(),
          })}
        >
          {
+            ({ handleChange, handleSubmit, values, errors, touched, handleBlur, isValid }) => (
              <View style={{ width: '80%' }}>

                <FormLabel>Name</FormLabel>
                <FormInput
                  onChangeText={handleChange('name')}
                  onBlur={handleBlur('name')}
                  value={values.name}
                />
                {touched.name && <FormValidationMessage>{errors.name}</FormValidationMessage>}

                <FormLabel>Email</FormLabel>
                <FormInput
                  onChangeText={handleChange('email')}
                  onBlur={handleBlur('email')}
                  value={values.email}
                />
                {touched.email && <FormValidationMessage>{errors.email}</FormValidationMessage>}

                <Button
                  onPress={handleSubmit}
                  title='Submit'
                  buttonStyle={{ marginTop: 30 }}
+                  disabled={!isValid}
                />
              </View>
            )
          }
        </Formik>
      </View>
    );
  }
}
STEP7:Validationの実装5:2度押し禁止
状況によりボタンの2通しを禁止したい場合もあります。それを実装してみます。isSubmittingでSubmitされたかどうかが取得できるようです。
import React from 'react';
import { StyleSheet, Text, View, Alert } from 'react-native';
import { Formik } from 'formik';
import { Button, FormLabel, FormInput, FormValidationMessage } from 'react-native-elements';
import * as Yup from 'yup';

export default class App extends React.Component {
  render() {
    return (
      <View style={{ flex: 1, alignItems: 'center', justifyContent: 'center' }}>
        <Formik
          initialValues={{ name: '', email: '' }}
          onSubmit={values => Alert.alert(JSON.stringify(values))}
          validationSchema={Yup.object().shape({
            name: Yup.string().required(),
            email: Yup.string().email().required(),
          })}
        >
          {
+            ({ handleChange, handleSubmit, values, errors, touched, handleBlur, isValid, isSubmitting }) => (
              <View style={{ width: '80%' }}>

                <FormLabel>Name</FormLabel>
                <FormInput
                  onChangeText={handleChange('name')}
                  onBlur={handleBlur('name')}
                  value={values.name}
                />
                {touched.name && <FormValidationMessage>{errors.name}</FormValidationMessage>}

                <FormLabel>Email</FormLabel>
                <FormInput
                  onChangeText={handleChange('email')}
                  onBlur={handleBlur('email')}
                  value={values.email}
                />
                {touched.email && <FormValidationMessage>{errors.email}</FormValidationMessage>}

                <Button
                  onPress={handleSubmit}
                  title='Submit'
                  buttonStyle={{ marginTop: 30 }}
+                  disabled={!isValid || isSubmitting}
                />
              </View>
            )
          }
        </Formik>
      </View>
    );
  }
}
STEP8:Validationの実装6:Checkboxの追加
Checkboxの制御ができるか試してみます。
下記のようにすることで値のコントロール、バリデーションができましたが、ベストな記述かどうかわ微妙です。
import React from 'react';
import { StyleSheet, Text, View, Alert } from 'react-native';
import { Formik } from 'formik';
+import { Button, FormLabel, FormInput, FormValidationMessage, CheckBox } from 'react-native-elements';
import * as Yup from 'yup';

export default class App extends React.Component {
  render() {
    return (
      <View style={{ flex: 1, alignItems: 'center', justifyContent: 'center' }}>
        <Formik
+          initialValues={{ name: '', email: '', check: false}}
          onSubmit={values => Alert.alert(JSON.stringify(values))}
          validationSchema={Yup.object().shape({
            name: Yup.string().required(),
            email: Yup.string().email().required(),
+            check: Yup.boolean().oneOf([true],'同意にチェックして下さい。')
          })}
        >
          {
+            ({ handleChange, handleSubmit, values, errors, touched, handleBlur, isValid, isSubmitting, setFieldValue }) => (
              <View style={{ width: '80%' }}>

                <FormLabel>Name</FormLabel>
                <FormInput
                  onChangeText={handleChange('name')}
                  onBlur={handleBlur('name')}
                  value={values.name}
                />
                {touched.name && <FormValidationMessage>{errors.name}</FormValidationMessage>}

                <FormLabel>Email</FormLabel>
                <FormInput
                  onChangeText={handleChange('email')}
                  onBlur={handleBlur('email')}
                  value={values.email}
                />
                {touched.email && <FormValidationMessage>{errors.email}</FormValidationMessage>}

+                <CheckBox
+                  center
+                  title='同意'
+                  checked={values.check}
+                  onPress={() => setFieldValue('check',!values.check)}
+                />
+                {touched.check && <FormValidationMessage>{errors.check}</FormValidationMessage>}

                <Button
                  onPress={handleSubmit}
                  title='Submit'
                  buttonStyle={{ marginTop: 30 }}
                  disabled={!isValid || isSubmitting}
                />
              </View>
            )
          }
        </Formik>
      </View>
    );
  }
}
おまけ:loading
最後に、formikとは関係ありませんが、Buttonにloadingを設定することでスピナーを表示できるようです。
外部API連携等の際は利用するといいかもしれません。
import React from 'react';
import { StyleSheet, Text, View, Alert } from 'react-native';
import { Formik } from 'formik';
import { Button, FormLabel, FormInput, FormValidationMessage, CheckBox } from 'react-native-elements';
import * as Yup from 'yup';

export default class App extends React.Component {
  render() {
    return (
      <View style={{ flex: 1, alignItems: 'center', justifyContent: 'center' }}>
        <Formik
          initialValues={{ name: '', email: '', check: false}}
          onSubmit={values => Alert.alert(JSON.stringify(values))}
          validationSchema={Yup.object().shape({
            name: Yup.string().required(),
            email: Yup.string().email().required(),
            check: Yup.boolean().oneOf([true],'同意にチェックして下さい。')
          })}
        >
          {
            ({ handleChange, handleSubmit, values, errors, touched, handleBlur, isValid, isSubmitting, setFieldValue }) => (
              <View style={{ width: '80%' }}>

                <FormLabel>Name</FormLabel>
                <FormInput
                  onChangeText={handleChange('name')}
                  onBlur={handleBlur('name')}
                  value={values.name}
                />
                {touched.name && <FormValidationMessage>{errors.name}</FormValidationMessage>}

                <FormLabel>Email</FormLabel>
                <FormInput
                  onChangeText={handleChange('email')}
                  onBlur={handleBlur('email')}
                  value={values.email}
                />
                {touched.email && <FormValidationMessage>{errors.email}</FormValidationMessage>}

                <CheckBox
                  center
                  title='同意'
                  checked={values.check}
                  onPress={() => setFieldValue('check',!values.check)}
                />
                {touched.check && <FormValidationMessage>{errors.check}</FormValidationMessage>}

                <Button
                  onPress={handleSubmit}
                  title='Submit'
                  buttonStyle={{ marginTop: 30 }}
                  disabled={!isValid || isSubmitting}
+                  loading={true}
                />
              </View>
            )
          }
        </Formik>
      </View>
    );
  }
}
追記(2019年8月30日)
react-native-elementsが1.xとなり、Formが廃止され、Inputになりました。それに伴い上記のコードは動きません。下記のような感じにする必要があります。
import React from 'react';
import { StyleSheet, Text, View } from 'react-native';
import { Card, Input, Button, CheckBox } from 'react-native-elements';
import { Formik } from 'formik';
import * as Yup from 'yup';

export default class App extends React.Component {

    state = {
        email: '',
        password: ''
    }

    render() {
        return (
            <View style={{ flex: 1, justifyContent: 'center', alignItems: 'center' }}>
                <Formik
                    initialValues={{ email: '', password: '', check: false }}
                    onSubmit={values => alert(JSON.stringify(values))}
                    validationSchema={Yup.object().shape({
                        email: Yup.string().email('Emailの形式ではないようです。').required('Emailは必須です。'),
                        password: Yup.string().min(4, '4文字以上。').required('パスワードは必須です。'),
                        check: Yup.boolean().oneOf([true], '進むには同意してください。'),
                    })}
                >
                    {
                        ({ handleChange, handleSubmit, values, errors, touched, handleBlur, isValid, isSubmitting, setFieldValue }) => (
                            <View style={{ alignSelf: 'stretch', justifyContent: 'center', alignItems: 'center' }}>
                                <Input
                                    label="Email"
                                    placeholder="Input email address"
                                    containerStyle={{ marginTop: 20, width: '80%' }}
                                    autoCapitalize="none"
                                    errorMessage={errors.email && touched.email ? errors.email : null}
                                    value={values.email}
                                    onChangeText={handleChange('email')}
                                    onBlur={handleBlur('email')}
                                />
                                <Input
                                    placeholder="Input password."
                                    label="Password"
                                    containerStyle={{ marginTop: 20, width: '80%' }}
                                    errorMessage={errors.password && touched.password ? errors.password : null}
                                    secureTextEntry={true}
                                    value={values.password}
                                    onChangeText={handleChange('password')}
                                    onBlur={handleBlur('password')}
                                />
                                <CheckBox
                                    center
                                    title="同意する"
                                    containerStyle={{ width: '75%', borderColor: "#fff", backgroundColor: "#fff", marginTop: 30 }}
                                    checked={values.check}
                                    onPress={() => setFieldValue('check', !values.check)}
                                />
                                <Text style={{ fontSize: 12, color: 'red' }}>{errors.check && touched.check ? errors.check : null}</Text>
                                <Button
                                    title="Entry"
                                    buttonStyle={{ marginTop: 30, width: 200 }}
                                    onPress={handleSubmit}
                                    disabled={!isValid || isSubmitting}
                                />
                            </View>
                        )
                    }
                </Formik>
            </View>
        );
    }
}