どこの決済サービスを利用するかは悩ましいところですが、業界標準のStripeはいずれにしてもおさえておきたい・・・ということで調査。意外と苦労したのでメモ。
前提知識
ネットに多くの情報がありますが、仕様が変化していて最新の情報を見つけるのに苦労しました。
事前に知っていればもっと楽だったことをまとめてみます。
Stripeのサービス
Stripeが提供するサービスはいろいろある。
- PAYMENT(ま、普通の決済)
- BILLING(月額課金)
- CONNECT(プラットフォーマー用)
ここの記事では PAYMENT を扱います。
他にも色々ありますが、日本では使えないものもあるので注意(Issuingとか)。
PAYMENTの中でもいろいろ
1つのサービスの中でも自サイトへの埋め込み方法やAPIの種類など複数あります。
埋め込み方
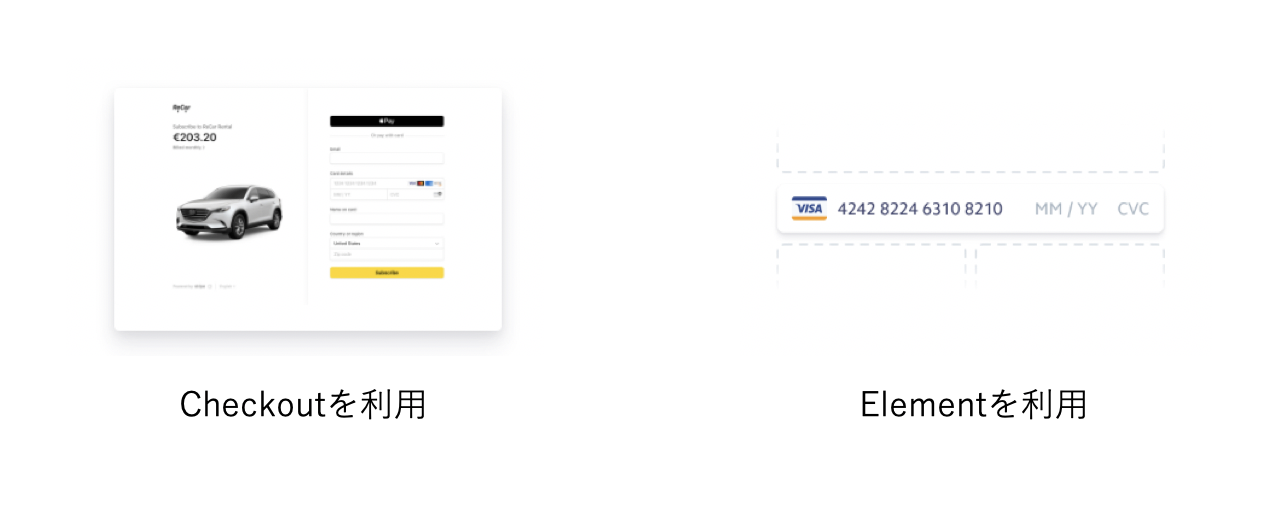
- Checkoutを利用する(Stripeが用意した決済画面を利用する(自分のサイトに埋め込む))
- Stripe.js/Elementを利用する(パーツとして用意されたUIとJSを利用する)

決済(API群)の種類
2019年の9月にSCA Readyである必要が発生し、その対応のためにpaymentIntentが登場したもよう。
日本で言うカード情報の「非通過」、「非保持」のためのPCI-DSS対応のようなものなやつ。
これが古い記事が参考にならない原因のようです。
- charge(古い => 事前にtokenを作るタイプのやつ(カード情報の処理が先))
- payementIntent(新しい => 事前にpaymentIntentを作る(カード情報の処理は後))
比較表が本家サイトにあります。
client側とserver側を実装する必要がある
プログラムはクライアントとサーバ側両方での実装が必要になります(めんどい)。
技術的には1つでもいい感じがしますが、paymentIntent作成リクエストに秘密鍵が必要なので、それを隠蔽するためかなという印象。
- server側プログラムが必要なのは 秘密鍵 を隠蔽するため(技術的にはなくても決済自体はできる)
React
これは私の用途限定。
- Reactに特化したelementとしてreact-stripe-elementsというパッケージがある
- 本家サイトで紹介されているのはcharge方式。ただ、paymentIntetにも対応している
- 本記事ではreact-stripe-elementsでpaymentIntentを利用する方法を紹介
ReactNativeだと現時点でtipsi-stripeとかを利用しないと行けないみたい(ExpoをEjectせずに利用できるライブラリは無いみたいです。。。)
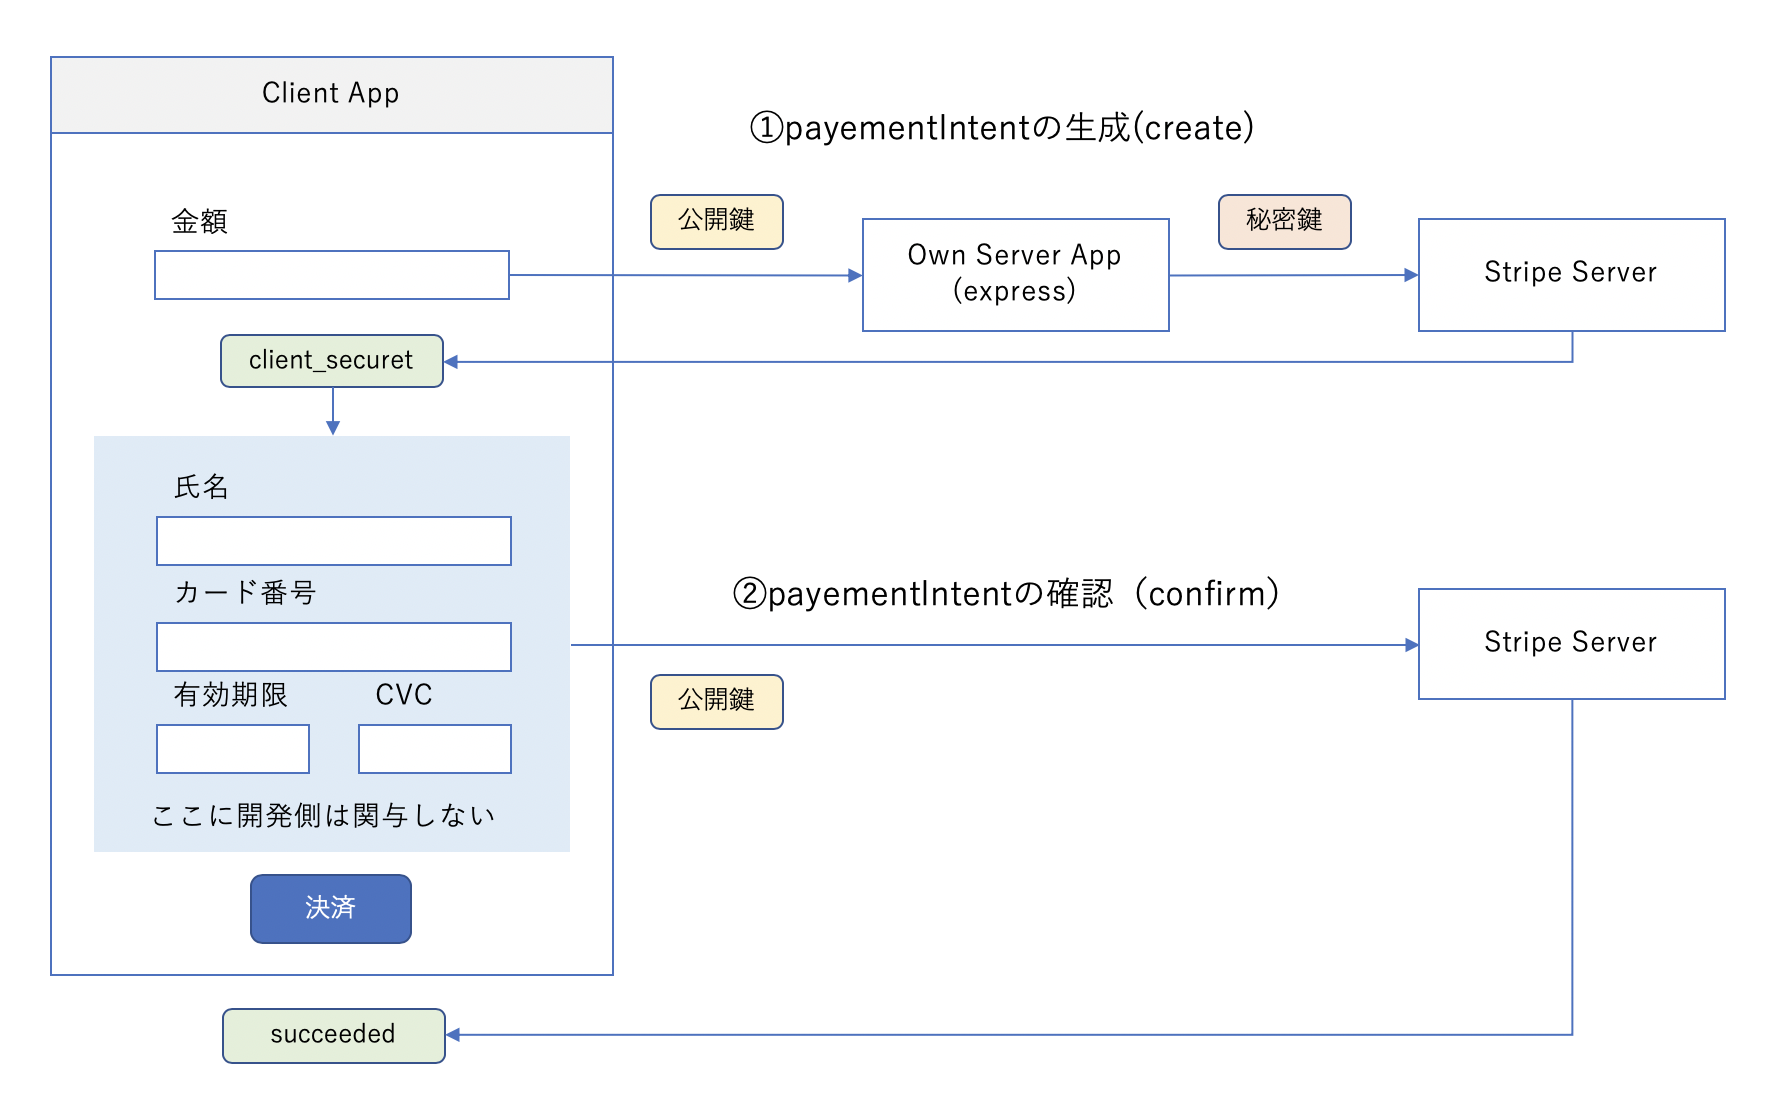
paymentIntent方式のフロー
では、現時点で主流のpaymentIntetを利用する決済フローを見てみます。間違ってたらご指摘を。
フローでの処理は大きく2つ。
- 金額を投げてpaymentIntentを作成する(紐付いたclient_secret(tokenではない)が戻る)
- client_securetを利用してconfirmCardPayment()を実行すると、裏でカード情報が一緒にStripeサーバに送られる
という感じ。
まず、カード情報をStripeサーバに投げて、戻ってきたtokenを利用して金額等を投げる仕様とは逆なので注意。
図式化したイメージ。
実装
では上記を踏まえて実装してみます。
準備
Stripeのアカウントとかなければ作って下さい。あとはテスト用の公開キーと秘密キーがあればいいです。
- Stripeのアカウントを作る(なければ)
- ダッシュボードで左メニュー下段の「テストデータの表示」をOnした状態で「公開可能キー」と「シークレットキー」をメモしておく。
- テストだとpk_test_xxxx, sk_test_xxxxという形式。本番だとtestの部分がliveになる。
- 処理した結佐は左メニューの「支払い」から確認できる
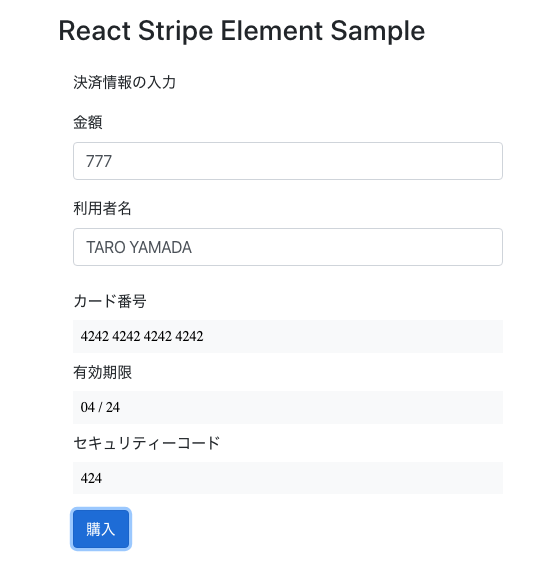
完成図
完成予定は下記のような感じ。決済OKならアラート出します。
1つのクリックで上記2つの通信をします(ので分かりづらい)。
クライアント側
ではクライアント側から。流れはこの記事と同じですが、決済方式がchargeではなくpaymentIntetntになります。雛形作成にはcreate-react-appを利用します。
必要なモジュールのインストール。
create-react-app stripe-client
cd stripe-client
npm install --save react-stripe-elements bootstrap reactstrap formik yup
index.html
<!DOCTYPE html>
<html lang="ja">

<head>
  <meta charset="utf-8" />
  <meta name="viewport" content="width=device-width, initial-scale=1" />
  <meta name="description" content="Payment for e-money service" />
+  <script src="https://js.stripe.com/v3/"></script>
  <title>Payment Site</title>
</head>

<body>
  <div id="root"></div>
</body>

</html>
index.js
import React from 'react';
import ReactDOM from 'react-dom';
import 'bootstrap/dist/css/bootstrap.min.css';
import './index.css';
import App from './App';

ReactDOM.render(<App />, document.getElementById('root'));
実装。App.jsと同じ階層にCheckoutForm.jsを作成して下記のようにします。
import React from 'react';
import { CardElement, injectStripe, CardNumberElement, CardExpiryElement, CardCVCElement, Elements } from 'react-stripe-elements';
import { Button, Form, FormGroup, Label, Input, FormFeedback } from 'reactstrap';
import { Formik } from 'formik'
import * as Yup from 'yup';

class CheckoutForm extends React.Component {

    handlePayment = async (values) => {

        // alert(JSON.stringify(values));

        const headers = new Headers();
        headers.set('Content-type', 'application/json');
        // headers.set('Access-Control-Allow-Origin', '*');

        //paymentIntentの作成を(ローカルサーバ経由で)リクエスト
        const createRes = await fetch('http://localhost:9000/createPaymentIntent', {
            method: 'POST',
            headers: headers,
            body: JSON.stringify({ amount: values.amount, username: values.username })
        })

        //レスポンスからclient_secretを取得
        const responseJson = await createRes.json();
        const client_secret = responseJson.client_secret;

        //client_secretを利用して(確認情報をStripeに投げて)決済を完了させる
        const confirmRes = await this.props.stripe.confirmCardPayment(client_secret, {
            payment_method: {
                // card: this.props.elements.getElement('card'),
                card: this.props.elements.getElement('cardNumber'),
                billing_details: {
                    name: values.username,
                }
            }
        });

        if (confirmRes.paymentIntent.status === "succeeded") {
            alert("決済完了");
        }
    }

    render() {
        console.log(this.props.stripe);
        return (
            <div className="col-8">
                <p>決済情報の入力</p>
                <Formik
                    initialValues={{ amount: 100, username: 'TARO YAMADA' }}
                    onSubmit={(values) => this.handlePayment(values)}
                    validationSchema={Yup.object().shape({
                        amount: Yup.number().min(1).max(1000),
                    })}
                >
                    {
                        ({ handleChange, handleSubmit, handleBlur, values, errors, touched }) => (
                            <Form onSubmit={handleSubmit}>
                                <FormGroup>
                                    <Label>金額</Label>
                                    <Input
                                        type="text"
                                        name="amount"
                                        value={values.amount}
                                        onChange={handleChange}
                                        onBlur={handleBlur}
                                        invalid={Boolean(touched.amount && errors.amount)}
                                    />
                                    <FormFeedback>
                                        {errors.amount}
                                    </FormFeedback>
                                </FormGroup>
                                <FormGroup>
                                    <Label>利用者名</Label>
                                    <Input
                                        type="text"
                                        name="username"
                                        value={values.username}
                                        onChange={handleChange}
                                        onBlur={handleBlur}
                                        invalid={Boolean(touched.username && errors.username)}
                                    />
                                    <FormFeedback>
                                        {errors.username}
                                    </FormFeedback>
                                </FormGroup>
                                {/* <CardElement
                                    className="bg-light p-3"
                                    hidePostalCode={true}
                                /> */}
                                <legend className="col-form-label">カード番号</legend>
                                <CardNumberElement
                                    ref={this.cardNumberRef}
                                    className="p-2 bg-light"
                                />
                                <legend className="col-form-label">有効期限</legend>
                                <CardExpiryElement
                                    className="p-2 bg-light"
                                />
                                <legend className="col-form-label">セキュリティーコード</legend>
                                <CardCVCElement
                                    className="p-2 bg-light"
                                />

                                <Button
                                    onClick={this.submit}
                                    className="my-3"
                                    color="primary"
                                >
                                    購入
                                </Button>
                            </Form>
                        )
                    }
                </Formik>

            </div>
        );
    }
}

export default injectStripe(CheckoutForm);
App.jsでCheckoutForm.jsを読み込みます。また、鍵の設定等も行います。
import React from 'react';
import { Elements, StripeProvider } from 'react-stripe-elements';
import CheckoutForm from './CheckoutForm';

function App() {
  return (
    <StripeProvider apiKey="pk_test_xxxxxxxxxxxxxxxxxxxxxxxxxxxxxx">
      <div className="container">
        <h3 className="my-4">React Stripe Element Sample</h3>
        <Elements>
          <CheckoutForm />
        </Elements>
      </div>
    </StripeProvider>
  );
}

export default App;
これでクライアント側は一旦完了。ボタンを押すと404エラーが出るはずです。
サーバ側
続いてサーバ側。
まず、必要なモジュールをインストールします。
mkdir stripe-server
cd stripe-server
npm init -f
npm install express body-parser stripe
メイン実装。
const app = require("express")();
const stripe = require("stripe")("sk_test_xxxxxxxxxxxxxxxxxxxxxxxxxxxxxx");
const cors = require('cors');
const bodyParser = require('body-parser');

app.use(require("body-parser").text());
app.use(cors());
app.use(bodyParser.urlencoded({ extended: true }));
app.use(bodyParser.json());

app.post('/createPaymentIntent', async (req, res) => {

    const result = await stripe.paymentIntents.create({
        amount: req.body.amount,
        currency: 'jpy',
        description: '●●商店決済', //option
        metadata: { username: req.body.username, tranId: '11111' } //option
    });

    console.log(result);
    res.json(result);

});

app.listen(9000, () => console.log("Listening on port 9000"));
stripe.paymentIntetns.create()が裏でStripeサーバと通信をしてIntentを作成しています。
作成が完了したらクライアント側でに結果を戻します。
動作確認
クライアント側
npm start
サーバ側
node index.js
Stripeダッシュボード
その他
サーバ側をFirebase Functionsに展開してみましたが、問題なく動きました。
あと、Functionsは1回以上実行される可能性もあるので冪等性を確保するためのkeyを付与したほうがいいという話があります。


