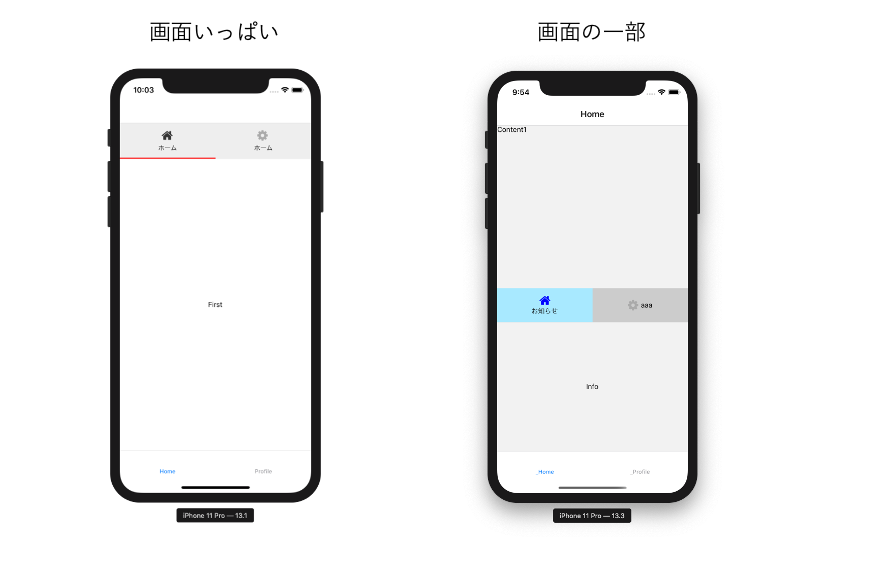
やりたいこと
react-navigatorで普通にネストすると画面いっぱいになります(そうしないやり方もありますが、めんどくさい)。今回やりたいのは画面の一部としてTabコンテンツを利用したい(かつなるべく簡単に)。
react-navigationのtab-navigationを使うより、そのベースになっているreact-native-tab-viewを使う方が簡単らしいので試してみました。
準備
私はexpoを使ってるのですが、2020年1月6日現在、いろいろ依存関係の問題などがあるのでモジュールのインストールはやや複雑?です。
場所の確保
まず場所の確保。言語とかはお好みで。
expo init innerTab
cd innerTab
必要モジュールのインストール
navigationの必須モジュール
まず、react-navigationと必須なモジュール。react-navigationのページにある通りにインストールします。
expo install react-navigation react-native-gesture-handler react-native-reanimated react-native-screens
各種ナビゲーション
次に必要なnavigationをインストール。
expo install npm react-navigation-stack react-navigation-tabs
エラー対応
下記2つのモジュールが無い!とエラーがでるのでインストール。
expo install react-native-safe-area-context @react-native-community/masked-view
内部Tab用モジュールインストール
内部Tabを作成するためのモジュールをインストール。アイコン表示も試したいので追加。
expo install react-native-tab-view react-native-vector-icons
実装
で、実装。まずApp.jsでレイアウトを行います。
全体を包むTab(HomeTab)を作って、そのうちのHome.jsに子Tabを記述します。
なお、私の趣味でStackNavigationでラップしています(必須ではありません)。
import React from 'react';
import { StyleSheet, Text, View } from 'react-native';

import { createAppContainer } from 'react-navigation';
import { createStackNavigator } from 'react-navigation-stack';
import { createBottomTabNavigator } from 'react-navigation-tabs';

//import screens
import Home from './screens/Home';
import Profile from './screens/Profile';
import Info from './screens/Info';
import News from './screens/News';

//HomeStack
const HomeStack = createStackNavigator(
    {
        Home: {
            screen: Home,
        }
    }
);

const ProfileStack = createStackNavigator(
    {
        Profile: {
            screen: Profile,
        }
    }
);

//HomeTab
const HomeTab = createBottomTabNavigator(
    {
        _Home: {
            screen: HomeStack,
        },
        _Profile: {
            screen: ProfileStack
        }
    }
);

//AppContainer
const AppContainer = createAppContainer(HomeTab);

class App extends React.Component {
    render() {
        return (
            <AppContainer />
        );
    }
}

export default App;
いよいろ本丸の子Tab。普通は分けてもいいのでしょうけど、Home.jsに全部書いちゃいます。
import React from 'react';
import { StyleSheet, Text, View } from 'react-native';

import { TabView, TabBar, SceneMap } from 'react-native-tab-view';
import Icon from 'react-native-vector-icons/FontAwesome';
import Info from './Info';
import News from './News';

class Home extends React.Component {

    state = {
        tabIndex: 0,
        tabRoutes: [
            //普通にアイコン表示
            { key: 'info', title: 'お知らせ', renderIcon: (color) => (<Icon size={24} name="home" color={color} />) },
            //titleと横並び(titleは消す)
            { key: 'news', renderIcon: (color) => (<View style={{ flexDirection: "row", alignItems: 'center' }}><Icon size={24} name="cog" color={color} /><Text style={{ marginLeft: 5 }}>aaa</Text></View>) }
        ],
    }

    render() {
        return (
            <View style={{ flex: 1 }} >
                <View style={{ flex: 1 }}>
                    <Text>Content1</Text>
                </View>
                <TabView
                    style={{ flex: 1 }}
                    navigationState={{
                        index: this.state.tabIndex,
                        routes: this.state.tabRoutes,
                    }}
                    renderScene={SceneMap({
                        info: Info,
                        news: News,
                    })}
                    onIndexChange={(index) => this.setState({ tabIndex: index })}
                    renderTabBar={(props) => (
                        <TabBar
                            {...props}
                            style={{ backgroundColor: "#ccc" }}
                            labelStyle={{ color: "#000" }}
                            indicatorStyle={{ backgroundColor: "#A8E9FF", height: "100%" }} //heightを100%にすれば背景色となる・・・
                            renderIcon={({ route, color }) => route.renderIcon(color)}
                            activeColor={"#00f"}
                            inactiveColor={"#aaa"}
                        />
                    )}
                />
            </ View>
        );
    }
}

export default Home;
その他のページはただページ名を中央に表示しているだけ。Info, Profile, Newsなど。。。
書きを参考にscreensフォルダの中に着くるとよいでしょう。
import React from 'react';
import { StyleSheet, Text, View } from 'react-native';

class Info extends React.Component {
    render() {
        return (
            <View style={{ flex: 1, justifyContent: 'center', alignItems: 'center' }}>
                <Text>Info</Text>
            </View>
        );
    }
}

export default Info;
以上です。
