Google Compute Engine上でUbuntuのLighttpdにLet's Encryptの証明書をインストールしてhttpsを有効にしてみます。基本的に自分用の備忘録です。
環境
- Google Cloud Platform
- Ubuntu LTS 14.04 LTS
- Lighttpd
GCEのVMインスタンスを起動
Machine typeはとりあえずf1-microを選択、OSはubuntu-14-04を選択、Firewallの設定のAllow HTTP trafficとAllow HTTPS trafficをチェックして起動します。
Lighttpdのインストール
$ sudo timedatectl set-timezone America/Los_Angeles
$ sudo apt-get update
$ sudo apt-get install git
$ sudo apt-get install lighttpd
この時点では、ブラウザからhttpでアクセスするとデフォルトのページが表示されますが、httpsでアクセスすると接続できません。
Let's Encryptのインストール
$ git clone https://github.com/letsencrypt/letsencrypt
Cloning into 'letsencrypt'...
remote: Counting objects: 31405, done.
remote: Compressing objects: 100% (255/255), done.
remote: Total 31405 (delta 159), reused 0 (delta 0), pack-reused 31150
Receiving objects: 100% (31405/31405), 8.28 MiB | 15.55 MiB/s, done.
Resolving deltas: 100% (22200/22200), done.
Checking connectivity... done.
$ cd letsencrypt
$ ./letsencrypt-auto --help
Bootstrapping dependencies for Debian-based OSes...
...
letsencrypt-autoの初回起動時は必要なパッケージをインストールするのに少し時間がかかります。
Let's Encryptから証明書を取得
以下、自分のドメインをhttps.example.comとします。
Let's EncryptのTechnology Overviewにあるように、証明書を発行する前にDomain Validationを行います。これは、https.example.comの証明書をリクエストするLet's Encryptクライアントがそのドメインを管理していることを証明しなければなりません。Let's EncryptクライアントのドキュメントのPluginsのところにいくつか方法がありますが、Lighttpdの場合はwebrootが簡単そうです。
$ ./letsencrypt-auto certonly --agree-tos --email z80@example.com --webroot --webroot-path /var/www -d https.example.com
Checking for new version...
Requesting root privileges to run letsencrypt...
   sudo /home/z80/.local/share/letsencrypt/bin/letsencrypt --no-self-upgrade certonly --agree-tos --email z80@example.com --webroot --webroot-path /var/www -
d https.example.com
IMPORTANT NOTES:
 - Congratulations! Your certificate and chain have been saved at
   /etc/letsencrypt/live/https.example.com/fullchain.pem. Your cert
   will expire on 2016-05-14. To obtain a new version of the
   certificate in the future, simply run Let's Encrypt again.
これで、/etc/letsencrypt/live/https.example.com/にcert.pem, chain.pem, fullchain.pem, privkey.pemが生成されました。
LighttpdのSSLの設定
証明書はどこに置いてもいいのですが、ここでは/etc/lighttpd/sslに置くことにします。Lighttpd SSL DocumentationのPermissionsによると
Lighttpd reads all pemfiles at startup, before dropping privileges. It is therefore best to make the pem file owned by root and readable by root only
ということなので、rootだけが読めるようにしておきます。
$ sudo mkdir /etc/lighttpd/ssl
$ sudo chmod 700 /etc/lighttpd/ssl
$ sudo sh -c "cat /etc/letsencrypt/live/https.example.com/privkey.pem /etc/letsencrypt/live/https.example.com/cert.pem > /etc/lighttpd/ssl/combined.pem"
$ sudo sh -c "cat /etc/letsencrypt/live/https.example.com/chain.pem > /etc/lighttpd/ssl/chain.pem"
LighttpdのSSLの設定を変更します。
# /usr/share/doc/lighttpd/ssl.txt

$SERVER["socket"] == "0.0.0.0:443" {
        ssl.engine  = "enable"
        ssl.pemfile = "/etc/lighttpd/ssl/combined.pem"  # 変更
        ssl.ca-file = "/etc/lighttpd/ssl/chain.pem"     # 追加

        ssl.cipher-list = "ECDHE-RSA-AES256-SHA384:AES256-SHA256:RC4:HIGH:!MD5:!aNULL:!EDH:!AESGCM"
        ssl.honor-cipher-order = "enable"
}
SSLを有効にしてLighttpdを再起動します。
$ sudo lighttpd-enable-mod ssl
Enabling ssl: ok
Run /etc/init.d/lighttpd force-reload to enable changes
$ sudo service lighttpd force-reload
 * Reloading web server configuration lighttpd                           [ OK ]
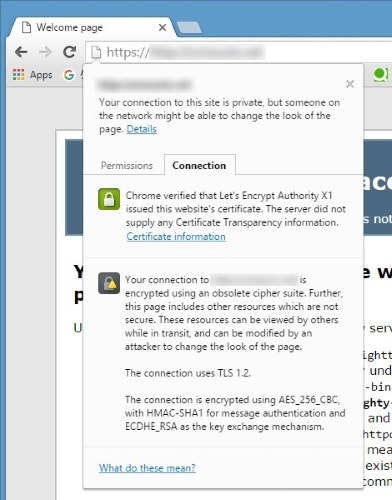
ブラウザからhttpsでアクセスすると(細かい問題はありますが)有効になっているようです。
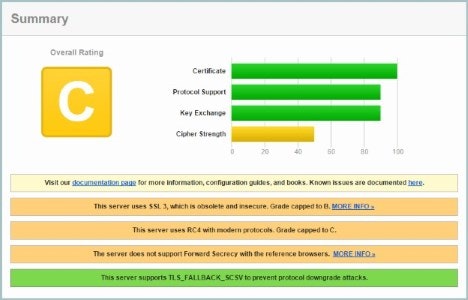
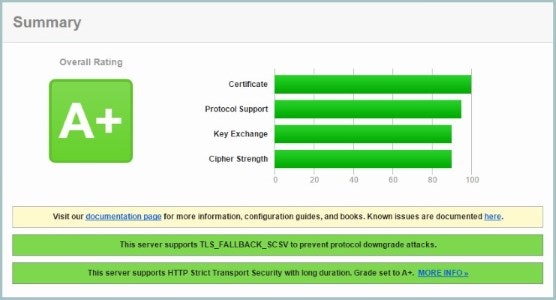
試しにQualys SSL LabsのSSL Server Testをやってみます。
デフォルトではOverall RatingがCと、それほどセキュアではなさそうです。
LighttpdのセキュアなSSLの設定
Stong SSL Security on lighttpdを参考に設定をいじります。
# /usr/share/doc/lighttpd/ssl.txt

$SERVER["socket"] == "0.0.0.0:443" {
        ssl.engine  = "enable"
        ssl.pemfile = "/etc/lighttpd/ssl/combined.pem"
        ssl.ca-file = "/etc/lighttpd/ssl/chain.pem"

        ssl.cipher-list = "EECDH+AESGCM:EDH+AESGCM:AES128+EECDH:AES128+EDH"  # 変更
        ssl.honor-cipher-order = "enable"
        ssl.use-sslv2          = "disable"  # 追加
        ssl.use-sslv3          = "disable"  # 追加
}
この環境ではSSL Compressionは無効化されているのようなので、ssl.use-compression = "disable"は必要ありません(あっても、WARNING: unknown config-key: ssl.use-compression (ignored)とログに残るだけで特に問題なさそうです)。
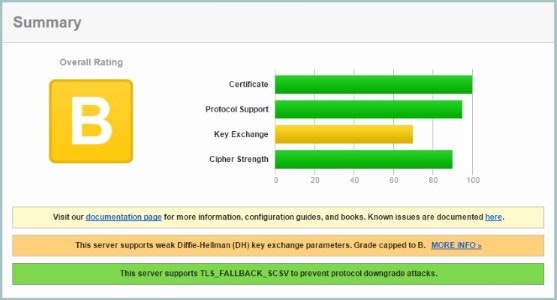
これでOverall RatingがBになりました。メッセージを見ると、Diffie-Hellman (DH) key exchange parametersのせいでB止まりになっているようなので、これも設定してみます。
$ sudo openssl dhparam -out /etc/lighttpd/ssl/dhparams.pem 4096
Generating DH parameters, 4096 bit long safe prime, generator 2
This is going to take a long time
...
$ sudo chmod 600 /etc/lighttpd/ssl/dhparams.pem
# /usr/share/doc/lighttpd/ssl.txt

$SERVER["socket"] == "0.0.0.0:443" {
        ssl.engine  = "enable"
        ssl.pemfile = "/etc/lighttpd/ssl/combined.pem"
        ssl.ca-file = "/etc/lighttpd/ssl/chain.pem"
        ssl.dh-file = "/etc/lighttpd/ssl/dhparams.pem"  # 追加
        ssl.ec-curve = "secp384r1"                      # 追加

        ssl.cipher-list = "EECDH+AESGCM:EDH+AESGCM:AES128+EECDH:AES128+EDH"
        ssl.honor-cipher-order = "enable"
        ssl.use-sslv2          = "disable"
        ssl.use-sslv3          = "disable"
}
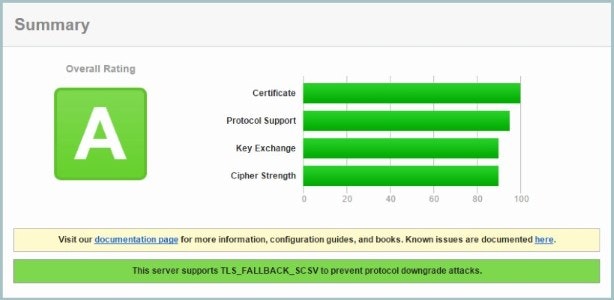
これでOverall RatingがAになりました。
もう一つ、HTTP Strict Transport SecurityもHTTP Strict Transport Security for Apache, NGINX and Lighttpdを参考に有効にしてみます。そのページにあるように、ついでにX-Frame-Options headerも足しておくと良さそうです。次の項目を/etc/lighttpd/lighttpd.confに足します(X-Frame-Optionsは必要に応じてDENY, SAMEORIGIN, ALLOW-FROM uriのいずれかに設定します)。
...
server.modules += ( "mod_setenv" )
$HTTP["scheme"] == "https" {
    setenv.add-response-header  = ( "Strict-Transport-Security" => "max-age=63072000; includeSubdomains; preload")
    setenv.add-response-header  += ( "X-Frame-Options" => "DENY")
}
これでOverall RatingがA+になりました。
Let's Encryptの証明書の更新
Let's Encryptの証明書は90日で失効するので1、定期的に更新する必要があります。証明書の取得はletsencrypt-auto certonlyコマンドで行いましたが、更新はletsencrypt-auto renewコマンドで行います。letsencrypt-autoはcertonlyとrenewを実行した際に設定を/etc/letsencrypt/renewal/https.example.com.confに保存していて、オプションを省略すると前回と同じ設定で実行してくれます。
試しに--dry-runで更新のテストをやってみます。
$ ./letsencrypt-auto renew --agree-tos --email z80@example.com --dry-run
Checking for new version...
Requesting root privileges to run letsencrypt...
   sudo /home/z80/.local/share/letsencrypt/bin/letsencrypt --no-self-upgrade renew --agree-tos --email
z80@example.com --dry-run
Processing /etc/letsencrypt/renewal/https.example.com.conf
** DRY RUN: simulating 'letsencrypt renew' close to cert expiry
**          (The test certificates below have not been saved.)
Congratulations, all renewals succeeded. The following certs have been renewed:
  /etc/letsencrypt/live/https.example.com/fullchain.pem (success)
** DRY RUN: simulating 'letsencrypt renew' close to cert expiry
**          (The test certificates above have not been saved.)
どうやら問題なさそうです。あとは、定期的に証明書を更新していけばOKでしょう。cronの設定はこんな感じにしてみます。
# !/bin/sh

DOMAIN="https.example.com"
EMAIL="z80@example.com"

if /home/z80/letsencrypt/letsencrypt-auto renew --agree-tos --email $EMAIL ;
then
  echo "Let's encrypt renewal succeeded."
  sudo sh -c "cat /etc/letsencrypt/live/$DOMAIN/privkey.pem /etc/letsencrypt/live/$DOMAIN/cert.pem > /etc/lighttpd/ssl/c
ombined.pem"
  sudo sh -c "cat /etc/letsencrypt/live/$DOMAIN/chain.pem > /etc/lighttpd/ssl/chain.pem"
  sudo service lighttpd force-reload
else
  echo "Let's encrypt renewal failed."
  exit 1
fi
MAILTO=z80@example.com
0 0 1 * * /home/z80/letsencrypt-renew.sh 2>&1
ちなみに、Google Compute Engine上では、crontabでMAILTOを使う場合、Sending Email from an Instanceに従ってごにょごにょ設定する必要があります。
まとめ
LighttpdにLet's Encryptの証明書をインストールしてhttpsを有効にすることができました。本当はもう少しちゃんと調べて理解してから設定するべきものなんでしょうが、Qualys SSL LabsのSSL Server Testのおかげでサクッと問題点やセキュリティの強度を確認できるのは非常に助かりました。
参考
Let's Encryptについて
- https://letsencrypt.org/
- https://github.com/letsencrypt/letsencrypt
- https://letsencrypt.readthedocs.org
- Let's Encrypt を支える ACME プロトコル
LighttpdのSSLについて
LighttpdとLet's Encryptについて
