はじめに
余っているモニターと、持て余しているRaspberry Piを使って情報端末:キオスク端末を作ろうと思ったので、その作業メモ。
今回使用したもの
- Raspberry Pi 3 model B
- micro SDカード 8GB
- USBキーボード & USBマウス
- RASPBIAN STRETCH WITH DESKTOP
- ダウンロードは公式サイトから。Download Raspbian for Raspberry Pi
- Version:September 2017
- Release date:2017-09-07
作業
Raspberry Pi のセットアップ
- RaspberryPi用イメージをダウンロード。
- 30分くらいかかるので事前にダウンロードしておくほうが良い。
- ダウンロードしたイメージをmicro SDカードに書き込む。
- WindowsならWin32 disk Imagerなどを使うと便利。
- 10MB/sで書き込む場合、10分くらいかかります。
- Raspberr Piの電源を入れる
- Terminalを開いて、インストール済みパッケージのアップデートをおこなう。
sudo apt-get updatesudo apt-get upgrade
ブラウザの自動起動
-
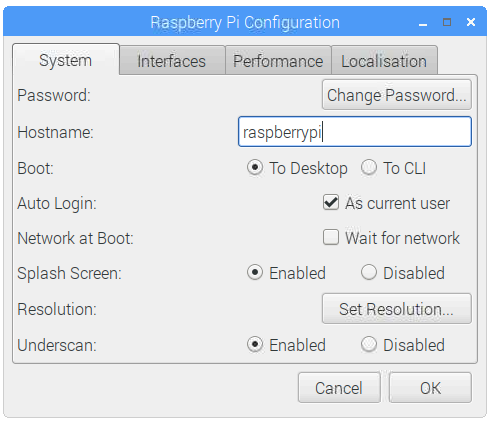
Performancesメニューの中にある、Raspberry Pi Configurationで自動ログイン設定する
-
起動時に
~/.config/chromium/Singleton*を削除するようにcrontabに追記@reboot rm -rf ~/.config/chromium/Singleton*-
~/.config/chromium/Singleton*、正常に終了できなかった場合に残る。
残っていると起動時にメッセージが表示されてしまう。
-
マウスがしばらく動いていないと、マウスカーソルの表示を消すツール
unclutterを入れるsudo apt-get install unclutter
-
~/.config/lxsession/LXDE-pi/autostartを編集する
~/.config/lxsession/LXDE-pi/autostart
@lxpanel --profile LXDE-pi
@pcmanfm --desktop --profile LXDE-pi
@xscreensaver -no-splash
-@point-rpi

+@xset s off
+@xset -dpms
+@xset s noblank
+@unclutter
+@chromium-browser --noerrdialogs --kiosk --incognito http://localhost/
@chromium-browserのhttp://localhost/を表示させたいURLに書き換える
- その他のオプションについて
- --noerrdialogs : エラーを表示させない
- --kiosk : 全画面モードで表示させる
- --incognito : シークレットモードで起動させる
サービスを自動起動させる
/etc/systemd/system/myprogram.service
[Unit
Description= My maked program
After=syslog.target

[Service]
Type=simple
WorkingDirectory = /home/pi/myprogram
ExecStart = home/pi/myprogram/programrun
Restart = always
TimeoutStopSec=5

[Install]
WantedBy = multi-user.target
- 上記ファイルを
/etc/systemd/system/に作る。 - あとはsystemctlを使って操作してみる
- 実行する
sudo systemctl start myprogram - 停止する
sudo systemctl stop myprogram - 起動時に実行させる
sudo systemctl enable myprogram - 起動時に実行させない
sudo systemctl disable myprogram
- 実行する
完了後の確認事項
- 再起動時、期待通りに自動起動するか確認。
- 実際に再起動してみる
- USB電源を強制切断してみる
- 外部に公開する前に、ログインするユーザー(pi)のパスワードを変更すること。
最後に
簡単にやりたいことができるのがRaspberry Piのいいところですよね。これからも、いろいろ作っていきたい。
