前回は「今日から始めるswagger入門」という最低限書けるようになっておいた方が良い物をこちらの記事で解説させてもらいました
今回は、筆者が4〜5年ほど現場で見てきたswaggerを元に、現場で必要になるswaggerの知識をまとめましたので、ぜひご覧になっていただけると嬉しいです!
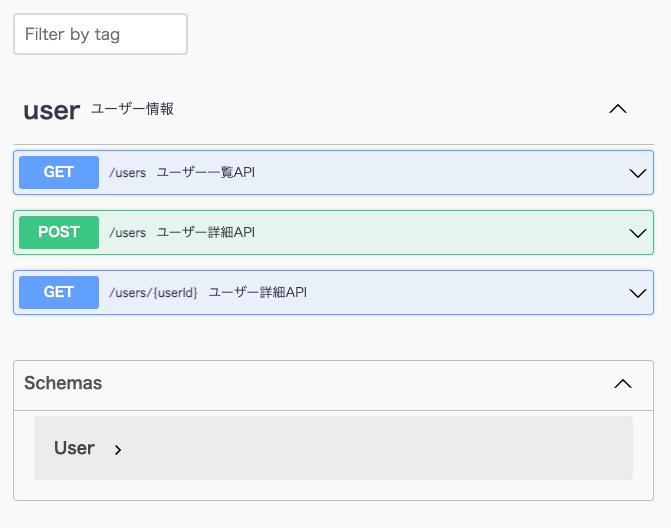
タグ付け
pathsに書かれている各APIendpointをタグ付けしてグルーピングする目的で使用されます
現場では大量のAPIendpointを設計していくこととなるので、多くなってくると大変見辛くなってきます
それをグルーピングすることにより見やすくしようということです
openapi: 3.0.3
info:
  title: test-api
  version: 0.0.1
# ここから
tags:
  - name: user
    description: ユーザー情報
# ここまで
paths:
  /users:
    get:
      # ここから
      tags:
        - user
      # ここまで
      summary: ユーザー一覧API
適切なModel化
paths内のrequestBodyやresponsesにプロパティを直に書くのは現場では指摘されるケースが多いと思います
ではどうするかというと、components/schemasにまとめて書いてく方法が推奨されます
一般的に、「スキーマ定義する」、「モデル作成する」などと言われたりします
適切にスキーマ定義が行われると、後述の共通化や参照することによりswaggerの記述量が減り、設計が楽になるかつすっきりとした内容になります(これだけでも大変意義がありますね)
また、プロパティの集合をスキーマ名でまとめることができ、どのAPIのリクエスト/レスポンスがどのスキーマかなどと表現でき仕様を共通言語化できるのも良さそうです
では実際にschemasの書き方を見ていきましょう
components:
  schemas:
    User: #これがスキーマ名となる
      type: object
      properties:
        id:
          type: string
        name:
          type: string
        address:
          type: string
        birthday:
          type: string
          format: date
        age:
          type: integer
        sex:
          type: string
          enum:
            - MALE
            - FEMALE
        memberType:
          type: string
          enum:
            - GENERAL
            - SPECIAL
            - CHILD
            - SENIOR
スキーマが定義されると、swagger viewerの表示にも影響があります
Tips swaggerではこのcomponents sectionにいくつかの物を定義でき、schemasはその一つになります
※ 以下、公式抜粋
components:
  # Reusable schemas (data models)
  schemas:
    ...
  # Reusable path, query, header and cookie parameters
  parameters:
    ...
  # Security scheme definitions (see Authentication)
  securitySchemes:
    ...
  # Reusable request bodies
  requestBodies:
    ...
  # Reusable responses, such as 401 Unauthorized or 400 Bad Request
  responses:
    ...
  # Reusable response headers
  headers:
    ...
  # Reusable examples
  examples:
    ...
  # Reusable links
  links:
    ...
  # Reusable callbacks
  callbacks:
    ...
共通化と参照(継承とポリモーフィズム)
さて、先ほどUserのスキーマを作成しましたが、これはユーザー一覧などの情報が絞られた状況下で使われるものと仮定したとき、ユーザー詳細APIを設計するときどうなるでしょう。
おそらく一般的にはUserスキーマの情報だけでは足りず、UserDetailを作成したくなるかと思います
そんなときは共通化されたUserを参照して、必要なプロパティを追加し、新たにUserDetailを作成してみましょう
ポイントは、allOfと$ref。
これさえ覚えておけば現場では問題ないでしょう!
allOf:スキーマ同士を結合するイメージです複数のスキーマ同士を結合したり、例のようなpropertiesも結合できます(無名のスキーマととらえるとイメージしやすい)
$ref:他の定義を参照する際に使用します。基本的にURI表現ができる箇所は全て参照できますが、現場ではcomponents/schemasを参照する場合でしか使用しないでしょう(refをしすぎると複雑さがますため)
components:
  schemas:
    User:
      type: object
      properties:
        id:
          type: string
        name:
          type: string
        address:
          type: string
        birthday:
          type: string
          format: date
        age:
          type: integer
        sex:
          type: string
          enum:
            - MALE
            - FEMALE
        memberType:
          type: string
          enum:
            - GENERAL
            - SPECIAL
            - CHILD
            - SENIOR
    # ここから
    UserDetail:
      allOf:
        - $ref: '#/components/schemas/User'
        - properties:
            email:
              type: string
            phoneNumber:
              type: string
    # ここまで
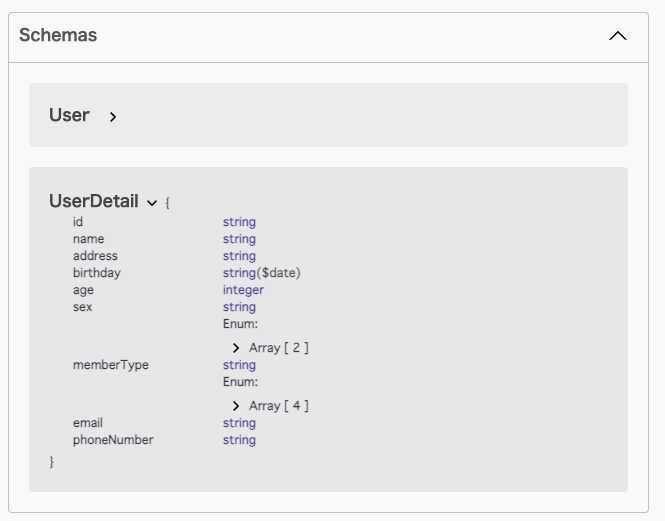
上記の記述で、UserDetailのスキーマが以下のように表現されるようになりました
required
APIというのはデータの登録や返却するサーバー側と、それを使うクライアント側の約束事を表現したものになります
その約束事においては、どのプロパティが必ず指定が必須か、またはレスポンスされるかという観点はAPI設計において非常に重要です
ですので、swaggerでもその表現をしっかり行っていきましょう!
requiredの記述は大きく分けて2種類あります
そちらを以下で解説します
parametersに利用する場合のrequired
paths:
  /users:
    get:
      tags:
        - user
      summary: ユーザー一覧API
      description: |
        ユーザーをデフォルトで全件取得して返却します <br>
        idの昇順。
      parameters:
      - name: limit
        in: path
        description: 上限数
        # ここから
        required: true
        # ここまで
        schema:
          type: integer
          nullable: false
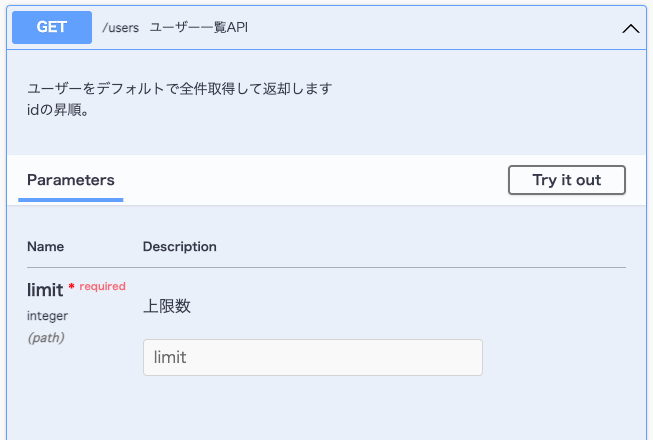
parametersにrequiredをつけると「* required」がつく
schemaに利用する場合のrequired
components:
  schemas:
    User:
      type: object
      properties:
        id:
          type: string
        name:
          type: string
        address:
          type: string
        birthday:
          type: string
          format: date
        age:
          type: integer
        sex:
          type: string
          enum:
            - MALE
            - FEMALE
        memberType:
          type: string
          enum:
            - GENERAL
            - SPECIAL
            - CHILD
            - SENIOR
      # ここから
      required:
        - id
        - name
      # ここまで
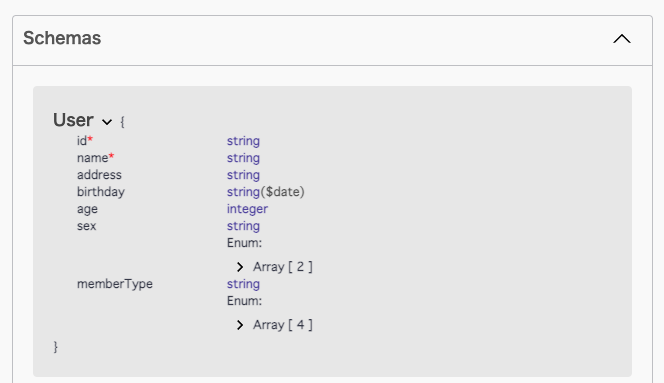
schemaにrequiredをつけると「*」がつく
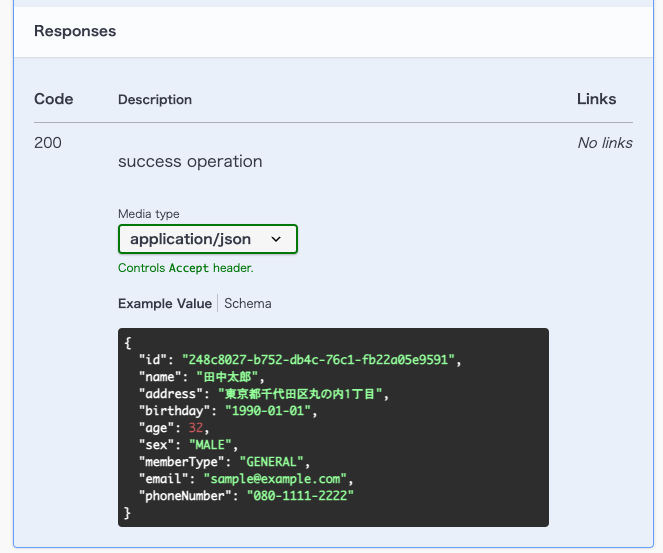
example
クライアント側はパラメータやレスポンスに指定されるプロパティの形式がどのようなものかを想像できた方が実装がしやすいです
ですので、exampleはなるべく書くようにし、認識齟齬につながらないようにしましょう
中でも、日付形式や、電話番号、郵便番号など表記にゆれが起きやすいものは特に注意です
components:
  schemas:
    User:
      type: object
      properties:
        id:
          type: string
          example: 248c8027-b752-db4c-76c1-fb22a05e9591
        name:
          type: string
          example: 田中太郎
        address:
          type: string
          example: 東京都千代田区丸の内1丁目
        birthday:
          type: string
          format: date
          example: "1990-01-01"
        age:
          type: integer
          example: 32
        sex:
          type: string
          enum:
            - MALE
            - FEMALE
          example: "MALE"
        memberType:
          type: string
          enum:
            - GENERAL
            - SPECIAL
            - CHILD
            - SENIOR
          example: "GENERAL"
      required:
        - id
        - name
    UserDetail:
      allOf:
        - $ref: '#/components/schemas/User'
        - properties:
            email:
              type: string
              example: sample@example.com
            phoneNumber:
              type: string
              example: "080-1111-2222"
exampleが記述されると、Example Valueに反映され、さらに見やすいAPI仕様書となりました
これまで解説した内容が盛り込まれたswaggerを最後に共有
openapi: 3.0.3
info:
  title: test-api
  version: 0.0.1
tags:
  - name: user
    description: ユーザー情報
paths:
  /users:
    get:
      tags:
        - user
      summary: ユーザー一覧API
      description: |
        ユーザーをデフォルトで全件取得して返却します <br>
        idの昇順。
      parameters:
      - name: limit
        in: query
        description: 上限数
        required: true
        schema:
          type: integer
          nullable: false
      responses:
        200:
          description: success operation
          content:
            application/json:
              schema:
                type: array
                items:
                  $ref: '#/components/schemas/User'
    post:
      tags:
        - user
      summary: ユーザー登録API
      requestBody:
        content:
          application/json:
            schema:
              $ref: '#/components/schemas/UserDetail'
      responses:
        200:
          description: success operation
          content:
            application/json:
              schema:
                $ref: '#/components/schemas/UserDetail'

  /users/{userId}:
    get:
      tags:
        - user
      summary: ユーザー詳細API
      description: |
        ユーザー詳細を取得して返却します <br>
      parameters:
      - name: userId
        in: path
        description: ユーザーID
        required: true
        schema:
          type: string
          example: 248c8027-b752-db4c-76c1-fb22a05e9591
          nullable: false
      responses:
        200:
          description: success operation
          content:
            application/json:
              schema:
                $ref: '#/components/schemas/UserDetail'

components:
  schemas:
    User:
      type: object
      properties:
        id:
          type: string
          example: 248c8027-b752-db4c-76c1-fb22a05e9591
          readOnly: true
        name:
          type: string
          example: 田中太郎
        address:
          type: string
          example: 東京都千代田区丸の内1丁目
        birthday:
          type: string
          format: date
          example: "1990-01-01"
        age:
          type: integer
          example: 32
        sex:
          type: string
          enum:
            - MALE
            - FEMALE
          example: "MALE"
        memberType:
          type: string
          enum:
            - GENERAL
            - SPECIAL
            - CHILD
            - SENIOR
          example: "GENERAL"
      required:
        - id
        - name
    UserDetail:
      allOf:
        - $ref: '#/components/schemas/User'
        - properties:
            email:
              type: string
              example: sample@example.com
            phoneNumber:
              type: string
              example: "080-1111-2222"