Spring Batchを本格的に勉強しようと思ったため、Spring BatchのQuick StartをIntelliJで動かしてみました。主な内容としては、Quick Startを動かすための手順をまとめたもので、超初心者向けとなります。
実施手順
Mavenプロジェクトの作成
Quick Startを読むとMavenとGradleのどちらでもでできるみたいです。
今回は、Mavenを利用することにするので、Mavenプロジェクトを作成します。
- IntelliJを開き、[File]→[New]→[Project]を選択します。
- Mavenを選択し、Project SDKを選択し、[Next]を押します。
- GroupIdとArtfactIdを入力し、[Next]を押します。
- Project nameとProject locationを入力し、[Finish]を押します。
Quick Startの実装と動作確認
Spring Batchのバージョンは、執筆時の最新である3.0.7を使います。
また、Quick Startでは、Spring Bootを使うと早いよと言っているため使うことにします。
手順1. pom.xmlの設定
Quick Startの内容に従い、pom.xmlのdependenciesにspring-boot-starter-batchを追加します。
その際、paretnにspring-boot-starter-parentも忘れずに設定します。
<parent>
    <groupId>org.springframework.boot</groupId>
    <artifactId>spring-boot-starter-parent</artifactId>
    <version>1.5.3.RELEASE</version>
</parent>
<dependencies>
    <dependency>
        <groupId>org.springframework.boot</groupId>
        <artifactId>spring-boot-starter-batch</artifactId>
    </dependency>
</dependencies>
ポイント
spring-boot-starter-parentはSpring Bootが提供する基本設定をビルド環境に組み込む際に必要となる必須事項です。
Quick Startではこのparetnの設定がないので、追記する必要があります。
設定例はSpring BootのQuick Startから拝借しました。
手順2. Configurationクラスの実装
ジョブを設定するConfigurationクラスを作成します。
基本的には、Quick Startの内容に従いクラスを作成してコピペするだけです。
@Configuration
@EnableBatchProcessing
@EnableAutoConfiguration
public class BatchConfiguration {

    @Autowired
    private JobBuilderFactory jobBuilderFactory;

    @Autowired
    private StepBuilderFactory stepBuilderFactory;

    @Bean
    public Step step1() {
        return stepBuilderFactory.get("step1")
                .tasklet(new Tasklet() {
                    public RepeatStatus execute(StepContribution contribution, ChunkContext chunkContext) {
                        return null;
                    }
                })
                .build();
    }

    @Bean
    public Job job(Step step1) throws Exception {
        return jobBuilderFactory.get("job1")
                .incrementer(new RunIdIncrementer())
                .start(step1)
                .build();
    }
}
手順3. Mainクラスの実装
Jobを実行するMainクラスを実装します。
こちらもQuick Startの内容をコピペします。
public class Main {
    public static void main(String [] args) {
        System.exit(SpringApplication.exit(SpringApplication.run(
                BatchConfiguration.class, args)));
    }
}
手順4. 実行
pom.xml、Configurationクラス、Mainクラスが用意できたので、IntelliJ上で実行します。
実行構成画面で必要事項をを設定した後、実行ボタンを押して、実行するとコンソールに「APPLICATION FAILED TO START」とエラーメッセージが表示されます。
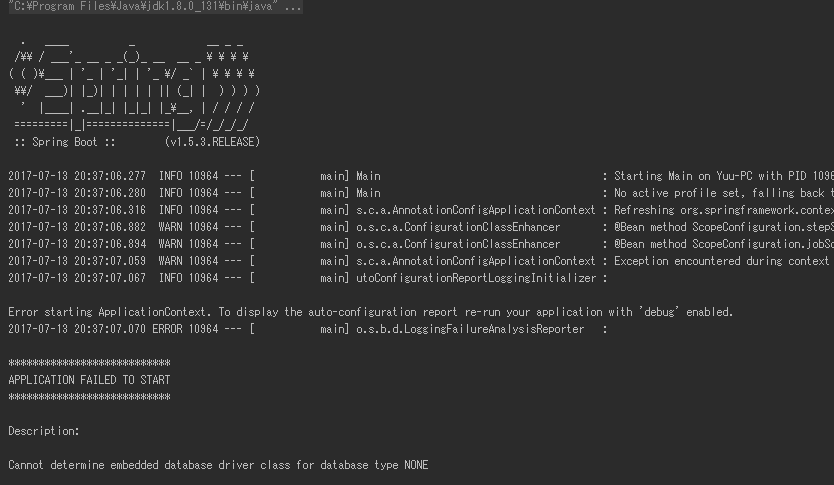
どうやら、DBドライバが定義されていないため表示されるようです。
そのため、pom.xmlにDBドライバを追加し、DB接続情報定義ファイルを用意します。
今回は例としてH2を利用することにします。
<dependencies>
    <!-- 省略 -->
    <dependency>
        <groupId>com.h2database</groupId>
        <artifactId>h2</artifactId>
    </dependency>
</dependencies>
spring.datasource.driver-class-name=org.h2.Driver
spring.datasource.url=jdbc:h2:mem:batch;DB_CLOSE_DELAY=-1
spring.datasource.username=sa
spring.datasource.password=
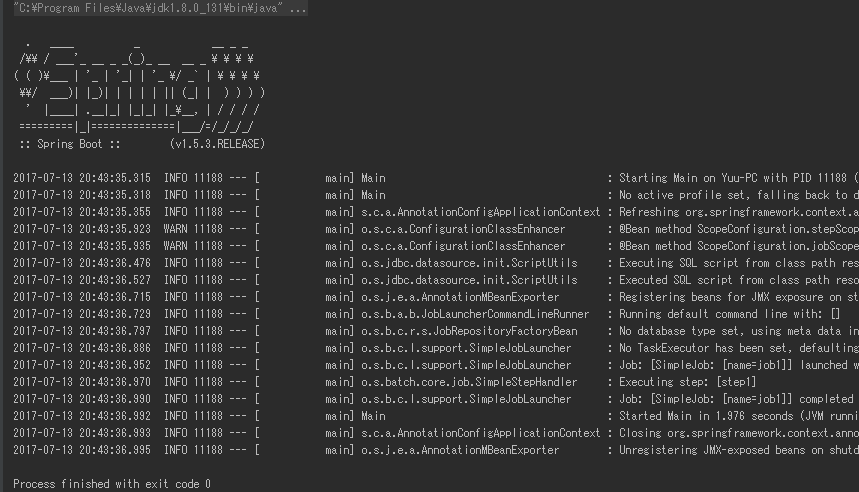
DB関係の設定ができたところで、もう一度実行します。
実行した結果、コンソールに「Process finished with exit code 0」と表示されれば成功です。
ポイント
DB関係の設定が面倒な場合、@EnableAutoConfigurationアノテーションをコメントアウトすることでもエラーを回避できます。
最後に
今回が初投稿でした。
今後は、Spring Batchをメインにいろろな内容を投稿していきたいなと思います。