初めに
今回アーキテクチャを触れるきっかけは、Golangで成果物を作りたいと考えたときに、文法などの知識を知っていてもどのようにフォルダの構造を決めてどの実装から取りかかればいいかわからなかったことです。アーキテクチャを勉強することでどのpackageがどのpackageに依存しているのかを明確にすることができるとともに、どの実装から取りかかれば良いのかも依存関係から知ることができる。
対象読者
- アーキテクチャってなんだろうという方
- Goで何か成果物を作りたいが最初何から実装すればいいかわからない方
- 他
実装内容
今回実装したのは、TodoリストのRESTAPIである。この記事を書いたのはGetAll()APIを実装した段階である。
アーキテクチャ
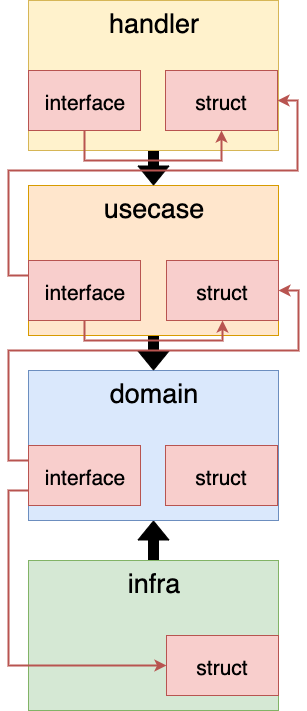
今回はレイヤードアーキテクチャを採用しました。アーキテクチャを初めて触れるにあたり触れやすいと聞いたので採用しました。構造は以下の通り作成しました。矢印方向に依存しています。
File構造
---cmd
 |
 |---domain
 | |-----model
 | | |-----todo.go
 | |-----repository
 | | |-----todo.go
 |---handler
 | |-----rest
 | | |-----todo.go
 |---infra
 | |-----persistence
 | | |-----todo.go
 |---usecase
 | |-----todo.go
実装手順
実装手順としては、「中心から外側へ」。つまり、上の図から
domain->infra->usecase->handler
の順番に実装していく。
依存元から実装していくのだ。
実装
実際に実装した手順通りに記していく。
domain層
domain層は業務的関心事を実装する場所。そのため、domain層においてrepositoryディレクトリでinterfacceを、modelディレクトリで構造体を実装する。技術的関心事を持ち込まない決まりとなっているため、技術的関心事はinfra層にて実装する。
今回のtodoAPIではrepositoryは以下の通りになる。
package repository

import (
	"context"

	"github.com/tnkyk/LayeredArch_sample/domain/model"
)

type TodoRepository interface {
	GetAll(context.Context) ([]*model.Todo, error)
}
TodoRepositoryというインターフェースはGetAllというメソッドを実装しているという制約を持っています。
そのため、TodoRepository型の変数を宣言した場合、その変数はGetAll()を実装していなければならない。実装をしていないとエラーが出る。
次に、modelでは以下を実装している。
package model

import (
	"time"
)
//Todoに関するデータ構造
type Todo struct {
	Id        int
	Title     string
	Author    string
	CreatedAt time.Time
}
modelでは上記のようにTodoに関するデータ構造を定義している。
このように技術的関心事を実装しないことでどこにも依存しない形を作り出す。
infra層
infra層では技術的関心事を扱う層である。例えば、DB操作などである。今回の実装ではGetAll()というメソッドの技術的関心事を以下のように実装する。
package persistence

import (
	"context"
	"time"

	"github.com/tnkyk/LayeredArch_sample/domain/model"
	"github.com/tnkyk/LayeredArch_sample/domain/repository"
)

type TodoPersistence struct {
}

func NewTodoPersistence() repository.TodoRepository {
	return &TodoPersistence{}
}

//値レシーバを使ってtpがGetAllを実装
func (tp TodoPersistence) GetAll(context.Context) ([]*model.Todo, error) {
//今回はDB接続を使わずに簡単に済ませた
	todo1 := model.Todo{Id: 1, Title: "a", Author: "Bob", CreatedAt: time.Now().Add(-24 * time.Hour)}
	todo2 := model.Todo{Id: 2, Title: "b", Author: "Alisa", CreatedAt: time.Now().Add(-24 * time.Hour)}

	return []*model.Todo{&todo1, &todo2}, nil
}
import()を見ていただければ分かる通りinfra層はdomain層に依存していることが分かる。また、NewTodoPersistence()について説明する。この関数は返り値としてimportしたdomain層で宣言されたTodoRepositoryインターフェース型を設定している。そのため、returnしている構造体TodoPersistenceはTodoRepositoryインターフェースを満たす必要がある。つまり、TodoPersistence構造体はGetAllメソッドを実装していなければならない。
この実装が意味するところは、 infra層で定義された独自の構造体のみが依存元であるdomain層のインターフェースと紐づけられているということである。 構造体に依存元インターフェースを紐づけることで、この紐付けのみで済む。
Usecase層
usecaseは業務の手順を簡潔に記す層。
今までの流れを振り返ると、domain層で業務的関心事を実装し、domain層の技術的関心事をinfra層が担っている。そしてこのdomain層を用いてusecase層で業務を一連の流れにまとめている。今回では「データを全件取得する」という一連の流れをまとめていることとなる。
package usecase

import (
	"context"

	"github.com/tnkyk/LayeredArch_sample/domain/model"
	"github.com/tnkyk/LayeredArch_sample/domain/repository"
)

type TodoUseCase interface {
	TodoGetAll(context.Context) ([]*model.Todo, error)
}

type todoUseCase struct {
	todoRepository repository.TodoRepository //TodoRepositoryインターフェースを満たす必要がある
}

//ここでドメイン層のインターフェースとユースケース層のインターフェースをつなげている。
func NewTodoUseCase(tr repository.TodoRepository) TodoUseCase {
	return &todoUseCase{
		todoRepository: tr,
	}
}

//Todoデータを全件取得するためのユースケース
func (tu todoUseCase) TodoGetAll(ctx context.Context) (todos []*model.Todo, err error) {
	// Persistenceを呼出
	todos, err = tu.todoRepository.GetAll(ctx)
	if err != nil {
		return nil, err
	}
	return todos, nil
}
tu.todoRepository.GetAll()はdomain層の repository/todo.go で実装されたインターフェースのフィールドを呼び出しているだけである。しかし、このフィールドは間接的にinfra層で実装された技術的関心事を呼び出す形となっている。そのため、わざわざinfra層をimportする必要がない。
handler層
handler層は、requestからパラメータを取り出しそれをusecase層に投げ、レスポンスの生成を生成する層である。
今回はRESTAPIであり、ライブラリhttprouterを用いて実装した。また、レスポンスはJSON形式で生成を行うため、新たに構造体を定義した。
package rest

import (
	"encoding/json"
	"net/http"
	"time"

	"github.com/julienschmidt/httprouter"
	"github.com/tnkyk/LayeredArch_sample/usecase"
)

type TodoHandler interface {
	Index(http.ResponseWriter, *http.Request, httprouter.Params)
}

//この構造体は元々TodoUseCaseinterfaceと紐づいていて、Indexメソッドの宣言の際にこの構造体と新たに紐づけられる
type todoHandler struct {
	todoUseCase usecase.TodoUseCase
}

// NewTodoUseCase : Todo データに関する Handler を生成
func NewTodokHandler(tu usecase.TodoUseCase) TodoHandler {
	return &todoHandler{
		todoUseCase: tu,
	}
}

//Index: Get /todos -> todoデータ一覧取得
func (th todoHandler) Index(w http.ResponseWriter, r *http.Request, pr httprouter.Params) {
	//request:TodoAPIのパラメータ
	//type requset struct {
	//	Begin uint `query:begin`
	//	Limit uint `query:limit`
	//}

	type TodoField struct {
		Id        int64     `json:"id"`
		Title     string    `json:"title"`
		Author    string    `json:"author"`
		CreatedAt time.Time `json:"created_at"`
	}
	//response : Todo API のレスポンス
	type response struct {
		Todos []TodoField `json:"todos"`
	}

	ctx := r.Context()

	//ユースケースの呼び出し
	todos, err := th.todoUseCase.TodoGetAll(ctx)
	if err != nil {
		http.Error(w, "Internal Sever Error", 500)
		return
	}

	//取得したドメインモデルをresponseに変換
	res := new(response)
	for _, todo := range todos {
		var tf TodoField
		tf.Id = int64(todo.Id)
		tf.Title = todo.Title
		tf.Author = todo.Author
		tf.CreatedAt = todo.CreatedAt
		res.Todos = append(res.Todos, tf)
	}

	//クライアントにレスポンスを返却
	w.Header().Set("Content-Type", "application/json")
	if err = json.NewEncoder(w).Encode(res); err != nil {
		http.Error(w, "Internal Server Error", 500)
		return
	}
}
エラーハンドリングをしっかりしていく必要があるが、まだ勉強中であるため割愛する。
main.go
main関数内では各インターフェース型の変数を宣言することで、handler層で実装したRESTAPIを使用できるようにする。
package main

import (
	"fmt"
	"log"
	"net/http"

	"github.com/julienschmidt/httprouter"
	handler "github.com/tnkyk/LayeredArch_sample/handler/rest"
	"github.com/tnkyk/LayeredArch_sample/infra/persistence"
	"github.com/tnkyk/LayeredArch_sample/usecase"
)

func main() {
	todoPersistence := persistence.NewTodoPersistence()
	todoUseCase := usecase.NewTodoUseCase(todoPersistence)
	todoHandler := handler.NewTodokHandler(todoUseCase)

	//ルーティングの設定
	router := httprouter.New()
	router.GET("/api/todos", todoHandler.Index)

	//サーバー起動
	port := ":3000" //"3000"だとエラーになる
	fmt.Println(`Server Start >> http:// localhost:%d`, port)
	log.Fatal(http.ListenAndServe(port, router))
}
今回の実装の概要
今回のアーキテクチャは以下のような構造になっている。このように図にしてみると依存関係は依存先のinterfaceを構造体のフィールドとして持つことで成り立っていることが分かる。

最後に
このようにアーキテクチャを考えて実装していくことを体験してみて、「変更する際に簡単であること」、「依存関係が明確化されておりどこに何を実装すればいいか分かる」、「何から実装すれば良いか明確」という恩恵を受けることができると知ることができた。今後、成果物を作っていく中で念頭において実装を進めていきたい。
ここまで、記事を読んでいただきありがとうございました。こちらが実装したソースになります。
この記事ではアーキテクチャを学び、まとめてみました。何かご指摘ありましたら、ご教授いただけると幸いです。
