更新
バナーサイズの表記に変更がありましたので更新しました。
詳細知りたい方はコチラもご覧ください。
今回作成するアプリ

はじめに
今回はSwiftUIで作成したアプリにAdMobを導入する方法についてです。
公式からも出ていますが、公式だけでは分からない人用に(自分の事ですw)この記事一本で作成できるように掲載しておこうと思いますので良ければ参考にしてみてください。
環境
・ /macOS Big Sur 11.3
・ SwiftUI : 2.0
・ Xcode : 12.0
手順
今回はSwiftUIでAdMob導入のTestを行うだけなので、FireBaseやAdMobの登録方法はありません。
次回実践編を書く予定なので実践方法を知りたい方はそちらをご覧下さい!
では下記手順になります。
1.アプリ作る
2.ターミナルで
・cocoapodsインストール
・pod file作成
・Pod file内の use_frameworks! 直下にpod ‘Google-Mobile-Ads-SDK’の追加してターミナルでpod install
・.xcworkspaceでプロジェクトを開いて
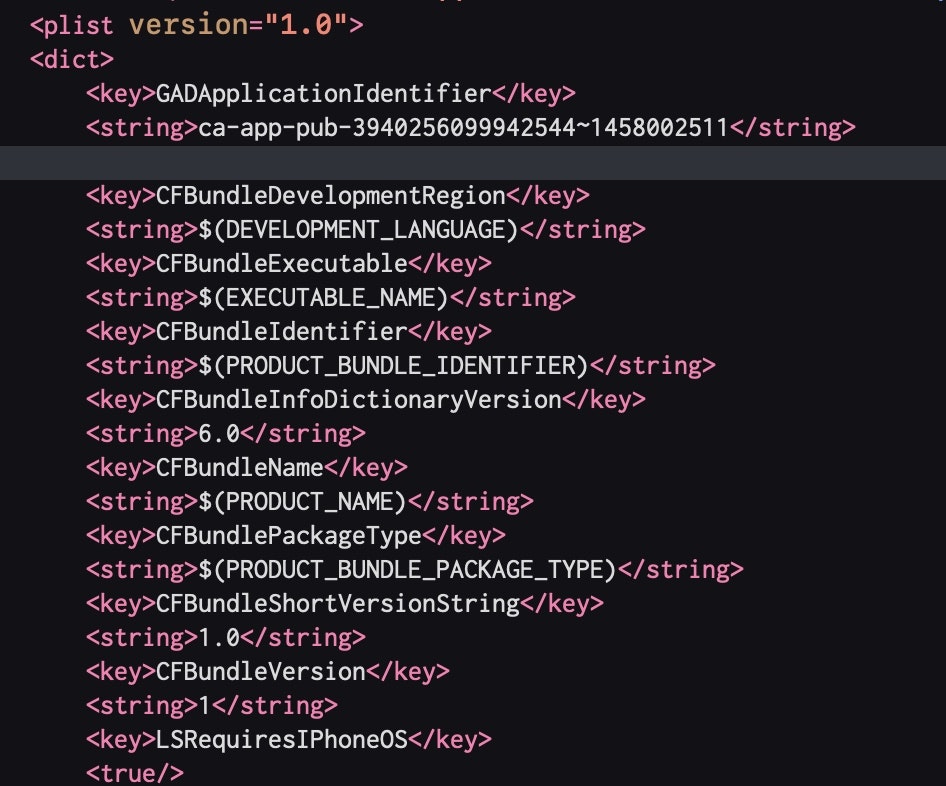
・Info.plistに
GADApplicationIdentifier
ca-app-pub-3940256099942544~1458002511
を追加(このIDはテスト用)
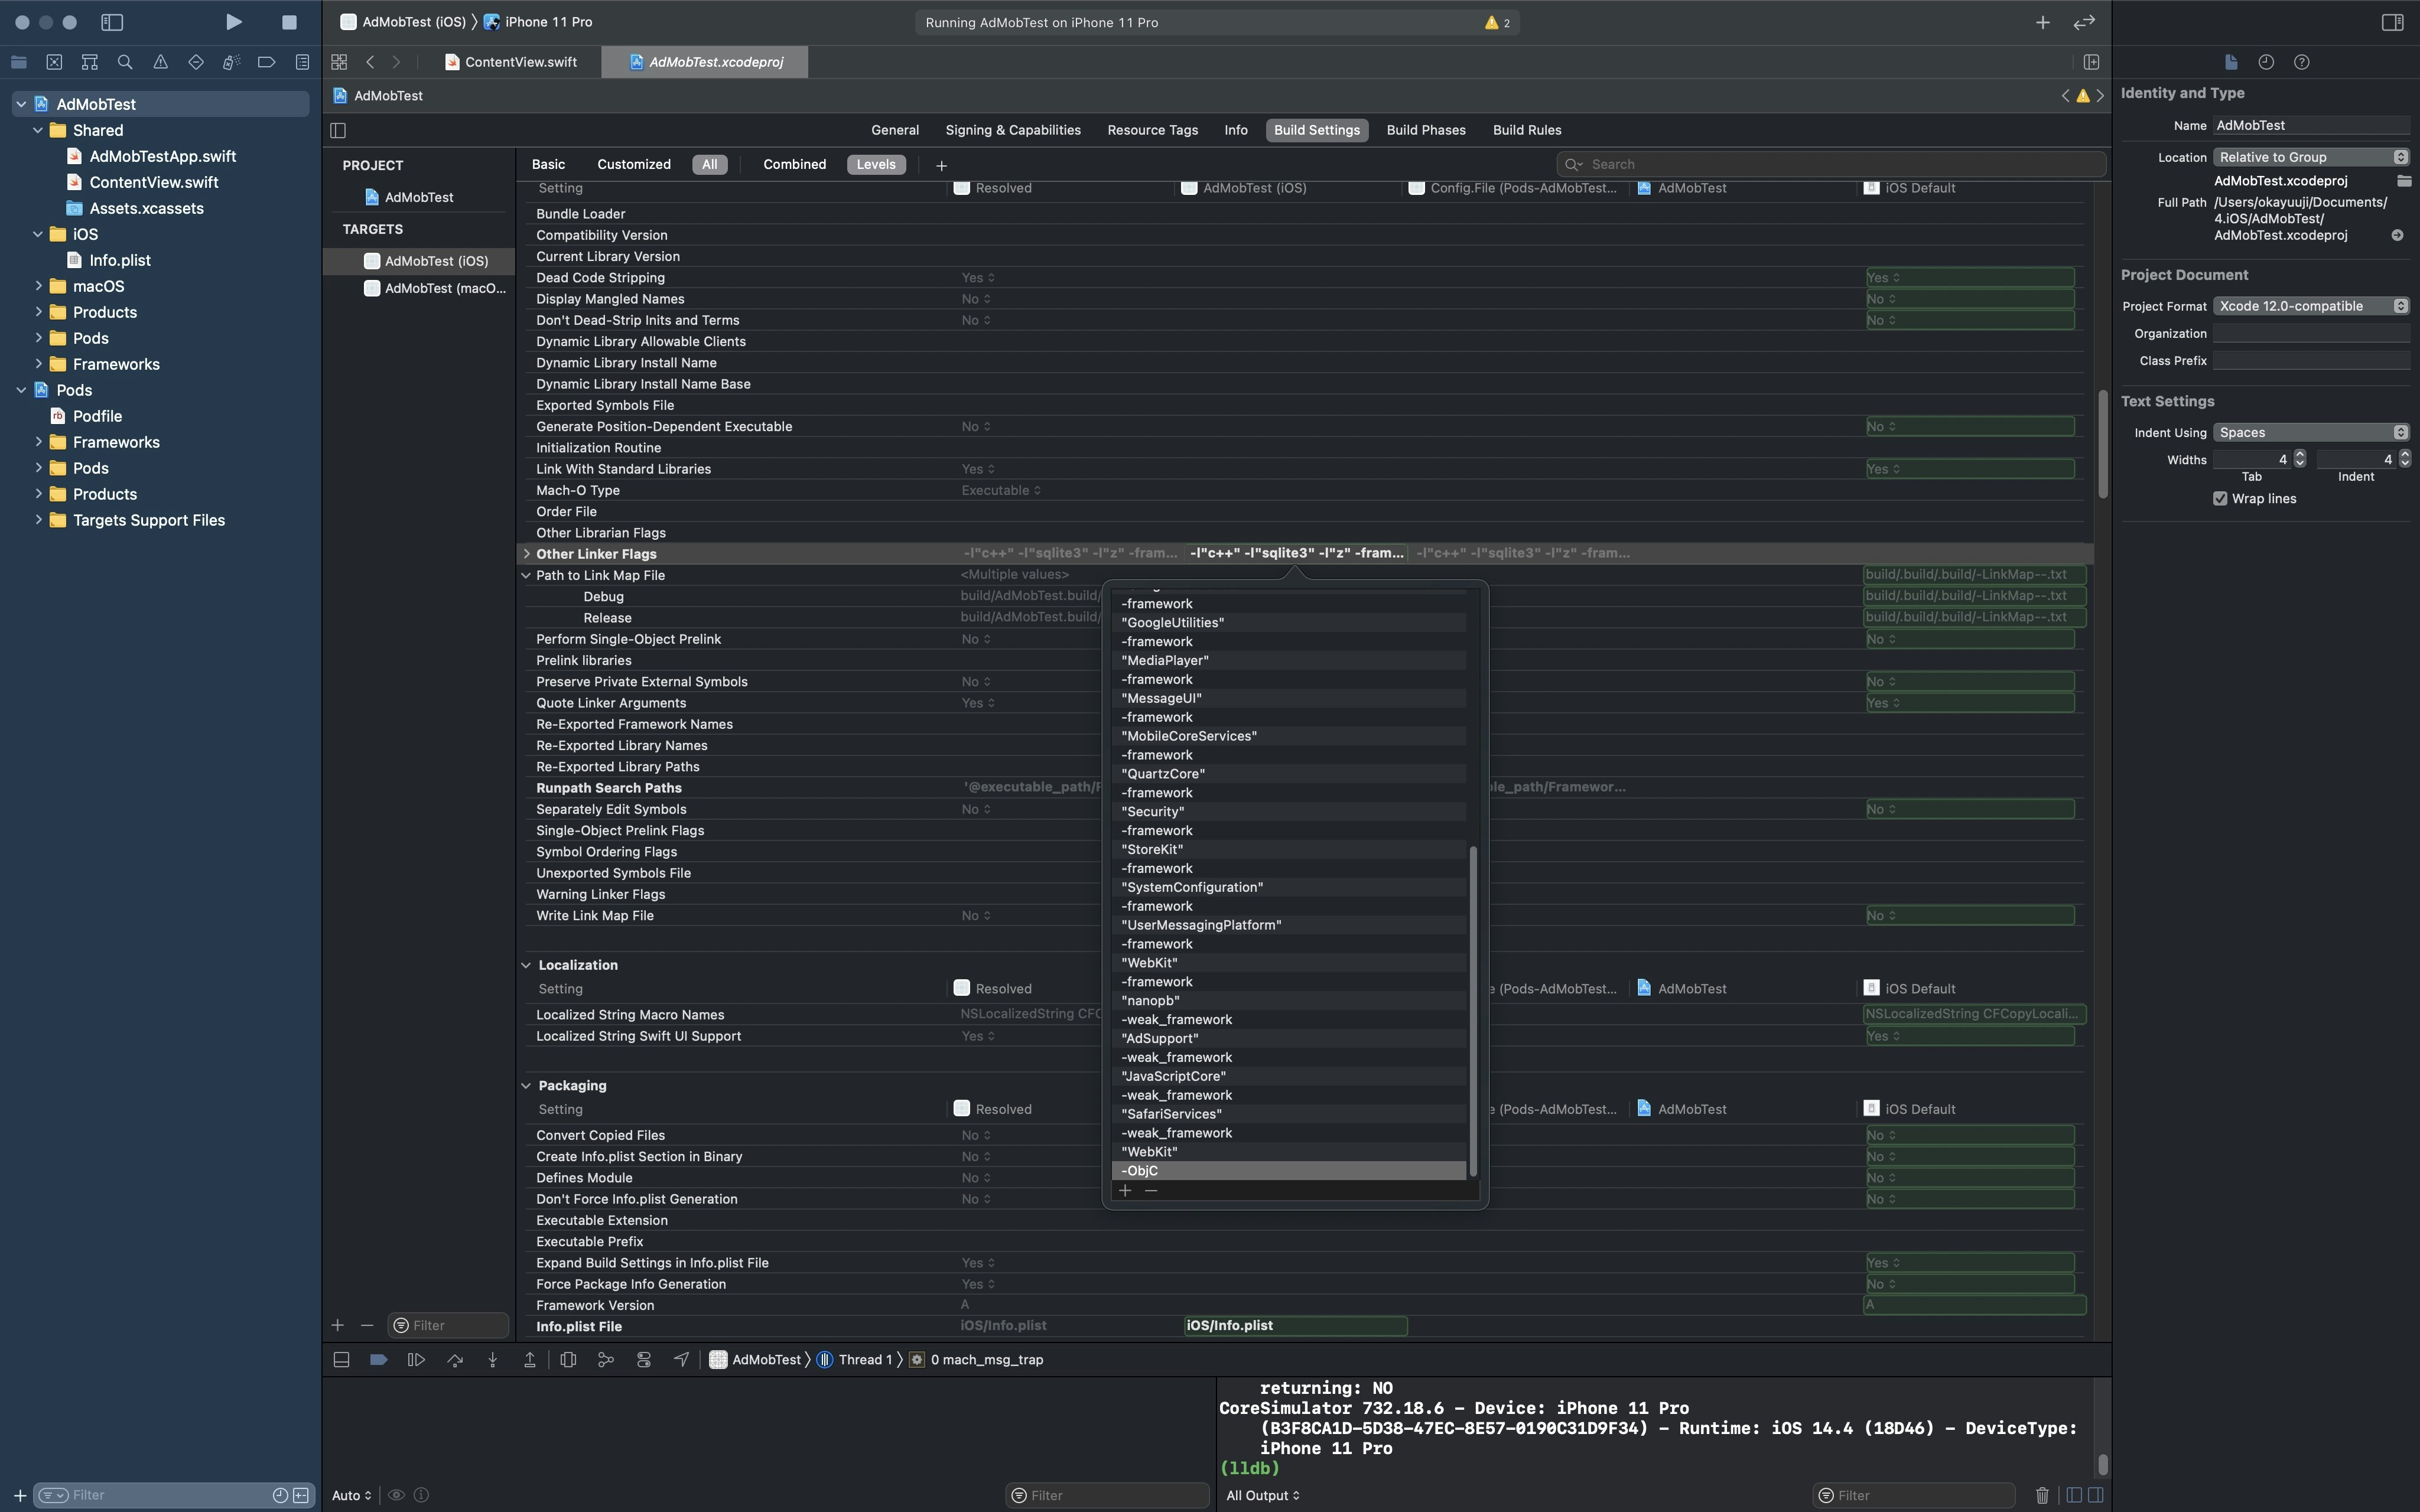
・プロジェクトのビルド設定で、-ObjCを追加(ここ分かりづらい)
・SwiftUIだとXcode 12からAppDelegate.swiftがないのでApp.swiftを修正する
・ファイル内にAdMobを表示するViewを作成
これでTest表示程度ならできます。それぞれの手順の詳細は以下です。
アプリを作る
今回はAdMobを表示させたいだけなのでSwiftUIのプロジェクトを新規作成するだけで問題ないです。(既存のアプリで試したい場合は既に作成されたアプリをご使用ください)
ターミナル操作
まずターミナルを起動してcocoapodsをインストールします。
sudo gem install cocoapods
次にxcodeプロジェクト(.xcodeprojのファイルがある場所)のディレクトリまで移動します。
(以下イメージです)
cd /Users/okayuuji/AdMobTest
次にPodfileを追加します。
pod init
するとファイル内にPodfileが追加されます。
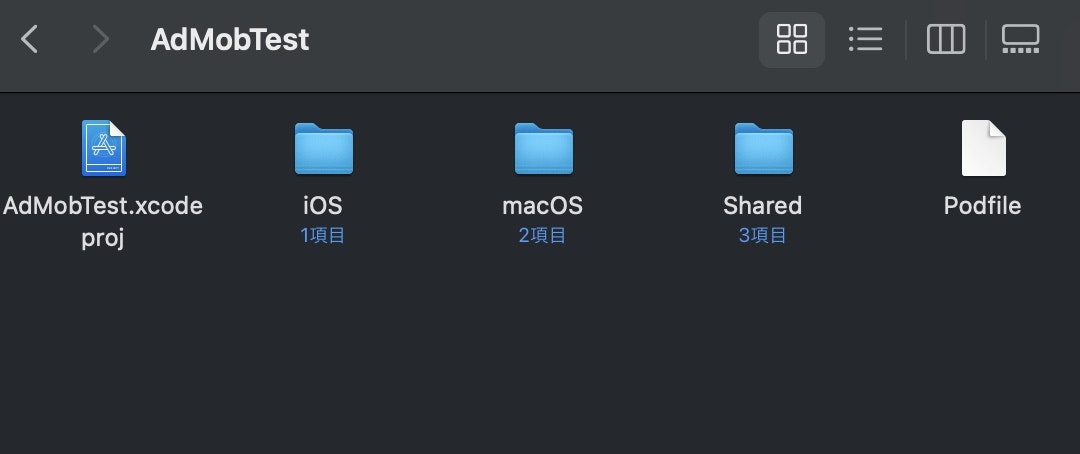
このPodfileを開き
use_frameworks!
の下に
pod 'Google-Mobile-Ads-SDK'
を追加し、閉じます。
その後
pod install
を実行しエラーがなければ成功です!(エラーは赤字で出ます)
成功するとファイル内に.xcworkspaceの拡張子がついたファイルが追加されているのでそちらを開きます。

ここまでがターミナルでの操作になります。
Info.plist
ここからはプロジェクト内での編集になります。
まず、Info.plistにて
GADApplicationIdentifier
ca-app-pub-3940256099942544~1458002511
を追加します。(このca-app-pub-3940256099942544~1458002511というIDはテスト用のID)
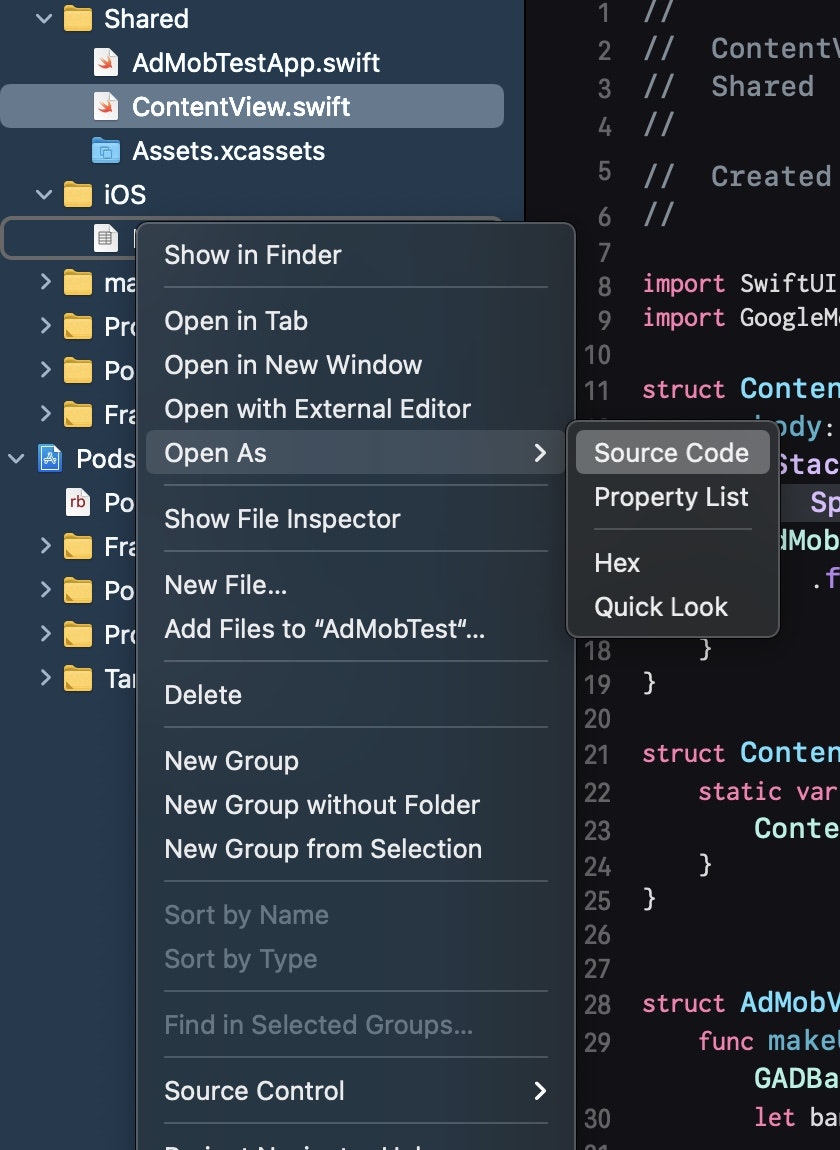
プロジェクトのビルド設定で、-ObjCを追加
筆者はここでつまづきました。
ここは詳細にどこにも掲載がなかったので、正直ここを詳細に掲載する為に今回記事を書いたようなものなので細かくスクショを掲載していきます。
まずは一番上にあるファイルをクリックし、Build settingsを選択し、以下の画面に行きます。
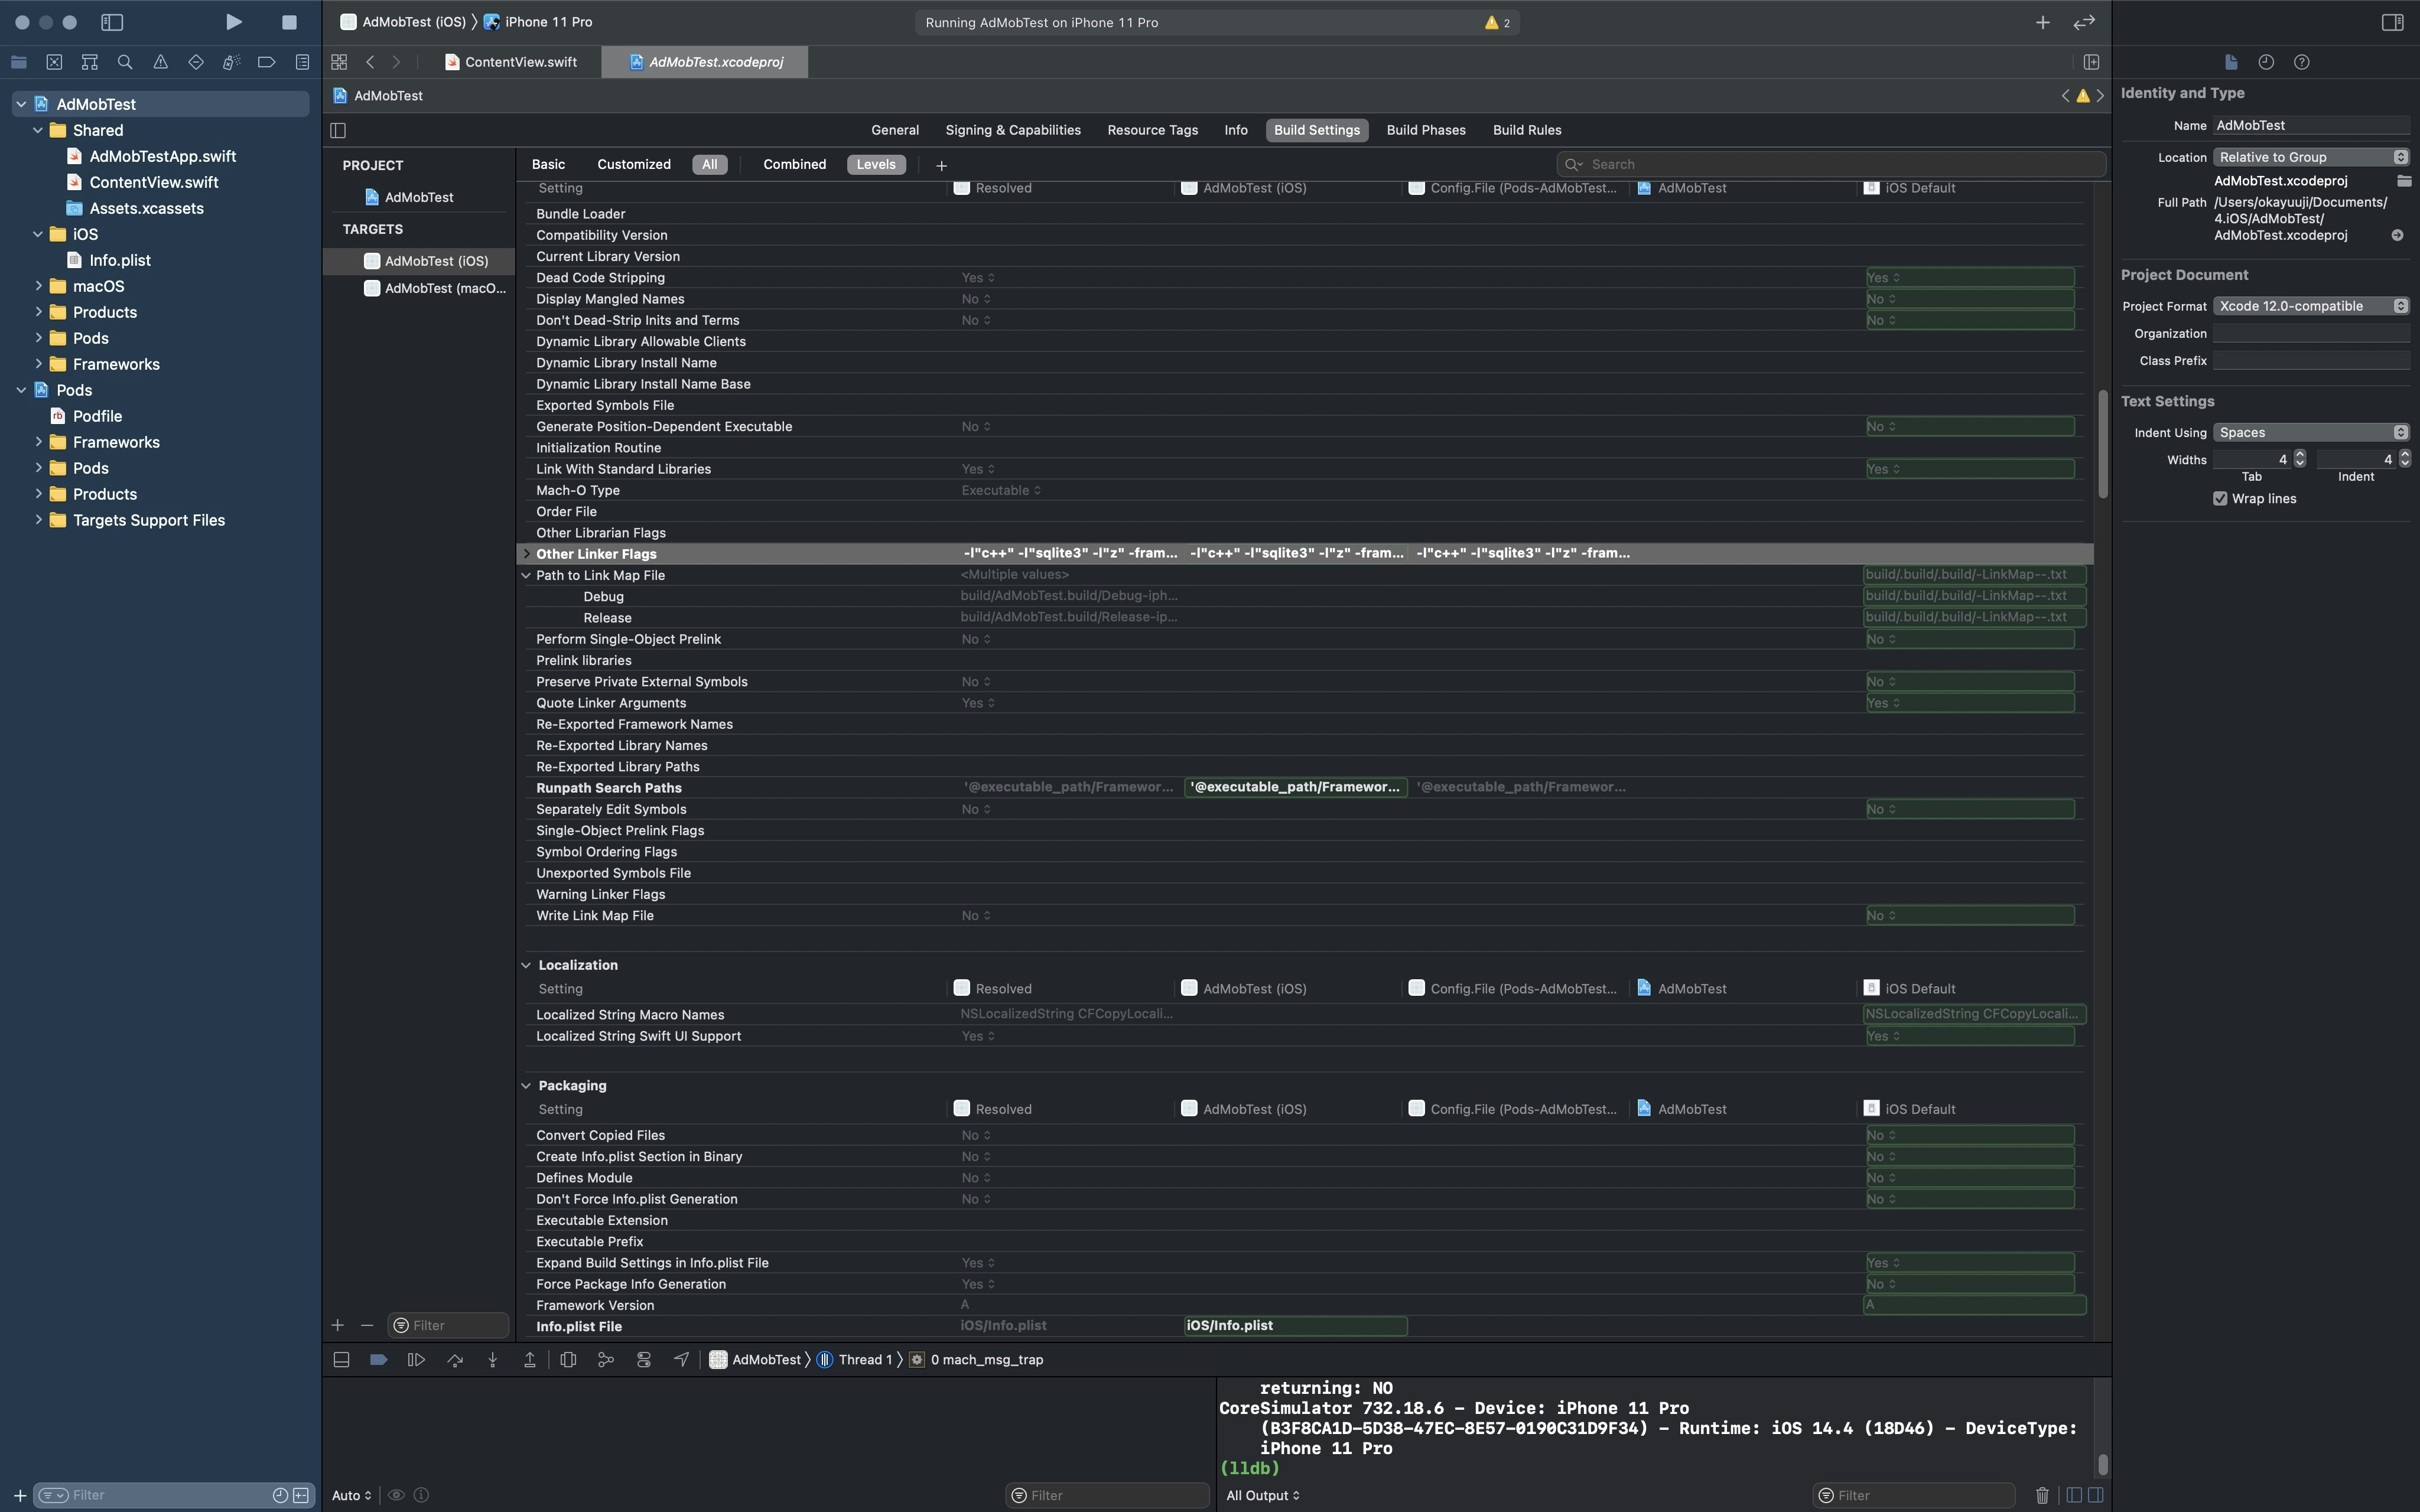
続いて以下の部分をダブルクリックで選択リストを表示させ、リストの下にある+を選択し、-ObjCと入力し-ObjCを追加します。
ここまできたら後は楽勝です。
App.swift
・SwiftUIだとXcode 12からAppDelegate.swiftがないのでApp.swiftを修正します。
import SwiftUI
import UIKit
import GoogleMobileAds

class AppDelegate: NSObject, UIApplicationDelegate {
    func application(_ application: UIApplication,didFinishLaunchingWithOptions launchOptions: [UIApplication.LaunchOptionsKey : Any]? = nil) -> Bool {
        // Mobile Ads SDKを初期化する
        GADMobileAds.sharedInstance().start(completionHandler: nil)
        return true
    }
}

@main
struct DemoApp: App {

    @UIApplicationDelegateAdaptor(AppDelegate.self) var appDelegate

    var body: some Scene {
        WindowGroup {
            ContentView()
        }
    }
}
ContentView.swift
import SwiftUI
import GoogleMobileAds

struct ContentView: View {
    var body: some View {
        VStack{
            Spacer()
        AdMobView()
            .frame(width: 150, height: 60)
        }
    }
}

struct ContentView_Previews: PreviewProvider {
    static var previews: some View {
        ContentView()
    }
}


struct AdMobView: UIViewRepresentable {
    func makeUIView(context: UIViewRepresentableContext<AdMobView>) -> GADBannerView{
        let banner = GADBannerView(adSize: GADAdSizeBanner)

        banner.adUnitID = "ca-app-pub-3940256099942544/2934735716"
        banner.rootViewController = UIApplication.shared.windows.first?.rootViewController
        banner.load(GADRequest())
        return banner
    }

    func updateUIView(_ uiView: GADBannerView, context:  UIViewRepresentableContext<AdMobView>) {
    }
}
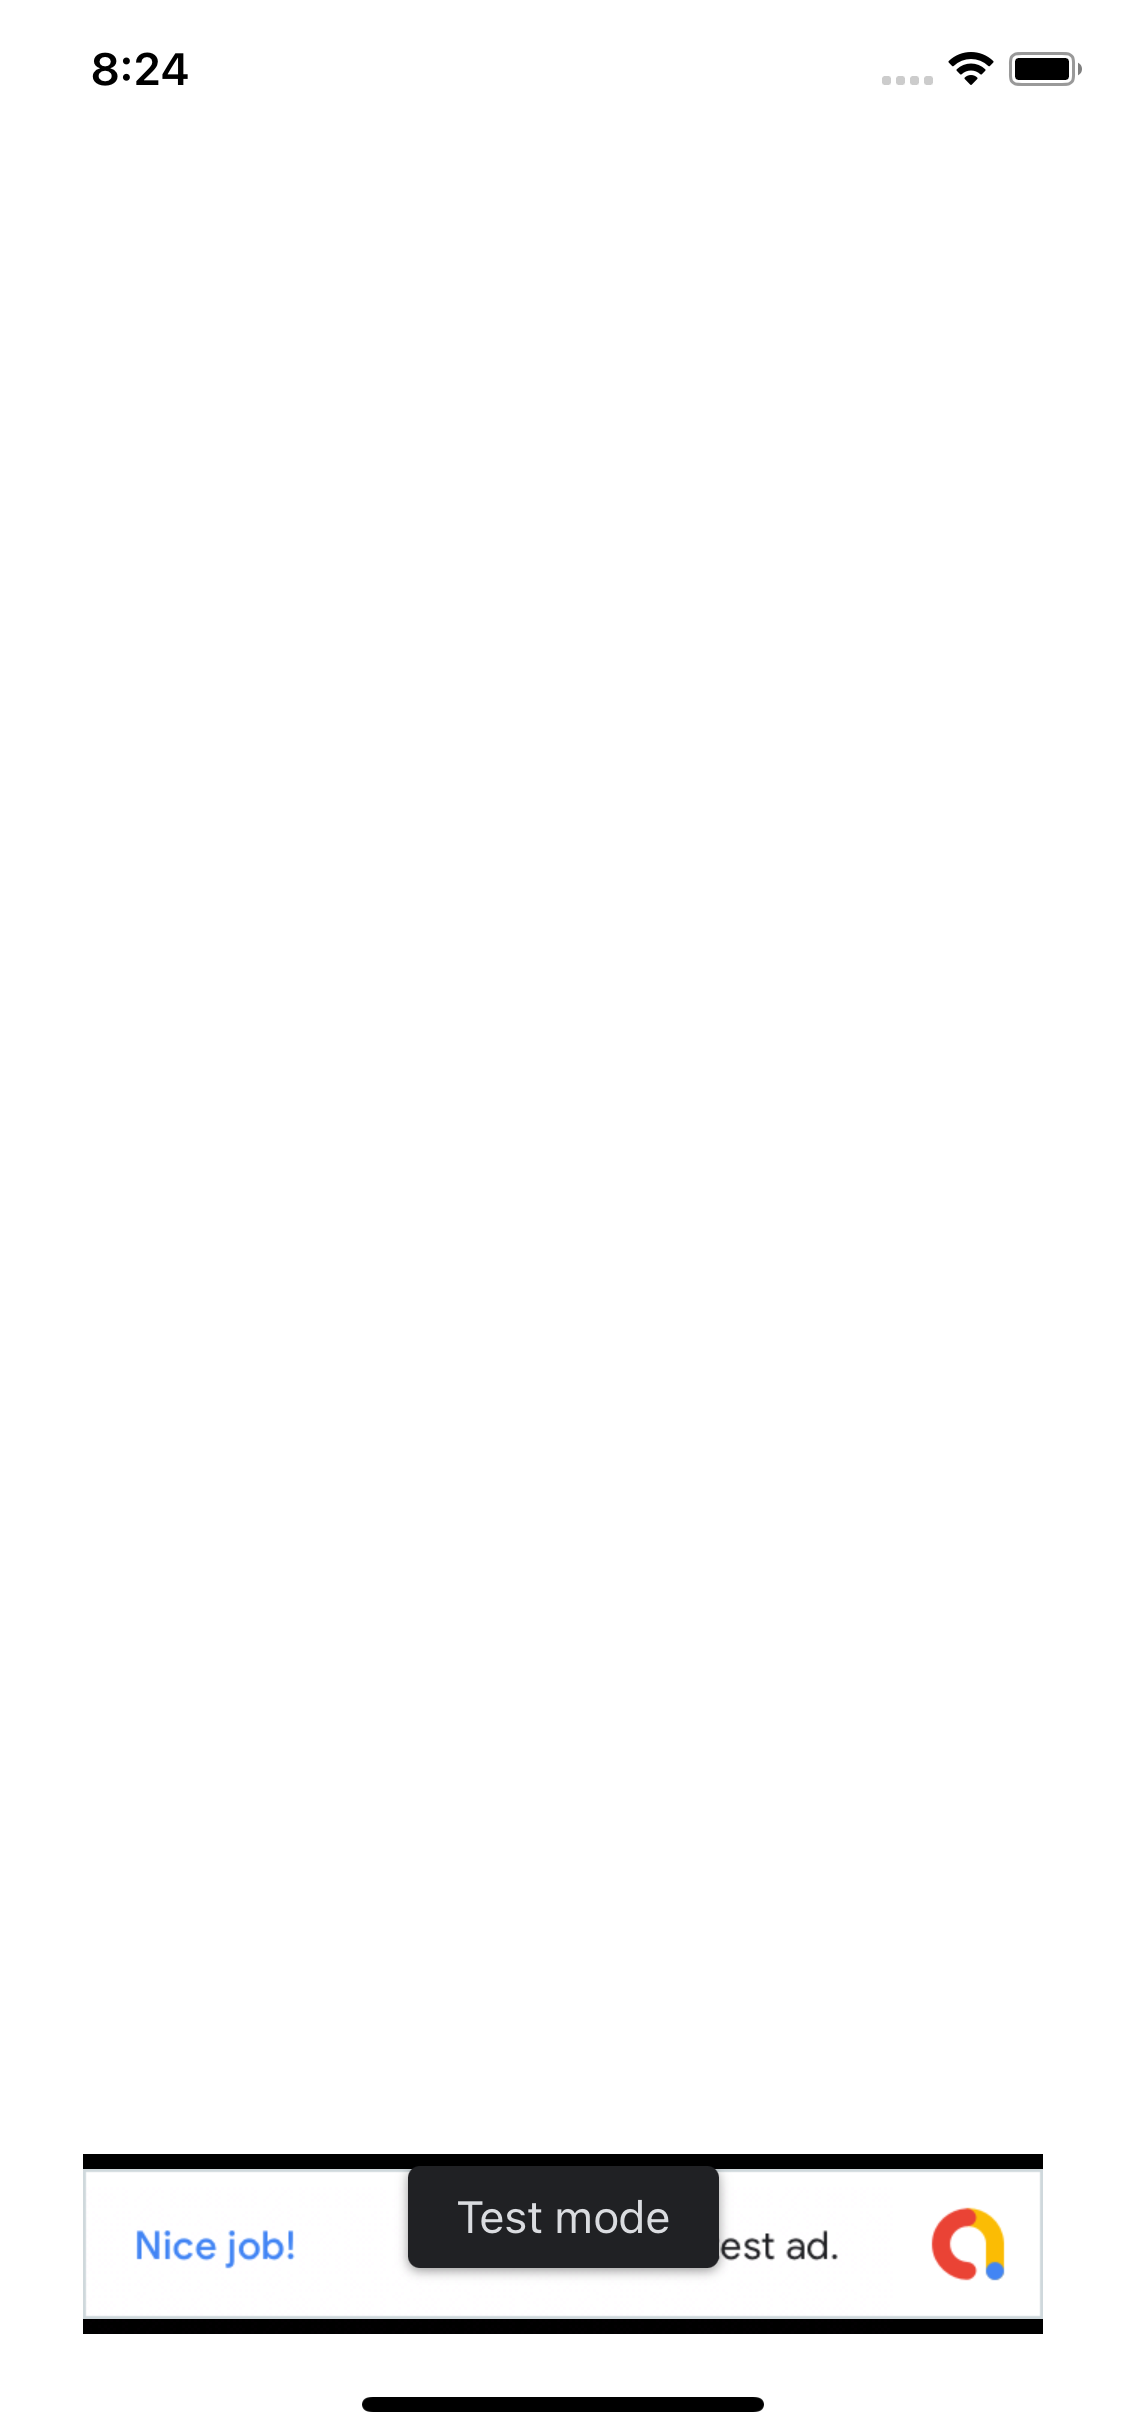
シュミレータ起動でいかが表示されます。(できなければ気軽にTwitterとかで連絡ください)
まとめ
今回はtest表示だけなのでFireBaseやAdMobの登録については記載してませんが、基本上記の事ができれば実践は簡単にできると思います。(後日実践編をUPします)
またGitも掲載しておきますので必要な方はどうぞ。
また参考にした記事や動画もいくつか貼っておきますので良ければそちらもご覧下さい。
動画
