PCで作業をしている傍らで炎が出るデスクトップアプリ
こんな演出をつくってみました。温度が上がるほど炎が激しくなります。
デスクトップの左下に表示させました。
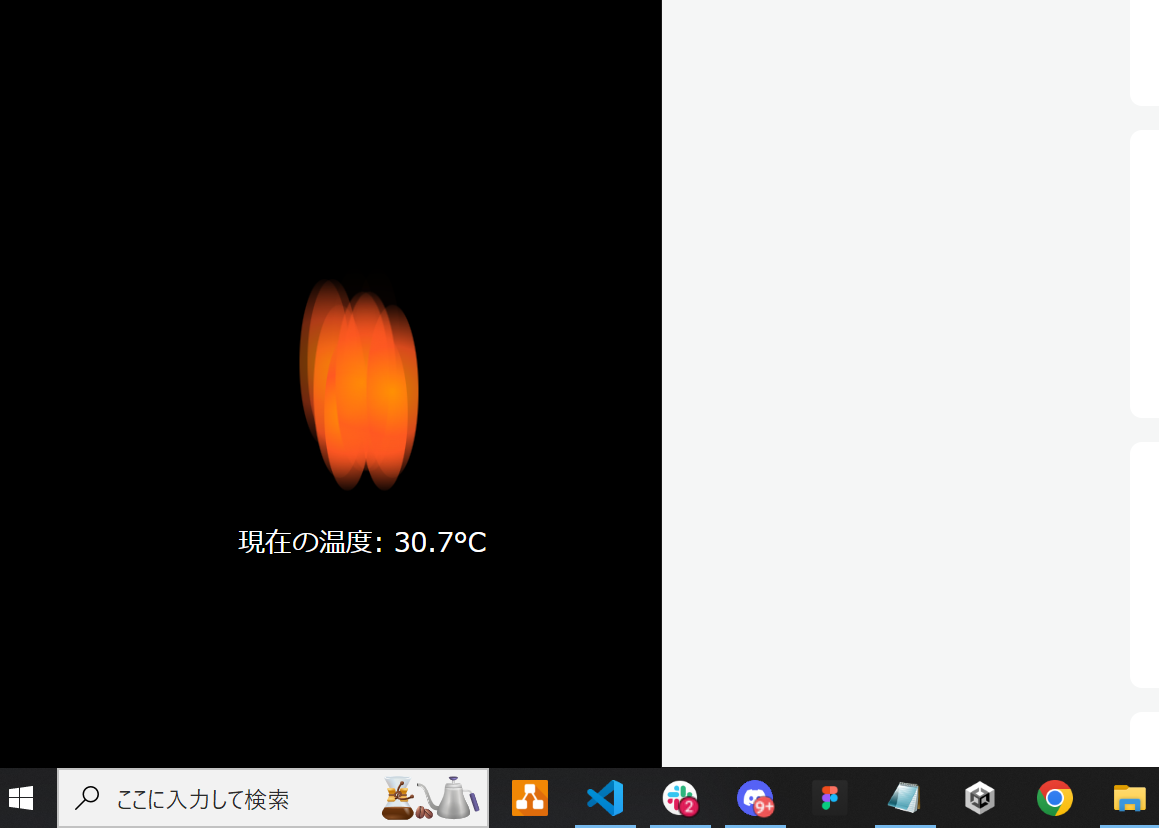
PCが火傷しそうなくらい熱くなる時はありませんか? 気づいた時にはPCを冷やすようにしていますが、作業に集中しているときは気づかないこともあります。そこで、PCの温度が高いと炎の大きさで知らせるアプリをつくりました
温度はこのようにセンサーがPCの熱を持つ部分に設置します。ベタ付けです!
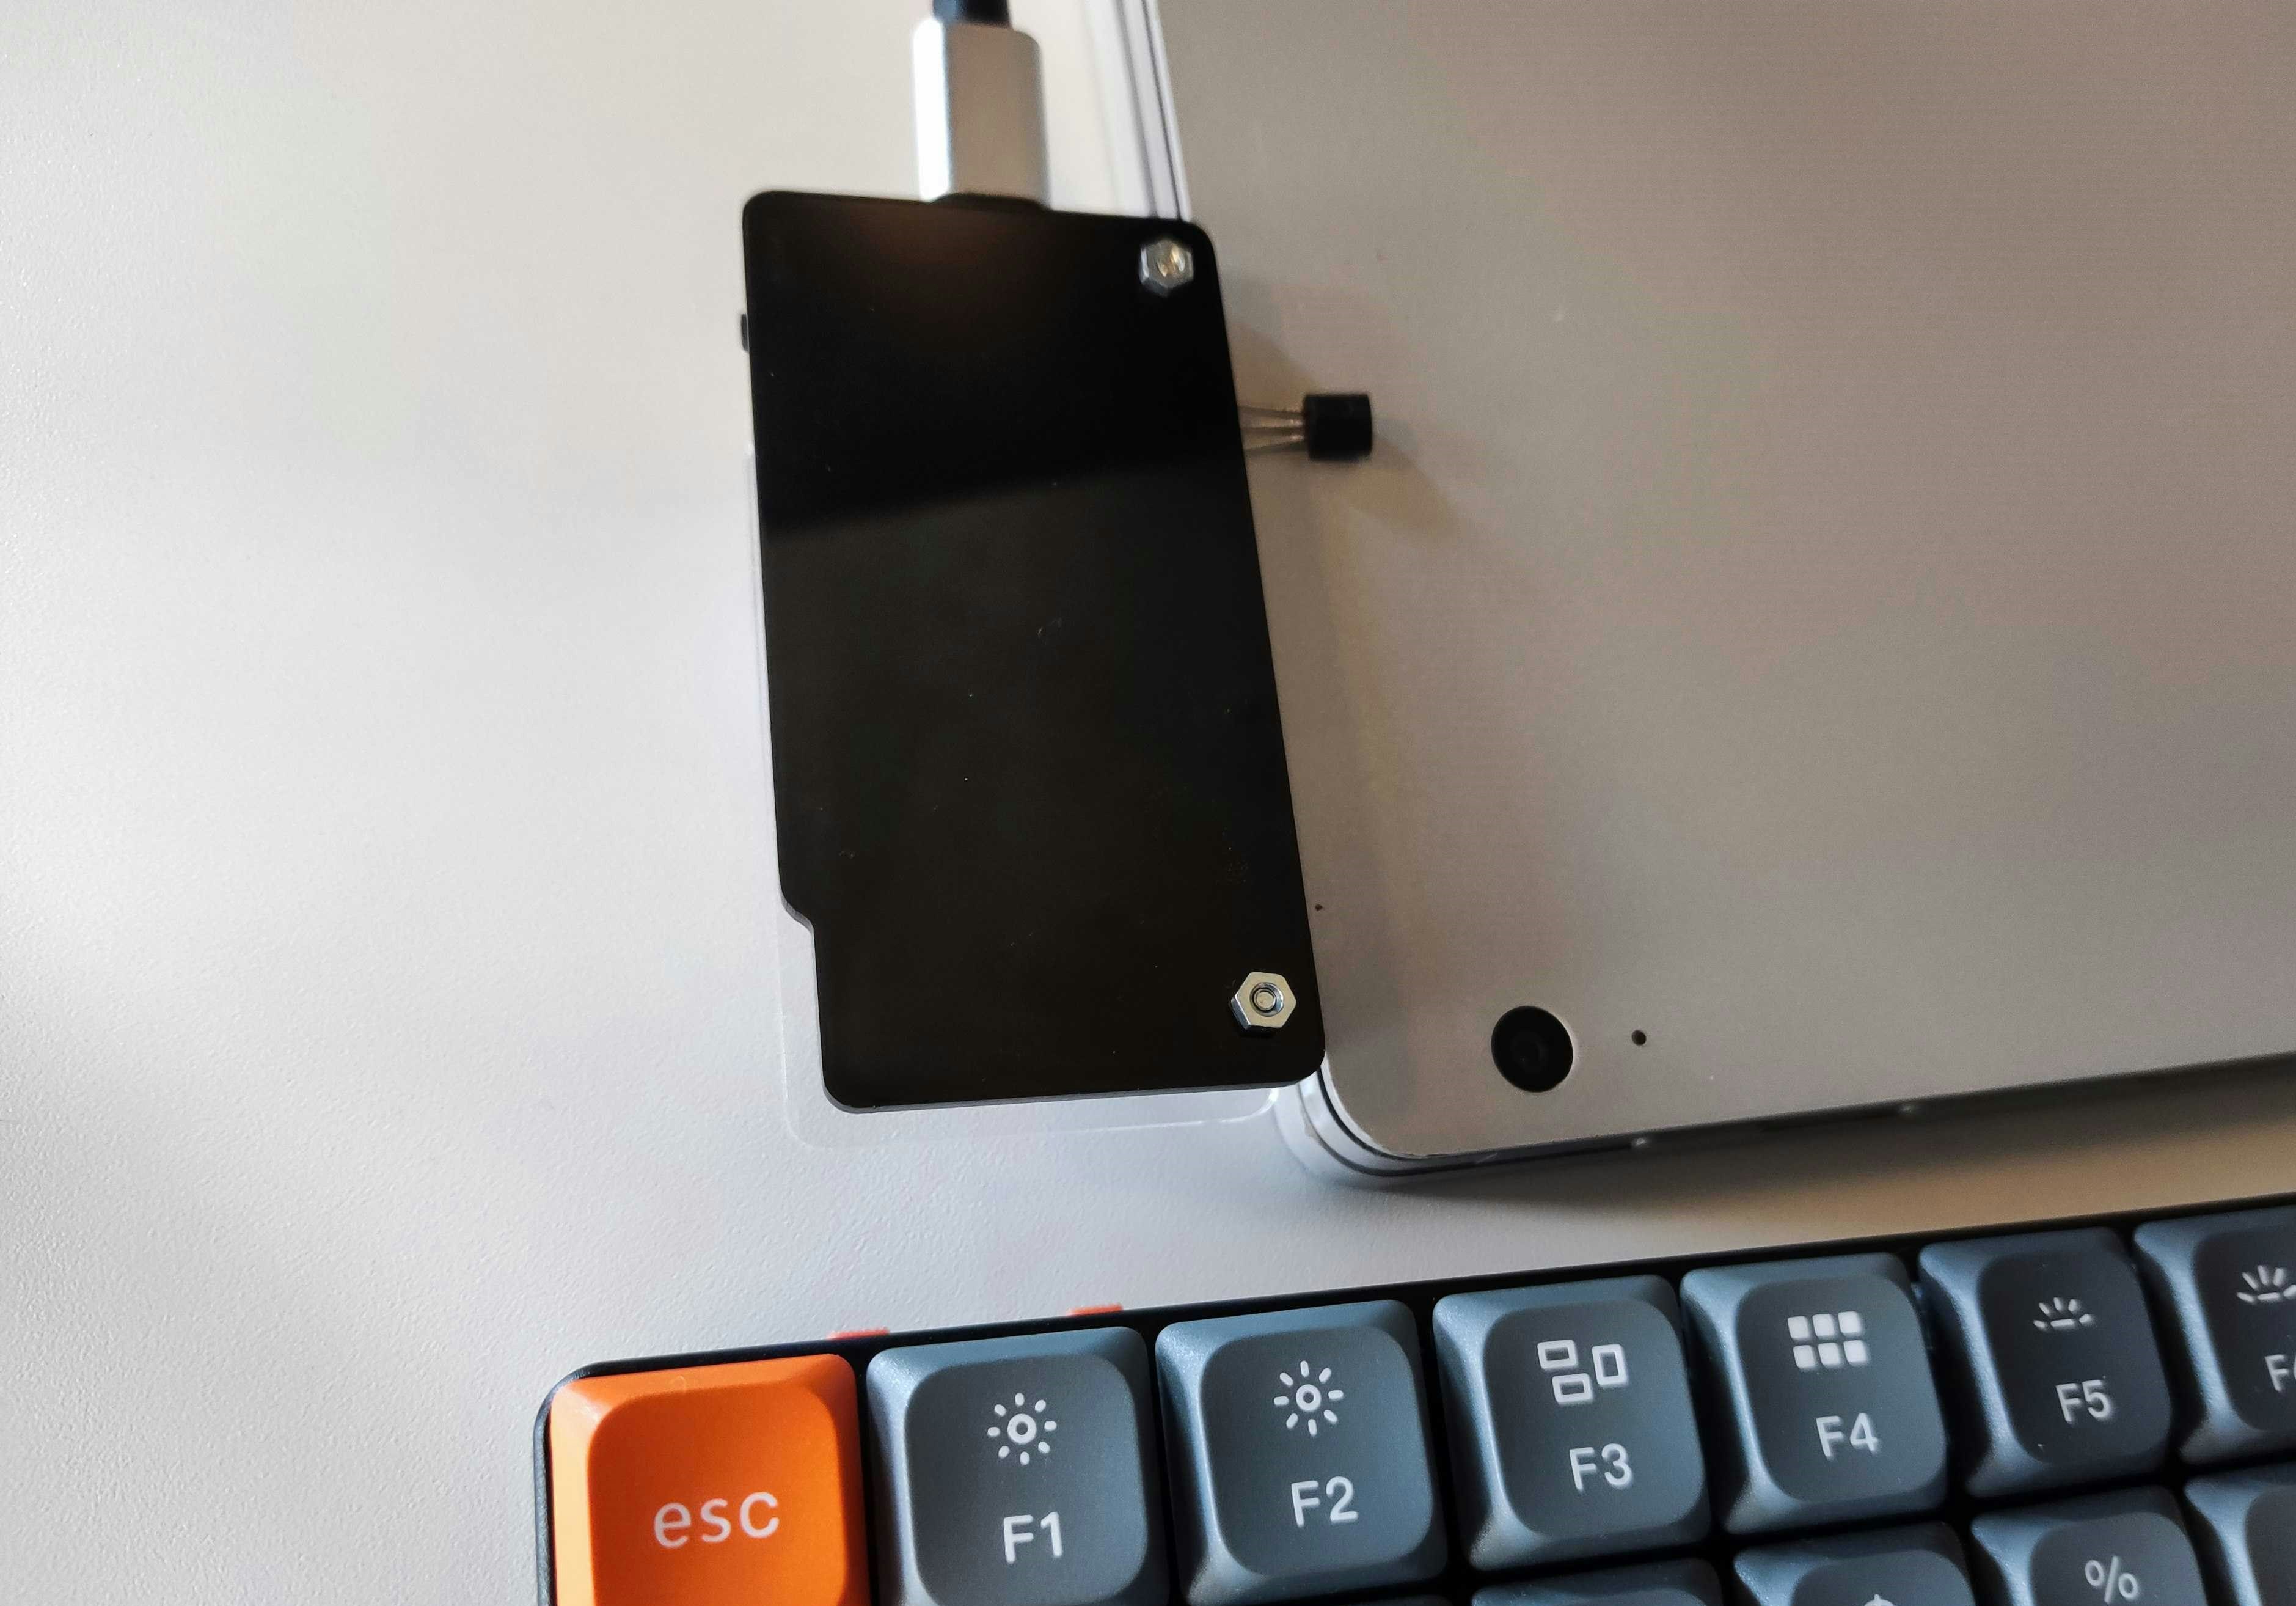
見せ方は少しふざけていますが、本来は温度が上がった時に冷却器をONにするという実用性のある制作です!
構成
先に言っておくと、実装は難しくありません!
デスクトップアプリとPCの温度を取得するセンサーを用います。
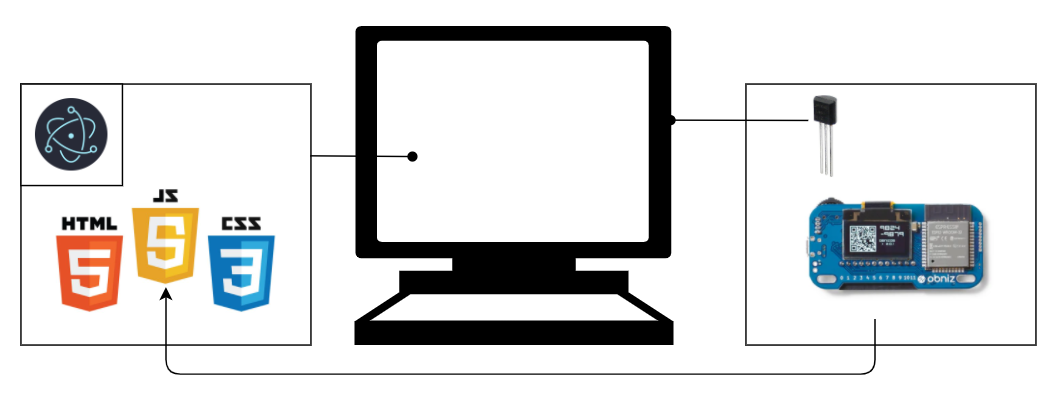
- デスクトップアプリ
Electronを使いました。
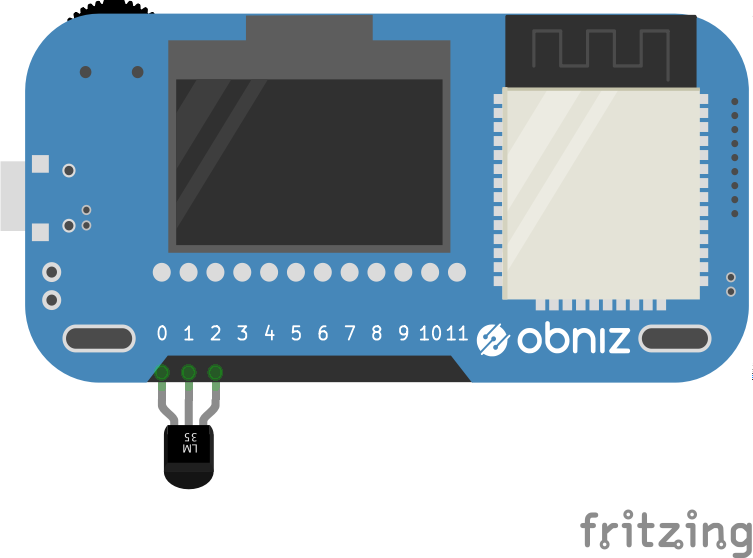
- センサーデバイス
obnizに温度センサをつなぎました。
温度は125度まで観測できます。
Electronの詳しい準備については別の記事で説明します
→ 2024/10/21 Electronの実装方法を紹介した記事を書きました!
温度センサーを読み取る関数
obnizのパッケージをインストールしておきます。
npm install obniz
温度を取得するためのobniz.jsファイルをつくります。
const Obniz = require("obniz");
const obniz = new Obniz("YOUR_OBNIZ_API_KEY");

obniz.onconnect = async () => {
    console.log("Obniz connected");

    // 温度センサーをポートに接続
    const temperatureSensor = obniz.wired("LM60", { gnd:0 , output:1, vcc:2});

    // 温度データを取得
    setInterval(async () => {
        const temperature = await temperatureSensor.getWait();
        console.log(`Current temperature: ${temperature}°C`);

        // メインウィンドウに温度を送信。1秒ごとに温度を取得
        mainWindow.webContents.send('temperature-update', temperature);
    }, 1000);
};
obnizとLM60の接続方法はこちらを参考にしました。
一応ピンなどは確認しておきましょう
炎の演出
フロントエンドは簡単な図形のアニメーションです。丸い細長い球で炎を表しています。
<!DOCTYPE html>
<html lang="ja">
<head>
    <meta charset="UTF-8">
    <meta name="viewport" content="width=device-width, initial-scale=1.0">
    <title>PC燃えてるぞ!!!</title>
    <link rel="stylesheet" href="style.css">
</head>
<body>
  <div class="fire">
    <div class="flame"></div>
    <div class="flame"></div>
    <div class="flame"></div>
    <div class="flame"></div>
    <div class="flame"></div>
    <div class="flame"></div>
    <div class="flame"></div>
    <div class="flame"></div>
    <div class="flame"></div>
    <div class="flame"></div>

  </div>

  <p id="temperatureDisplay">PCの温度: --°C</p>

  <!--   <script src="https://unpkg.com/obniz/obniz.js"></script> -->
  <script src="script.js"></script>
</body>
</html>
CSSはここでは大事なところだけ紹介します。下に詳細なコードを載せておきます。
.flame {
    position: absolute;
    bottom: 0;
    width: 30px;
    height: 100px;
    background: radial-gradient(circle, rgba(255,150,0,1) 0%, rgba(255,87,34,1) 50%, rgba(0,0,0,0) 100%);
    border-radius: 50%;
    animation: flame-animation 2s infinite ease-in-out;
    transition: transform 0.5s ease-in-out, animation-duration 0.5s ease-in-out;
}

@keyframes flame-animation {
    0% {
        transform: scale(1) translateY(0);
        opacity: 1;
    }
    50% {
        transform: scale(1.5) translateY(-20px);
        opacity: 0.8;
    }
    100% {
        transform: scale(1) translateY(-50px);
        opacity: 0;
    }
}

#temperatureDisplay {
  margin-top: 20px;
  font-size: 18px;
}
CSSのコード全体はこちらです
body {
  display: flex;
  flex-direction: column;
  justify-content: center;
  align-items: center;
  height: 100vh;
  margin: 0;
  background-color: #000;
  color: #fff;
}

.fire {
  position: relative;
  width: 100px;
  height: 200px;
  display: flex;
  justify-content: space-between;
  transform: rotate(0deg);
}

.flame {
  position: absolute;
  bottom: 0;
  width: 30px;
  height: 100px;
  background: radial-gradient(circle, rgba(255,150,0,1) 0%, rgba(255,87,34,1) 50%, rgba(0,0,0,0) 100%);
  border-radius: 50%;
  animation: flame-animation 2s infinite ease-in-out;
  transition: transform 0.5s ease-in-out, animation-duration 0.5s ease-in-out;
}

.flame:nth-child(1) {
  left: 10px;
  animation-delay: 0s;
}

.flame:nth-child(2) {
  left: 20px;
  animation-delay: 0.2s;
}

.flame:nth-child(3) {
  left: 30px;
  animation-delay: 0.4s;
}

.flame:nth-child(4) {
  left: 40px;
  animation-delay: 0.6s;
}

.flame:nth-child(5) {
  left: 50px;
  animation-delay: 0.8s;
}
.flame:nth-child(6) {
  left: -10px;
  animation-delay: 0s;
}

.flame:nth-child(7) {
  left: -20px;
  animation-delay: -0.2s;
}

.flame:nth-child(8) {
  left: -30px;
  animation-delay: -0.4s;
}

.flame:nth-child(9) {
  left: -40px;
  animation-delay: -0.6s;
}

.flame:nth-child(10) {
  left: -50px;
  animation-delay: -0.8s;
}
@keyframes flame-animation {
  0% {
    transform: scale(1) translateY(0);
    opacity: 1;
  }
  50% {
    transform: scale(1.2) translateY(-20px);
    opacity: 0.8;
  }
  100% {
    transform: scale(1) translateY(-50px);
    opacity: 0;
  }
}

#temperatureDisplay {
  margin-top: 20px;
  font-size: 18px;
}
良い炎の演出があれば教えてください!
温度によって炎の演出を変える
先ほどつくったobniz.jsをmain.jsでインポートし、script.jsで温度変化に応じた動作を記述します。
const { app, BrowserWindow, ipcMain } = require('electron');
const path = require('path');
const Obniz = require('./obniz.js');  // obniz.jsをインポート

let mainWindow;

function createWindow() {
    mainWindow = new BrowserWindow({
        width: 800,
        height: 600,
        webPreferences: {
            preload: path.join(__dirname, 'preload.js'),
            nodeIntegration: true,
            contextIsolation: false,
        }
    });

    mainWindow.loadFile('index.html');

    mainWindow.on('closed', function () {
        mainWindow = null;
    });
}

app.on('ready', createWindow);

ipcMain.on('temperature-update', (event, temperature) => {
    mainWindow.webContents.send('temperature-update', temperature);
});

app.on('window-all-closed', function () {
    if (process.platform !== 'darwin') app.quit();
});

app.on('activate', function () {
    if (mainWindow === null) createWindow();
});
const { ipcRenderer } = require('electron');

// 炎のサイズとアニメーション速度の更新
ipcRenderer.on('temperature-update', (event, temperature) => {
    let scaleValue;
    let animationSpeed;

    if (temperature <= 20) {
        // 温度が低い
        scaleValue = 0.5;
        animationSpeed = 2; // アニメーションが遅い
    } else if (temperature >= 40) {
        // 温度が高い
        scaleValue = 2;
        animationSpeed = 0.5; // アニメーションが速い
    } else {
        // 中間のサイズ
        scaleValue = 1 + (temperature - 20) / 20;
        animationSpeed = 2 - (temperature - 20) / 20;
    }

    document.querySelectorAll('.flame').forEach(flame => {
        flame.style.transform = `scale(${scaleValue})`;
        flame.style.animationDuration = `${animationSpeed}s`; // アニメーションの速度
    });
});
プロジェクト全体
フォルダのディレクトリは以下の通りです。
app.
│  index.html
│  main.js
│  script.js
│  style.css
│  package.json
│  preload.js
│
└─node_modules
ローカルインストールでパッケージを入れています、
index.html
<!DOCTYPE html>
<html lang="ja">
<head>
    <meta charset="UTF-8">
    <meta name="viewport" content="width=device-width, initial-scale=1.0">
    <title>PC燃えてるぞ!!!</title>
    <link rel="stylesheet" href="style.css">
</head>
<body>
  <div class="fire">
    <div class="flame"></div>
    <div class="flame"></div>
    <div class="flame"></div>
    <div class="flame"></div>
    <div class="flame"></div>
    <div class="flame"></div>
    <div class="flame"></div>
    <div class="flame"></div>
    <div class="flame"></div>
    <div class="flame"></div>

  </div>

  <p id="temperatureDisplay">PCの温度: --°C</p>

  <!--   <script src="https://unpkg.com/obniz/obniz.js"></script> -->
  <script src="script.js"></script>
</body>
</html>
main.js
const { app, BrowserWindow, ipcMain } = require('electron');
const path = require('path');
const Obniz = require('./obniz.js');  // obniz.jsをインポート

let mainWindow;

function createWindow() {
    mainWindow = new BrowserWindow({
        width: 800,
        height: 600,
        webPreferences: {
            preload: path.join(__dirname, 'preload.js'),
            nodeIntegration: true,
            contextIsolation: false,
        }
    });

    mainWindow.loadFile('index.html');

    mainWindow.on('closed', function () {
        mainWindow = null;
    });
}

app.on('ready', createWindow);

ipcMain.on('temperature-update', (event, temperature) => {
    mainWindow.webContents.send('temperature-update', temperature);
});

app.on('window-all-closed', function () {
    if (process.platform !== 'darwin') app.quit();
});

app.on('activate', function () {
    if (mainWindow === null) createWindow();
});
script.js
const { ipcRenderer } = require('electron');

// 炎のサイズとアニメーション速度の更新
ipcRenderer.on('temperature-update', (event, temperature) => {
    let scaleValue;
    let animationSpeed;

    if (temperature <= 20) {
        // 温度が低い
        scaleValue = 0.5;
        animationSpeed = 2; // アニメーションが遅い
    } else if (temperature >= 40) {
        // 温度が高い
        scaleValue = 2;
        animationSpeed = 0.5; // アニメーションが速い
    } else {
        // 中間のサイズ
        scaleValue = 1 + (temperature - 20) / 20;
        animationSpeed = 2 - (temperature - 20) / 20;
    }

    document.querySelectorAll('.flame').forEach(flame => {
        flame.style.transform = `scale(${scaleValue})`;
        flame.style.animationDuration = `${animationSpeed}s`; // アニメーションの速度
    });
});
style.css
body {
  display: flex;
  flex-direction: column;
  justify-content: center;
  align-items: center;
  height: 100vh;
  margin: 0;
  background-color: #000;
  color: #fff;
}

.fire {
  position: relative;
  width: 100px;
  height: 200px;
  display: flex;
  justify-content: space-between;
  transform: rotate(0deg);
}

.flame {
  position: absolute;
  bottom: 0;
  width: 30px;
  height: 100px;
  background: radial-gradient(circle, rgba(255,150,0,1) 0%, rgba(255,87,34,1) 50%, rgba(0,0,0,0) 100%);
  border-radius: 50%;
  animation: flame-animation 2s infinite ease-in-out;
  transition: transform 0.5s ease-in-out, animation-duration 0.5s ease-in-out;
}

.flame:nth-child(1) {
  left: 10px;
  animation-delay: 0s;
}

.flame:nth-child(2) {
  left: 20px;
  animation-delay: 0.2s;
}

.flame:nth-child(3) {
  left: 30px;
  animation-delay: 0.4s;
}

.flame:nth-child(4) {
  left: 40px;
  animation-delay: 0.6s;
}

.flame:nth-child(5) {
  left: 50px;
  animation-delay: 0.8s;
}
.flame:nth-child(6) {
  left: -10px;
  animation-delay: 0s;
}

.flame:nth-child(7) {
  left: -20px;
  animation-delay: -0.2s;
}

.flame:nth-child(8) {
  left: -30px;
  animation-delay: -0.4s;
}

.flame:nth-child(9) {
  left: -40px;
  animation-delay: -0.6s;
}

.flame:nth-child(10) {
  left: -50px;
  animation-delay: -0.8s;
}
@keyframes flame-animation {
  0% {
    transform: scale(1) translateY(0);
    opacity: 1;
  }
  50% {
    transform: scale(1.5) translateY(-20px);
    opacity: 0.8;
  }
  100% {
    transform: scale(1) translateY(-50px);
    opacity: 0;
  }
}

#temperatureDisplay {
  margin-top: 20px;
  font-size: 18px;
}
package.json
初期化と必要なパッケージを入れます。npm init -y
npm install --save-dev electron obniz
アプリの開始するスクリプトにmain.jsを指定するため一部書き換えます。
{
  "name": "electron-fire-app",
  "version": "1.0.0",
  "description": "",
  "main": "main.js",
  "scripts": {
    "start": "electron ."
  },
  "devDependencies": {
    "electron": "^latest"
  }
}
preload.js
こちらは空のファイルでOKです。
touch preload.js
プロジェクトのルートディレクトリで以下を実行すればデスクトップ上に立ち上がります。
npm start
まとめ
Electronさえ起動できれば躓くところはほとんどないと思います。また、Obnizに給電できていれば他の部屋の温度の状況など離れた場所の情報を知ることもできますね!