実装すること
①ユーザーは問い合わせフォームから問い合わせを送ることができる
②管理者はユーザーからのお問い合わせ一覧から問い合わせの確認ができる
③管理者が問い合わせ詳細から返信すると、ユーザーの登録しているメールアドレスに届く
ActionMailerとは
ActionMailerを使うと、railsアプリケーションのメイラークラスやビューでメールを送信することができます。
(例)
・メールマガジンの一斉送信
・ウェブサイトに会員登録した時のthank youメール
・お問い合わせフォームの記入内容が管理者にメールでも送信される
参考:Railsガイド https://railsguides.jp/action_mailer_basics.html
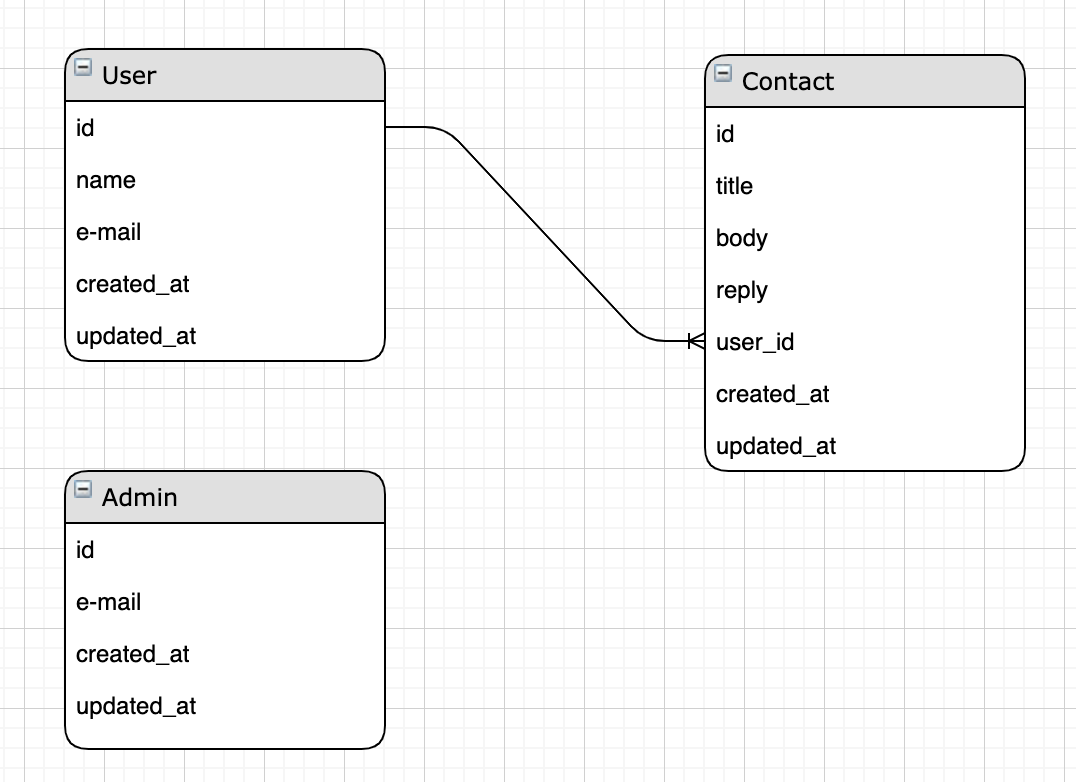
ER図
User:Contact = 1:N の関係になります。
モデルの作成
今回はUserモデル、Adminモデル、Contactモデルを作成します。
Userモデル、Adminモデルはdeviseを使用してモデルを作成していきます。
deviseのviewはusersフォルダとadminsフォルダそれぞれに作成されるようにします。
deviseの導入
gem 'devise'
$ bundle install
$ rails g devise:install
$ rails g devise User name:string
$ rails g devise Admin name:string
$ rails g devise:views users
$ rails g devise:views admins
アソシエーションの確認
Userモデル
class User < ApplicationRecord
 devise :database_authenticatable, :registerable,
         :recoverable, :rememberable, :validatable, :omniauthable

 has_many :contact, dependent: :destroy
end
Contactモデル
reply以外のtitleとbodyにバリデーションを掛けます。
class Contact < ApplicationRecord

	belongs_to :user
	#バリデーション
	validates :title, presence: true
	validates :body, presence: true
end
コントローラーの作成
$ rails g controller users
$ rails g controller admins
$ rails g controller contacts new
ルーティングの設定
・管理者側のURLは、path_namesで推測されないように変更します。
・namespaceで、エンドユーザー側か管理者側かが分かりやすいように、urlにusersかadminsかを記載します。
Rails.application.routes.draw do
 devise_for :admins,
     path: 'auth',
     path_names: {
     sign_in: 'xxxxxxxxxx',
     sign_out: 'xxxxxxxxxx',
     password: 'xxxxxxxxxx',
     confirmation: 'xxxxxxxxxx',
     unlock: 'xxxxxxxxxx',
     registration: 'xxxxxxxxxx',
     sign_up: 'xxxxxxxxxx' },
     controllers: {
         sessions: 'admin/sessions',
         passwords: 'admin/passwords',
         registrations: 'admin/registrations',
  }
  devise_for :users,
     controllers: {
         sessions: 'users/sessions',
         passwords: 'users/passwords',
         registrations: 'users/registrations',
         omniauth_callbacks: 'users/omniauth_callbacks'
  }

  namespace :admins do

    resources :contacts

  end

  namespace :users do

    resources :users
    resources :contacts

  end
end
メイラーの作成
$ rails g mailer ContactMailer
サーバーの設定
今回はGmailを使用するメール送信機能を記述します。
・raise_delivery_errorsは、メールの送信に失敗した時にエラーを出すかどうかです。
・default_url_optionsで、アプリケーションのホスト情報をメイラー内で使いたい場合は:hostパラメータを明示的に指定します。
・delivery_methodは、デフォルトでsmtpです。
・smtp_settingsで、詳細設定をします。
1.port => SMTPサーバーのポート番号
2.address => SMTPサーバーのホスト名
3.domain => HELOドメインを指定する必要がある場合はここで行なう
4.user_name => メール送信に使用するgmailのアカウント
5.password => メール送信に使用するgmailのパスワード
6.authentication => 認証方法
7.enable_starttls_auto => メールの送信にTLS認証を使用するか
Rails.application.configure do
    config.action_mailer.raise_delivery_errors = true

    config.action_mailer.default_url_options = { :host => 'localhost:3000' }
    config.action_mailer.delivery_method = :smtp

    config.action_mailer.smtp_settings = {
        port:                 587,
        address:              'smtp.gmail.com',
        domain:               'gmail.com',
        user_name:            '<YOUR EMAIL ADDRESS>',
        password:             '<YOUR EMAIL PASSWORD>',
        authentication:       'login',
        enable_starttls_auto: true
    }
end
メイラーを編集
application_mailerには、全メイラー共通の設定を、
sample_mailerには、メイラー個別の設定をします。
application_mailer.rb
defaultメソッドで、共通の処理・設定を記述します。
class ApplicationMailer < ActionMailer::Base
  default from: 'from@example.com'
  layout 'mailer'
end
contact_mailer.rb
管理者の返信が、ユーザーのemailに届くようにします。
個別の設定にはmailメソッドを使用します。
・send_when_replyedメソッドを呼び出す時に渡されるユーザーの情報から、
emailアドレスだけを取り出してメールの送信先としてします。
・mailメソッドが呼び出されると、メール本文が記載されているビューが読み込まれます。
インスタンス変数でメイラービューに値を渡してあげたいので、インスタンス変数を用意しています。
class ContactMailer < ApplicationMailer
	default from: 'from@example.com'

	def send_when_admin_reply(user, contact) #メソッドに対して引数を設定
    @user = user #ユーザー情報
    @answer = contact.reply #返信内容
    mail to: user.email, subject: '【サイト名】 お問い合わせありがとうございます'
  end
end
メールの本文を作成する
1つはHTMLフォーマット、もう一つはテキストメールです。
顧客によってはHTMLフォーマットのメールを受け取ることができない / 受け取りたくない人もいるので、テキストメールも作成しておくのが最善です。
contact_mailer/send_when_admin_reply.html.erb
<h2><%= @user.name %> 様</h2>
 <p>この度は、お問い合わせありがとうございました。<br>
 以下でご質問の回答となっておりますでしょうか。</p>

  <p><%= @answer %></p>

  <p>今後とも弊社をよろしくお願いいたします。</p>
contact_mailer/send_when_admin_reply.text.erb
  <%= @user.name %> 様

  この度は、お問い合わせありがとうございました。
 以下でご質問の回答となっておりますでしょうか。

  <%= @answer %>

  今後とも弊社をよろしくお願いいたします。
問い合わせフォームの作成(ユーザー側)
users/contacts_controller.rb
class Users::ContactsController < ApplicationController

	def new
		@contact = Contact.new
	end

	def create
		@contact = Contact.new(contact_params)
		@contact.user_id = current_user.id
		if @contact.save
			redirect_to root_path
		else
			@contacts = Contact.all
			@users = User.all
			render :new
		end
	    flash[:success] = 'お問い合わせを送信しました。'
	end

	private
	def contact_params
		params.require(:contact).permit(:title, :body, :reply)
	end
end
users/contacts/new.html.erb
  <% if @contact.errors.any? %>
        <%= @contact.errors.count %>件のエラー。
        <% @contact.errors.full_messages.each do |message| %>
          <%= message %>。
        <% end %>
  <% end %>
  <h2 class="contact-title">お問い合わせフォーム</h2>
      <%= form_for @contact, url: users_contacts_path do |f| %>
          <%= f.label :タイトル %>
              <%= f.text_field :title, class:"form-control" %>
          <%= f.label :内容 %>
              <%= f.text_field :body, class:"form-control" %>
          <%= f.submit "送信" %>
      <% end %>
返信処理の作成(管理者側)
・コントローラーのアクションによって、application_mailer.rb / contact_mailer.rbを起動します。
・流れは、
①管理者が問い合わせ一覧(index)から
②問い合わせ詳細(edit)へ飛び、
③返信を送信(update)し、
④その内容をメールでユーザーに送信します。
・ユーザーが問い合わせをした時点で、Contactsテーブルの中に、
レコードが作成されます。その中に「返信(reply)」というカラムが用意されています。
updateアクションを使って、すでにあるレコードの中に管理者の返信のデータだけを更新することで、ContactMailerのsend_when_admin_replyアクションが発火します。
deliver_nowについていくつかの参考書や解説サイトでは、deliver_nowメソッドではなくdeliverメソッドを使うように記載されています。
じつは、deliver_nowを使ってメール送信すると、メール送信が完了するまでRailsが反応しなくなることがあります。そのため、Rails4.2から「Active Job」という非同期処理が導入されました。「Active Job」を使うと、メール送信を裏で行わせながら処理を行うことができますので、メール送信完了を待つ必要がなくなるのです。
そのため、「すぐに送信する」ということが分かるように、deliverではなく、deliver_nowという名称になっているのです。
参考:https://web-camp.io/magazine/archives/19143
admins/contacts_controller.rb
class Admins::ContactsController < ApplicationController

	def index
		@contacts = Contact.page(params[:page]).order(created_at: :desc).per(16)
		@users = User.all
	end

	def edit
		@contact = Contact.find(params[:id])
	end

	def update
		contact = Contact.find(params[:id]) #contact_mailer.rbの引数を指定
	   	contact.update(contact_params)
	   	user = contact.user
	   	ContactMailer.send_when_admin_reply(user, contact).deliver_now #確認メールを送信
	   	redirect_to admins_items_path
	end

	def destroy
		contact = Contact.find(params[:id])
		contact.destroy
		@contacts = Contact.page(params[:page]).order(created_at: :desc).per(16)
		@users = User.all
		render :index
	end

	private
	def contact_params
		params.require(:contact).permit(:title, :body, :reply)
	end
end
問い合わせ一覧(admins/contacts/index.html.erb)
<h2>問い合わせ一覧</h2>
    <table>
        <thead>
	    <tr>
	        <th>ユーザー名</th>
		<th>問い合わせタイトル</th>
		<th>受信日</th>
		<th></th>
		<th></th>
	    </tr>
	</thead>
	<tbody>
	    <% @users.each do |user| %>
	        <% user.contact.each do |contact| %>
		      <tr>
		          <td><%= contact.user.name %><%= user.name %></td>
			      <td><%= contact.title %></td>
			      <td><%= contact.created_at.strftime("%Y年%m月%d日 ") %></td>
			      <td><%= link_to "返信", edit_admins_contact_path(contact) %></td>
			      <td><%= link_to "削除", admins_contact_path(contact), method: :delete %></td>
		       </tr>
		    <% end %>
	   <% end %>
        </tbody>
</table>
問い合わせ内容(admins/contacts/edit.html.erb)
<h2>お問い合わせ内容</h2>
    <%= form_for @contact, url: admins_contact_path do |f| %>
        <h3>顧客名</h3>
	    <%= @contact.user.name %>さん
	    <h3>問い合わせ日</h3>
	    <%= @contact.created_at.strftime("%Y年%m月%d日 ") %>
	    <h3>タイトル</h3>
	    <%= @contact.title %>
	    <h3>問い合わせ内容</h3>
	    <%= @contact.body %>
	    <h3>返信</h3>
	    <%= f.text_area :reply, class:"form-control", placeholder: "返信内容" %>
	    <%= f.submit "送信" %>
    <% end %>
Google側での設定
・2段階認証をオンにする
https://support.google.com/accounts/answer/185839?co=GENIE.Platform%3DDesktop&hl=ja
・アプリケーション用のパスワードを発行する
https://support.google.com/accounts/answer/185833?hl=ja
・2段階認証プロセスで使用するパスワードとコード
https://support.google.com/accounts/answer/1070457?hl=ja
最後に
最後までご覧いただきありがとうございます。
初学者ですので間違っていたり、分かりづらい部分もあるかと思います。
何かお気付きの点がございましたら、お気軽にコメントいただけると幸いです。
参考
Railsガイド
https://railsguides.jp/action_mailer_basics.html
Action Mailer でメール送信機能をつくる
https://qiita.com/annaaida/items/81d8a3f1b7ae3b52dc2b
Gmail 経由での SMTP メール送信が出来ない時の解決法 (ユーザー名とパスワードは合っているのに。。)
https://qiita.com/Yinaura/items/6886682a607951a71bac