テストを書いてみよう
・テストとは、コードが動くことを保証するプログラムのこと
・Railsには以下の3つのテストがある
① request spec (Controllerのテスト)
② model spec (Modelのテスト)
③ system spec (見た目のテスト)
・テストの流れは以下の通り
① 確認したいことを決める
② ダミーデータを作成する
③ ダミーデータで①が動くかを確認する
・テストの流れの例(model specの場合)→バリデーション
① タイトルが未入力だと保存が失敗することを確認したい
② タイトルが未入力のダミーデータを作成
③ ダミーデータを保存できないかを確認する
・テストの流れの例(request specの場合)
①リクエストを送って200や正しいレスポンスが返ってくるかを確認したい
②リクエストを送る
③200ステータスを確認&レスポンスを確認
・テストの流れの例(system specの場合)
① 画面が正しく表示されているのかを確認したい
② 画面の表示に必要なデータを作成する
③ プログラムによってブラウザを操作して想定どおりに表示されているかを確認する
・factory botとは、ダミーデータを作るためのライブラリ。これを使うと効率よくダミーデータを作成できる。
モデルのテストを書いてみよう
・rspecとは、Railsのgemでテストを簡単に実行できる環境を作ってくれる
→テストを書く際は、まずrspecをインストールする
group :development, :test do
  gem 'rspec-rails'
end
# bundle install
・gemのインストール後に以下のコマンドを実行する
$ rails g rspec:install
# 以下フォルダ・ファイルが生成される
create  .rspec
create  spec
create  spec/spec_helper.rb
create  spec/rails_helper.rb
→以上でrspecのインストールは完了
・では、まずはarticleモデルのvalidationが動いているかを確認しましょう
class Article < ApplicationRecord
    has_one_attached :eyecatch
    has_rich_text :content

    validates :title, presence: true
    validates :title, length: { minimum: 2, maximum: 10 }
    validates :title, format: { with: /\A(?!\@)/ }

    validates :content, presence: true

    has_many :comments, dependent: :destroy
    belongs_to :user
    has_many :likes, dependent: :destroy
end
・articleモデルに関するテストを実行するファイルを作成する
$ rails g rspec:model article
# rails g rspec:model [model名]

# 以下のファイルが生成されます
create  spec/models/article_spec.rb
→ファイルの中のpendingの行は不必要なので消しましょう
・ではまずは、Articleモデルのデータがしっかり保存できるかを確認しましょう
①確認したいことを決める
require 'rails_helper'

RSpec.describe Article, type: :model do
  it 'タイトルと内容が入力されていれば、記事を保存できる' do
  end
end
# it [確認したいこと] do
# end
②ダミーデータを作成する
→実際に記事を作成して保存する
・記事の作成にはユーザと記事が必要であるため、ユーザと記事のダミーデータが必要である
require 'rails_helper'

RSpec.describe Article, type: :model do
  it 'タイトルと内容が入力されていれば、記事を保存できる' do
    user = User.create!({
      email: 'test@example.com',
      password: 'password'
    })
    article = user.articles.build({
      title: Faker::Lorem.characters(number: 10),
      content: Faker::Lorem.characters(number: 100)
    })

    expect(article).to be_valid
# expect(変数).to be_valid
# 変数が有効であるかを確認したい
  end
end
# userのデータを作成し、articleのデータを作成(build=newのためsaveはされていない)
③ダミーデータで①が動くかを確認する
$bundle exec rspec spec/models/article_spec.rb
# bundle exec rspec [ディレクトリを指定]

.
# 緑の点が出てたらテストが通った証(ここでは赤になっているがiTermでは緑)
# 赤い点が出てたら失敗しているということ

Finished in 0.13453 seconds (files took 11.67 seconds to load)
1 example, 0 failures
# 成功数と失敗数が出てくる
rspecのルールを覚えよう
・前提条件を作る場合contextというものを使う
・contextのなかにbefore doを作ってその中に前提条件を記載する
require 'rails_helper'

RSpec.describe Article, type: :model do
  context 'タイトルと内容が入力されている場合' do
    before do
      user = User.create!({
        email: 'test@example.com',
        password: 'password'
      })
      @article = user.articles.build({
        title: Faker::Lorem.characters(number: 10),
        content: Faker::Lorem.characters(number: 100)
      })
    end
# @articleにすることで他のdo-end間でも使用できるように変更
    it '記事を保存できる' do
      expect(@article).to be_valid
    end
  end
end
・しかし変数を宣言するletを使うともっと違う書き方ができる
require 'rails_helper'

RSpec.describe Article, type: :model do
  context 'タイトルと内容が入力されている場合' do
    let!(:user) do
# let!(:user) doは user= と同じであると考えたらわかりやすい
      User.create!({
        email: 'test@example.com',
        password: 'password'
      })
    end

    let!(:article) do
      user.articles.build({
        title: Faker::Lorem.characters(number: 10),
        content: Faker::Lorem.characters(number: 100)
      })
    end

    it '記事を保存できる' do
      expect(article).to be_valid
# letを使うとインスタンス変数にしなくてもデータを取得できるようになる
    end
  end
end
保存出来ない場合のテスト
require 'rails_helper'

RSpec.describe Article, type: :model do
  let!(:user) do
    User.create!({
      email: 'test@example.com',
      password: 'password'
    })
  end
# いろんなcontextにおいて使用するため上で定義する

  context 'タイトルの文字が1文字の場合' do
    let!(:article) do
      user.articles.create({
# 内容を保存しないとエラーが出ないためcreateしている
        title: Faker::Lorem.characters(number: 1),
        content: Faker::Lorem.characters(number: 100)
      })
    end

    it '記事を保存できない' do
      expect(article.errors.messages[:title][0]).to eq('は2文字以上で入力してください')
# [0]の部分は.firstでも大丈夫
    end
  end
end
factory_bot
・今までは、fakerなどを使ってその都度ダミーデータを作成してきたが正直かなり大変な作業と言える
・factory botとは、ダミーデータを作るためのライブラリ。これを使うと効率よくダミーデータを作成できる。
・まずはfactory botをインストールする
group :development, :test do
  gem 'factory_bot_rails'
end
# $bundle install
・次にメソッドなどが定義されている設定を読み込む必要がある
RSpec.configure do |config|
  config.include FactoryBot::Syntax::Methods
end
・これで設定は完了です
・まずspec配下にfactoriesフォルダを作成します
・今回はユーザに関するダミーデータを作成したいので、factoriesフォルダの配下にusers.rbを作成する
FactoryBot.define do
  factory :user do
# userというfactoryを作成します
    email { Faker::Internet.email }
    password { 'password' }
# userモデルにはemailとpasswordがあるので上記に値を入れます
# 値を入れるときは{}に入れます
  end
end
RSpec.describe Article, type: :model do
  let!(:user) { create(:user) }
end
# これでダミーデータを作成できています
# create(引数)の引数は factory :user doの:userです
# FactoryBotにはcreateメソッドがあり、保存まで行ってくれます
・ダミーデータの内容を一部指定したい場合は第二引数以降に指定してあげる
RSpec.describe Article, type: :model do
  let!(:user) { create(:user, email: 'test@test.com') }
end
・次にarticleに関するダミーデータを作成したいので、factoriesフォルダの配下にarticles.rbを作成する
FactoryBot.define do
  factory :article do
    title { Faker::Lorem.characters(number: 10) }
    content { Faker::Lorem.characters(number: 100) }
  end
end
RSpec.describe Article, type: :model do
  let!(:user) { create(:user) }

  context 'タイトルと内容が入力されている場合' do
    let!(:article) { build(:article, user: user) }
# FactoryBotにはbuildメソッドがあり、データの作成まで行います
# userにはuserが紐づいていることを記述する
    it '記事を保存できる' do
      expect(article).to be_valid
    end
  end
→FactoryBotのcreateはcreate!であり、例外が発生してしまうため、buildを咲いた後にsaveしてあげる必要がある
・最終的にarticleモデルのテストは以下のようになりました
require 'rails_helper'

RSpec.describe Article, type: :model do
  let!(:user) { create(:user) }

  context 'タイトルと内容が入力されている場合' do
    let!(:article) { build(:article, user: user) }

    it '記事を保存できる' do
      expect(article).to be_valid
    end
  end

  context 'タイトルの文字が1文字の場合' do
    let!(:article) { build(:article, title: Faker::Lorem.characters(number: 1), user: user) }

    before do
      article.save
    end

    it '記事を保存できない' do
      expect(article.errors.messages[:title][0]).to eq('は2文字以上で入力してください')
    end
  end
end
request spec を書こう
・続いてcontrollerのテストであるrequest specについて勉強します
・テストの流れの例(request specの場合)
①リクエストを送って200や正しいレスポンスが返ってくるかを確認したい
②リクエストを送る
③200ステータスを確認&レスポンスを確認
request specを書いてみよう
・今回はarticlesコントローラにGETリクエストを送って返ってくるのかを確認したい
・まずはテストを書くファイルを作成する
$ rails g rspec:request article
# 以下のようなファイルが作成される
create  spec/requests/articles_spec.rb
・以上でテストの環境は整いました
request specの基本を学ぼう
RSpec.describe 'Articles', type: :request do
let!(:user) { create(:user) }
# 記事を作るにはuserが必要なので、userのダミーデータを作成する
let!(:articles) { create_list(:article, 3, user: user) }
# 複数のデータを作成する場合はcreate_listを使う第二引数に作成したい数を記述する

  describe 'GET /articles' do
    it '200ステータスが返ってくる' do
      get articles_path
      expect(response).to have_http_status(200)
    end
  end
end
→ターミナルで以下を実行するとテストが通っているかを確認できる
$ bundle exec rspec spec/requests/articles_spec.rb
・次に記事を保存できるのか(POSTリクエスト)について見ていく
RSpec.describe 'Articles', type: :request do
  describe 'POST /articles' do
    context 'ログインしている場合' do
      before do
        sign_in user
      end
# 前提条件としてcerateはログインしていないとできないためログインをする
# Deviseにはsign_inメソッドがあり、sign_inメソッドを使えばログインできる
# しかしテストで使うには設定が必要である(下記参照)
      it '記事が保存される' do
        article_params = attributes_for(:article)
# 保存する場合はparamsが必要なので作成する
# attributes_forはfactoryのメソッドで:articleのfactoryからtitleとcontentのattributeを取ってきてくれる
        post articles_path(article: article_params)
# ここでキー(:article)とattribute(titleとcontent)を渡してあげる
# strongparameterに引っかからないように
        expect(response).to have_http_status(302)
# リダイレクトする場合は302が返ってくるため302を指定
        expect(Article.last.title).to eq(article_params[:title])
# 実際に記事が保存されていることを確認するためには最後の記事が今回の記事の内容と一致していればOK
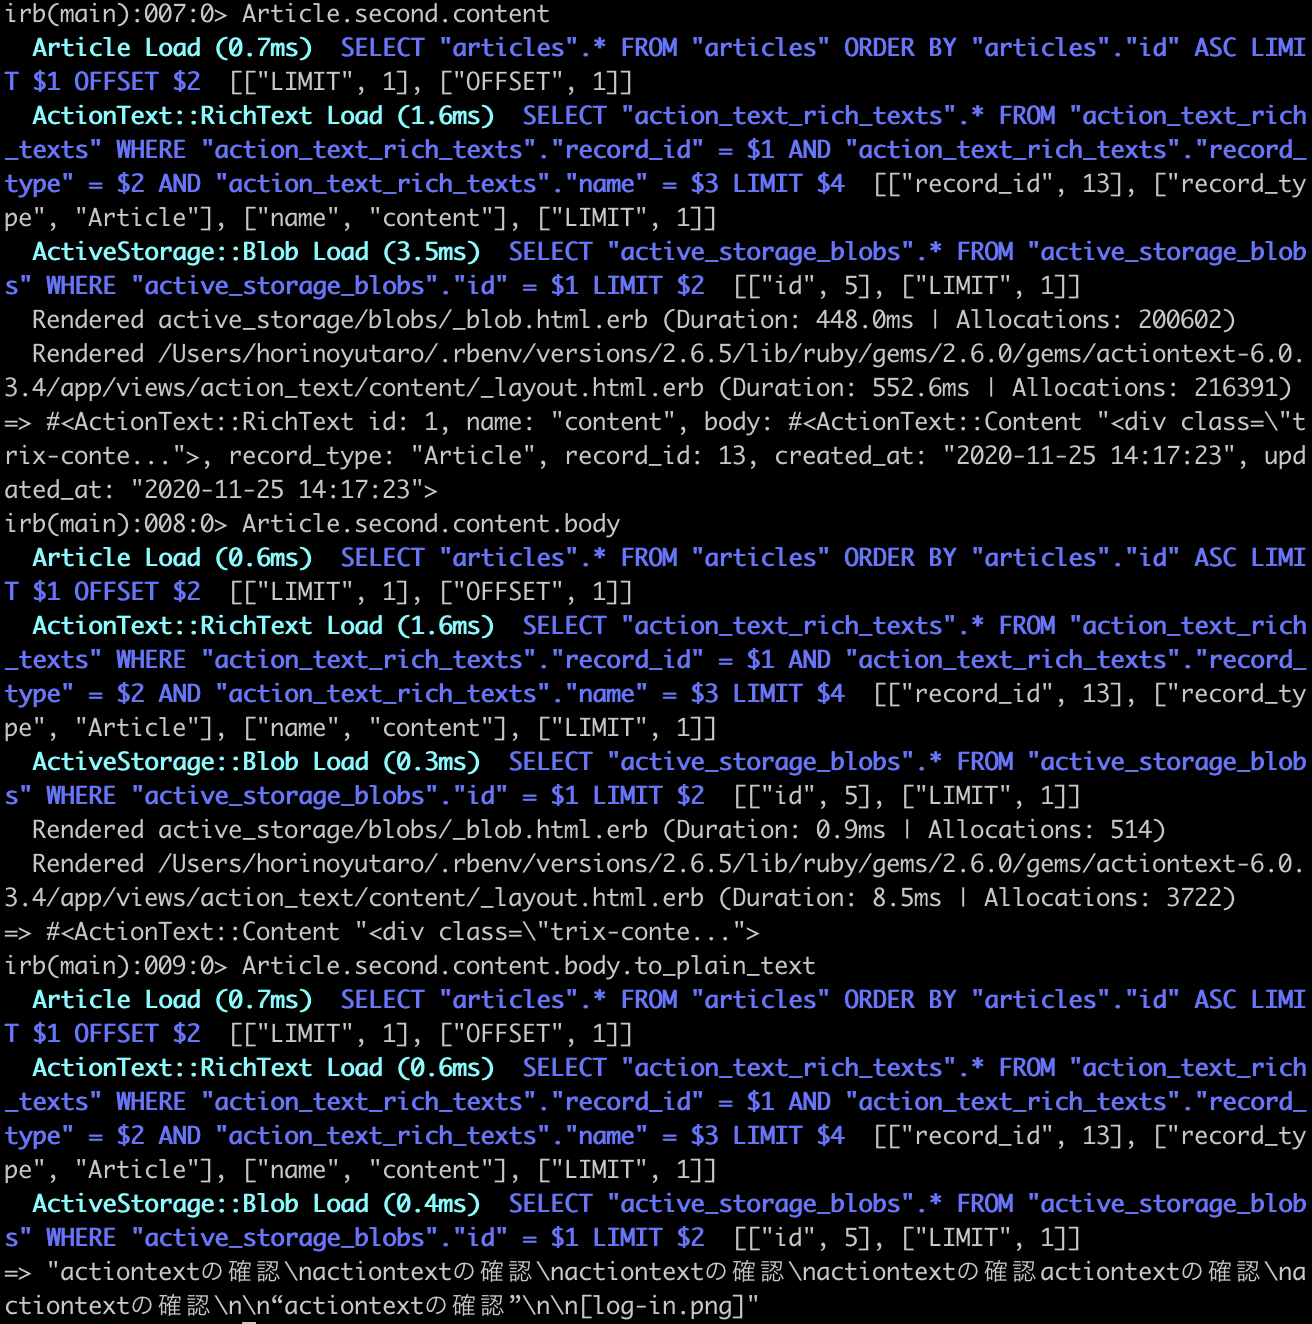
        expect(Article.last.content.body.to_plain_text).to eq(article_params[:content])
# contentの内容をとるためにはcontent.body.to_plain_textとする必要がある
# ->actiontextを使っているためこうなってしまっている
      end
    end
  end
end

→このようにArticle.last.contentとしてもインスタンスが返って来てしまう
・テスト環境でdeviseのsign_inメソッドなどを使用したい
RSpec.configure do |config|
  config.include Devise::Test::IntegrationHelpers, type: :request
# type: :requestでリクエストスペックでdeviseのメソッドを実行しますと宣言
end
・最後にログインしていない場合のテストを実行する
RSpec.describe 'Articles', type: :request do
  describe 'POST /articles' do
    context 'ログインしていない場合' do
      it 'ログイン画面に遷移する' do
        article_params = attributes_for(:article)
        post articles_path(article: article_params)
        expect(response).to redirect_to(new_user_session_path)
# redirect_toでリダイレクト先のパスを指定できる
# 今回はsign_inページに飛ぶはずなので上記のパスになる
      end
    end
  end
end
APIのテストを書こう
・次にAPIのテストを書いていきます
・まずはテストを記述するファイルを作成します
$ rails g rspec:request api/comment
・作成ができたら、コメントのダミーデータを作成します
・spec/factories配下にcomments.rbファイルを作成します
FactoryBot.define do
  factory :comment do
    content { Faker::Lorem.characters(number: 100) }
  end
end
・ダミーデータを作成してリクエストを送ったら200ステータスが返ってくるかを検証する
require 'rails_helper'

RSpec.describe 'Api::Comments', type: :request do
  let!(:user) { create(:user) }
  let!(:article) { create(:article, user: user) }
  let!(:comments) { create_list(:comment, 3, article: article) }

  describe 'GET /api/comments' do
    it '200ステータスが返ってくる' do
      get api_comments_path(article_id: article.id)
      expect(response).to have_http_status(200)
    end
  end
end
$ bundle exec rspec spec/requests/api/comments_spec.rb
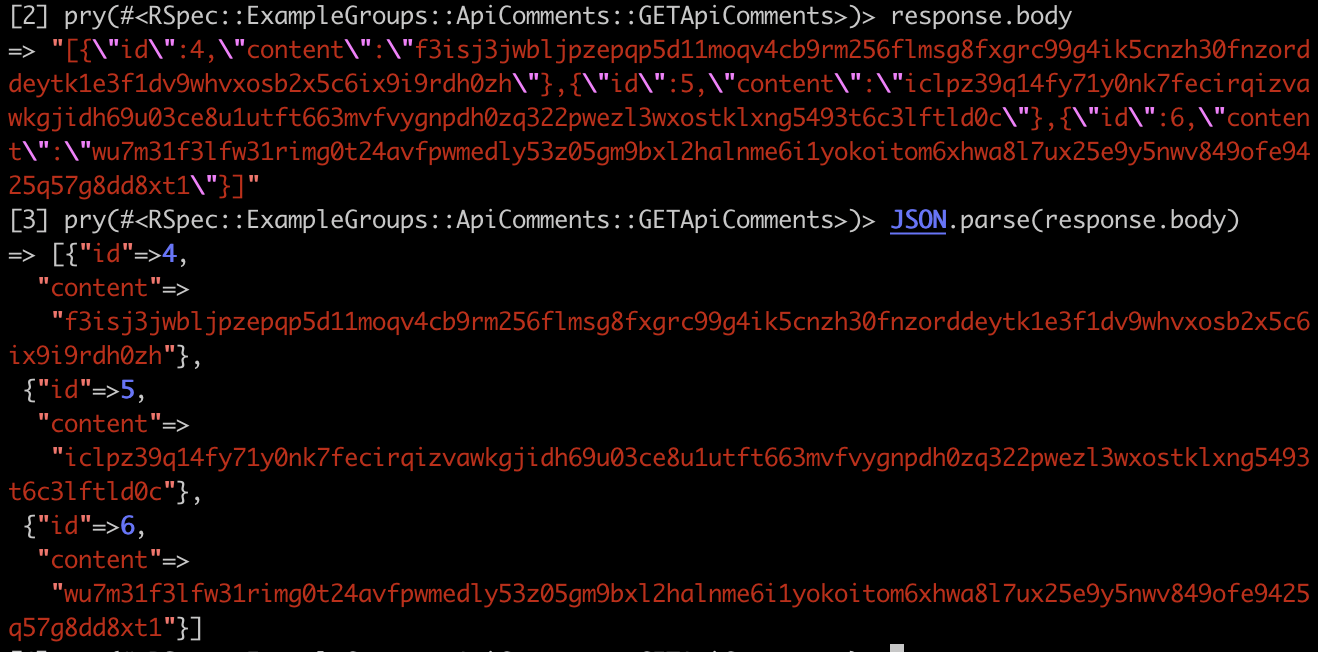
・次に、commentのAPIのレスポンスの内容(json)をチェックしたい
・この内容が:commentsの内容と一致していればレスポンスの内容は正しいと言える
require 'rails_helper'

RSpec.describe 'Api::Comments', type: :request do
  let!(:user) { create(:user) }
  let!(:article) { create(:article, user: user) }
  let!(:comments) { create_list(:comment, 3, article: article) }

  describe 'GET /api/comments' do
    it '200ステータスが返ってくる' do
      get api_comments_path(article_id: article.id)
      expect(response).to have_http_status(200)

      body = JSON.parse(response.body)
      expect(body.length).to eq 3
      expect(body[0]['content']).to eq comments.first.content
      expect(body[1]['content']).to eq comments.second.content
      expect(body[2]['content']).to eq comments.third.content
    end
  end
end
・APIのテストはこのようにレスポンスの内容もテストすることが多い
system spec を書こう
・テストの流れの例(system specの場合)
①画面が正しく表示されているのかを確認したい
②画面の表示に必要なデータを作成する
③プログラムによってブラウザを操作して想定どおりに表示されているかを確認する
簡単な system spec を書いてみよう
・システムスペックはブラウザを操作して、プログラムを実行する
→Chromeソフトウェアが必要になってくる
$ brew cask install chromedriver
🍺  chromedriver was successfully installed!
・これでインストールは完了です
・Genfile内の'capybara'のおかげでRubyでブラウザを操作できるメソッドを実行できるようになっている
・では実際に操作していきます
・まずspecフォルダ配下にsystemというフォルダを作ります
・今回は記事の一覧がちゃんと表示されているのかを確認したいため、systemフォルダ配下に、article_spec.rbというファイルを作成します
・コントローラのテストでは200ステータスが返ってくるか否かを確認しているだけであり、今回はちゃんと表示されているかを確認したい
require 'rails_helper'

RSpec.describe 'Article', type: :system do
# Articleに関するテストを行います
# typeはsystemかmodelかrequestを指定する
# ->rails_helperにタイプごとに違う設定が書いてある
  it '記事一覧が表示される' do
    visit root_path
# root_pathのページを開きますというvisitメソッド(capybara)
  end
end
・これでテストを実行すると一瞬だけchromeが表示されて消える。これで成功
$ bundle exec rspec spec/system/article_spec.rb
・次にダミーデータを作って、記事のデータがちゃんと表示されているのかを確認する
・まずユーザを作って、そのユーザに記事をたくさん作成させるというダミーデータを作成する
require 'rails_helper'

RSpec.describe 'Article', type: :system do
  let!(:user) { create(:user) }
  let!(:articles) { create_list(:article, 3, user: user) }

  it '記事一覧が表示される' do
    visit root_path

    expect(page).to have_content(articles.first.title)
# そのpageにarticles.firstのtitleという文字が存在しているか否かを
# 確認できる(have_contentメソッド/capybara)
  end
end
・今回は3つの記事に対して全て確認を行いたいためeachメソッドを使用する
articles.each do |article|
  expect(page).to have_content(article.title)
end
・これで記事のタイトルが表示されているのかの確認テストは完了です
Capybaraを使いこなそう
・より正確にテストを実行するためにはどうしたらいいか
→capybaraではhave_cssメソッドがあって、そのcssが存在しているか、及びそのcssに対応するクラスがあるか、及びそのクラスが適用されているタグのテキストがarticleのtitleかをテストできる(正確性がupする)
.card_content
  .card_title
    = article.title
require 'rails_helper'

RSpec.describe 'Article', type: :system do
  let!(:user) { create(:user) }
  let!(:articles) { create_list(:article, 3, user: user) }

  it '記事一覧が表示される' do
    visit root_path

    articles.each do |article|
      expect(page).to have_css('.card_title', text: article.title)
# card_titleというクラスに対して、article.titleというテキストを持っているものがあるか否かを判定できる
    end
  end
end
・次に記事の詳細を表示できることを検証していく
→一覧表示画面の記事をクリックしたら、その記事の詳細が表示されるかを確認する
・articlesのshowにどのようなクラスがついているのかを確認する
  %h1.article_title= @article.title

  .article_content
    = @article.content
・確認したクラスをもとに記事一覧ページのaタグをクリックしたら詳細ページに遷移し、遷移した詳細ページのタイトルと内容がしっかり表示されているか否かを確認する
  it '記事の詳細を表示できる' do
    visit root_path
    article = articles.first
# 記事のタイトルをクリックしたら詳細表示できる
# click_onメソッドはaタグをクリックしてくれる
    click_on article.title
    expect(page).to have_css('.article_title', text: article.title)
    expect(page).to have_css('.article_content', text: article.content.to_plain_text)
  end
factory_bot の trait を使おう
・今回はプロフィールのテストをしていきます
・まずspec/system配下にprofile_spec.rbを作成します
・まずプロフィールを作成するためにはログインする必要があるのでrails_helper.rbにログインメソッドを使用できるように設定を記述します
RSpec.configure do |config|
  config.include Devise::Test::IntegrationHelpers, type: :request
  config.include Devise::Test::IntegrationHelpers, type: :system
end
・今回はプロフィールに関するダミーデータを作成したいので、spec/factories配下にprofiles.rbファイルを作成します
FactoryBot.define do
  factory :profile do
    nickname { Faker::Name.name }
    introduction { Faker::Lorem.characters(number: 100) }
    gender { Profile.genders.keys.sample }
# sampleは配列の中から適当に一つの値を取り出すメソッド
    birthday { Faker::Date.birthday(min_age: 18, max_age: 65) }
  end
end
・ユーザのダミーデータが作成されたときに勝手にそのユーザのプロフィールも作成されるようにしたい
→イメージとしてはlet!(:user) { create(:user, :with_profile) }とすればprofileも勝手に作成されるようにしたい
→そんなときに使えるのがtraitです
・traitにwith_profileなどを指定すれば、その指定した内容を同時に実行してくれるようになる
FactoryBot.define do
  factory :user do
    email { Faker::Internet.email }
    password { 'password' }
  end

  trait :with_profile do
    after :build do |user|
# 以下はuserのインスタンスが作成された後の処理です
      build(:profile, user: user)
    end
  end
end
・上記の内容をもとにテスト内容を記述していく
require 'rails_helper'

RSpec.describe 'Profile', type: :system do
  let!(:user) { create(:user, :with_profile) }

  context 'ログインしている場合' do
    before do
      sign_in user
    end

    it '自分のプロフィールを作成できる' do
      visit profile_path
      expect(page).to have_css('.profilePage_user_displayName', text: user.profile.nickname)
    end
  end
end
