はじめに
Reduxのチュートリアル用のプレゼンテーションをほぼそのまま乗っけます。間違っているところとかあるかもですのでご承知ください。
1.Reduxの基本
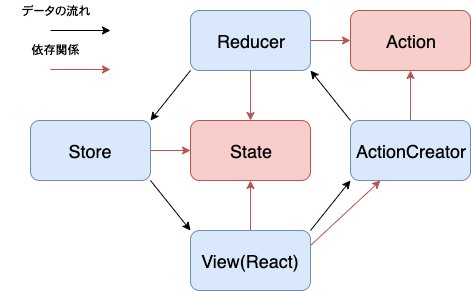
Reduxの基本構造
- 単方向データフロー
- 純粋な関数の多用
Action
Actionは起こったイベントを表す
interface PayloadAction<P, T extends string, M, E> {
  type: T;
  payload: P;
  meta: M;
  error: E;
}
-
action.type- Actionを識別する文字列- アクションの名前はシステムが行うことではなく実際に起こったことを書く
- 例) (x)
'CREATE_COMMENT'(o)'POST_COMMENT'
-
action.payload- Actionに必要なデータ -
action.meta-action.payloadに含まれない副次的なデータ -
action.error-trueである時エラーであり、action.payloadがエラーオブジェクトである
例
{
  type: 'ADD_TODO',
  payload: {
    id: 1,
    text: '〇〇を実装する'
  }
}
{
  type: 'TOGGLE_TODO',
  payload: 1
}
ActionCreator
Actionを生成する関数
let nextTodoId = 0;
export function addTodo(text: string)
    :PayloadAction<{ id: number, text: string}, typeof ADD_TODO> {
  return {
    type: ADD_TODO,
    payload: { id: nextTodoId++, text }
  };
}
export function toggleTodo(id: number)
    :PayloadAction<number, typeof TOGGLE_TODO> {
  return {
    type: TOGGLE_TODO,
    payload: id
  };
}
redux-toolkit: createAction
actionCreatorをいちいち定義するのは面倒なので、@redux/toolkitのcreateActionを利用する。(createActionは実質的にはcreateActionCreatorなので注意)
let nextTodoId = 0;
export const addTodo = createAction(
  'ADD_TODO_WITH_ID',
  (text: string, id: number) => ({payload: { nextTodoId++, text }})
);
export const toggleTodo = createAction(
  'TOGGLE_TODO',
  (id: number) => ({payload: id})
);
State
StateはJSON serializableなインターフェース(クラスや関数がない、オブジェクトや配列はOK)で、プログラムの状態を表す。
interface Todo {
  id: number,
  text: string,
  completed: boolean
}
interface State {
  todos: Todo[]
  visibilityFilter: 'SHOW_ALL' | 'SHOW_COMPLETED' | 'SHOW_ACTIVE' ,
}
Reducer
Actionと前のstateから次のstateを生成する。
function reducer(state=initialState, action: PayloadAction<any>) {
  switch(action.type) {
    case ADD_TODO:
      const newTodo = {...action.payload, completed: false} as Todo;
      return {
        ...state, todos: [...state.todos, newTodo]
      };
    case TOGGLE_TODO:
      return {
        ...state,
        todos: state.todos.map(todo =>
          todo.id === action.payload ?
          {...todo, completed: !todo.completed} :
          todo
        )
      };
    default:
      return state;
  }
}
- ここでは、元のstateを直接変更していないことに注意(純粋な関数であるため)
redux-toolkit: createReducer
redux-toolkitのcreateReducerを使って簡単に書くことができる。
const reducer = createReducer(initialState, builder =>
  builder
    .addCase(addTodoWithID, (state, action) => {
      state.todos.push({...action.payload, completed: false});
      return state;
    })
    .addCase(toggleTodo, (state, action) => {
      let todo = state.todos.find(todo => todo.id === action.payload);
      if(todo) {
        todo.completed = !todo.completed;
      }
      return state;
    })
);
)
addCaseの関数の中身が純粋な関数じゃなくなったが、Immerを利用しているのでreducer全体をみると純粋な関数を保っている。
Store
- 現在の状態を管理する
- 現在の状態を
getState()で提供する - Actionを受け取って状態を変化させる
dispatch(action)を提供する
const store = createStore(reducer);

store.getState() //現在の状態
store.dispatch(addTodo(1, '〇〇を実装する'));
store.getState() //変更後の状態
redux-toolkitのconfigureStoreはデバッグ用のミドルウェアなど便利機能を追加してくれます。
const store = configureStore({
  reducer
});
View(react-redux)
AppをProviderに繋ぐと、状態にアクセスするhookuseSelectorとdispatchにアクセスするuseDispatchにアクセスすることができる。
ReactDOM.render(
  <Provider store={store}>
    <App />
  </Provider>,
  element
)

const App = () => {
  const todos = useSelector(state => state.todos);
  const dispatch = useDispatch();
  const handleClick = () => dispatch(addTodo(1, '〇〇を実装する'));
  return (
    <>
      {todos.map(todo => <TodoComponent todo={todo} />)}
      <button onClick={handleClick}>Add Todo</button>
    </>
  );
}
bindActionCreators
actionが増えてくると、いちいちdispatch(action)を定義するのが面倒なのでreduxのbindActionCreatorsを利用する。
const actions = [addTodo, toggleTodo];

const App = () => {
  const todos = useSelector(state => tate.todos);
  const dispatch = useDispatch();
  const boundActionCreators = bindActionCreators(actions, dispatch);
  const handleClick = () => boundActionCreators.addTodo(1, '〇〇を実装する');
  return (
    <>
      {todos.map(todo => <TodoComponent todo={todo} />)}
      <button onClick={handleClick}>Add Todo</button>
    </>
  );
}
2. 非同期処理
redux-thunk
- reducerもactionCreatorも純粋な関数なので、非同期処理(通信や遅延のあるaction)が定義できない
- redux-thunkによって実現する
function addTodoFromAPI(id: number) {
  return async (dispatch) => {
    const {id, text} = await fetchTodo(id);
    dispatch(addTodo(id, text));
  }
}

store.dispatch(addTodoFromAPI(id)) // 非同期actionが実行される
他にもいろいろできる
- 複数actionを同期的にdispatch(できるだけ避ける)
function addTodoTwice(id1, id2, text) {
  return (dispatch) => {
    dispatch(addTodo(id1, text));
    dispatch(addTodo(id2, text));
  };
}
- 複数actionを非同期的にdispatch
function addTodoFromAPI(id: number) {
  return async (dispatch) => {
    dispatch(setLoading());
    const {id, text} = await fetchTodo(id);
    dispatch(addTodo(id, text));
  }
}
- actionの引数にstateを入れる
function addTodoFromAPI(): ThunkAction<void, RootState, undefined, any> {
  return async (dispatch, getState) => {
    const id = getState().inputID;
    const {id, text} = await fetchTodo(id);
    dispatch(addTodo(id, text));
  }
}
3.さらなる分割
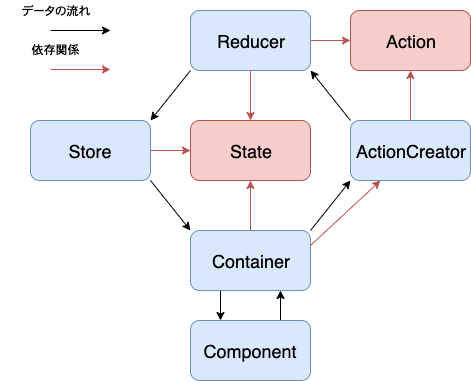
Presentational Component/ Container Component
- Presentational Component(component)
- 見た目だけを扱うコンポーネント
- propsから受け取ったデータを表示する
- stateには触れない、dispatchにも触れない
- Reduxへの依存からの脱却
- Container Component(container)
- componentに状態とactionを与える
- useSelector, useDispatch, bindActionCreatorsなどを呼び出す
- 見た目(DOM)には触れない
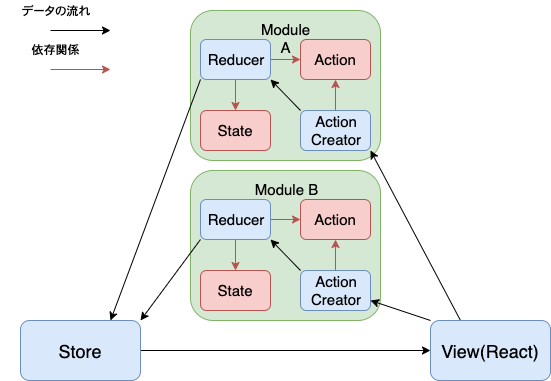
Ducksパターン
- このままでは、reducerが肥大化していく
- Reducerを分割する方法
- ついでに、reducerに関連するaction creatorも分割する
modules/Todos.ts:
export const actions = { addTodo, toggleTodo };
export const todosReducer = createReducer([], builder =>
  builder
    .addCase(addTodo, (state, action) => {
      state.push({...action.payload, completed: false});
      return state;
    })
);
export type TodosState = ReturnType<typeof todoReducer>;
// type TodosState = Todo[]
modules/Visibility.ts:
const setVisibilityFilter = createAction(
  'SET_VISIBILITY_FILTER',
  (filter: VisibilityFilters) => ({payload: filter})
);
export const actions = { setVisibilityFilter };

export const reducer = createReducer(VisibilityFilters.SHOW_ALL, builder =>
  builder
    .addCase(setVisibilityFilter, (state, action) => {
      return action.payload;
    })
);
modules/index.ts
export const rootReducer = combineReducer({
  todos: todoReducer,
  visibilityFilter: visibilityReducer
});

export type State = ReturnType<typeof rootReducer>;
/*
type State = {
  todos: TodosState,
  visibilityFilter: VisibilityState
}
*/
redux-toolkit: createSlice
シンプルなDucksモジュールはredux-toolkitのcreateSliceを使うと良い
export const { actions, reducer } = createSlice({
  name: 'visibilityFilter',
  initialState: 'SHOW_ALL',
  reducers: {
    setVisibilityFilter: (state, action) => action.payload
  }
})
Re-ducksパターン
- Ducksパターンで、moduleが大きくなって来た時に使える
- 必要だと感じた時のみ
modules/Todos/
├── index.ts
├── actions.ts
├── reducers.ts
├── ...
- Action/Stateが大きいので、さらなる分割を行うこともできる
- operations - 通常のaction(actionCreator)と、thunk actionを分離する
- selectors - Containerの
useSelectorで頻出するような関数をまとめる(参考: Reselect)


