はじめに
仕事で Google Cloud や Terraform を使う機会があるのですが、日本語のドキュメントがあまりなく理解に苦しんでいるため備忘も兼ねてまとめました。
本記事では Teraform で Google Cloud のリソースを作成するのに必要な最小限の内容について触れています。
Terraform でよく使用するコマンドやパラメータ等については別の記事でまとめようと思います。
本記事を見れば、とりあえず Terraform で Google Cloud 基盤を構築できるようになる、とだけ理解していただければと思います。
Terraform とは
Terraform は Hashicorp 社が提供している Infrastructure as Code (以下、IaC) ツールです。IaC はインフラの状態をコードで管理する手法であり、これを活用することで容易に基盤を複製できたり、基盤構築を自動化できるのでヒューマンエラーを削減できたりします。
Terraform はオープンソースであり、Google Cloud だけでなく、他にも AWS (Amazon Web Service)、Azure など他のクラウドプロバイダや他の SaaS 製品も使用できます。
各クラウドベンダーにも IaC ツールがありますが (Google Cloud だと Deployment Manger)、Terraform を使うとマルチクラウド構成も一つのファイルで管理できます。
Terraform の仕組み
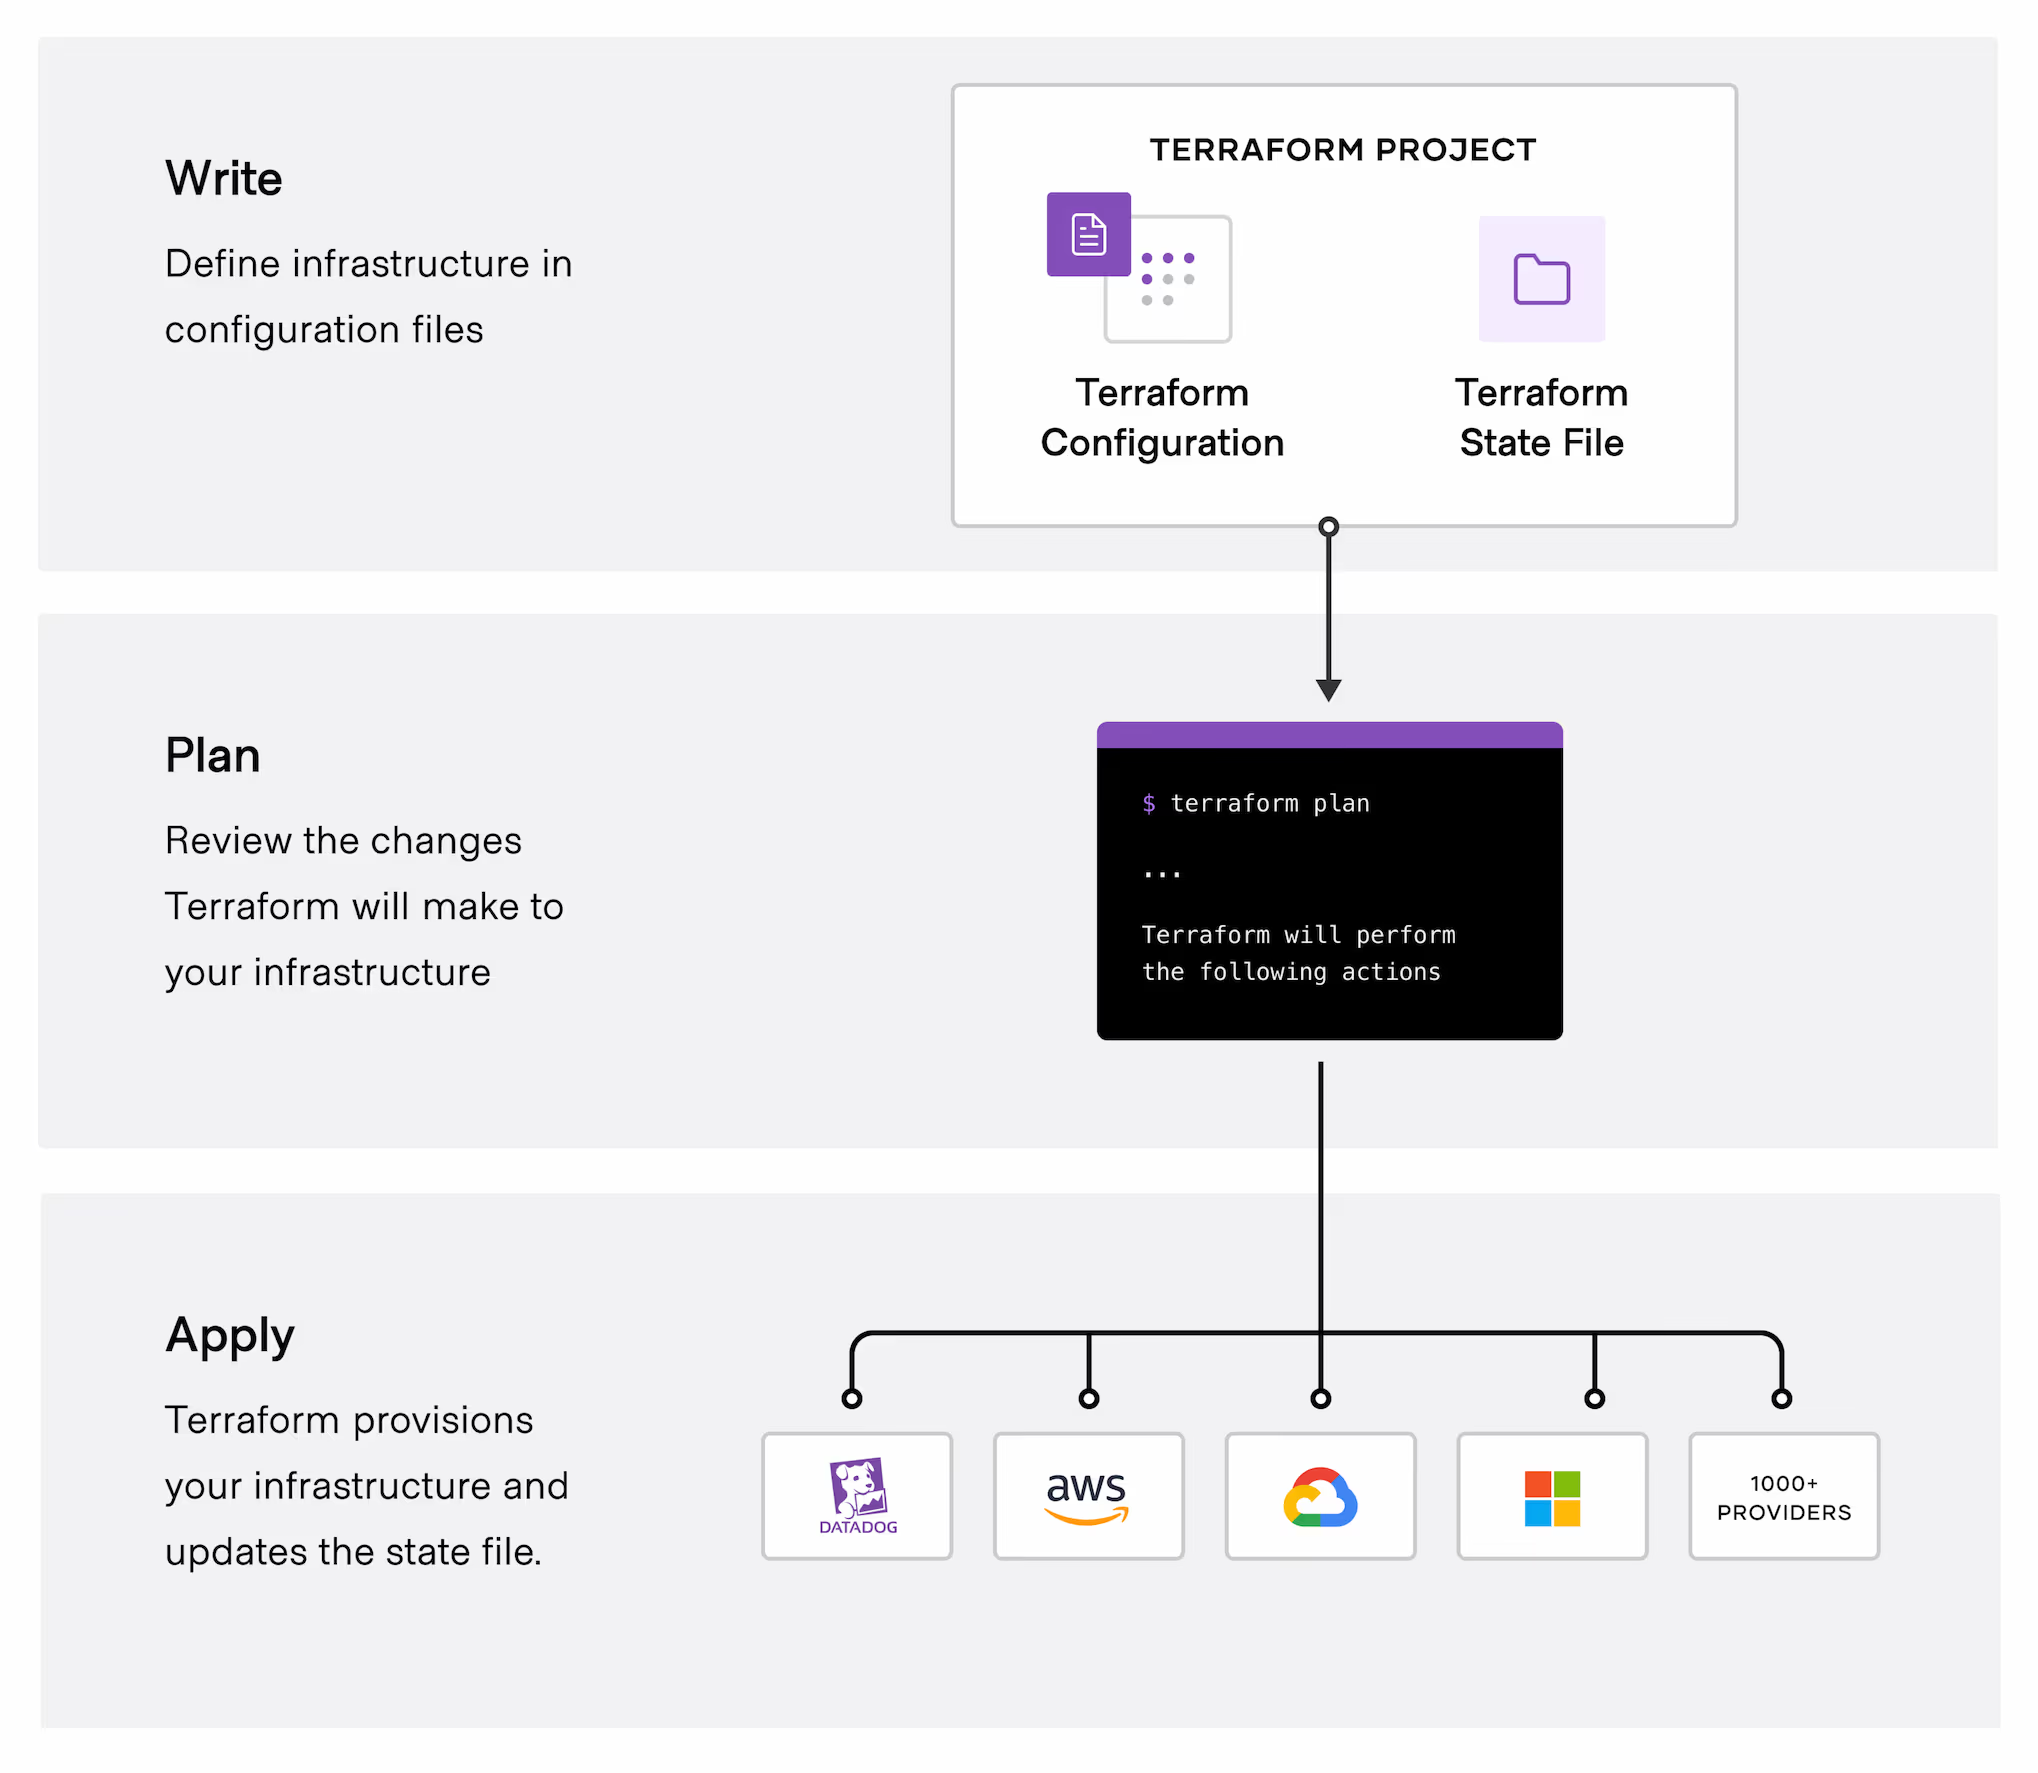
Terraform によりリソースが構築される概要図は下図のとおりです。

※画像引用元:https://developer.hashicorp.com/terraform/intro
Terraform による構成定義ファイルは HCL (Hashicorp Configration Language) で記述し、ファイル名は*.tfとなります (つまり、拡張子はtf)。
HCL で記述された tf ファイルに対して、まず terraform init を実行して認証情報を保存したり、リソース作成に必要な Providers ツールをローカルにダウンロードしたりします (詳細な内容は別記事でまとめる予定です)。
次に、terraform plan を実行することで、tf ファイルで定義したリソースによって実際にインフラストラクチャにどのように影響を及ぼすかについて差分を出力します (差分がなければ No changes)。
その差分に対して、terraform apply を実行することで tf ファイルの内容を開発者に代わって Terraform がプロバイダへ API リクエストを送ることでリソースが作成・修正・削除されます。
Terrafom による開発者目線での流れは下図の通りです。

※画像引用元:https://developer.hashicorp.com/terraform/intro
Terraform 実行環境の準備
Terraform の実行ファイルは下記サイトから自分の開発環境に適したものをダウンロードしてローカルで実行しましょう。
本記事では Terraform で Google Cloud のリソースを作成するため、Google Cloud 認証に必要な gcloud CLI もインストールします。
ちなみに、Google Cloud コンソール上の Cloud Shell を使用すれば、Terraform がデフォルトでインストール済みのため、この手順を省略することができます。
本記事ではこの Cloud Shell を使ってリソースを作ります。
Terraform 実行に必要なファイルの定義
本章では Terraform を実行する前によく定義される二つの設定について説明します。
provider.tf
このファイルでは Terraform が使用するプロバイダの種類やバージョンを定義します。
# Google Cloud のプロバイダを指定
provider "google" {
  project = "sample-project"
  region  = "asia-northeast1"
}

# ここでプロバイダに必要なバージョンを指定 (指定しない場合は latest バージョンをダウンロード)
terraform {
  required_providers {
    mycloud = {
      source  = "registry.terraform.io/providers/hashicorp/google/"
      version = "~> 1.0"
    }
  }
}
参考:
backend.tf
Terraform で管理しているリソースは terraform.tfstate (以下 tfstate) ファイルで管理されます。このファイルはデフォルトでローカルに作成・管理されます。しかし、ローカルで管理すると複数人でインフラ構築をしているときに、それぞれが同一の tfstate ファイルを読み込めないため、余分にリソースを作成してしまったり、それぞれの環境で Terraform を実行したときにエラーが発生します。
そのため、tfstate ファイルは Google Cloud だと Google Cloud Storage (以下、GCS) で管理することが多いです。(AWS だと S3、Azure だと Blob Storage)
tfstate ファイルを保存する場所は terraform init 実行する前に存在しなくてはいけません。そのため、tfstate ファイルを保存する GCS バケットも Terraform で管理したい場合は、
- バックエンドを指定せずに GCS バケットを作成 (ローカルに
tfstateファイルが作成) -
tfstateファイルをローカルから GCS バケットに移動
と少し手間がかかります。
本記事では上述した手順で Terraform の実行環境を準備しますが、もしtfstateファイルを管理する GCS バケットは自分で用意するわって人は本記事の手順を踏まずに下記のbackend.tfをそのまま定義して利用してください。
terraform {
  backend "gcs" {
    bucket  = "tf-state-bucket" # GCS の命名規約からここはグローバルで一意
    prefix  = "terraform/state"
  }
}
上記のように backend.tf を定義すると tfstate ファイルは「tf-state-bucket」という GCS バケットの「terraform/state」配下に作成されます。
以下の Google Cloud 公式ドキュメントに記載されていますが、GCS バケットはグローバルで一意な命名規約となっているため、プロジェクトの指定は不要です。
(ここで指定した GCS バケットを世界中のどこかから探す感じだと思いますが、基本的には自分にそれらの GCS バケットに対する権限がないためはじかれます)
参考:
Terraform でリソースを作ってみる
本章から実際に Terraform を使って、Google Cloud プロジェクトにリソースを作成していきます。
tfstate を保存する GCS バケットの作成
前述したとおり、tfstate ファイルを格納する GCS バケットから Terraform で作成してみます。
必要な tf ファイルは以下の通りです。
※ provider.tf を定義していないですが、定義しない場合はデフォルトの値 (Cloud Shell を使用している場合、project は Terraform コマンドを実行している project、または gcloud config set project <project の値> で設定した project) となります
resource "google_storage_bucket" "default" {
  name     = "terraform-tfstate-bucket" # ここは任意の値に変更してください
  location = "ASIA-NORTHEAST1"

  force_destroy               = false
  public_access_prevention    = "enforced"
}
実行結果は以下の通りです。
※Cloud Shell で実行する場合は gcloud auth application-default login が不要です。
terraform init
user@cloudshell:~ (sample-project)$ terraform init

Initializing the backend...

Initializing provider plugins...
- Finding latest version of hashicorp/google...
- Installing hashicorp/google v6.12.0...
- Installed hashicorp/google v6.12.0 (signed by HashiCorp)

Terraform has created a lock file .terraform.lock.hcl to record the provider
selections it made above. Include this file in your version control repository
so that Terraform can guarantee to make the same selections by default when
you run "terraform init" in the future.

Terraform has been successfully initialized!

You may now begin working with Terraform. Try running "terraform plan" to see
any changes that are required for your infrastructure. All Terraform commands
should now work.

If you ever set or change modules or backend configuration for Terraform,
rerun this command to reinitialize your working directory. If you forget, other
commands will detect it and remind you to do so if necessary.
terraform plan
user@cloudshell:~ (sample-project)$ terraform plan

Terraform used the selected providers to generate the following execution plan. Resource actions are indicated with the following symbols:
  + create

Terraform will perform the following actions:

  # google_storage_bucket.default will be created
  + resource "google_storage_bucket" "default" {
      + effective_labels            = {
          + "goog-terraform-provisioned" = "true"
        }
      + force_destroy               = false
      + id                          = (known after apply)
      + location                    = "ASIA-NORTHEAST1"
      + name                        = "terraform-tfstate-bucket"
      + project                     = (known after apply)
      + project_number              = (known after apply)
      + public_access_prevention    = "enforced"
      + rpo                         = (known after apply)
      + self_link                   = (known after apply)
      + storage_class               = "STANDARD"
      + terraform_labels            = {
          + "goog-terraform-provisioned" = "true"
        }
      + uniform_bucket_level_access = (known after apply)
      + url                         = (known after apply)
    }

Plan: 1 to add, 0 to change, 0 to destroy.

─────────────────────────────────────────────────────────────────────────────────────────────────────────────────────────────────────────────────────────────

Note: You didn't use the -out option to save this plan, so Terraform can't guarantee to take exactly these actions if you run "terraform apply" now.
terraform apply
user@cloudshell:~ (sample-project)$ terraform apply

Terraform used the selected providers to generate the following execution plan. Resource actions are indicated with the following symbols:
  + create

Terraform will perform the following actions:

  # google_storage_bucket.default will be created
  + resource "google_storage_bucket" "default" {
      + effective_labels            = {
          + "goog-terraform-provisioned" = "true"
        }
      + force_destroy               = false
      + id                          = (known after apply)
      + location                    = "ASIA-NORTHEAST1"
      + name                        = "terraform-tfstate-bucket"
      + project                     = (known after apply)
      + project_number              = (known after apply)
      + public_access_prevention    = "enforced"
      + rpo                         = (known after apply)
      + self_link                   = (known after apply)
      + storage_class               = "STANDARD"
      + terraform_labels            = {
          + "goog-terraform-provisioned" = "true"
        }
      + uniform_bucket_level_access = (known after apply)
      + url                         = (known after apply)
    }

Plan: 1 to add, 0 to change, 0 to destroy.

Do you want to perform these actions?
  Terraform will perform the actions described above.
  Only 'yes' will be accepted to approve.

  Enter a value: yes

google_storage_bucket.default: Creating...
google_storage_bucket.default: Creation complete after 2s [id=xxxxxxxxxxxxxxxxxxxxxxxxxxxxxxxxxxx]

Apply complete! Resources: 1 added, 0 changed, 0 destroyed.
user@cloudshell:~ (sample-project)$
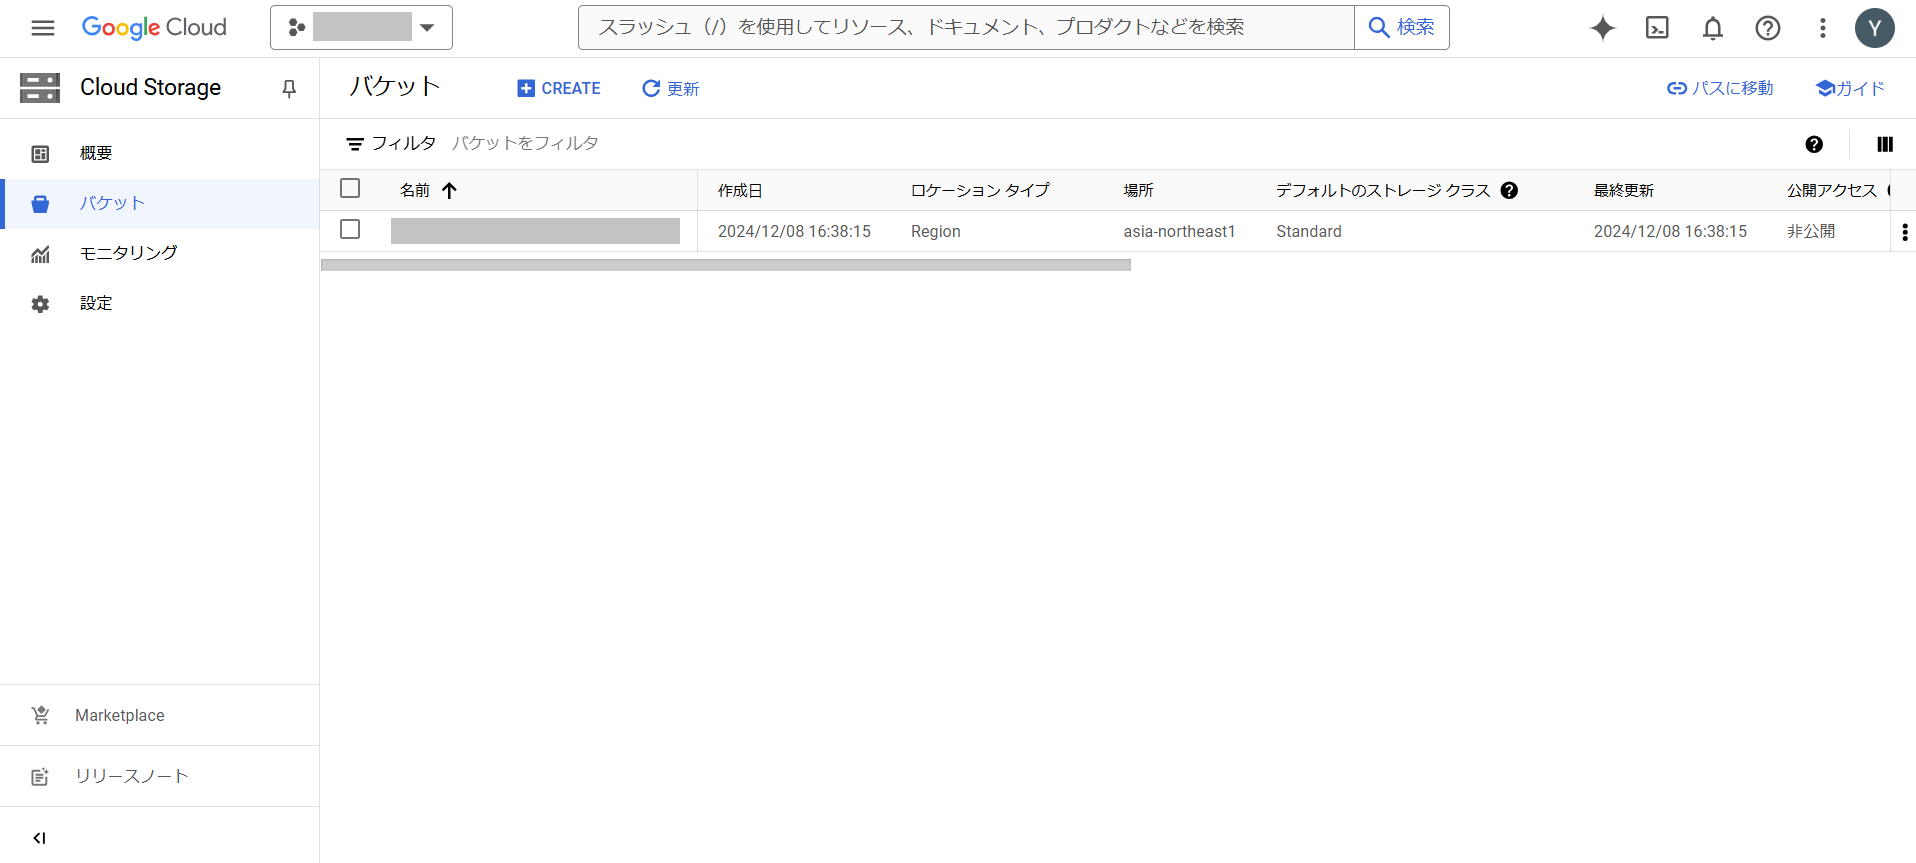
コンソール上で確認してみると、ちゃんと main.tf で定義した GCS バケットの存在を確認できます。
また、Terraform コマンドを実行したディレクトリ (私の場合は Cloud Shell) には terraform.tfstateがあることが確認できます。
terrafom.tfstate の中身
ここでローカルにある terraform.tfstate には何が記述されているのか簡単に解説します。
{
  "version": 4,
  "terraform_version": "1.5.7",
  "serial": 1,
  "lineage": "560e84ba-4853-5535-4f38-84908b448c98",
  "outputs": {},
  "resources": [
    {
      "mode": "managed",
      "type": "google_storage_bucket",
      "name": "default",
      "provider": "provider[\"registry.terraform.io/hashicorp/google\"]",
      "instances": [
        {
          "schema_version": 3,
          "attributes": {
            "autoclass": [],
            "cors": [],
            "custom_placement_config": [],
            "default_event_based_hold": false,
            "effective_labels": {
              "goog-terraform-provisioned": "true"
            },
            "enable_object_retention": false,
            "encryption": [],
            "force_destroy": false,
            "hierarchical_namespace": [
              {
                "enabled": false
              }
            ],
            "id": "xxxxxxxxxxxxxxxxxxxxxxxxxxxxxxxxxxx",
            "labels": null,
            "lifecycle_rule": [],
            "location": "ASIA-NORTHEAST1",
            "logging": [],
            "name": "xxxxxxxxxxxxxxxxxxxxxxxxxxxxxxxxxxx",
            "project": "sample-project",
            "project_number": 000000000000,
            "public_access_prevention": "enforced",
            "requester_pays": false,
            "retention_policy": [],
            "rpo": null,
            "self_link": "https://www.googleapis.com/storage/v1/b/xxxxxxxxxxxxxxxxxxxxxxxxxxxxxxxxxxx",
            "soft_delete_policy": [
              {
                "effective_time": "2024-12-08T07:38:15.013Z",
                "retention_duration_seconds": 604800
              }
            ],
            "storage_class": "STANDARD",
            "terraform_labels": {
              "goog-terraform-provisioned": "true"
            },
            "timeouts": null,
            "uniform_bucket_level_access": false,
            "url": "gs://xxxxxxxxxxxxxxxxxxxxxxxxxxxxxxxxxxx",
            "versioning": [],
            "website": []
          },
          "sensitive_attributes": [],
          "private": "xxxxxxxxxxxxxxxxxxxxxxxxxxxxxxxxxxx"
        }
      ]
    }
  ],
  "check_results": null
}
以下 4 つのパラメータは Terraform が状態を管理するために使われるためのものです。
- version
- terraform_version
- serial
- lineage
version と terraform_version は分かりやすいですが、serial と lineage については下記記事を参照してください。
先ほど main.tf で定義した GCS バケットの情報は resource で囲まれたカッコ内に記載されています。
tf ファイル内で定義していないパラメータについてはデフォルトの値が自動で入力されています (実際のインフラストラクチャもその値で構築されています) 。z
GCS バケットに tfstate を移動
前項で作成した GCS バケットに tfstate ファイルを移動します。
まずは、下記のように backend.tf を定義します。
terraform {
  backend "gcs" {
    bucket  = "terraform-tfstate-bucket" # 前項で作成した GCS バケット名にする
    prefix  = "terraform/state"
  }
}
そして、tfsate ファイルを移動させるコマンドを実行して、tfstate ファイルを移動させます。
※バックエンドをコピーして良いですか?と聞かれるので、問題なければ "yes" と入力しましょう
user@cloudshell:~ (sample-project)$ terraform init -migrate-state

Initializing the backend...
Do you want to copy existing state to the new backend?
  Pre-existing state was found while migrating the previous "local" backend to the
  newly configured "gcs" backend. No existing state was found in the newly
  configured "gcs" backend. Do you want to copy this state to the new "gcs"
  backend? Enter "yes" to copy and "no" to start with an empty state.

  Enter a value: yes


Successfully configured the backend "gcs"! Terraform will automatically
use this backend unless the backend configuration changes.

Initializing provider plugins...
- Reusing previous version of hashicorp/google from the dependency lock file
- Using previously-installed hashicorp/google v6.12.0

Terraform has been successfully initialized!

You may now begin working with Terraform. Try running "terraform plan" to see
any changes that are required for your infrastructure. All Terraform commands
should now work.

If you ever set or change modules or backend configuration for Terraform,
rerun this command to reinitialize your working directory. If you forget, other
commands will detect it and remind you to do so if necessary.
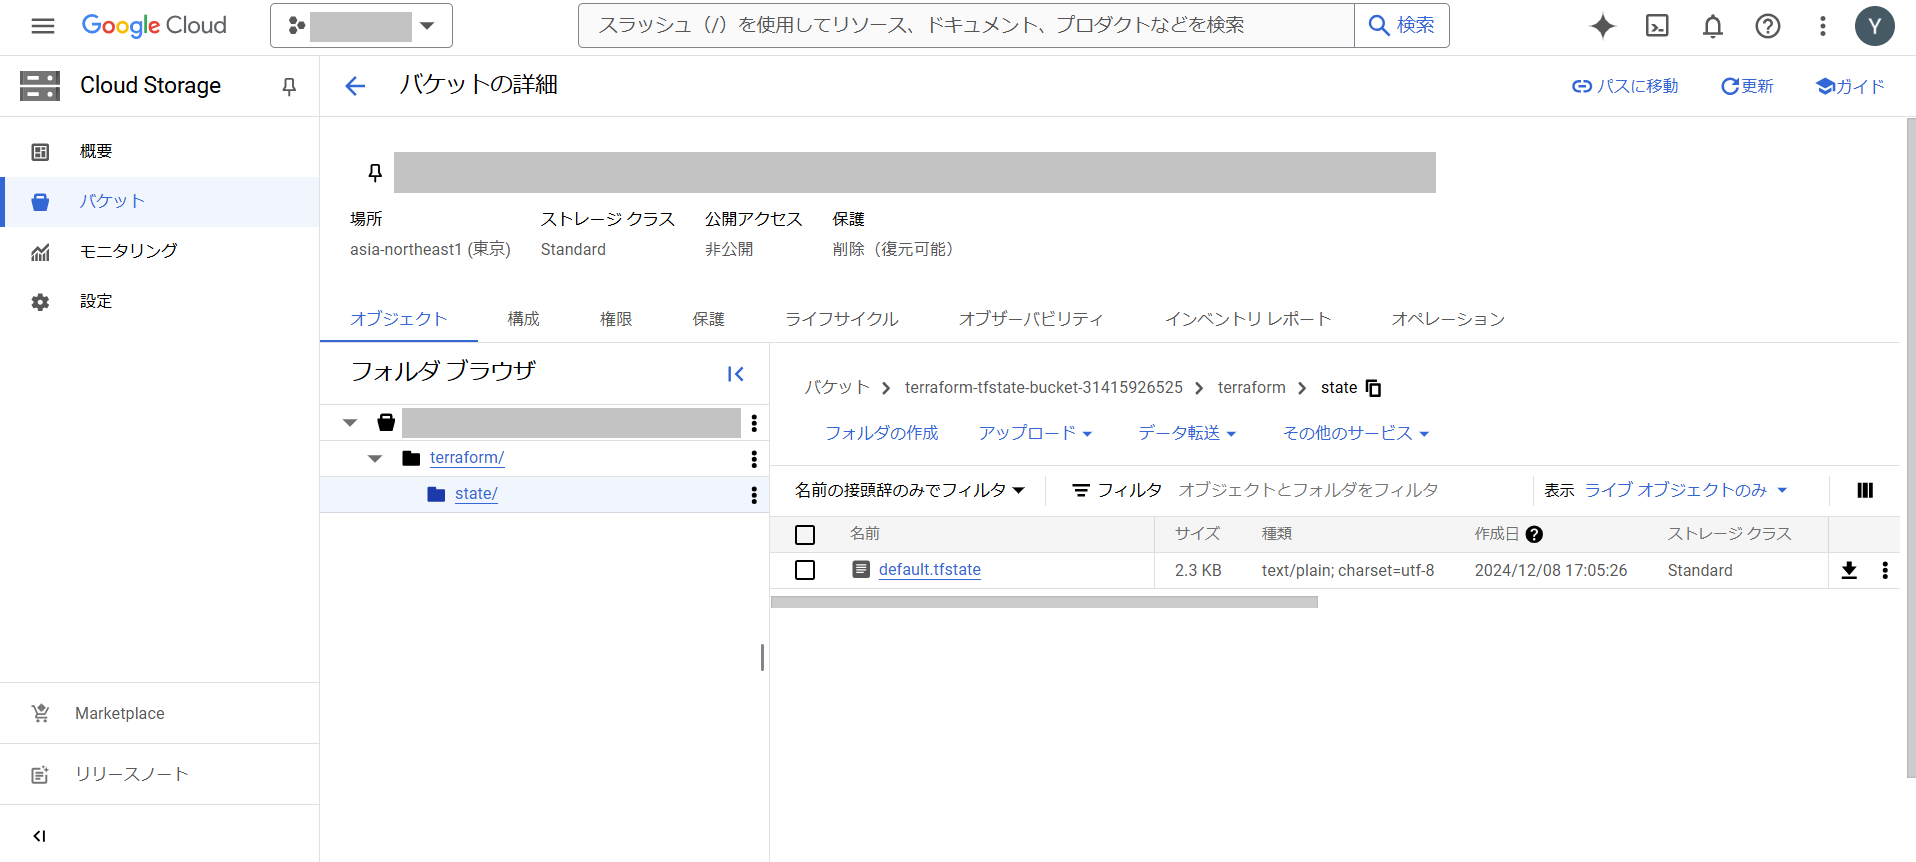
Successfully configured the backend "gcs"! と出力されている通り、これで tfstate ファイルが先ほど作成した GCS バケットに移動しました。
実際にその GCS バケットを見てみると、下図のような tfstate ファイルがあります。
以上で、tfstate ファイルを準備する作業は終わりました。
次項からは実際に Terraform を使ってリソースを作成してみます (もう GCS バケットは作成しましたが...) 。
ちなみに、tfstate 用の GCS バケットは Terraform で作成せずとも、コンソール上でちゃっと作ってから Terraform に Import する方法もあります (別の記事でまとめる予定です) 。
Terraform でリソースを作成する
本記事では Service Account のリソースを作成してみます。
Terraform でリソースを作成する場合は、下記の HashiCorp 公式サイト、もしくは Google Cloud 公式サイトの Terraform リソースサンプルをご活用ください。
tf ファイルの作成
Service Account を作成するため、以下を main.tf に追記します。
# デフォルトは IAM API が無効化されているので、それを有効化する必要があります
resource "google_project_service" "iam_api" {
  service = "iam.googleapis.com"
}

resource "google_service_account" "service_account" {
  account_id   = "test-service-account"
  display_name = "Test Service Account"
}
そして、terraform plan、terraform apply と順に実行して適用していきます。
※「Cloud Resource Manager API (cloudresourcemanager.googleapis.com) を有効化してください」というエラーが出た場合は、google_project_service で Terraform リソースとし定義、もしくはコンソール上で有効化してください。
terraform plan
user@cloudshell:~ (sample-project)$ terraform plan
google_storage_bucket.default: Refreshing state... [id=xxxxxxxxxxxxxxxxxxxxxxxxxxxxxxxxxxx]

Terraform used the selected providers to generate the following execution plan. Resource actions are indicated with the following symbols:
  + create

Terraform will perform the following actions:

  # google_project_service.iam_api will be created
  + resource "google_project_service" "iam_api" {
      + disable_on_destroy = true
      + id                 = (known after apply)
      + project            = "sample-project"
      + service            = "iam.googleapis.com"
    }

  # google_service_account.service_account will be created
  + resource "google_service_account" "service_account" {
      + account_id   = "test-service-account"
      + disabled     = false
      + display_name = "Test Service Account"
      + email        = (known after apply)
      + id           = (known after apply)
      + member       = (known after apply)
      + name         = (known after apply)
      + project      = "sample-project"
      + unique_id    = (known after apply)
    }

Plan: 2 to add, 0 to change, 0 to destroy.

─────────────────────────────────────────────────────────────────────────────────────────────────────────────────────────────────────────────────────────────

Note: You didn't use the -out option to save this plan, so Terraform can't guarantee to take exactly these actions if you run "terraform apply" now.
user@cloudshell:~ (sample-project)$
terraform apply
user@cloudshell:~ (sample-project)$ terraform apply
google_storage_bucket.default: Refreshing state... [id=xxxxxxxxxxxxxxxxxxxxxxxxxxxxxxxxxxx]

Terraform used the selected providers to generate the following execution plan. Resource actions are indicated with the following symbols:
  + create

Terraform will perform the following actions:

  # google_project_service.iam_api will be created
  + resource "google_project_service" "iam_api" {
      + disable_on_destroy = true
      + id                 = (known after apply)
      + project            = "sample-project"
      + service            = "iam.googleapis.com"
    }

  # google_service_account.service_account will be created
  + resource "google_service_account" "service_account" {
      + account_id   = "test-service-account"
      + disabled     = false
      + display_name = "Test Service Account"
      + email        = (known after apply)
      + id           = (known after apply)
      + member       = (known after apply)
      + name         = (known after apply)
      + project      = "sample-project"
      + unique_id    = (known after apply)
    }

Plan: 2 to add, 0 to change, 0 to destroy.

Do you want to perform these actions?
  Terraform will perform the actions described above.
  Only 'yes' will be accepted to approve.

  Enter a value: yes

google_project_service.iam_api: Creating...
google_project_service.iam_api: Still creating... [10s elapsed]
google_project_service.iam_api: Still creating... [20s elapsed]
google_project_service.iam_api: Creation complete after 24s [id=sample-project/iam.googleapis.com]
google_service_account.service_account: Creating...
google_service_account.service_account: Still creating... [10s elapsed]
google_service_account.service_account: Creation complete after 13s [id=projects/sample-project/serviceAccounts/test-service-account@sample-project.iam.gserviceaccount.com]

Apply complete! Resources: 2 added, 0 changed, 0 destroyed.
基本的には上から順に実行されますが、IAM API が有効化される前に Service Account を作成しようとしてエラーとなる場合があります。
その場合は、Service Account を作成する tf ファイルを以下のように IAM API を有効化した後、 Service Account が作成されるよう修正します。
resource "google_service_account" "service_account" {
  account_id   = "test-service-account"
  display_name = "Test Service Account"
+ depends_on   = [google_project_service.iam_api]
}
おわりに
今回は Google Cloud における Terraform の簡単な使い方についてまとめました。
今後、この Terraform を活用した CI/CD や、Terraform でよく使うコマンドの詳細についての記事も書いていきたいと思います。

