初めに
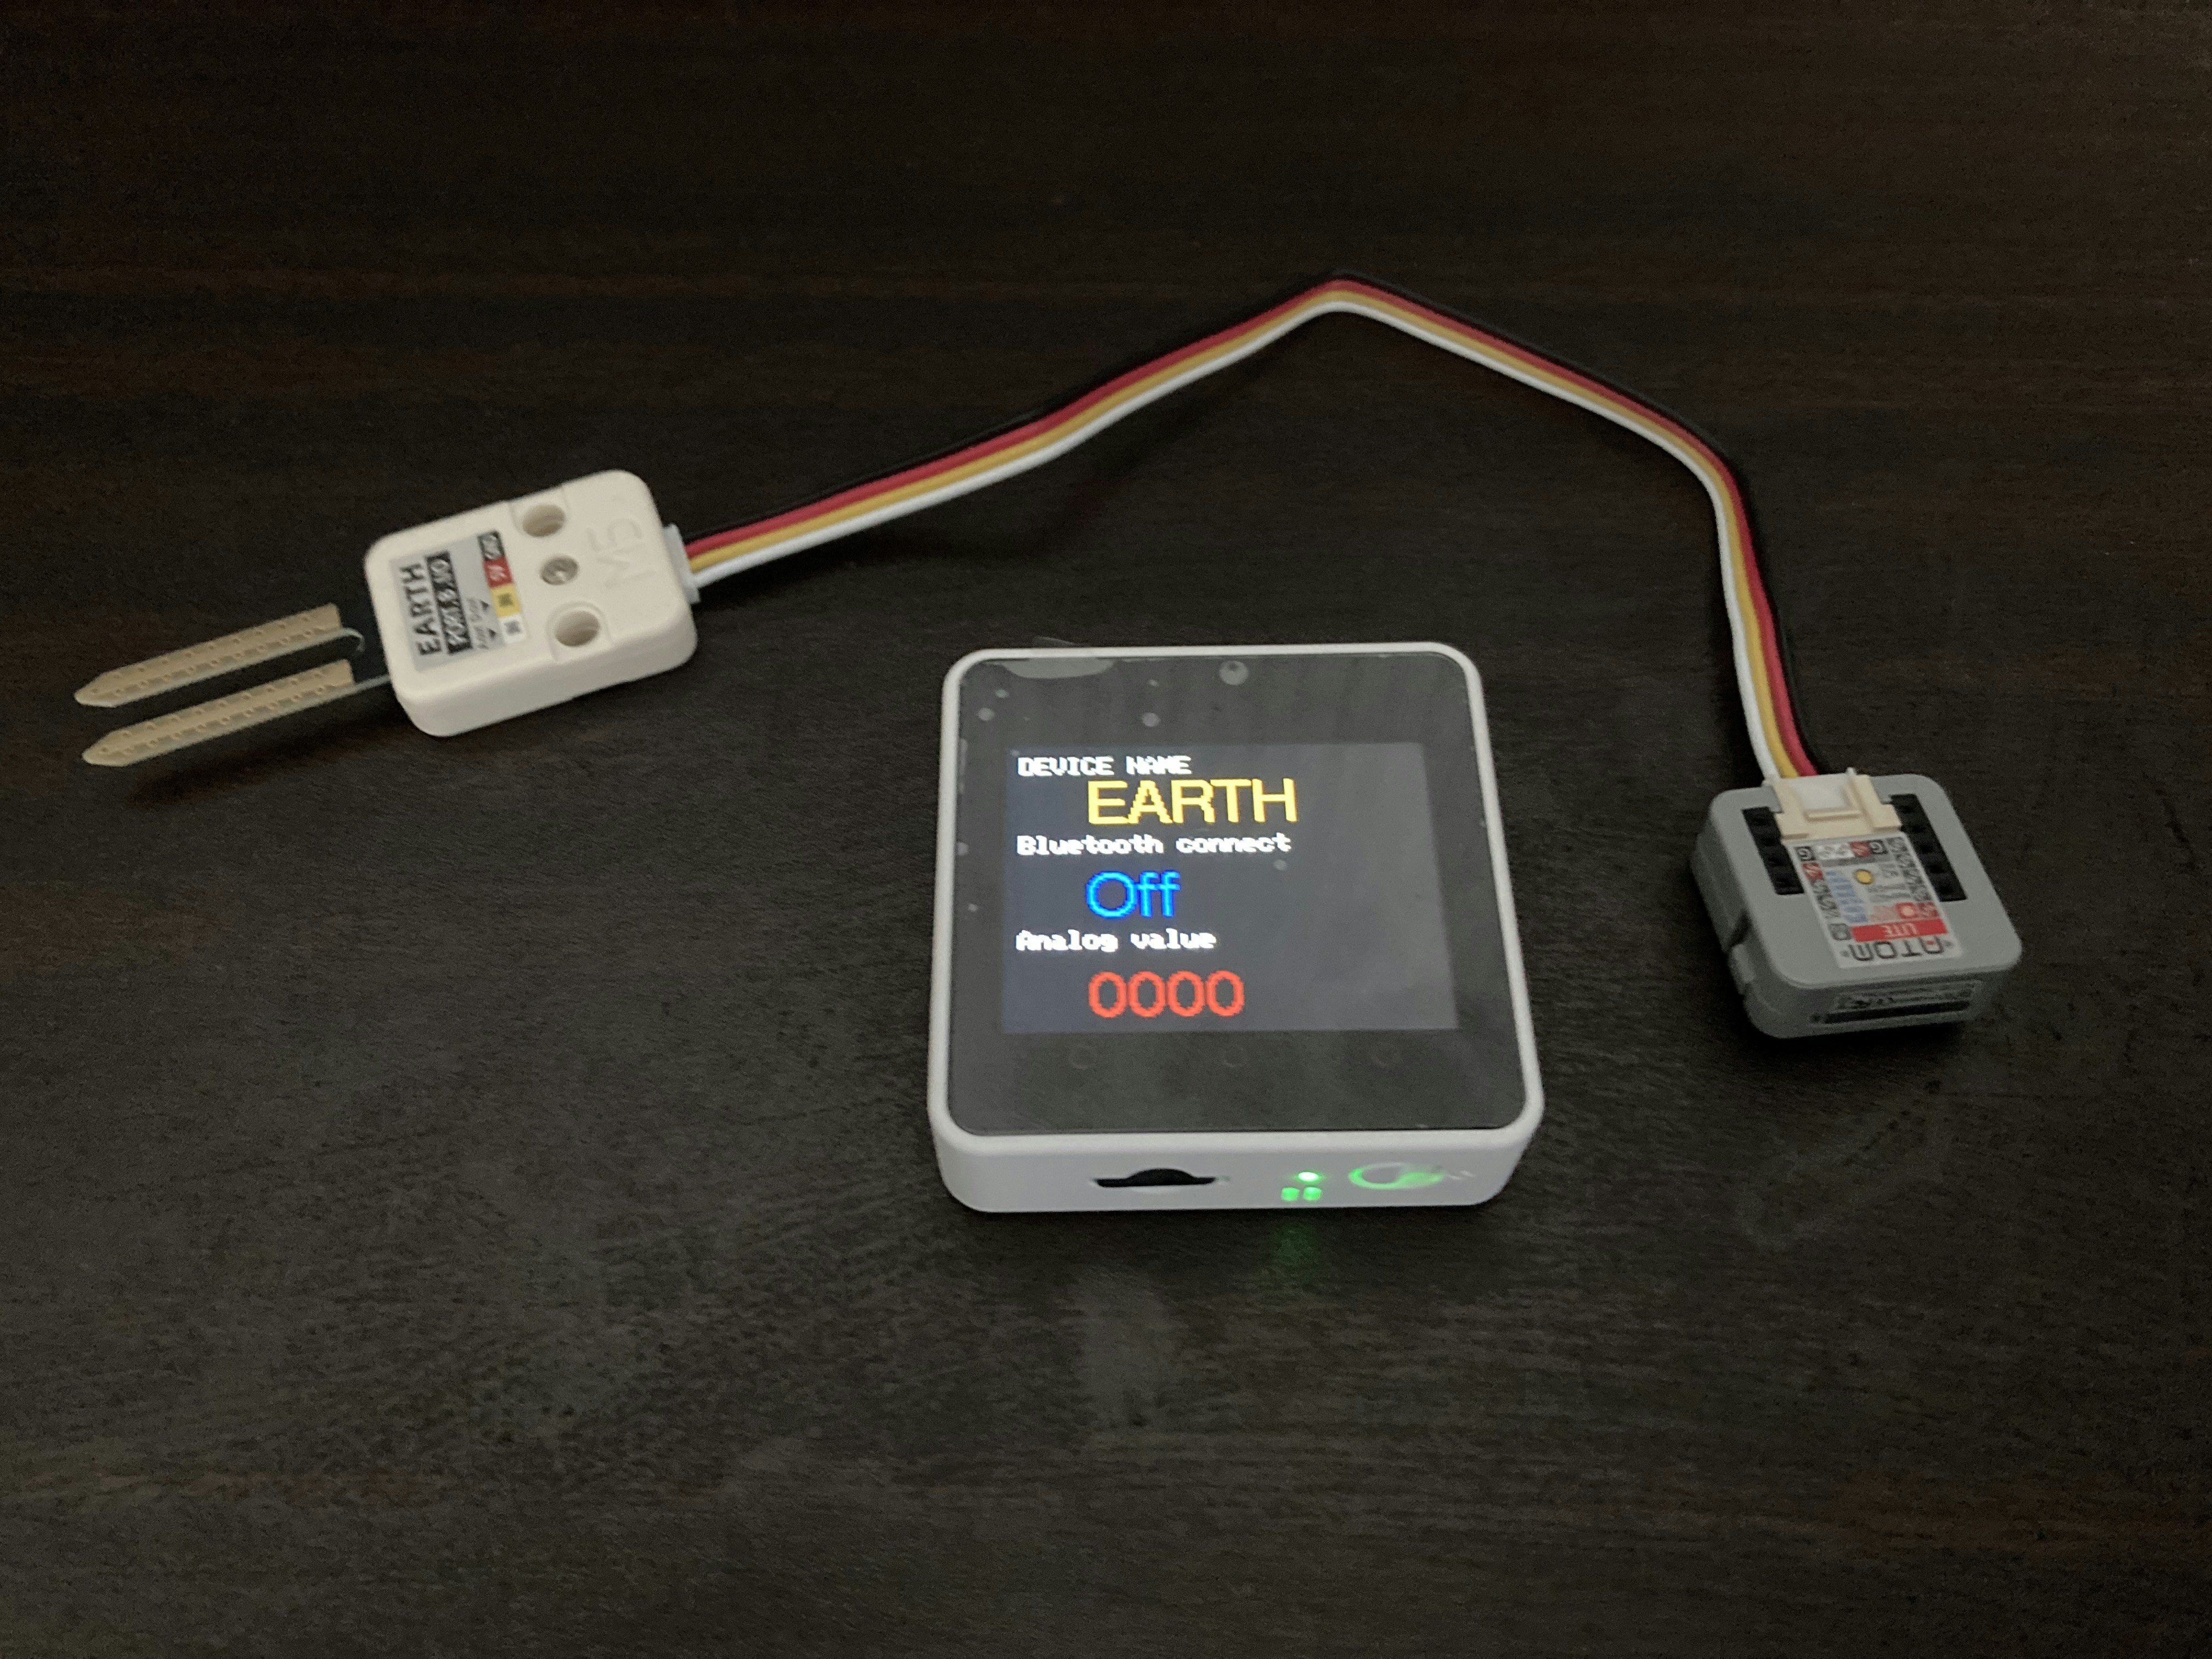
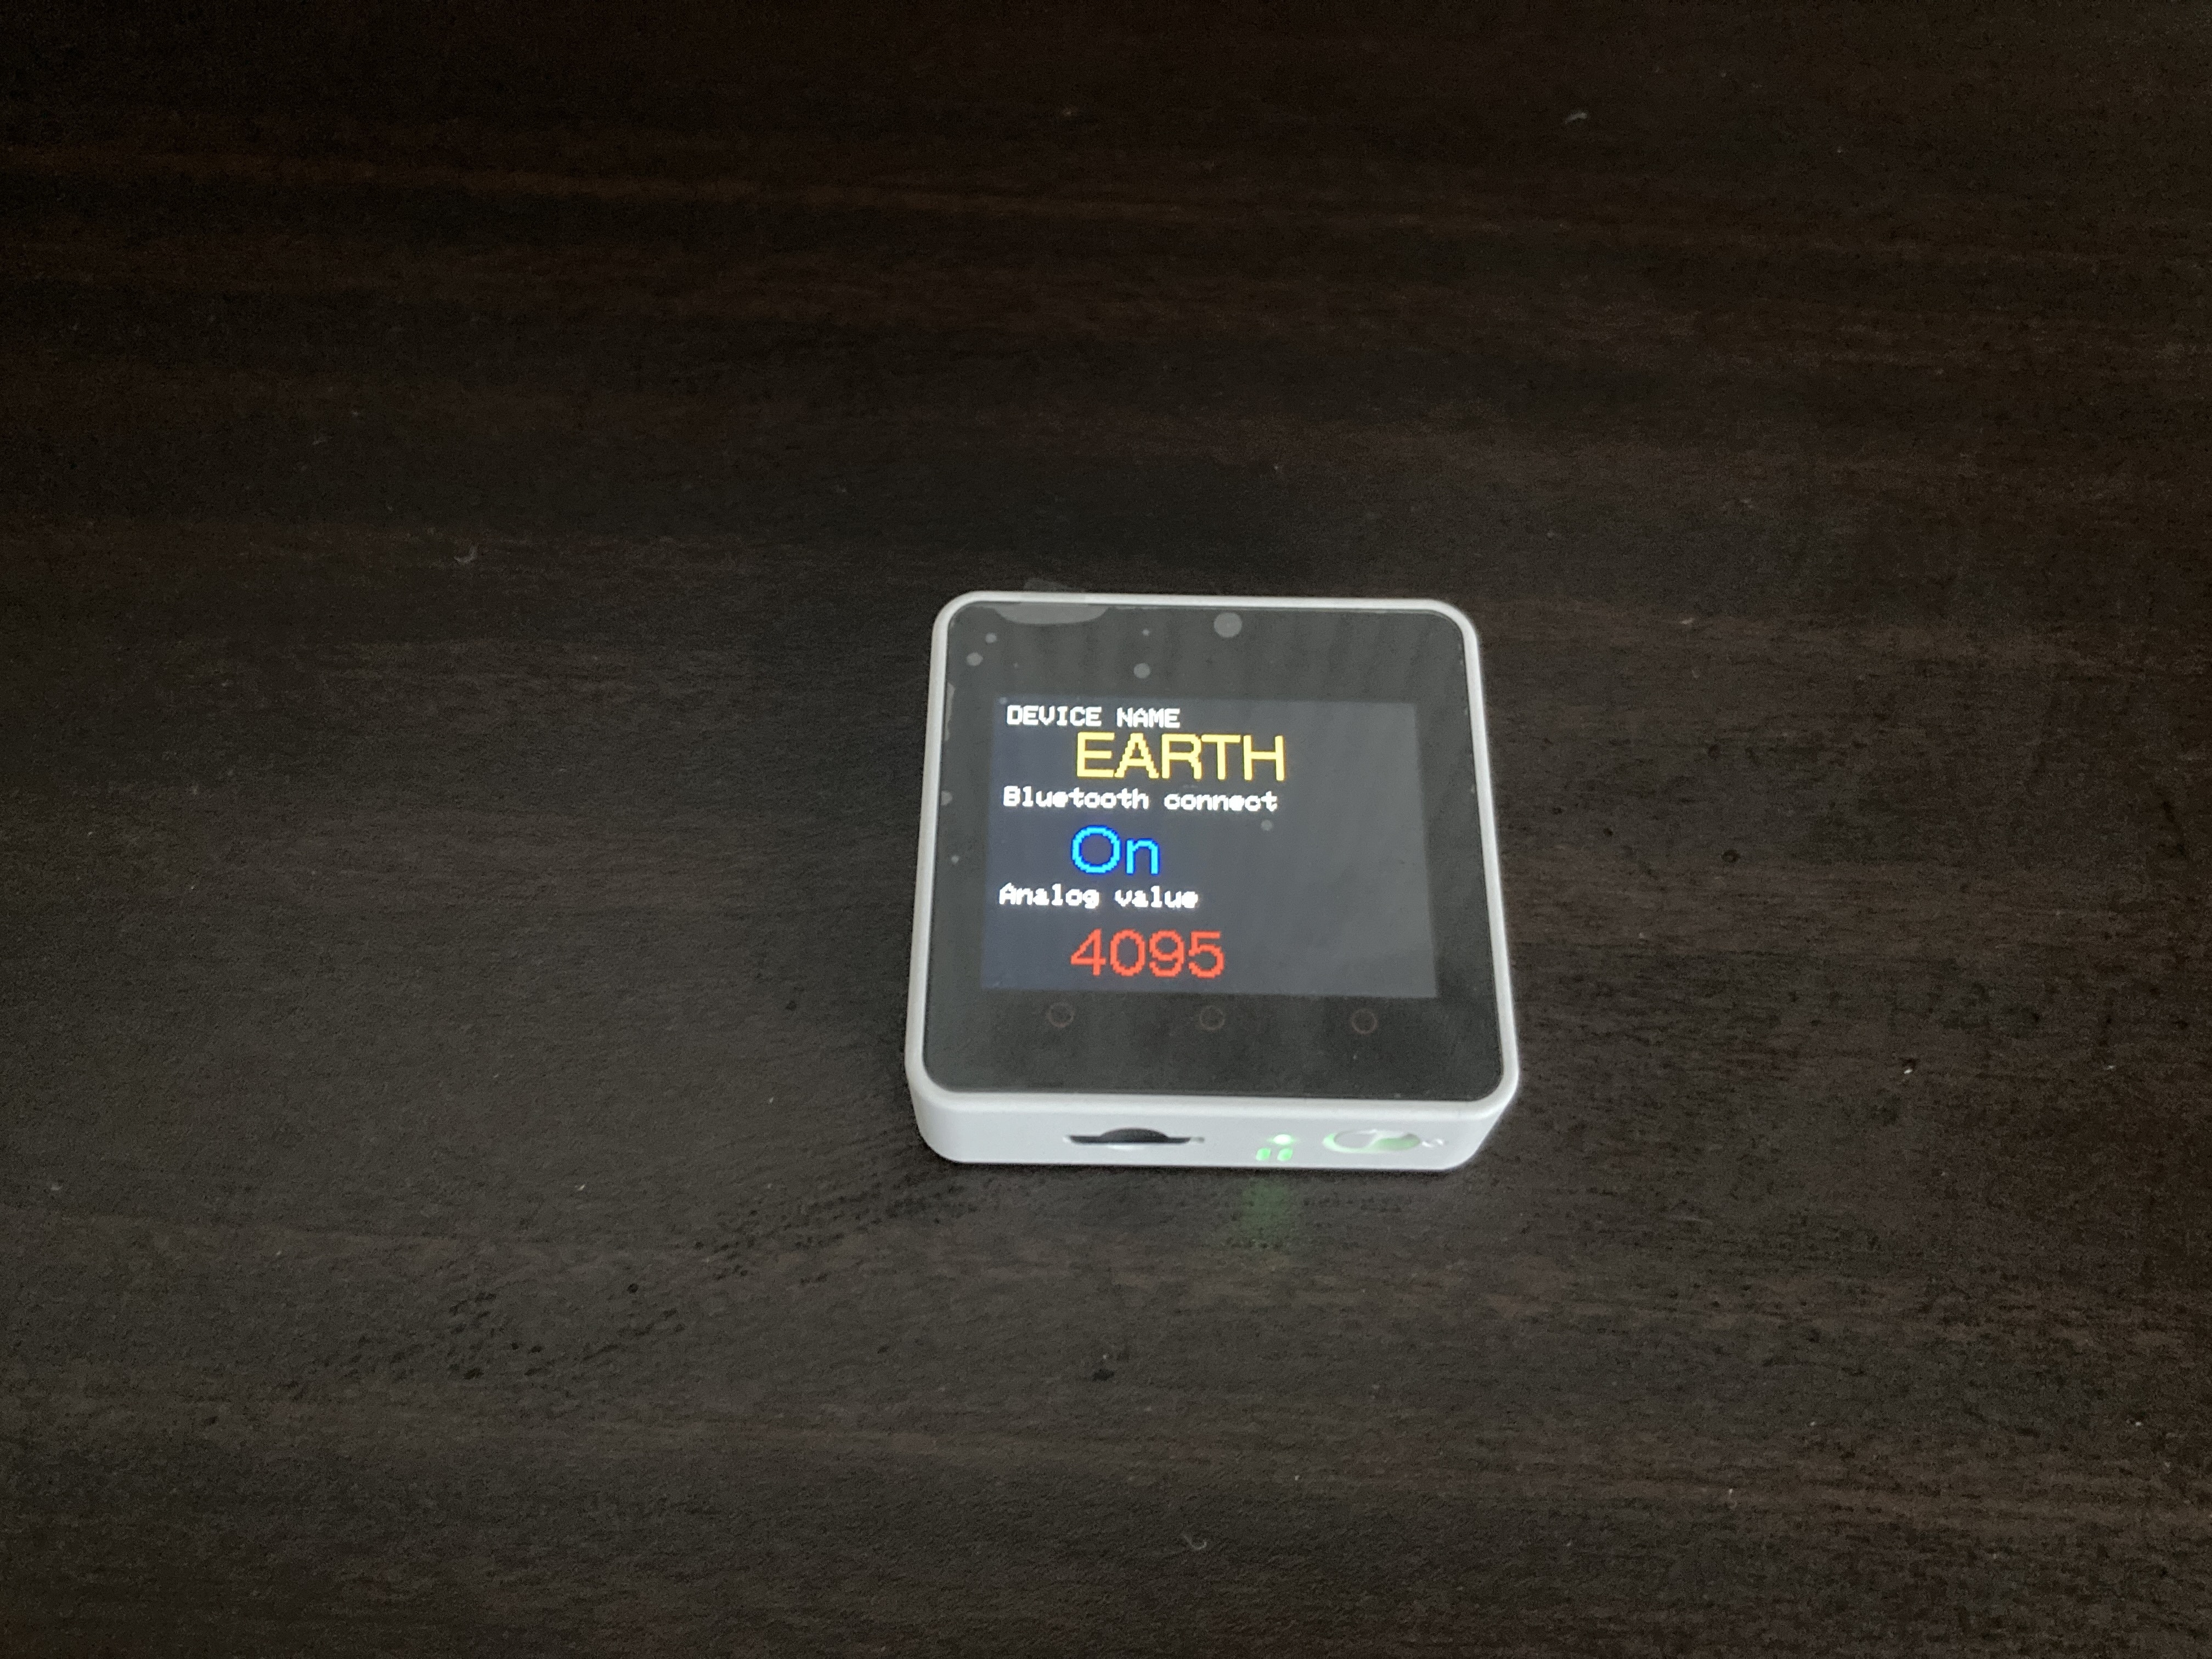
M5atomで取得した土壌センサーの値をM5stackのディスプレイに表示させてみました。
環境
OS: windows 10.0
Arduino IDE:2.0.0
デバイス:M5stackcore2,M5atom,M5Stack用土壌水分センサユニット
bluetooth接続
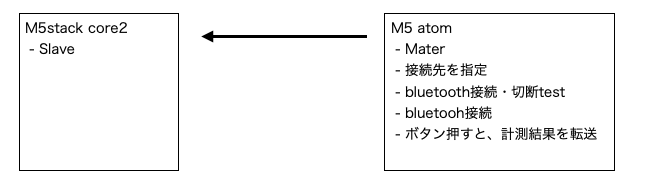
M5 atomのbleutooth接続は、Masterと、M5stack core2はSlaveとしました。
M5 atomでは、M5stack core2の接続先を指定して、Set upのときに接続、切断のテストを行っています。M5atomのボタンを押すと土壌センサから値を取得し、bluetoothに転送させています。その後、M5stack core2側では、ディスプレイへ転送結果を表示させるようにしました。
bluetooth接続先の取得
最初にslaveのbluetoothのMACアドレスを取得します。下記プログラムを実行すると、シリアルモニタに出力されます。
#include <M5Core2.h>

void setup(void) {
  Serial.begin(115200);
  Serial.println("-----------------");
  uint8_t macBT[6];
  esp_read_mac(macBT, ESP_MAC_BT);
  Serial.printf("%02X:%02X:%02X:%02X:%02X:%02X\r\n", macBT[0], macBT[1], macBT[2], macBT[3], macBT[4], macBT[5]);
}

void loop() {
  delay(1000);
}
プログラム
M5 atom側
最初にM5 atom側のスケッチです。先ほど取得したMACアドレスをMACadd、addressへ入力します。プログラムは、bluetoothの接続、切断をテストし、再度接続、その後、ボタンを押すと、bluetoothを経由してデータを転送することができます。
#include "M5Atom.h"
#include "BLEDevice.h"
#include "BLEUtils.h"
#include "BLEBeacon.h"
#include "esp_sleep.h"
#include "BluetoothSerial.h"

BluetoothSerial SerialBT;

String MACadd = "XA:XB:XC:XD:XE:XF";
uint8_t macBT[6];
uint8_t address[6]  = {0xXA, 0xXB, 0xXC, 0xXD, 0xXE, 0xXF};
bool connected;

int bluetooth_address =0;
uint16_t analogRead_value = 0;
uint16_t digitalRead_value = 0;
uint16_t device_id = 0x0101;        // your any sensor device id

BLEAdvertising *pAdvertising;

void readEarthSensor() {
  analogRead_value = analogRead(32);
  digitalRead_value = digitalRead(26);
  Serial.printf("0x%04x, %d, %d\n", device_id, digitalRead_value, analogRead_value);
}

void print_readEarthSensor() {
  analogRead_value = analogRead(32);
  digitalRead_value = digitalRead(26);
  //SerialBT.printf("%d,%d\r", digitalRead_value, analogRead_value);
  SerialBT.printf("%d\r", analogRead_value);
}

void setAdvData() {
  BLEAdvertisementData oAdvertisementData = BLEAdvertisementData();

  oAdvertisementData.setFlags(0x06); // BR_EDR_NOT_SUPPORTED | LE General Discoverable Mode
  std::string strServiceData = "";
  strServiceData += (char)0x08;   // length
  strServiceData += (char)0xff;   // AD Type 0xFF: Manufacturer specific data
  strServiceData += (char)0xff;   // Test manufacture ID
  strServiceData += (char)0xff;   // Test manufacture ID
  strServiceData += (char)((device_id >> 8) & 0xff);
  strServiceData += (char)(device_id & 0xff);
  strServiceData += (char)((analogRead_value >> 8) & 0xff);
  strServiceData += (char)(analogRead_value & 0xff);
  strServiceData += (char)(digitalRead_value & 0xff);

  oAdvertisementData.addData(strServiceData);
  pAdvertising->setAdvertisementData(oAdvertisementData);
}

void setup() {
  M5.begin(true, false, true);
  delay(10);
  Serial.begin(115200);
  M5.dis.clear();
  pinMode(26, INPUT);
  Serial.println("\nEarth Test");
  // Read earth sensor value
  readEarthSensor();

  // Create the BLE Device
  BLEDevice::init("Earth_Beacon");
  pAdvertising = BLEDevice::getAdvertising();

  // set advertizing packet data
  setAdvData();
  delay(3000);

  // Check my bluethooth address. for debug.
  if (bluetooth_address == 1){
  Serial.println("-----------------");
  esp_read_mac(macBT, ESP_MAC_BT);
  Serial.printf("%02X:%02X:%02X:%02X:%02X:%02X\r\n", macBT[0], macBT[1], macBT[2], macBT[3], macBT[4], macBT[5]);
  }
  // Start advertising
  pAdvertising->start();
  Serial.println("Advertizing started...");
  delay(1200);
  pAdvertising->stop();

  // Set bluethooth master.
  SerialBT.begin("ESP32test", true);  //Bluetooth device name
  Serial.println("The device started in master mode, make sure remote BT device is on!");

  connected = SerialBT.connect(address);
  if(connected) {
    Serial.println("Connected Succesfully!");
  } else {
    while(!SerialBT.connected(10000)) {
      Serial.println("Failed to connect. Make sure remote device is available and in range, then restart app.");
    }
  }
  // disconnect() may take upto 10 secs max
  if (SerialBT.disconnect()) {
    Serial.println("Disconnected Succesfully!");
  }
  // this would reconnect to the name(will use address, if resolved) or address used with connect(name/address).
  SerialBT.connect();

}

void loop() {

  if (M5.Btn.wasPressed()) {
  // Read earth sensor value
  readEarthSensor();
  print_readEarthSensor();
  }
  M5.update();
  delay(1*1000);

}
M5stack core2側
M5stack core2側のスケッチです。M5stackからbluetoothへ転送された情報を一旦ポインタに入れてから、出力するようにしています。何度も転送したときに文字化けしたので、メモリの確保と解放させるために入れてます。
#include <M5Core2.h>
#include "BluetoothSerial.h"
#include <stdio.h>
#include <stdlib.h>

// 構造体の宣言
typedef struct {
	char *str;
} strct;

//Bluetooth
BluetoothSerial SerialBT;

// sprite
TFT_eSprite sprite = TFT_eSprite(&M5.Lcd);

int   earth_analog = 0;

void setup() {
  M5.begin();
  M5.Lcd.setBrightness(10);
  M5.Lcd.setRotation(1);
  M5.Lcd.setTextSize(2);
  M5.Lcd.fillScreen(BLACK);

  SerialBT.begin("M5Stack2",false);
  Serial.println("M5 Slave mode. you can pair it with bluetooth!");

  Wire.begin();               //  // Wire init, adding the I2C bus.
  qmp6988.init();
  sprite.setColorDepth(8);
  sprite.setTextSize(2);
  sprite.fillScreen(BLACK);
  sprite.createSprite(M5.lcd.width(), M5.lcd.height());

}

void loop() {

  sprite.pushSprite( 0, 0);
  M5.update();// update button state

    sprite.fillScreen(BLACK);
    // print for earth
    sprite.setTextColor(WHITE);
    sprite.setCursor(10, 10, 1);
    sprite.printf("DEVICE NAME");
    sprite.setTextColor(ORANGE);
      sprite.setCursor(60, 30, 4);
    sprite.printf("EARTH");
    // print for blue tooth
    sprite.setTextColor(WHITE);
    sprite.setCursor(10, 80, 1);
    sprite.printf("Bluetooth connect");
    sprite.setTextColor(BLUE);
    sprite.setCursor(60, 110, 4);
    SerialBT.available() ? sprite.printf("On") : sprite.printf("Off");
    // print for blue tooth
    sprite.setTextColor(WHITE);
    sprite.setCursor(10, 160, 1);
    sprite.printf("Analog value");
    sprite.setTextColor(TFT_MAROON);
    sprite.setCursor(60, 190, 4);
    sprite.printf("%04d\n", earth_analog);

    if (SerialBT.available()) {
      // Set up ant allocating dynamic memory
      strct *receive_dataStr;
	    receive_dataStr = (strct*)malloc(sizeof(strct));
	    receive_dataStr->str = (char*)malloc(sizeof(char) * 64); //initalize
      sprintf(receive_dataStr->str, "%s", SerialBT.readStringUntil('\r'));
      Serial.print(receive_dataStr->str); // for debug
      earth_analog = atoi(receive_dataStr->str);
      free(receive_dataStr->str);
      free(receive_dataStr);
    delay(1 * 1000);
    }
}
参考リンク
今回のプログラムを作成するにあたって、下記リンクを参考にさせていただきました。ありがとうございました。
https://karakuri-musha.com/inside-technology/arduino-m5stickc-plus-10-bluetooth-serialimu-01/
ESP32同士をBluetoothシリアルでつないでみる