はじめに
この記事は、現在実務でGraphQLを使っている筆者が、Inputで得た知見を自分なりにまとめたものです。
公開してはいますが、日々キャッチアップしたら都度更新していくので、優しく見守っていただけると!
記載している文章内で不備などありましたら、ご指摘いただけると幸いです。
対象となる読者
- Class_BaseにGraphQLの書き方を知りたい人
- GraphQLでのMutationの書き方がいまいちわからない人
- とりあえず、RailsとGraphQLでCRUDをやってみたい人
前提
GraphQLってなに?などの概念的な話はあまり出てきません。
それらについては、他のサイトや記事でたくさん紹介されているので、参考リンクを参照ください。
参考リンク
GraphQlとRESTの違い
| GraphQl | REST |
|---|---|
| HTTP上などで動作する | HTTP上などで動作する |
| エンドポイントが一つだけ | エンドポイントが複数ある |
| 1リクエストで多くのリソースを包括 | 1リクエストにつき1リソース |
| フェッチしない | フェッチが過剰 |
Gemfileにgraphqlを追加
gem 'graphql'
GraphQLをGenerateする
rails g graphql:install
次のようにファイル群が作成される。
Running via Spring preloader in process 75061
      create  app/graphql/types
      create  app/graphql/types/.keep
      create  app/graphql/bookshelf_schema.rb
      create  app/graphql/types/base_object.rb
      create  app/graphql/types/base_enum.rb
      create  app/graphql/types/base_input_object.rb
      create  app/graphql/types/base_interface.rb
      create  app/graphql/types/base_union.rb
      create  app/graphql/types/query_type.rb
add_root_type  query
      create  app/graphql/mutations
      create  app/graphql/mutations/.keep
      create  app/graphql/types/mutation_type.rb
add_root_type  mutation
      create  app/controllers/graphql_controller.rb
       route  post "/graphql", to: "graphql#execute"
Skipped graphiql, as this rails project is API only
  You may wish to use GraphiQL.app for development: https://github.com/skevy/graphiql-app
GraphiQLをbrewでinstall
公式ページ: https://electronjs.org/apps/graphiql
brewを使って、MacにGraphiQLをインストールする
brew cask install graphiql
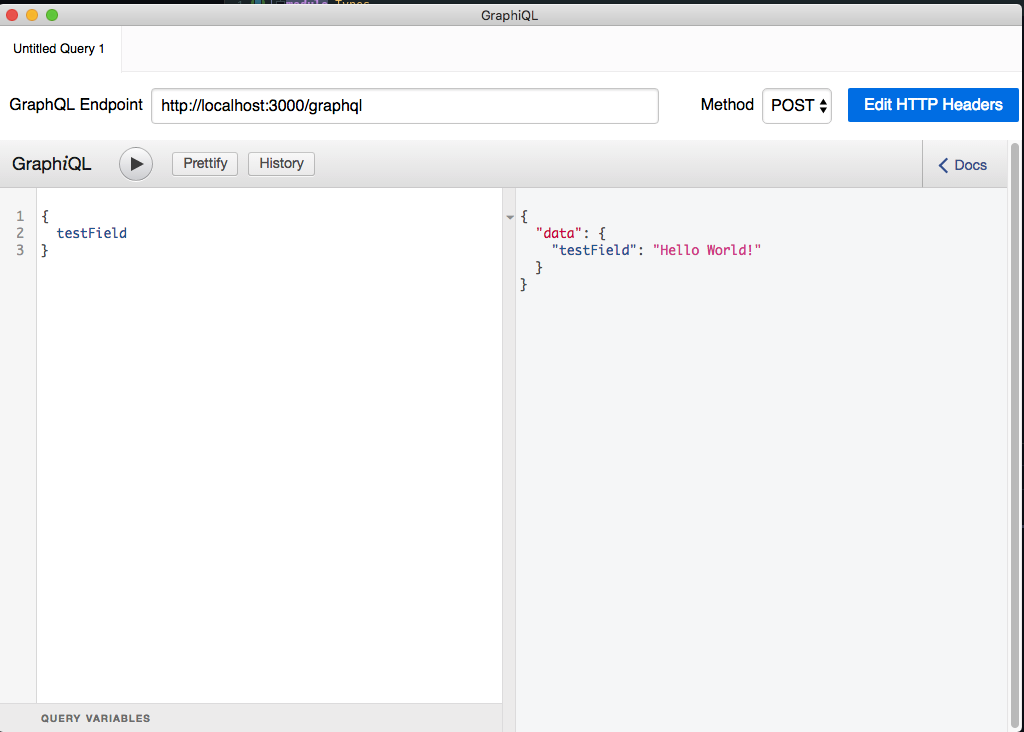
GraphiQLでクエリを投げてみる
GraphQL Endpointに以下のURLを入力する
http://api.graphloc.com/graphql
次に、緯度と経度のクエリを投げて、動作確認してみる
{
  getLocation(ip: "8.8.8.8") {
    location {
      latitude
      longitude
    }
  }
}
成功すると、次のようなデータが返ってくる。
{
  "data": {
    "getLocation": {
      "location": {
        "latitude": "37.751",
        "longitude": "-97.822"
      }
    }
  }
}
GrahiQLの操作
Rails serverでアプリケーションサーバーを起動させていれば、GraphiQLでも動作させることができる。
正しく起動できていれば、< Docsが開けるようになるので、クリックするとDocumentation Explorerが開く。
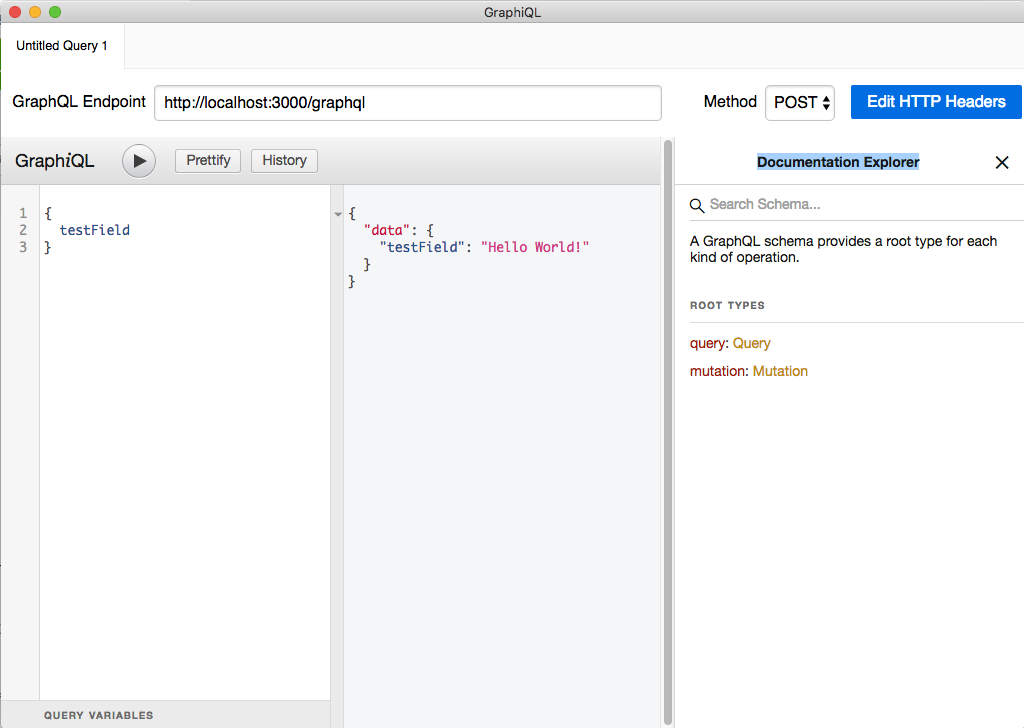
Queryをクリックすると、現在プロジェクト内のquery_type.rbで定義されているクエリが確認できる。
JSONについては、以下のWikipediaを参照のこと。
query_typeの書き方
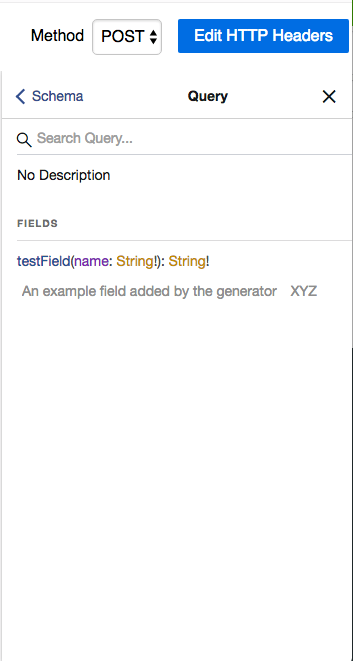
rails g graphql:installを実行すると、以下のようなquery_type.rbが生成される
module Types
  class QueryType < Types::BaseObject
    # Add root-level fields here.
    # They will be entry points for queries on your schema.

    # TODO: remove me
    field :test_field, String, null: false,
      description: "An example field added by the generator XYZ"
    def test_field
      "Hello World!"
    end
  end
表示されている項目を説明すると、
| field | :test_field | String | null: false | description |
|---|---|---|---|---|
| fieldを定義 | DBでいうところのカラム名 | fieldのデータ型 | nullを許可するかどうか | fieldの説明 |
こんな感じ。
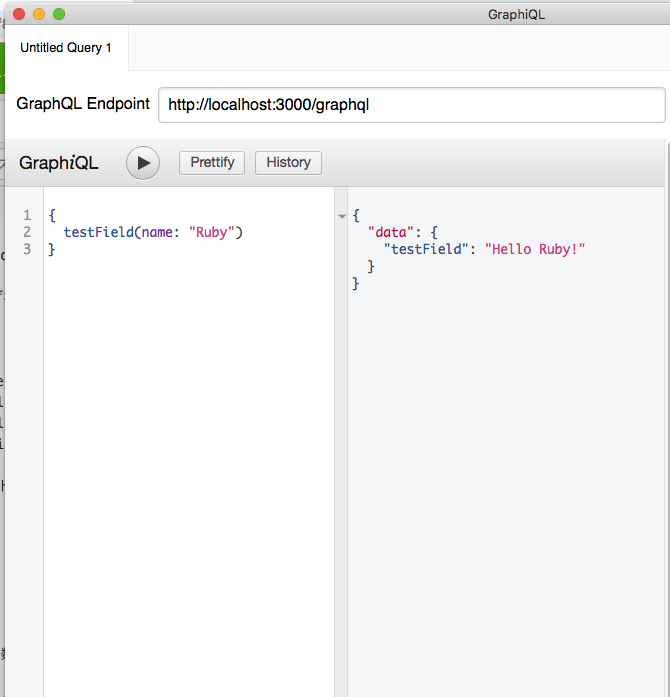
filedに引数を定義したい場合
書き方としては、ブロックを作り、そこにargumentとして引数を定義。
定義する際には、データ型と必須であればrequired: trueを記載する。
あとは、メソッドの引数に通常通り与えてあげればOK。
module Types
  class QueryType < Types::BaseObject
    field :test_field, String, null: false,
      description: "An example field added by the generator XYZ"do
      argument :name, String, required: true
    end
    # フロント側で呼び出すfieldをメソッド形式を定義
    def test_field(name:)
      "Hello #{name}"
    end
  end
end
GraphiQLをリロードして確認してみると、引数にnameが追加されているのがわかる。
testFieldの引数にnameを指定して、適当な文字列を追加してあげると、ちゃんと定義通りに反映されているのがわかる。
Contextについて
contextは各クエリ固有の情報を、後述するresolveメソッドにhash形式で渡す役割を持っている。
graphql_controller.rbを開くと、次のようなコードになっているのがわかります。
class GraphqlController < ApplicationController
  def execute
    variables = ensure_hash(params[:variables])
    query = params[:query]
    operation_name = params[:operationName]
    context = {
        time: Time.now
      # Query context goes here, for example:
      # current_user: current_user,
    }
    result = BookshelfSchema.execute(query, variables: variables, context: context, operation_name: operation_name)
    render json: result
  rescue => e
    raise e unless Rails.env.development?
    handle_error_in_development e
  end

  private

  # Handle form data, JSON body, or a blank value
  def ensure_hash(ambiguous_param)
    case ambiguous_param
    when String
      if ambiguous_param.present?
        ensure_hash(JSON.parse(ambiguous_param))
      else
        {}
      end
    when Hash, ActionController::Parameters
      ambiguous_param
    when nil
      {}
    else
      raise ArgumentError, "Unexpected parameter: #{ambiguous_param}"
    end
  end

  def handle_error_in_development(e)
    logger.error e.message
    logger.error e.backtrace.join("\n")

    render json: { error: { message: e.message, backtrace: e.backtrace }, data: {} }, status: 500
  end
end
この中にcontext = {}という箇所があり、そこにresolveメソッドに渡したいcontextを定義します。
(省略)
context = {
        time: Time.now
    }
(省略)
続いて、query_type.rbでcontext[:time]`を渡してあげましょう。
(省略)
def test_field(name:)
  Rails.logger.info context[:time]
  "Hello #{name}!"
end
(省略)
この状態でGraphiQLでクエリを投げ、Railsのログを見てみると、
Started POST "/graphql" for 127.0.0.1 at 2018-09-16 00:13:18 +0900
Processing by GraphqlController#execute as HTML
  Parameters: {"query"=>"{\n  testField(name: \"Ruby\")\n}", "variables"=>nil, "graphql"=>{"query"=>"{\n  testField(name: \"Ruby\")\n}", "variables"=>nil}}
2018-09-16 00:13:18 +0900 #=> context = { time: Time.now }で定義した部分
Completed 200 OK in 43ms (Views: 0.7ms | ActiveRecord: 0.0ms)
現在の時刻が表示されているのがわかります。
使い所としては、例えば、現在ログインしているのが誰なのかを表すcurrent_userなどを渡せば、ログで確認することができるということですね。
Scalarについて
スカラーは、GraphQLで定義したオブジェクトごとのキーと値を独自のデータ型で管理したもの。
GraphQLでデフォルトで用意されているスカラー型は、以下の5つ。
| String | Int | Boolean | Id | Float |
|---|---|---|---|---|
| UTF-8のシーケンス | 符号付き32ビットの整数 | true or false | オブジェクトごとに割り振られたID | 符号付き倍精度浮動小数点値 |
ただ、スカラー型については独自に定義することができるので、これを応用すればカスタマイズすることが可能。
Null制約について
GraphQLでは、それぞれのfieldごとにnull制約をつけることができる。
null; falseを設定したfieldは、フロント側でクエリを取得した時やmutationを実行した際にエラーが返るようになる。
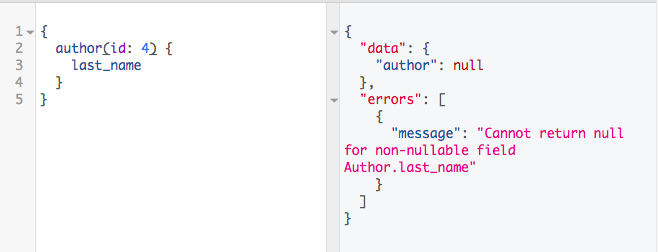
サーバーサイド側でもnull制約を設けたい場合は、別途バリデーション定義をすればOK。
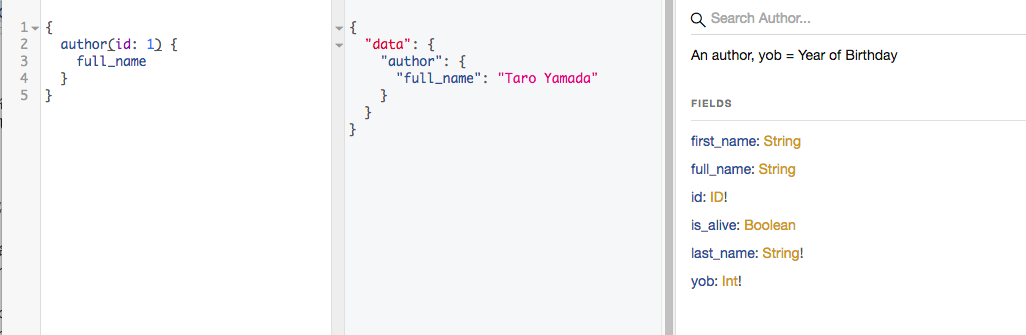
独自にQuery_typeを定義する
ActiveRecordを使って、独自のQuery_typewを定義することが可能。
例えば、full_nameというメソッドを独自に定義したい場合は、該当するモデルに定義し、query_typeにそのfieldを追記してあげればいい。
# author.rb
class Author < ApplicationRecord
  def full_name
    ([first_name, last_name].compact).join " "
  end
end
# author_type.rb
class Types::AuthorType < Types::BaseObject
  (省略)
  field :full_name, String, null: false, camelize: false
end
ちなみに、モデルにロジックを書かなくても、各query_type.rbに記載しても同じ結果が得られる。
その場合は、定義するobjectのfield名のprefixにobjectをつけてあげればOK。
(GraphQL側でObjectの対象となるモデル名を検知してくれる)
# author_type.rb
class Types::AuthorType < Types::BaseObject
  (省略)
  field :full_name, String, null: false, camelize: false

  def full_name
    ([object.first_name, object.last_name]).compact).join " "
  end
end
GraphiQLで実際に叩いてみると、定義されたfieldが正常にresponseされるのがわかる。
fieldTypeをカスタマイズする
GraphQLでは、Fieldtypeも独自定義することが可能。
やり方は簡単で、
- モデルに独自定義したいfieldTypeをメソッドとして定義する
-
graphql/typesディレクトリ配下に新規で1と同じ名前のquery_type.rbを作成 - 取得するためのfieldを定義する
- モデルに対応した各query_type.rbにfieldを追記する
モデルに独自定義したいfieldTypeをメソッドとして定義する
例えば、緯度と経度を作成するcoordinatesというFieldTypeをメソッドとしてモデルファイルに定義する。
class Author < ApplicationRecord

  def coordinates
    # 緯度と経度について、それぞれ定義するメソッド
    # 第一要素が緯度で第二要素が経度
    [rand(90), rand(90)]
  end
end
graphql/typesディレクトリ配下に新規で1と同じ名前のquery_type.rbを作成
touch app/graphql/types/coordinates_type.rb
ルートレベルで取得するためのfieldを定義する
# coordinates_type.rb
class Types::CoordinatesType < Types::BaseObject
  field :latitude, Float, null: false
  field :longitude, Float, null: false

  def latitude
    object.first
  end

  def longitude
    object.last
  end
end
モデルに対応した各query_type.rbにfieldを追記する
# author_type.rb
class Types::AuthorType < Types::BaseObject
  field :coordinates, Types::CoordinatesType, null: false
end
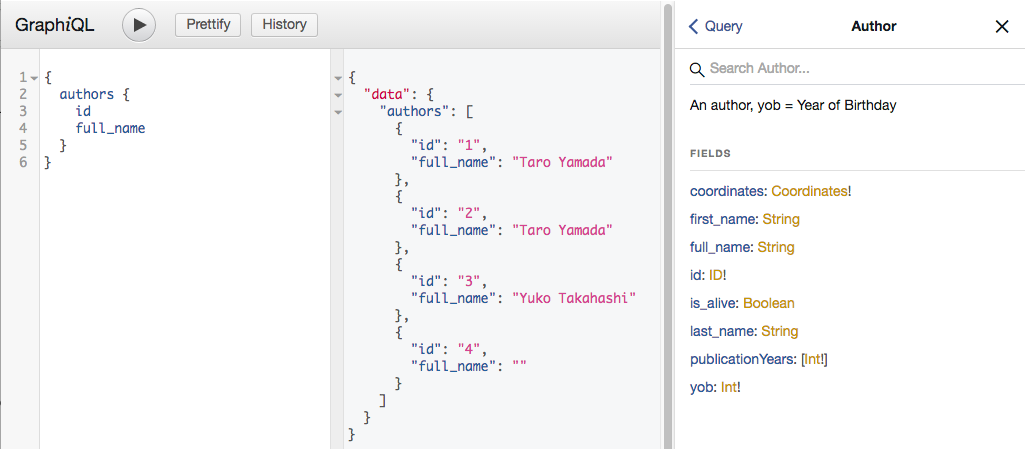
QueryTypeに配列を定義する
配列を定義するにはまず、データベースの玄関口であるモデルに対象となるfieldをメソッドで定義する。
# author.rb
class Author < ApplicationRecord
  def publication_years
    # 出版した年度が配列でランダムに最大10個返ってくる
    (1..rand(10)).to_a.map { 1900 - rand(100)}
  end
end
次に、各query_typeを定義しているファイルに、fieldを定義する。
class Types::AuthorType < Types::BaseObject
  field :publication_years, [Int], null: true
end
最後に、ルートレベルのquery_type.rbにfieldとArrayに対応した呼び出しメソッドを定義する。
field :authors, [Types::AuthorType], null: false

def authors
  Author.all
end
これでGraphiQLを叩くと、複数形にすればArrayでQueryが取得できる。
MutaionによるCRUD処理
Mutationはデータの変更を行うときに使うfield。
Create,Update, Deleteのような既存のfieldを変更する際に使用される。
MutationによるCreate
MutationでCreateを行う方法は2通りある。
その1:typesディレクトリ内にあるmutation_type.rbに記述する
# app/graphql/types/mutation_type.rb
module Types
  class MutationType < Types::BaseObject

    field :create_author, AuthorType, null: true, description: "Create an author" do
      argument :first_name, String, required: false, camelize: false
      argument :last_name, String, required: false, camelize: false
      argument :yob, Int, required: false
      argument :is_alive, Boolean, required: false, camelize: false
    end

    def create_author(first_name:, last_name:, yob:, is_alive:)
      Author.create first_name: first_name, last_name: last_name, yob: yob, is_alive: is_alive
    end

  end
end
create処理をするfieldを用意して、引数に何を与えるかの処理をブロックで記述。
 field :create_author, AuthorType, null: true, description: "Create an author" do
   argument :first_name, String, required: false, camelize: false
   argument :last_name, String, required: false, camelize: false
   argument :yob, Int, required: false
   argument :is_alive, Boolean, required: false, camelize: false
 end
その後、ActiveRecordによるデータベースに問い合わせるための処理をメソッドの形式で定義する。
 def create_author(first_name:, last_name:, yob:, is_alive:)
      Author.create first_name: first_name, last_name: last_name, yob: yob, is_alive: is_alive
 end
その2:mutationsディレクトリにmutation.rbを作成して記述する
class Mutations::CreateAuthor < GraphQL::Schema::Mutation
  null true

  argument :first_name, String, required: false, camelize: false
  argument :last_name, String, required: false, camelize: false
  argument :yob, Int, required: false
  argument :is_alive, Boolean, required: false, camelize: false

  def resolve(first_name:, last_name:, yob:, is_alive:)
    Author.create first_name: first_name, last_name: last_name, yob: yob, is_alive: is_alive
  end
end
mutationsディレクトリにmutation.rbを作成し、createする際に必要な引数を定義する
  argument :first_name, String, required: false, camelize: false
  argument :last_name, String, required: false, camelize: false
  argument :yob, Int, required: false
  argument :is_alive, Boolean, required: false, camelize: false
その後、resolveメソッドを定義し、引数に必要なもfieldを渡し、ActiveRecordでDBへ問い合わせるための処理を記述する。
  def resolve(first_name:, last_name:, yob:, is_alive:)
    Author.create first_name: first_name, last_name: last_name, yob: yob, is_alive: is_alive
  end
最後に、typesディレクトリ内にあるmutation_type.rbで定義したmutationを呼び出してあげれば、その1と挙動が同じになる。
module Types
  class MutationType < Types::BaseObject
    field :create_author, Types::AuthorType, mutation: Mutations::CreateAuthor
  end
end
Query_Variableについて
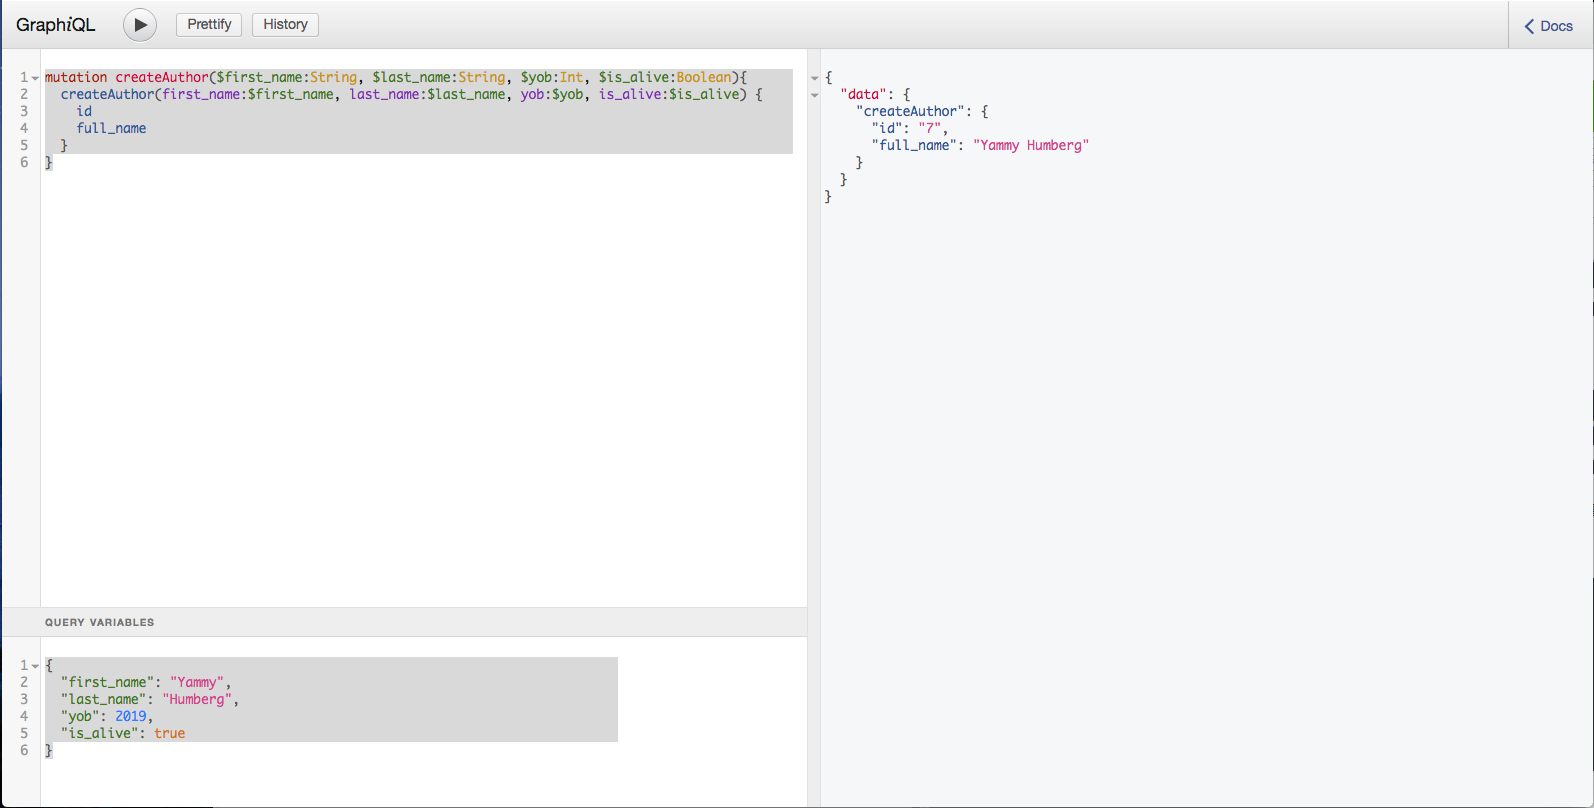
GraphiQLでMutationを実行するとき、query_variableを使うと、fieldの値を別ウィンドウで定義できるので便利。
mutation createAuthor($first_name:String, $last_name:String, $yob:Int, $is_alive:Boolean){
  createAuthor(first_name:$first_name, last_name:$last_name, yob:$yob, is_alive:$is_alive) {
    id
    full_name
  }
}
mutationに続いてMutation名を記述し、field名のprefixに$をつけてあげる。
createAuthor($first_name:String, $last_name:String, $yob:Int, $is_alive:Boolean)
続いて、mutationの箇所には$のついたfield名を渡してあげる。
createAuthor(first_name:$first_name, last_name:$last_name, yob:$yob, is_alive:$is_alive)
あとは、GraphiQLのQUERY VARIABLESの箇所にJSON形式でfield名に対応した渡したい値を記述してあげればOK。
{
  "first_name": "Yammy",
  "last_name": "Humberg",
  "yob": 2019,
  "is_alive": true
}
成功すると、次のようなresponseになる。
{
  "data": {
    "createAuthor": {
      "id": "7",
      "full_name": "Yammy Humberg"
    }
  }
}
InputTypesについて
これまでCreateを行うときには、GraphiQLで次のように書いてきました。
mutation createAuthor($first_name:String, $last_name:String, $yob:Int, $is_alive:Boolean){
  createAuthor(first_name:$first_name, last_name:$last_name, yob:$yob, is_alive:$is_alive) {
    id
    full_name
  }
}
ただ、これだと同じfield名が2回も登場していて、全然DRYではないですよね。
そこで登場するのが、InputTypeです。
InpuTypeは、GraphQL::Schema::InputObjectを継承させて次のように定義します。
class Types::AuthorInputType < GraphQL::Schema::InputObject
  graphql_name "AuthorInputType"
  description "All the attributes for creating an author"

  argument :id, ID, required: false
  argument :first_name, String, required: false, camelize: false
  argument :last_name, String, required: false, camelize: false
  argument :yob, Int, required: false
  argument :is_alive, Boolean, required: false, camelize: false
end
InputTypeの各項目については、次の通りです。
| argument | required | graphqql_name | description |
|---|---|---|---|
| InputTypeに必要な引数 | 必須かどうか | InputType名 | InputTypeの説明 |
次に、MutationTypeで定義したCreateをInputTypeで書き換えます。
class Types::MutationType < Types::BaseObject
   field :create_author, AuthorType, null: true, description: "Create an author" do
    argument :author, Types::AuthorInputType, required: true
  end
  def create_author(author:)
    Author.create author.to_h
  end
 end
あとはGraphiQLで以下のようにクエリを投げ、QUERY VARIABLESで値を指定すればOK。

QUERY
mutation createAuthor($author:AuthorInputType!) {
  createAuthor(author:$author) {
    id
    full_name
  }
}
QUERY VARIABLES
{ "author": {
  "first_name": "Hina",
  "last_name": "Okamoto",
  "yob": 1933,
  "is_alive": true
  }
}
MutationによるUpdate
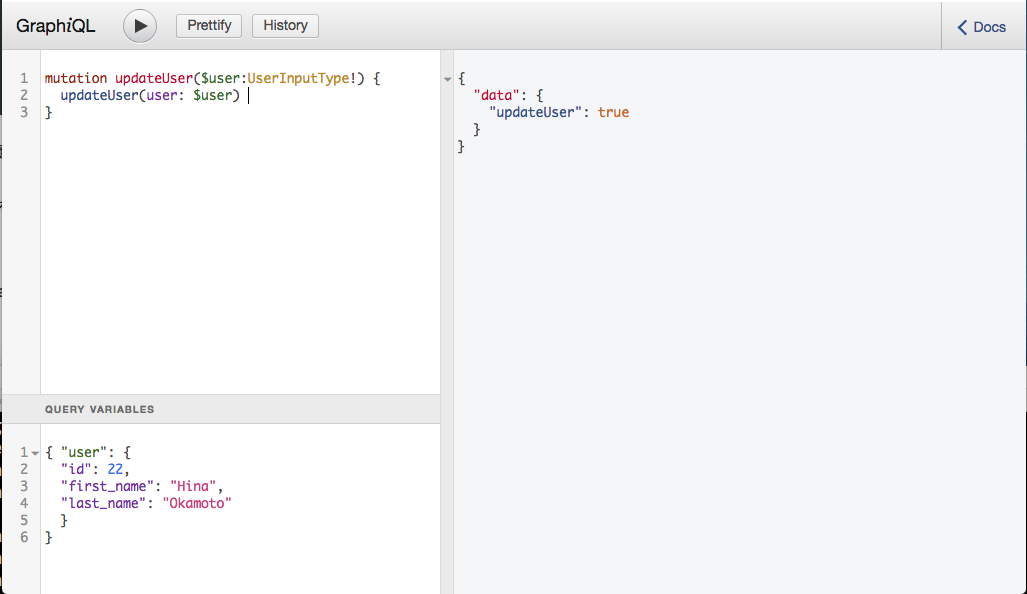
InputTypeまでできたら、あとは簡単。個別にUpdateのMutationを作成してあげればいいんです。
class Types::MutationType < Types::BaseObject
  field :update_author, Boolean, null: false, description: "Update an author" do
    argument :author, Types::AuthorInputType, required: true
  end

  def update_author(author:)
    existing = Author.where(id: author[:id]).first
    #&.でnil以外なら更新されたデータのhashを返す
    existing&.update author.to_h
  end
ここで、update_authorにBooleanの指定があることに、疑問を持った方がいるかもしれません。
これは、フロント側はデーターベース側にどんな変更があったかを知る必要がないので、基本的にApplicationRecordの戻り値を渡さなくてもOKだから。
そのため、フロント側ではBoolean型にしてupdateがtrueなのかfalseなのかを返せばいいので、このようになっています。
MutationによるDelete
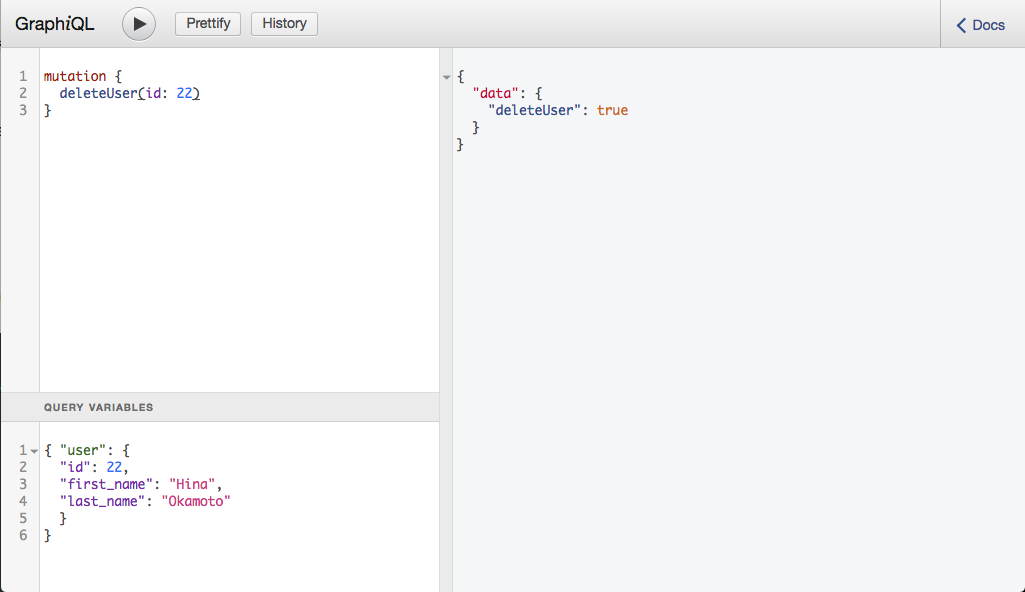
deleteではInputTypeを使わず、削除対象となるIDを渡してあげればOK。
class Types::MutationType < Types::BaseObject
  field :delete_author, Boolean, null: false, description: "Delete an author"do
    argument :id, ID, required: true
  end

  def delete_author(id:)
    Author.where(id: id).destroy_all
    true
  end
end
destroy_allによって、ActiveRecordを介してDBにIDを問い合わせ、レコードを削除しています。