はじめに
Vertex AI Gemini API を使って Function calling の動きを確認してみたいと思います。
「名古屋の今後3日の天気予報を踏まえて、いつ洗濯を干せば良いか教えてください」と聞いたら、
「明日の名古屋は晴れ時々曇りで、降水量は0.0mmなので洗濯物を干すには最適です。明後日は小雨ですが、降水量は0.1mmと少ないので、短時間であれば洗濯物を干すことも可能です。3日後は雷雨の予報なので、洗濯物は干さない方が良いでしょう。」
のように答えてくれる天気アドバイザーを作ってみます。
生成AIの制約について
Vertex AI では、Google の Gemini モデルにアクセスできます。
大規模言語モデル(LLM)は、さまざまな問題の解決に効果的です。しかしトレーニングが完了すると固定されるため、新しい知識を用いた回答が出来ず、外部データのクエリや変更も行えません。
例えば天気について尋ねると以下のように回答できないというレスポンスになります。
- プロンプト: 東京の天気を教えてください
- レスポンス: 申し訳ありませんが、私はリアルタイムの情報にアクセスできないため、東京の現在の天気は分かりません
Function calling (関数呼び出し) について
Function calling (関数呼び出し) を使用すると、こうした欠点を補うことができます。
Function callingは ユーザーの入力(プロンプト)に応じて、事前に定義されたソースコード上の関数から呼ぶべき関数とその関数に渡す引数を Vertex AI Gemini API が 構造化して出力してくれる機能です。
たとえば、位置情報パラメータを受け取り、その場所の天候に関する情報を返す関数 get_weather を定義できます。

Function calling を用いて気象情報に対応させる流れ
Vertex AI で Function calling を利用する際は以下のような流れになります。
- モデルを初期化する
- 関数宣言を使用して、使用可能な一連の関数を定義する
- ユーザーのプロンプトと関数宣言をモデルに送信する
- モデルから出力された構造化データを使用して、関数を呼び出す
- 関数の出力をモデルに提供する
今回は天気予報APIから情報を取得する関数を先に用意し、Vertex AI を用いる部分はまとめて実装します。
天気予報API (Open-Meteo) からの情報取得
今回は Open-Meteo という天気予報APIを利用します。こちらは記事執筆時点において非営利プロジェクトであれば誰でも自由に使うことが可能な天気予報APIです。
Python用に Open-Meteo SDK が用意されているので、こちらを利用します。
今回は Python 3.10.12 が導入されている Colab Enterprise 環境を利用しました。
まずは Open-Meteo SDK の依存ライブラリをインストールします。Colab環境では先頭に!をつけてコマンド実行してください。
pip3 install --upgrade --user openmeteo_requests requests-cache retry-requests
以下のPython コードブロックで Open-Meteo API client を定義します。
import openmeteo_requests
import json

import requests_cache
from retry_requests import retry

# Setup the Open-Meteo API client with cache and retry on error
cache_session = requests_cache.CachedSession('.cache', expire_after = 3600)
retry_session = retry(cache_session, retries = 5, backoff_factor = 0.2)
openmeteo = openmeteo_requests.Client(session = retry_session)
天気は WMO Weather interpretation codes で定義される数値情報で返却されるので、変換する関数を定義しておきます。
def get_weathercode_description(code):
    weather_code = {
      "0":{ "description":"Sunny" },
      "1":{ "description":"Mainly Sunny" },
      "2":{ "description":"Partly Cloudy" },
      "3":{ "description":"Cloudy" },
      "45":{ "description":"Foggy" },
      "48":{ "description":"Rime Fog" },
      "51":{ "description":"Light Drizzle" },
      "53":{ "description":"Drizzle" },
      "55":{ "description":"Heavy Drizzle" },
      "56":{ "description":"Light Freezing Drizzle" },
      "57":{ "description":"Freezing Drizzle" },
      "61":{ "description":"Light Rain" },
      "63":{ "description":"Rain" },
      "65":{ "description":"Heavy Rain" },
      "66":{ "description":"Light Freezing Rain" },
      "67":{ "description":"Freezing Rain" },
      "71":{ "description":"Light Snow" },
      "73":{ "description":"Snow" },
      "75":{ "description":"Heavy Snow" },
      "77":{ "description":"Snow Grains" },
      "80":{ "description":"Light Showers" },
      "81":{ "description":"Showers" },
      "82":{ "description":"Heavy Showers" },
      "85":{ "description":"Light Snow Showers" },
      "86":{ "description":"Snow Showers" },
      "95":{ "description":"Thunderstorm" },
      "96":{ "description":"Light Thunderstorms With Hail" },
      "99":{ "description":"Thunderstorm With Hail" }
    }
    return weather_code[str(int(code))]["description"]
現在の天気を取得する
現在の天気を取得する関数を定義します。
Open-Meteo API は緯度と経度の情報を元に気象情報を返却するAPIなので、緯度と経度を引数にします。
def get_current_weather(latitude, longitude):
    print("DEBUG: current weather function is called.")
    print(f"latitude: {latitude}, longitude: {longitude}")

    if (latitude is None or longitude is None):
        return """{"error": "I couldn't find the location. Where would you like to know the weather?"}"""

    # Make sure all required weather variables are listed here
    url = "https://api.open-meteo.com/v1/forecast"
    params = {
      "latitude": latitude,
      "longitude": longitude,
      "current": ["temperature_2m", "rain", "weather_code"],
      "timezone": "Asia/Tokyo"
    }

    try:
        responses = openmeteo.weather_api(url, params=params)

        # Process first location. Add a for-loop for multiple locations or weather models
        response = responses[0]

        current = response.Current()
        current_temperature_2m = current.Variables(0).Value()
        current_rain = current.Variables(1).Value()
        current_weather_code = current.Variables(2).Value()

        current_weather_description = get_weathercode_description(current_weather_code)

        weather = {
            "weather": current_weather_description,
            "temperature": "{:.1f}".format(current_temperature_2m),
            "precipitation": "{:.1f}mm".format(current_rain)
        }
    except Exception as e:
        return """{"error": "Sorry, the weather could not be retrieved."}"""

    return json.dumps(weather, ensure_ascii=False)
動作確認のため関数を呼び出してみます。
get_current_weather(35.68, 139.69)

指定日後の天気予報を取得する
指定日後の天気予報を取得する関数を準備します。
def get_weather_forecast(latitude, longitude, days_after):
    print("DEBUG: weather forecast function is called.")
    print(f"latitude: {latitude}, longitude: {longitude}, days_after: {days_after}")

    if (latitude is None or longitude is None):
        return """{"error": "I couldn't find the location. Where would you like to know the weather?"}"""

    if days_after > 15:
      return f"""{{"error": "Sorry, I can't tell you what the weather will be like {days_after} days from now. Please specify a shorter number of days."}}"""

    # Make sure all required weather variables are listed here
    url = "https://api.open-meteo.com/v1/forecast"
    params = {
      "latitude": latitude,
      "longitude": longitude,
      "daily": ["weather_code", "temperature_2m_max", "temperature_2m_min", "rain_sum"],
	    "timezone": "Asia/Tokyo",
	    "forecast_days": 16
    }

    try:
        responses = openmeteo.weather_api(url, params=params)

        # Process first location. Add a for-loop for multiple locations or weather models
        response = responses[0]

        daily = response.Daily()
        daily_weather_code = daily.Variables(0).Values(days_after)
        daily_temperature_2m_max = daily.Variables(1).Values(days_after)
        daily_temperature_2m_min = daily.Variables(2).Values(days_after)
        daily_rain_sum = daily.Variables(3).Values(days_after)

        weather = {
            "weather": get_weathercode_description(daily_weather_code),
            "temperature_max": "{:.1f}".format(daily_temperature_2m_max),
            "temperature_min": "{:.1f}".format(daily_temperature_2m_min),
            "precipitation": "{:.1f}mm".format(daily_rain_sum)
        }

    except Exception as e:
        return """{"error": "Sorry, the weather could not be retrieved."}"""

    return json.dumps(weather, ensure_ascii=False)
こちらも動作確認のため関数を呼び出します。

2日後の予報が取得できました。
Function calling を用いて気象情報の取得に対応する
Vertex AI で Function calling を利用するため、以下を実施していきます。
- モデルを初期化する
- 関数宣言を使用して、使用可能な一連の関数を定義する
- ユーザーのプロンプトと関数宣言をモデルに送信する
- モデルから出力された構造化データを使用して、関数を呼び出す
- 関数の出力をモデルに提供する
モデルを初期化
Vertex AIモデルを初期化します。
import vertexai

PROJECT_ID = "your-project-id"  # @param {type:"string"}
REGION = "asia-northeast1"  # @param {type:"string"}

vertexai.init(project=PROJECT_ID, location=REGION)

from vertexai.generative_models import (
    GenerationConfig,
    GenerativeModel,
    FunctionDeclaration,
    Part,
    Tool,
)
使用可能な関数を定義する
生成AIモデルが関数を理解するために、事前定義した関数の情報を記載した関数宣言 (function declarations) を渡す必要があります。 生成AIモデルはこの関数宣言から関数の目的を理解し、ユーザーのプロンプトに対する最適な関数を選択します。
関数宣言には以下の情報を含めます。関数の説明は詳細に記載することが推奨されています。
- 関数名
- 関数の説明
- 関数パラメーター
事前に用意した現在の天気を取得する関数get_current_weather と、指定日後の天気予報を取得する関数get_weather_forecast に対する FunctionDeclaration を定義します。
APIを呼び出すために緯度と経度の情報が必要になるため、関数パラメータに定義します。
get_current_weather_function = FunctionDeclaration(
    name="get_current_weather",
    description="Get the current weather for the specified location",
    parameters={
        "type": "object",
        "properties": {
            "latitude": {"type": "number", "description": "latitude of location"},
            "longitude": {"type": "number", "description": "longitude of location"},
        },
    },
)

get_weather_forecast_function = FunctionDeclaration(
    name="get_weather_forecast",
    description="Get the weather forecast for a specific location for the next specified date",
    parameters={
        "type": "object",
        "properties": {
            "latitude": {"type": "number", "description": "latitude of location"},
            "longitude": {"type": "number", "description": "longitude of location"},
            "days_after": {"type": "number", "description": "How many days from now"},
        },
    },
)
作成した関数宣言をまとめ、生成AIが呼び出すツールを定義します。
tool = Tool(
    function_declarations=[
        get_current_weather_function,
        get_weather_forecast_function,
    ],
)
モデルを定義する
関数宣言を含めてモデルを作成します。
今回はGemini 1.5 Flash モデルを使用します。
冒頭に記載したように生成AIはトレーニング時点の知識を基に回答を行います。天気を尋ねるプロンプトを与えると「申し訳ありませんが、私はリアルタイムの情報にアクセスできないため、東京の現在の天気は分かりません。」という回答になります。system_instructionを用いて天気に対する回答をモデルに基づいて行わないように制御します。
system_instructionを設定していても、特定の場所の現在の天気を尋ねた場合に「リアルタイムの情報にアクセスできないため答えら寝ない」応答になることがありました。
system_instructionの記載内容を調整して、こちらの内容にしたところ関数宣言が呼び出されることを確認しましたが、モデルバージョンによっては見直す必要があるかもしれません。
model = GenerativeModel(
    model_name="gemini-1.5-flash",
    generation_config=GenerationConfig(temperature=0),
    system_instruction=[
        """
        Don't answer questions about the weather yourself. If asked for real-time weather information, Don't answer questions about the weather yourself.
        For other questions, please answer the user's question correctly.
        """,
    ],
    tools=[tool],
)
モデルを用いてチャットを開始します。
chat = model.start_chat()
function_callの動作確認
試しに東京の天気を聞いてみます。
response = chat.send_message("東京の天気を教えてください")
print(response)
function_call 内で get_current_weather が指定され、引数が設定されていることが確認できます。
candidates {
  content {
    role: "model"
    parts {
      function_call {
        name: "get_current_weather"
        args {
          fields {
            key: "latitude"
            value {
              number_value: 35.6895
            }
          }
          fields {
            key: "longitude"
            value {
              number_value: 139.6917
            }
          }
        }
      }
    }
  }
  finish_reason: STOP
モデルから出力されたデータを使用して、関数を呼び出す
response に含まれる function_call に基づいて処理を行う関数を定義します。
Part.from_function_response()を用いて関数の出力をモデルに提供します。
さらにhandle_response(response)を再帰的に呼び出すようにします。複数の天気予報を確認するプロンプトの場合には次の function_call を処理する必要があるためです。
def handle_response(response):
    if response.candidates[0].function_calls:
        function_call = response.candidates[0].function_calls[0]
    else:
        print("==OUTPUT==")
        print(response.text)
        return

    if function_call.name == "get_current_weather":
        latitude = function_call.args.get('latitude')
        longitude = function_call.args.get('longitude')
        weather_res = get_current_weather(latitude, longitude)
        response = chat.send_message(
            Part.from_function_response(
                name=function_call.name,
                response={
                    "content": weather_res,
                },
            ),
        )
        return handle_response(response)
    elif function_call.name == "get_weather_forecast":
        latitude = function_call.args.get('latitude')
        longitude = function_call.args.get('longitude')
        days_after = function_call.args.get('days_after')
        weather_res = get_weather_forecast(latitude, longitude, days_after)
        response = chat.send_message(
            Part.from_function_response(
                name=function_call.name,
                response={
                    "content": weather_res,
                },
            ),
        )
        return handle_response(response)
    else:
        print(function_call)
Function calling を用いた動作を確認する
緯度経度を渡して天気を確認すると、現在の天気を取得するget_current_weatherが呼ばれ、結果が表示されました。
response = chat.send_message("東経139.69、北緯35.68の天気を教えてください")
handle_response(response)

都市名でも試していきます。
response = chat.send_message("東京の天気を教えてください")
handle_response(response)
都市に対応する緯度経度が取得され、関数が呼びされました。

予報を聞いてみます。
response = chat.send_message("名古屋の明日と明後日の天気を教えてください")
handle_response(response)
2回get_weather_forecast関数が呼びされ、天気が表示されました。
DEBUG: weather forecast function is called.
latitude: 35.18, longitude: 136.9063, days_after: 1.0
DEBUG: weather forecast function is called.
latitude: 35.18, longitude: 136.9063, days_after: 2.0
==OUTPUT==
明日の名古屋の天気は、晴れ時々曇りで最高気温は32.1度、最低気温は24.5度、降水量は0.0mmです。明後日は、小雨で最高気温は33.2度、最低気温は25.2度、降水量は0.1mmです。
いつ洗濯物を干すのが良いのかを質問をしてみます。
response = chat.send_message("名古屋の今後3日の天気予報を踏まえて、いつ洗濯を干せば良いか教えてください")
handle_response(response)
天気予報を踏まえてアドバイスをしてくれました。
DEBUG: weather forecast function is called.
latitude: 35.18, longitude: 136.9063, days_after: 1.0
DEBUG: weather forecast function is called.
latitude: 35.18, longitude: 136.9063, days_after: 2.0
DEBUG: weather forecast function is called.
latitude: 35.18, longitude: 136.9063, days_after: 3.0
==OUTPUT==
明日の名古屋は晴れ時々曇りで、降水量は0.0mmなので洗濯物を干すには最適です。明後日は小雨ですが、降水量は0.1mmと少ないので、短時間であれば洗濯物を干すことも可能です。3日後は雷雨の予報なので、洗濯物は干さない方が良いでしょう。
海外の都市名でも確認してみます。
response = chat.send_message("ニューヨークの明日の天気を教えてください。傘を持った方がいいですか?")
handle_response(response)
longitudeが西経を示すマイナスの値になり、ニューヨークの天気が示されました。
DEBUG: weather forecast function is called.
latitude: 40.7128, longitude: -74.006, days_after: 1.0
==OUTPUT==
ニューヨークの明日の天気は曇りで、降水量は0.0mmです。傘は必要ないでしょう。
場所を指定しない場合には緯度経度がNoneになるので、それをエラー内容を基にユーザーに場所を確認する形になります。

曜日や日付を指定した場合の挙動
明日やN日後の天気を聞くと回答が得られましたが、日付や曜日を指定した場合の挙動を見ていきます。
response = chat.send_message("20日の大阪の天気を教えてください")
handle_response(response)
現在の日付や曜日がモデルには分からないため、回答が得られませんでした。
==OUTPUT==
20日は何曜日ですか?教えてください!
ここでは簡単な対処として、モデルのsystem_instructionに現在の日付を与えてみます。
import datetime
now = datetime.datetime.now(datetime.timezone(datetime.timedelta(hours=9), 'JST'))

model = GenerativeModel(
    model_name="gemini-1.5-flash",
    generation_config=GenerationConfig(temperature=0),
    system_instruction=[
        f"""
        Don't answer questions about the weather yourself. If asked for real-time weather information, Don't answer questions about the weather yourself.
        Today's Date is {now.strftime('%Y/%m/%d')}. Today's day is {now.strftime('%a')}.
        For other questions, please answer the user's question correctly.
        """,
    ],
    tools=[tool],
)

chat = model.start_chat()
その上で再度同じ質問を行いました。
response = chat.send_message("20日の大阪の天気を教えてください")
handle_response(response)
本日は16日 月曜日ですが、4日後の20日の天気が取得されるようになりました。
DEBUG: weather forecast function is called.
latitude: 34.6865, longitude: 135.52, days_after: 4.0
==OUTPUT==
大阪の天気は曇りで、最高気温は31.7度、最低気温は27.3度、降水量は0.0mmです。
タイムゾーンや日付跨ぎを考慮すると、このままでは正しい結果を得られない可能性があります。
番外編: Google 検索によるグラウンディングを使ってみる
グラウンディングとは、モデルの出力を検証可能な情報源に紐付ける仕組みを指します。
Vertex AI では、サポートされているモデルの出力を次の 2 つの方法でグラウンディングできます。
- Google 検索によるグラウンディング
- 独自のデータによるグラウンディング
Google 検索によるグラウンディングはオプションを有効にするのみで簡単に利用できます。
Vertex AI の画面で試す場合は Groud model response を有効にして、プロンプトを実行します。
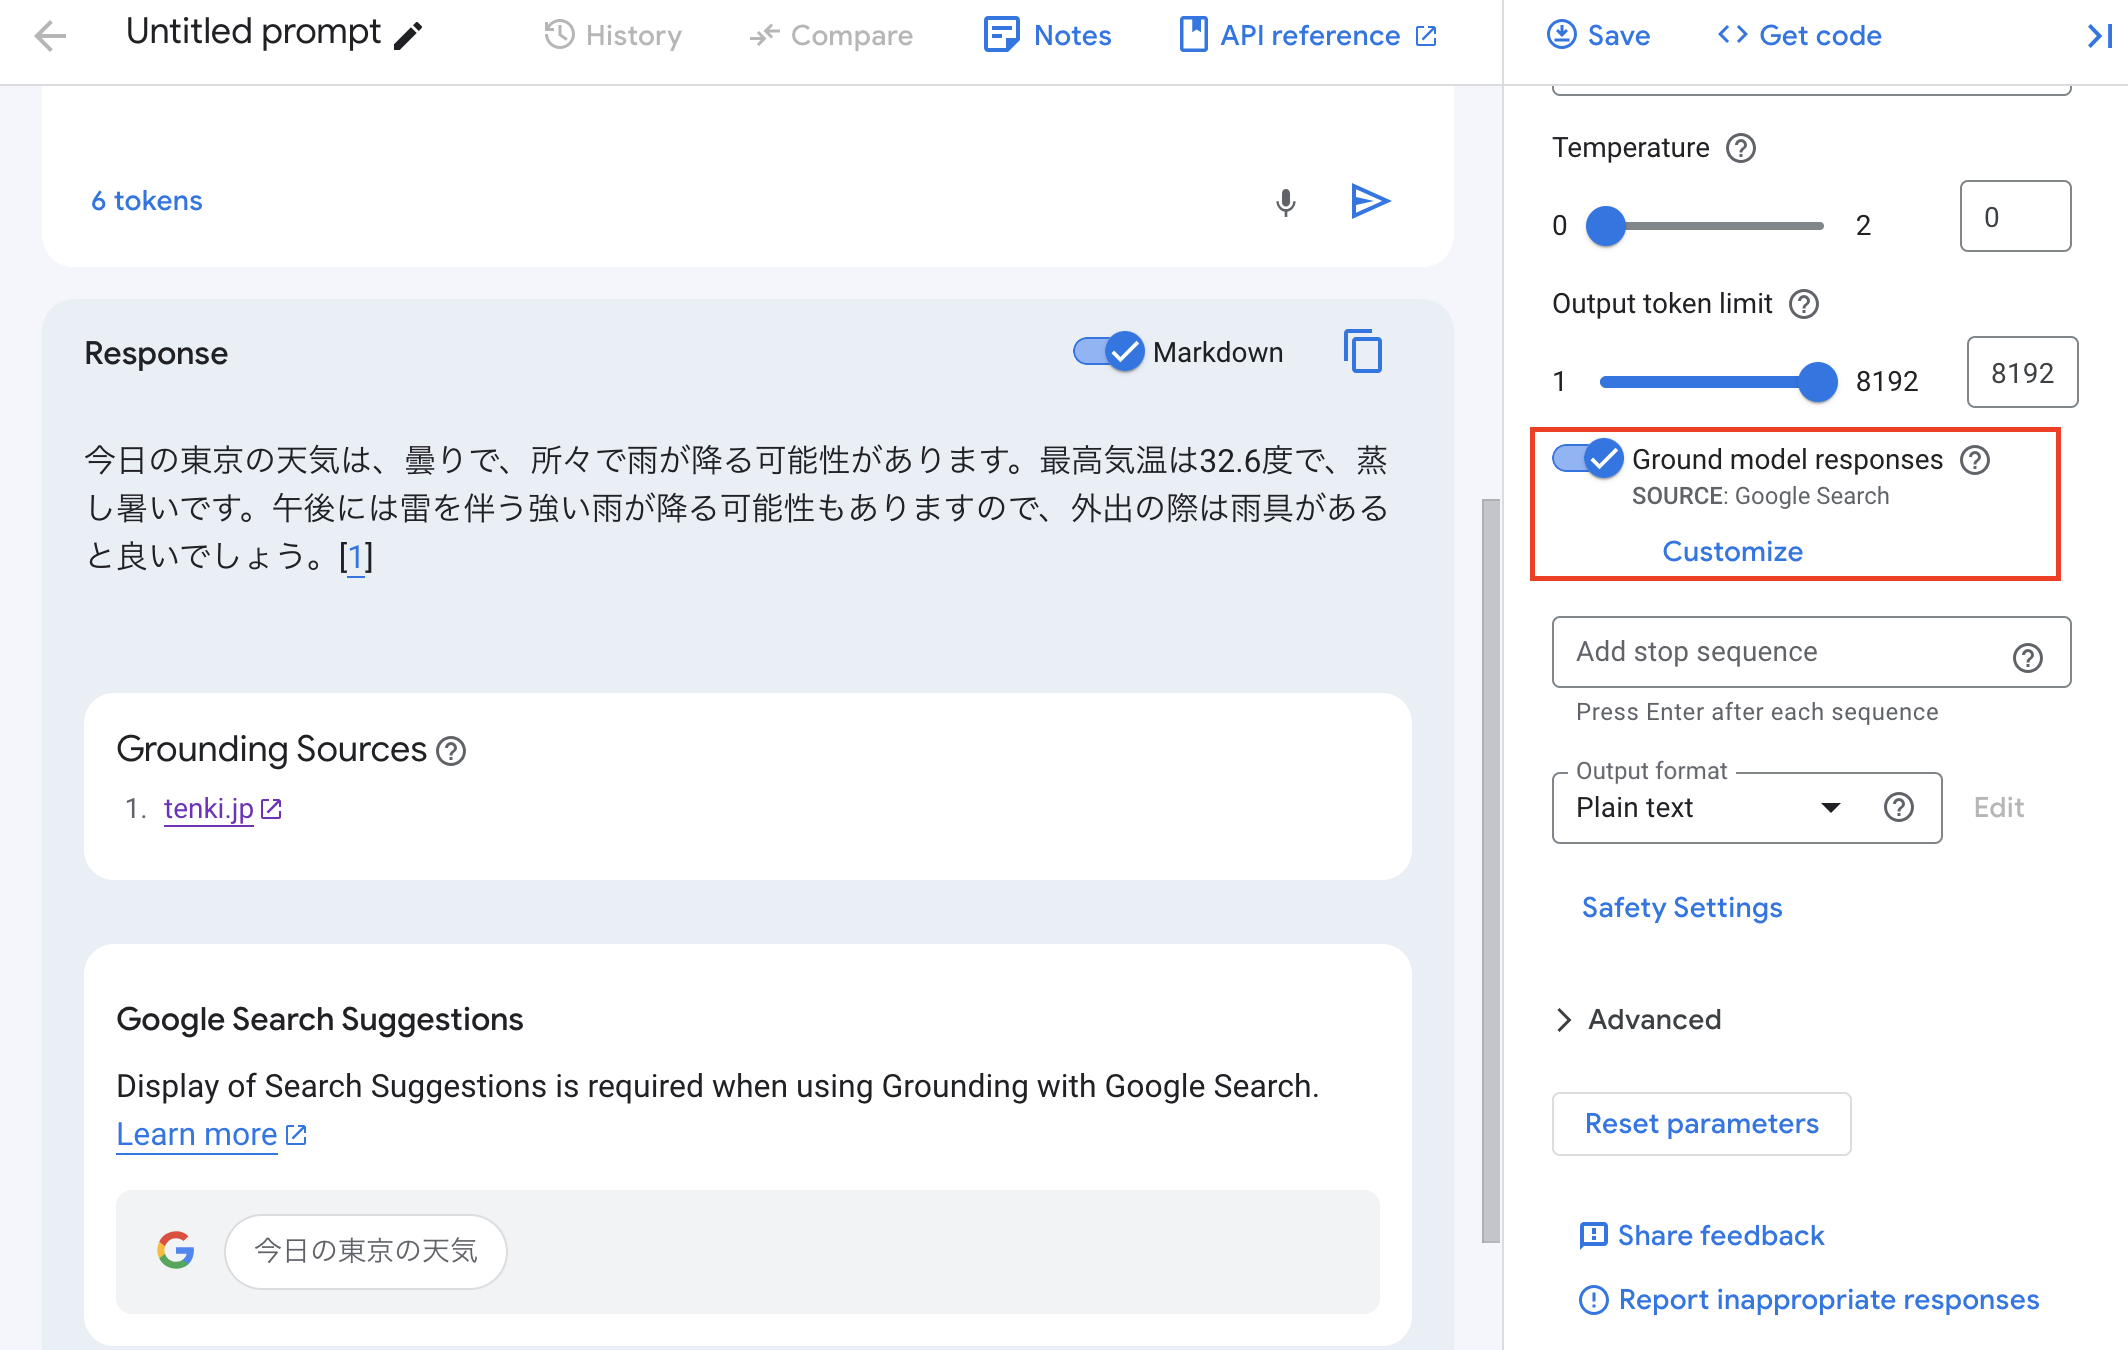
気象情報を示すWebページからの検索結果を用いて天気が回答されました。
Pythonで利用する場合は、Toolsにgroundingを指定します。
from vertexai.generative_models import (
    grounding,
)

# Use Google Search for grounding
tool_googlesearch = Tool.from_google_search_retrieval(grounding.GoogleSearchRetrieval())

prompt = "今日の横浜の天気は?"
response = model.generate_content(
    prompt,
    tools=[tool_googlesearch],
    generation_config=GenerationConfig(
        temperature=0.0,
    ),
)

print(response.text)
# 今日の横浜の天気は、日差しが届くものの、段々と雲が多くなり、雨が降る可能性があります。強雨や雷雨の可能性もあるため、外出の際は雨具があると安心です。昼間は厳しい残暑が続くので、熱中症対策も忘れずに行いましょう。沿岸部では強風に注意が必要です。
Function calling を用いた方法ではAPIに渡す位置情報が必要でしたが、シンプルに「明日の天気は?」と聞いた場合には日本語での検索になるので日本の天気予報がレスポンスになりました。
プロンプト:「明日の天気は?」
レスポンス:「明日の天気は、日本海側を中心に雨になるようです。特に東北や北陸では大雨に警戒が必要です。西日本や関東は晴れ間も出ますが、所々で雷を伴った激しい雨が降りそうです。北海道と沖縄は日差しが届くでしょう。」
まとめ
Function calling を用いることで外部APIからのレスポンスを利用して生成AIモデルが持たないリアルタイムの情報を用いたテキスト生成の動きを確認しました。
Function Calling APIを用いることでLLMが対応できる応答の幅を増やすことができます。
最後まで読んでいただき、ありがとうございました。