はじめに
久しぶりにRuby on Rails を触ります。直近のバージョンを触るので、このメモ書きを残しておくことで少しでも皆様のお役に立ちたいと思います。
環境
Ubuntu20.04 (on Windows10 WSL2)
Rubyのインストール
- 任意のディレクトリで以下コマンドを実行
$ sudo apt-get install ruby
- インストールされていることを確認します。
$ ruby -v
ruby 2.7.0p0 (2019-12-25 revision 647ee6f091) [x86_64-linux-gnu]
- インストールされていますが、気になるメッセージが出力されていました。
Suggested packages:
  apache2 | lighttpd | httpd ri ruby-dev bundler
- ここではruby-dev、bundler、及びCコンパイラ系のパッケージもインストールしようと思います。
$ sudo gem update --system
$ sudo gem install bundler
$ sudo apt-get install build-essential liblzma-dev patch ruby-dev zlib1g-dev libsqlite3-dev nodejs sqlite3
- rails をインストールします。
$ sudo gem install rails
- railsがインストールされたか確認を行います。6.0.3.1 がインストールされたようです。
$ rails -v
Rails 6.0.3.1
#プロジェクト作成
Hello Worldプロジェクトを作成
- 以下コマンドを実行します。
- rails new 新規作成プロジェクト名 を実行することにより雛型のソースコードが作成されます。
$ rails new helloworld
newのオプション
- 今回はオプションを指定しませんでしたが以下のオプションを指定できます。
new -dオプション
-d DBMS指定
DBMS指定としてSQLLite3、MySQL、Oracle、PostgreSQL、FrontBase、DB/2が指定可能。デフォルト値はSQLLite3です。
| DBMS | オプション値 |
|---|---|
| SQLLite3 | sqlite3 |
| MySQL | mysql |
| Oracle | oracle |
| PostgreSQL | postgresql |
| FrontBase | frontbase |
| DB/2 | ibm_db |
- mysql を指定する場合は以下となります。
$ rails new hoge_app -d mysql
new -fオプション
- ファイルが存在する場合に上書きします。作成したプロジェクトを作り直すときに指定します。
$ rails new hoge_app -f
new -rオプション
- rubyバイナリのパスを指定する際に使用します。rubyが複数バージョンインストールされているときに使用するオプションでしょうか...
$ rails new hoge_app -r /usr/bin/ruby2.7
new -Gオプション
- .gitignoreを組み込まないオプションです。
$ rails new hoge_app -G
new ーBオプション
- bundle installしないオプションです。
$ rails new hoge_app -B
new -Jオプション
- javascriptを組み込まないオプションです。
$ rails new hoge_app -J
new -Tオプション
- test::unitを組み込まないオプションです。
$ rails new hoge_app -T
Webサーバーの起動
作成したhelloworldプロジェクトフォルダに移動し、サーバー起動コマンドを実行します。
$ cd helloworld/
$ rails s
Warning: the running version of Bundler (2.1.2) is older than the version that created the lockfile (2.1.4). We suggest you to upgrade to the version that created the lockfile by running `gem install bundler:2.1.4`.
=> Booting Puma
=> Rails 6.0.3.1 application starting in development
=> Run `rails server --help` for more startup options
Puma starting in single mode...
* Version 4.3.5 (ruby 2.7.0-p0), codename: Mysterious Traveller
* Min threads: 5, max threads: 5
* Environment: development
* Listening on tcp://127.0.0.1:3000
* Listening on tcp://[::1]:3000
Use Ctrl-C to stop
- ここで、「ブラウザでlocalhostに接続して確認してください。」と言いたいところですが私の環境はWSL2上に構築していましたので、ホストからWSL2のlocalhostにアクセスするにはひと工夫必要です。
-
%userprofile%\.wslconfigというファイルを用意してください。そのファイル内に以下記載をします。
localhostForwarding=True
-
その後、Windowsを再起動してください。
-
言わずもがなですが、再起動した場合、もう一度
rails sを実行してWebサーバーを起動してください。 -
http://localhost:3000にアクセスしてください。

修正を加えてみます
-
Hello Worldプロジェクトと言いながら、Hello World の文言が無いのはさみしいので、修正を加えてみます。
-
Ctrl+Cキーを押下してWebサーバーを停止させます。
-
helloworld プロジェクトに移動していることを確認します。異なるディレクトリの場合は、helloworld ディレクトリに移動してください。
$ pwd
/home/user1/dev/ror/helloworld
- 以下コマンドを実行してください。
$ rails g controller hello index
- 結果、コントローラクラスとしてhello_controller.rb、ビュークラスとしてhelloディレクトリ下にindex.html.erb が作成されました。
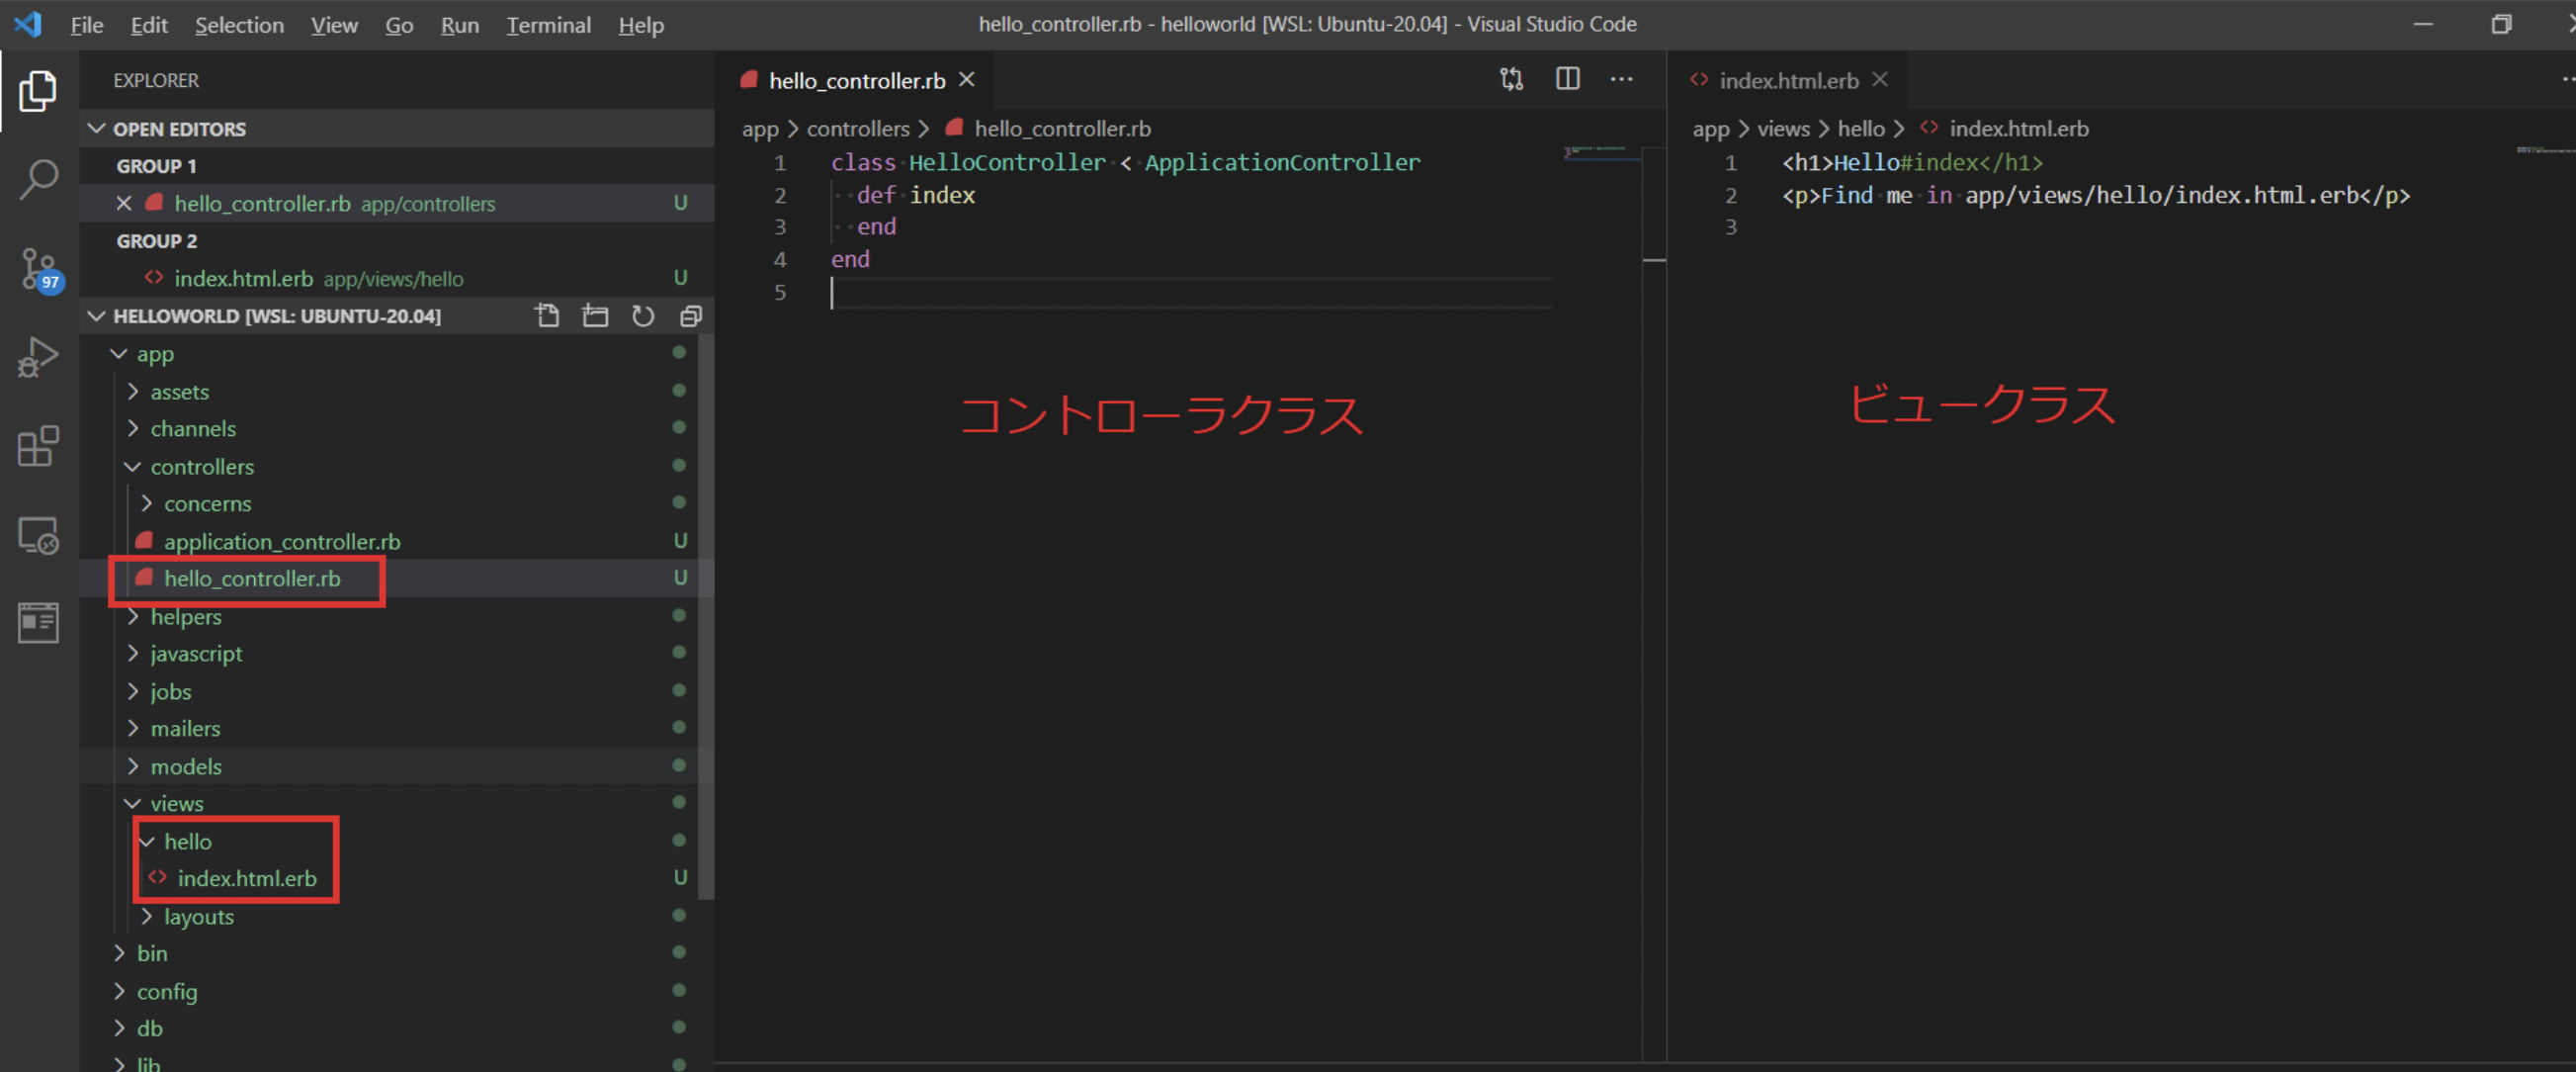
- ビュークラスの文言を以下修正します。
<h1>Hello#index</h1>
<p>Find me in app/views/hello/index.html.erb</p>
<p>Hello World</p>
- 再度、
rails sを実行してWebサーバーを起動します。 -
http://localhost:3000/hello/indexのURLをブラウザで開きます。
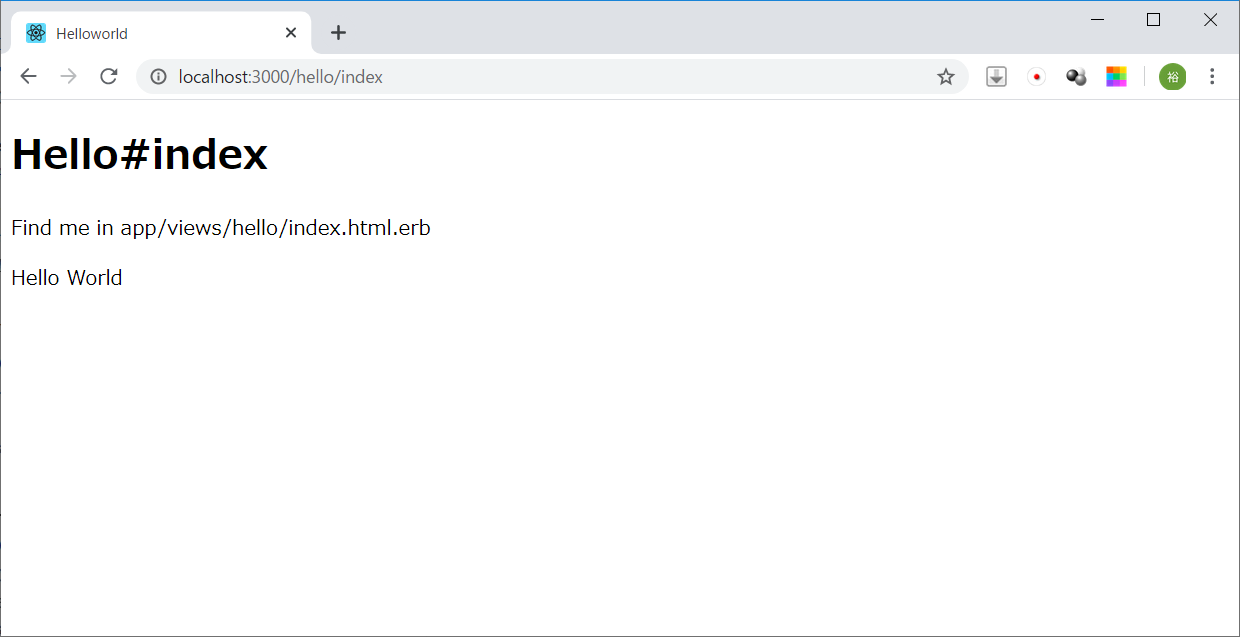
- helloコントローラの下のindexファイルに想定通り、「Hello World」の文言を出力できました。
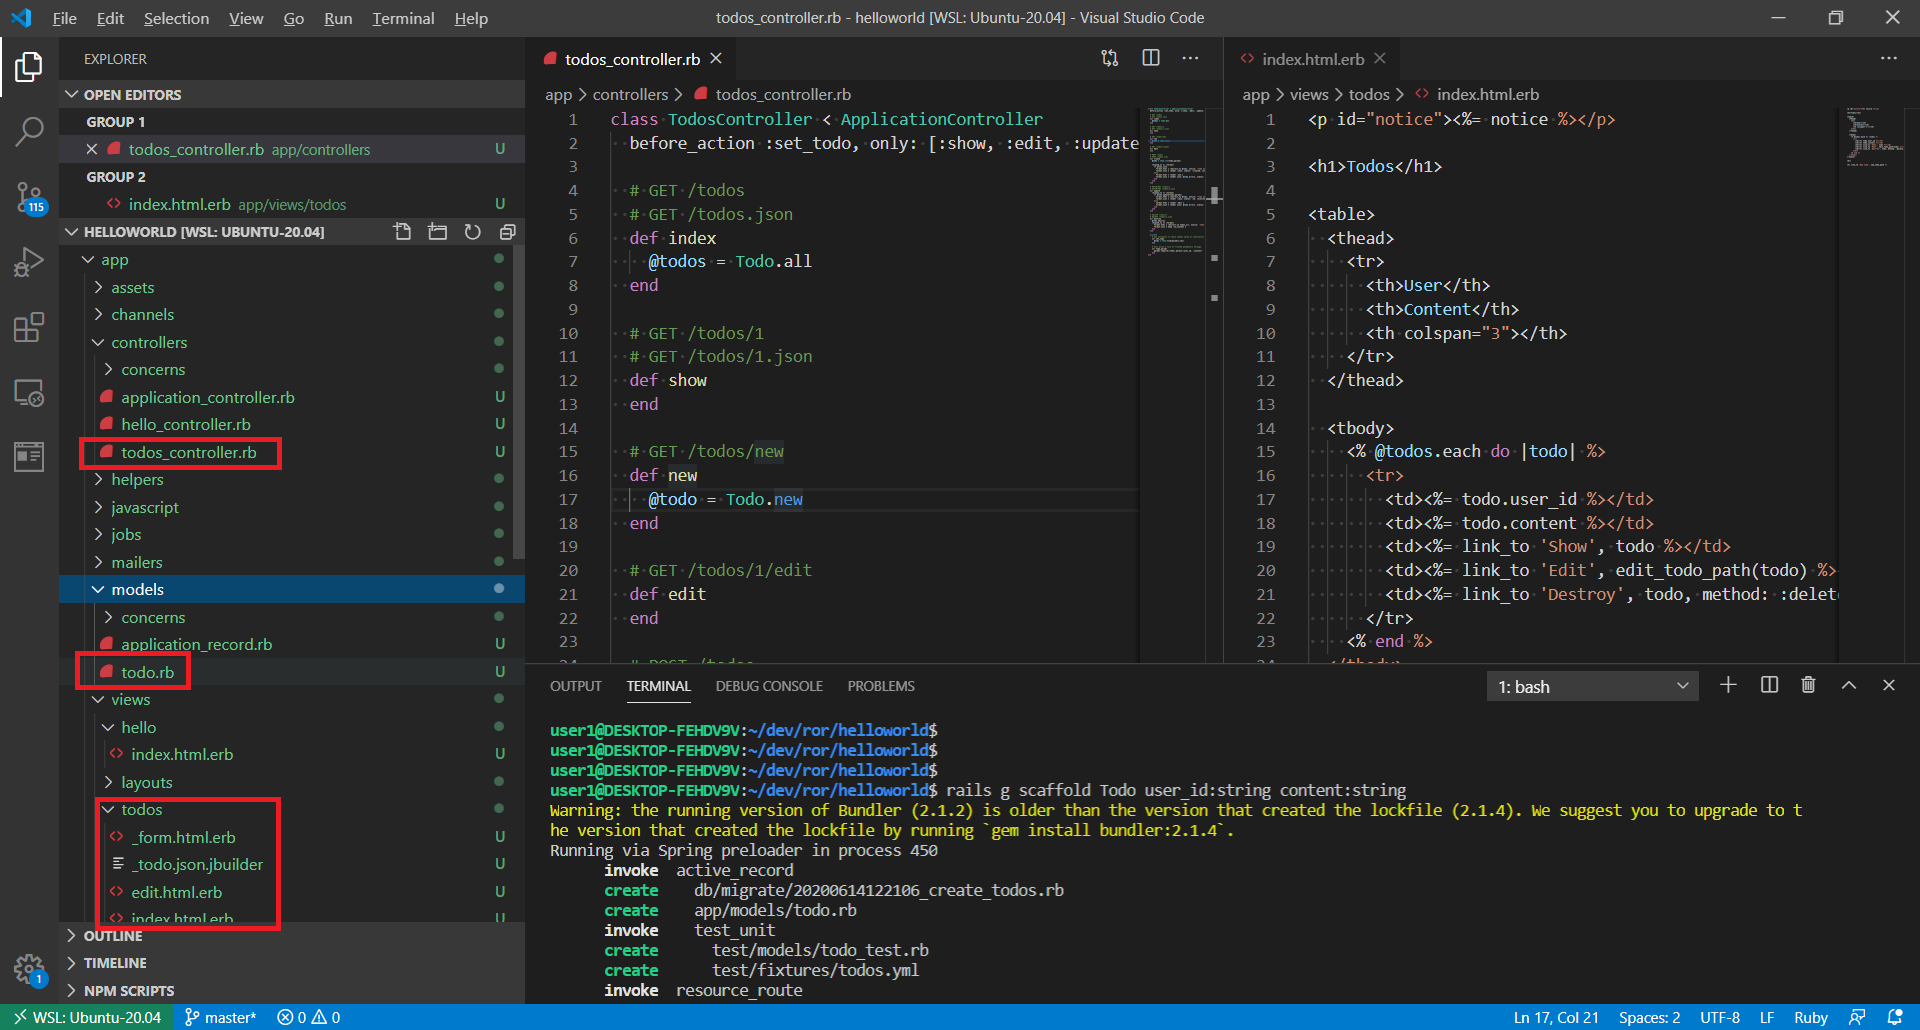
scaffoldを実装
- Hello Worldだけだと味気ないので、scaffoldについても言及しておきます。
- scaffoldジェネレータとは、定義したモデルのCRUD操作を作成し、DBへも反映する機能です。
- 書き方としては以下
rails g scaffold モデル名 カラム名:型 ...
- 例 モデル名:todo の場合
| 列名 | 型 |
|---|---|
| user_id | string |
| content | string |
$ rails g scaffold Todo user_id:string content:string
- 上記の結果、mvcモデルのソースコードが自動生成されます。
- 続いて、テーブルを作成します。
- 以下おまじないを唱えてください。
$ rake db:migrate
== 20200614122106 CreateTodos: migrating ======================================
-- create_table(:todos)
   -> 0.0079s
== 20200614122106 CreateTodos: migrated (0.0102s) =============================
- sqlite3で確認してみましょう。
rails dbconsole
Warning: the running version of Bundler (2.1.2) is older than the version that created the lockfile (2.1.4). We suggest you to upgrade to the version that created the lockfile by running `gem install bundler:2.1.4`.
SQLite version 3.31.1 2020-01-27 19:55:54
Enter ".help" for usage hints.
sqlite> .tables
- sqliteのコマンドとして以下実行
sqlite> .tables
ar_internal_metadata  schema_migrations     todos
-
todosテーブルが作成されていることが確認できました。
-
一応、todosテーブルを検索してみます。
sqlite> select * from todos;
sqlite>
-
sqliteのターミナルを抜け出します。 Ctrl + D を押下してください。
-
では、Webサーバーを起動してみます。おなじみの
rails sを実行してください。その後、http://localhost:3000/todos のURLにブラウザでアクセスしてください。
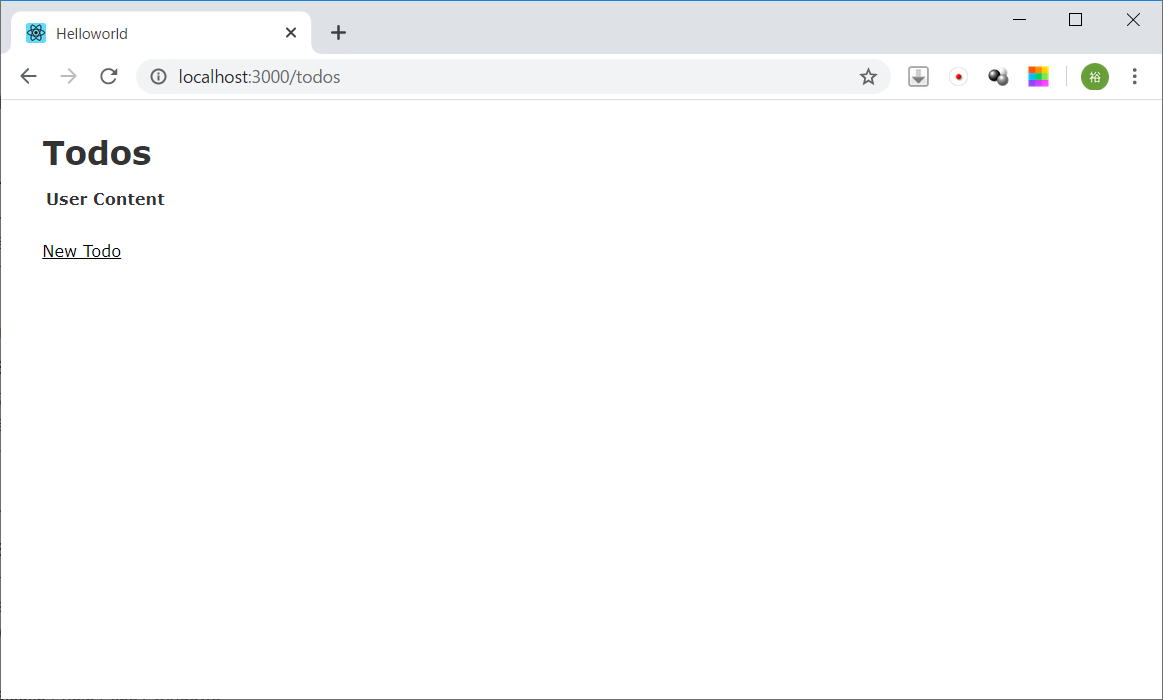
- コードを一行も書かずにtodoの機能が実装されています。
- 登録してみます。
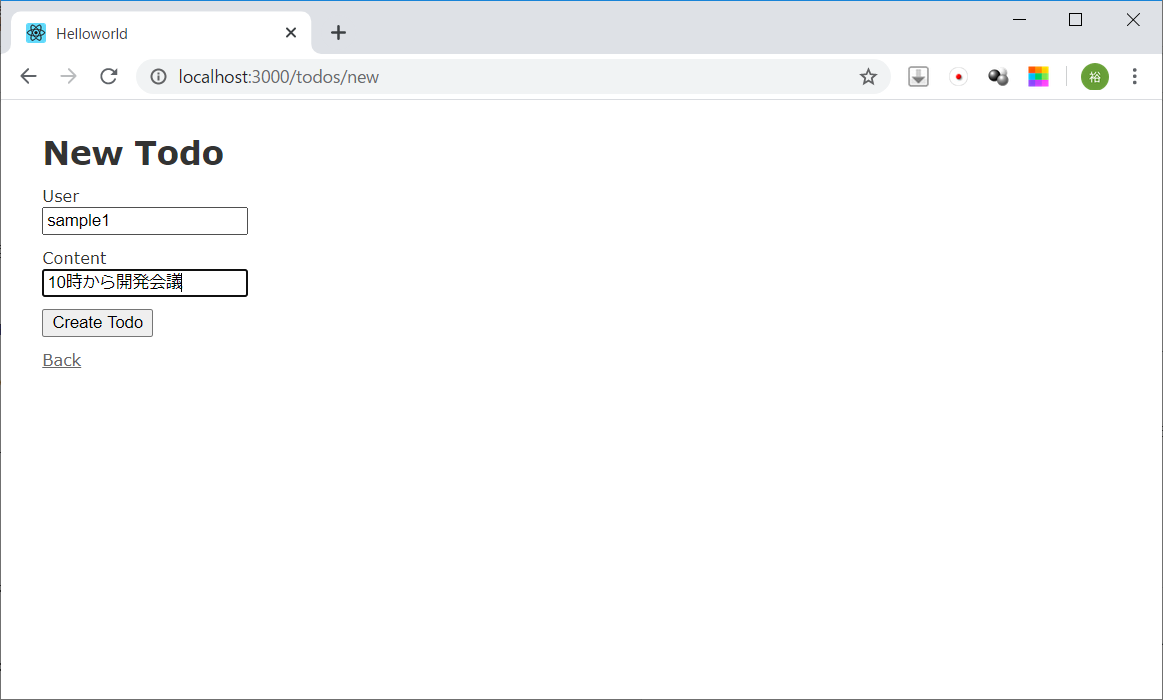
- 結果、表示されています。
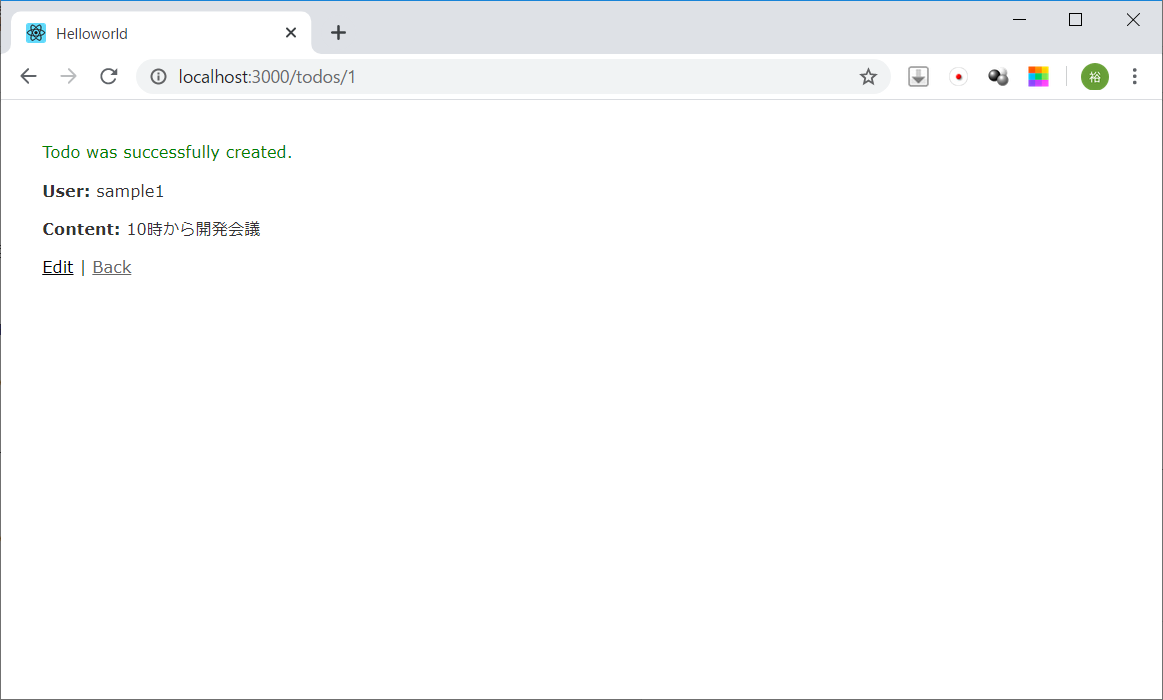
- DBのテーブルレコードも覗いてみます。
select * from todos;
1|sample1|10時から開発会議|2020-06-14 12:39:29.896376|2020-06-14 12:39:29.896376
sqlite>
- 正しくレコードも作成されています。
- scaffoldジェネレーターのコマンドだけでCRUDのソースコード、DBテーブルの連携も行えますのでスピーディーな開発が行えます。
migrationジェネレーター
-
DBテーブルに変更が発生した場合、どうするのか。もう一度scaffoldジェネレータを使用して再構築するのかという疑問を持たれた方もいるかと思います。
-
その場合に、migrationジェネレータ機能を使用します。DBスキーマの変更をマイグレーションファイルとして作成します。
-
rails g migration マイグレーション名のコマンドを実行する事で、DBの差分のみを取り込むことが出来ます。 -
マイグレーション名としては、
Addカラム名Toテーブル名、Removeカラム名Fromテーブル名という命名規約で定義することで、カラムの追加、カラムの削除を制御できます。 -
しかしながら、自由なマイグレーション名でマイグレーションファイルを作成しても、DBテーブル定義の変更は行えますので、ご安心ください。
-
例として先に作成した todosテーブルにカラムを追加するマイグレーションファイルを作成してみます。
$ rails g migration AddColumnTodos
Warning: the running version of Bundler (2.1.2) is older than the version that created the lockfile (2.1.4). We suggest you to upgrade to the version that created the lockfile by running `gem install bundler:2.1.4`.
Running via Spring preloader in process 764
      invoke  active_record
      create    db/migrate/20200614130727_add_column_todos.rb
class AddColumnTodos < ActiveRecord::Migration[6.0]
  def change
  end
end
-
マイグレーションファイルの記載で、
def change内に変更内容を記載する事も出来ますが、マイグレーションのバージョンを下げる際には処理が走りませんので、def up、def downに変更内容、変更を元に戻す内容を記載するのがおすすめだと思います。 -
以下、サンプルを記載しました。
-
def upの中で、 add_column を行うことで、列を追加する事を宣言しています。 -
追加する列の情報として、location カラムで型は string と定義しています。
-
def downの中で、remove_column を行うことで、列を削除する事を宣言しています。 -
削除する列の情報として、location カラムで型は string と定義しています。
class AddColumnTodos < ActiveRecord::Migration[6.0]
  def up
    add_column :todos, :location, :string
  end

  def down
    remove_column :todos, :location, :string
  end
end
- 作成したマイグレーションファイルを適用する前に現在のステータスを見てみましょう
rails db:migrate:status
Warning: the running version of Bundler (2.1.2) is older than the version that created the lockfile (2.1.4). We suggest you to upgrade to the version that created the lockfile by running `gem install bundler:2.1.4`.

database: db/development.sqlite3

 Status   Migration ID    Migration Name
--------------------------------------------------
   up     20200614122106  Create todos
  down    20200614130727  Add column todos
-
Migration NameがCreate todos と有るのは、既に適用済みのマイグレーションです。
-
Status が down のAdd column todosのマイグレーションは今、作成したばかりのマイグレーションでまだ未適用の状態を表しています。
-
では、マイグレーションを実行しますね。先におまじないと称していたコマンドを実行します。
$ rake db:migrate
== 20200614130727 AddColumnTodos: migrating ===================================
-- add_column(:todos, :location, :string)
   -> 0.0049s
== 20200614130727 AddColumnTodos: migrated (0.0052s) ==========================
- ステータスを見てみましょう
$ rails db:migrate:status
Warning: the running version of Bundler (2.1.2) is older than the version that created the lockfile (2.1.4). We suggest you to upgrade to the version that created the lockfile by running `gem install bundler:2.1.4`.

database: db/development.sqlite3

 Status   Migration ID    Migration Name
--------------------------------------------------
   up     20200614122106  Create todos
   up     20200614130727  Add column todos
- すべてStatus がup となっています。取り込まれたようですね。DBテーブル定義を見てみます。
sqlite> .schema todos
CREATE TABLE IF NOT EXISTS "todos" ("id" integer PRIMARY KEY AUTOINCREMENT NOT NULL, "user_id" varchar, "content" varchar, "created_at" datetime(6) NOT NULL, "updated_at" datetime(6) NOT NULL, "location" varchar);
-
正しくlocation カラムが追加されているようです。
-
マイグレーションはロールバックも可能です。但し、1件ずつのようですが
-
只今適用したマイグレーションをロールバックします。以下コマンドを実行してください。
$ rails db:rollback
Warning: the running version of Bundler (2.1.2) is older than the version that created the lockfile (2.1.4). We suggest you to upgrade to the version that created the lockfile by running `gem install bundler:2.1.4`.
== 20200614130727 AddColumnTodos: reverting ===================================
-- remove_column(:todos, :location, :string)
   -> 0.0547s
== 20200614130727 AddColumnTodos: reverted (0.0553s) ==========================
- ロールバックが成功したかステータスを見てみましょう。
$ rails db:migrate:status
Warning: the running version of Bundler (2.1.2) is older than the version that created the lockfile (2.1.4). We suggest you to upgrade to the version that created the lockfile by running `gem install bundler:2.1.4`.

database: db/development.sqlite3

 Status   Migration ID    Migration Name
--------------------------------------------------
   up     20200614122106  Create todos
  down    20200614130727  Add column todos
-
Add column todosのステータスが down となっていますのでロールバックされていますね。 -
DBテーブルの方も見てみましょう。
.schema todos
CREATE TABLE IF NOT EXISTS "todos" ("id" integer NOT NULL PRIMARY KEY, "user_id" varchar DEFAULT NULL, "content" varchar DEFAULT NULL, "created_at" datetime(6) NOT NULL, "updated_at" datetime(6) NOT NULL);
-
location カラムが無くなっています。正しくロールバックできているようです。
-
マイグレーションを上手に利用することにより、コードとDBの連携をスムーズに行えて便利ですね。
最後に
- Ruby on Rails を活用する事で、スピーディーな開発が行えます。
- コードをほとんど書かずとも、定義したモデルのCRUDに沿ったWebアプリケーションを作成できます。フロントサイドはBootstrapを適用して、要件に合った画面仕様とすべく後付けすれば良いだけとなります。バックエンドもDBアクセスロジックは骨格が既に作成されているので、業務仕様に沿ったロジックを組み込むことに集中できます。
- Webアプリケーションの開発において大規模な開発においてはJavaの採用がまだまだ多いと思います。また「Ruby on Railsももう終わった。ブームが過ぎた」とも言われていますが、どううまく使うかではないかと思います。まだ、Ruby on Rails を使用する事でスピーディーな開発が行えると思っています。
- Javaにしろ、Ruby on Railsにしろ Python+Djangoにしろ、C#にしろ、業務、要件、確保できるエンジニアの得意言語によって、ケースバイケースで言語、フレームワークを採用すべきだと思っています。
- 私個人としては、各言語の特徴を正しく理解すべく、実際に各言語を触ってみて理解を深めていきたいと思います。
付録
WSL環境使用時のおすすめIDE
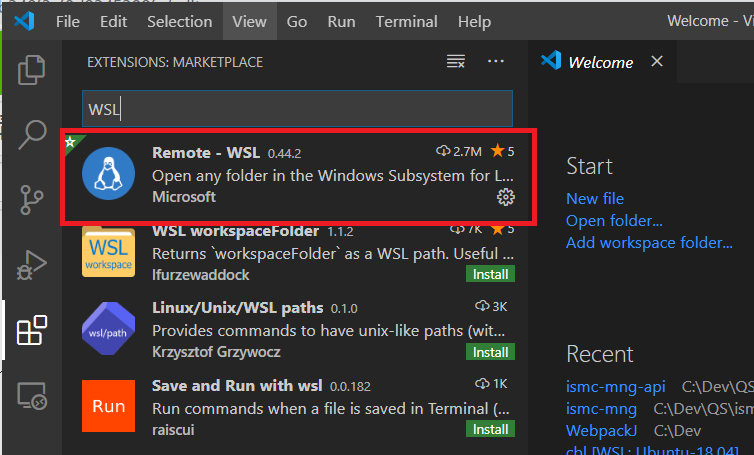
- WSL上にROR環境を構築時のおすすめIDEとしてはVisual Studio Codeが有ります。以下簡単に手順を記載しておきます。
Visual Studio CodeからWSL上のプロジェクトを開くには
-
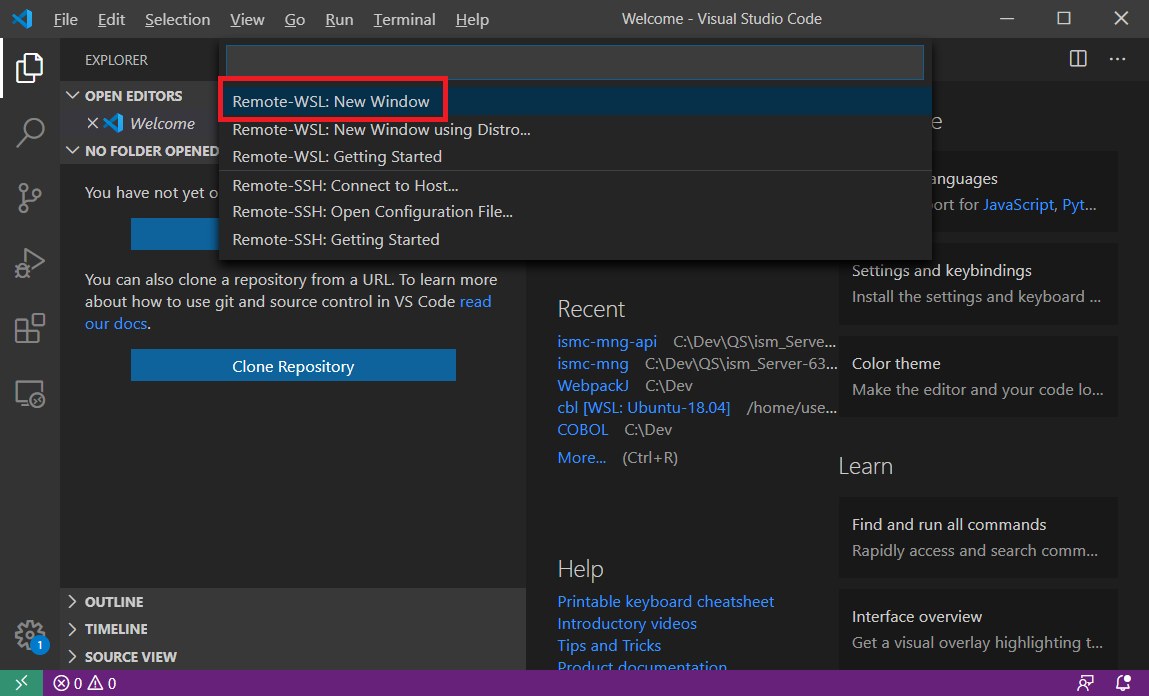
Visual Studio Codeの拡張機能としてRemote - WSL をインストールします。
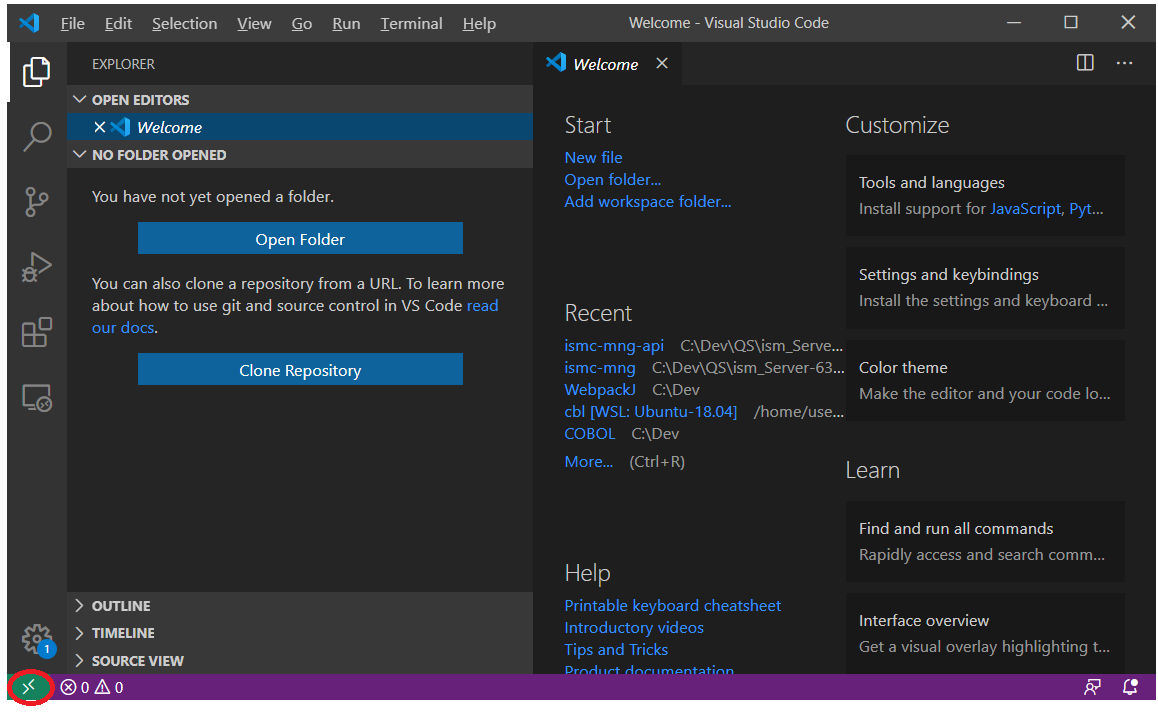
-
左下のRemote接続用アイコンをクリックします。
-
パレットから[Remote-WSL ...]の任意の選択肢を選択。ここでは[Remote-WSL:New Window]を選択
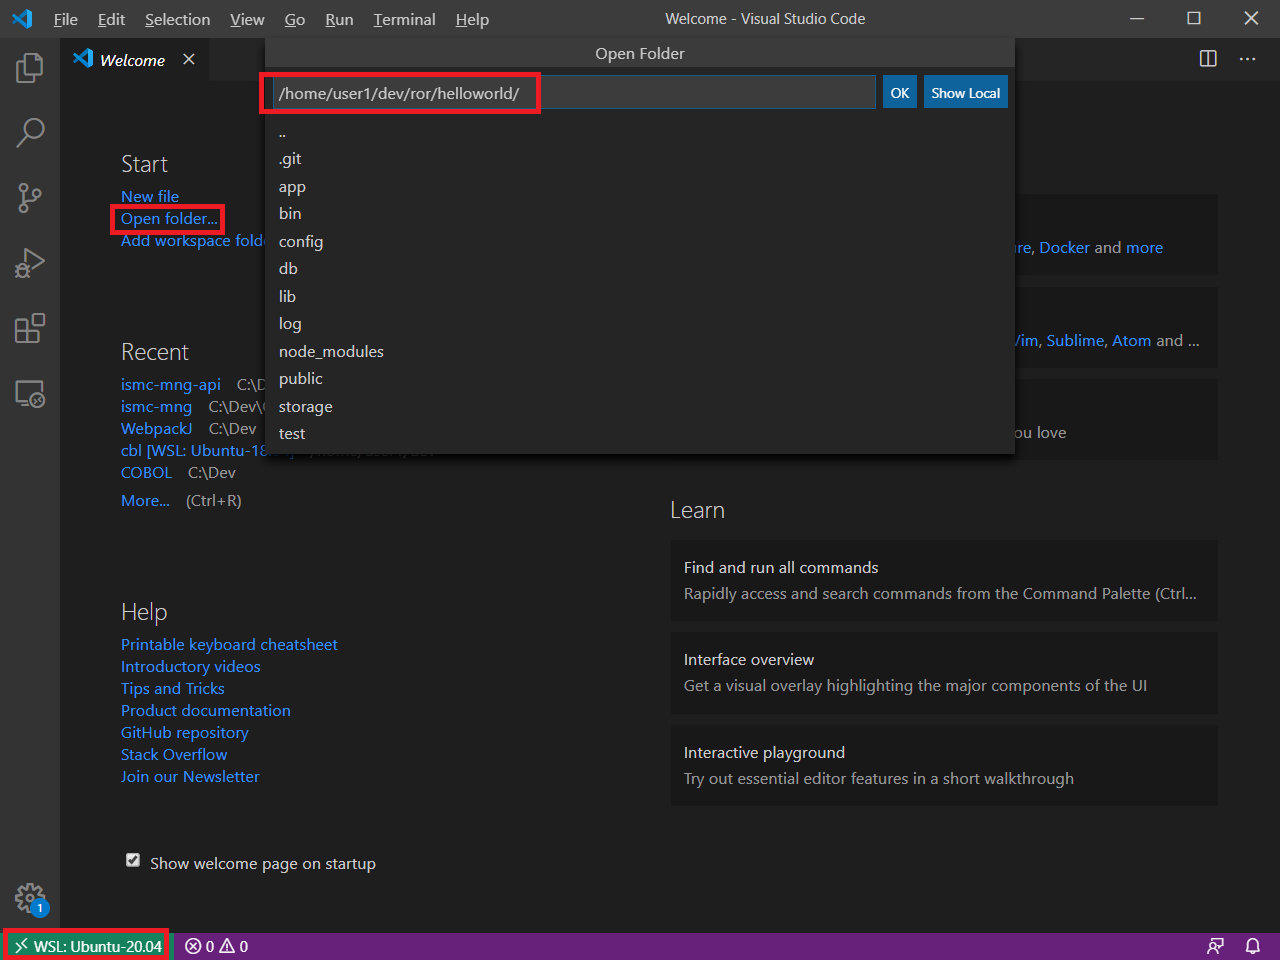
-
左下のRemote接続用のアイコンが変わったのが見て取れると思います。[WSL:Ubuntu-20.04]と表記が変わりました。[Open folder...]を選択し、RoRのプロジェクトフォルダを開きます。
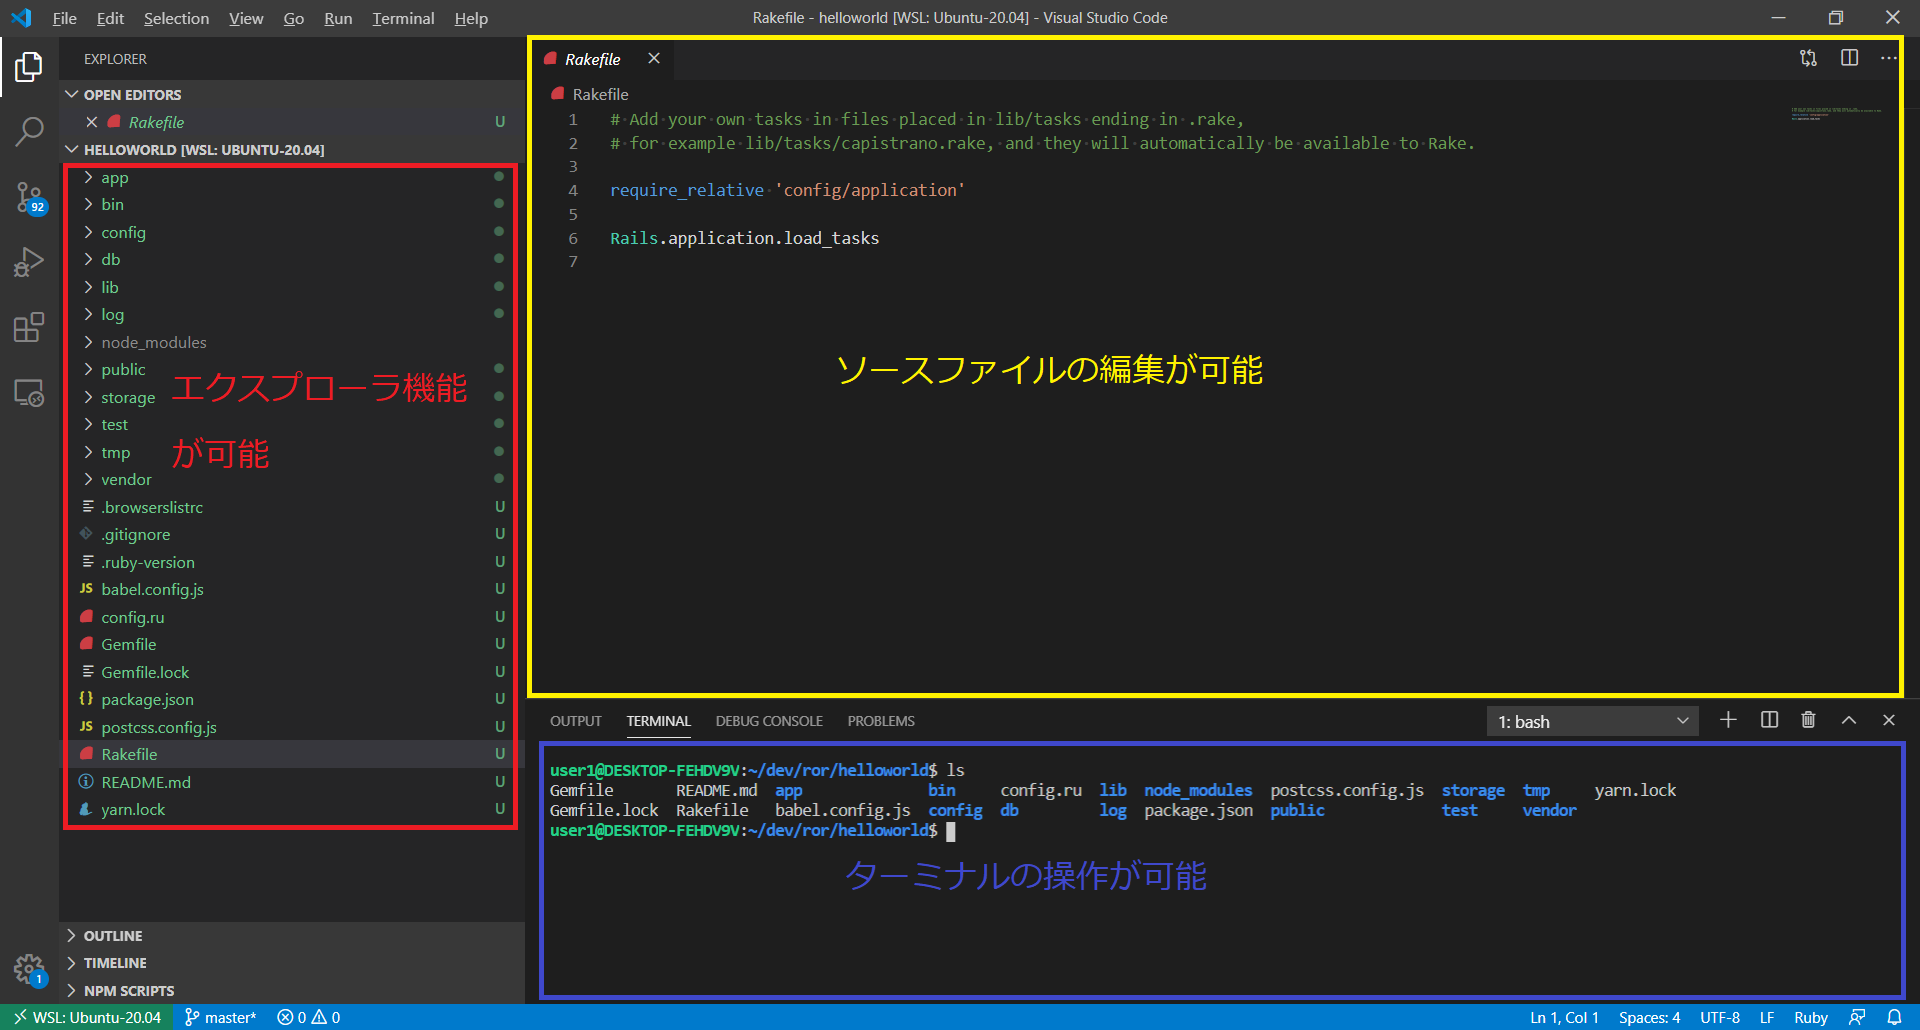
-
以下の様に、左側のツリーでエクスプローラ機能、右上のウィンドウでファイル編集機能、「Ctrl + @」でターミナルが開くことでターミナル操作も可能となり、Visual Source Code上で大抵の操作を行えますので、便利です。
トラブルシューティング
railsのインストール時に以下エラーが発生した場合
E: Failed to fetch http://security.ubuntu.com/ubuntu/pool/main/l/linux/linux-libc-dev_5.4.0-33.37_amd64.deb  404  Not Found [IP: 91.189.88.152 80]
E: Unable to fetch some archives, maybe run apt-get update or try with --fix-missing?
- エラーメッセージ通り、
sudo apt-get updateを実行してから行ってください。
railsのインストール時にCコンパイラ系のエラーが発生した場合
ERROR:  Error installing rails:
        ERROR: Failed to build gem native extension.

    current directory: /var/lib/gems/2.7.0/gems/nokogiri-1.10.9/ext/nokogiri
/usr/bin/ruby2.7 -I /usr/lib/ruby/2.7.0 -r ./siteconf20200614-4621-1erqs4m.rb extconf.rb
checking if the C compiler accepts ... *** extconf.rb failed ***
Could not create Makefile due to some reason, probably lack of necessary
libraries and/or headers.  Check the mkmf.log file for more details.  You may
need configuration options.
- 再掲となりますが、以下コマンドでrailsインストールに必要なパッケージをインストールしてみてください。
$ sudo gem update --system
$ sudo gem install bundler
$ sudo apt-get install build-essential liblzma-dev patch ruby-dev zlib1g-dev libsqlite3-dev nodejs