最初に
Hi5とPerception Neuron PROはVTuberハッカソン 全国ツアー2019に参加した際に借りた機材になります。
個人で所有していないため、本機材に関する質問には、返答できない場合があります。
ご了承ください。
本記事の目標
Unity上でVRM形式のモデルをNeuron、Hi5で動かし、そのモーションを記録する
環境
【PC】Windows10 1903
【Unity】2019.2f1
トラッカー
SDK
- Noitom Perception Neuron PRO
ダウンロードページ
お借りしたモデル
- 折岸みつ
モデルページ
お借りしたスクリプト
モデルインポート
- UniVRM
ソースコード
モーショントラッキング関係
モーション記録関係
- EasyMotionRecorder
ソースコード
設定
Noitom Perception Neuron PRO SDK
-
ダウンロードページからAXIS NEURON PROをダウンロード、インストールし起動する
-
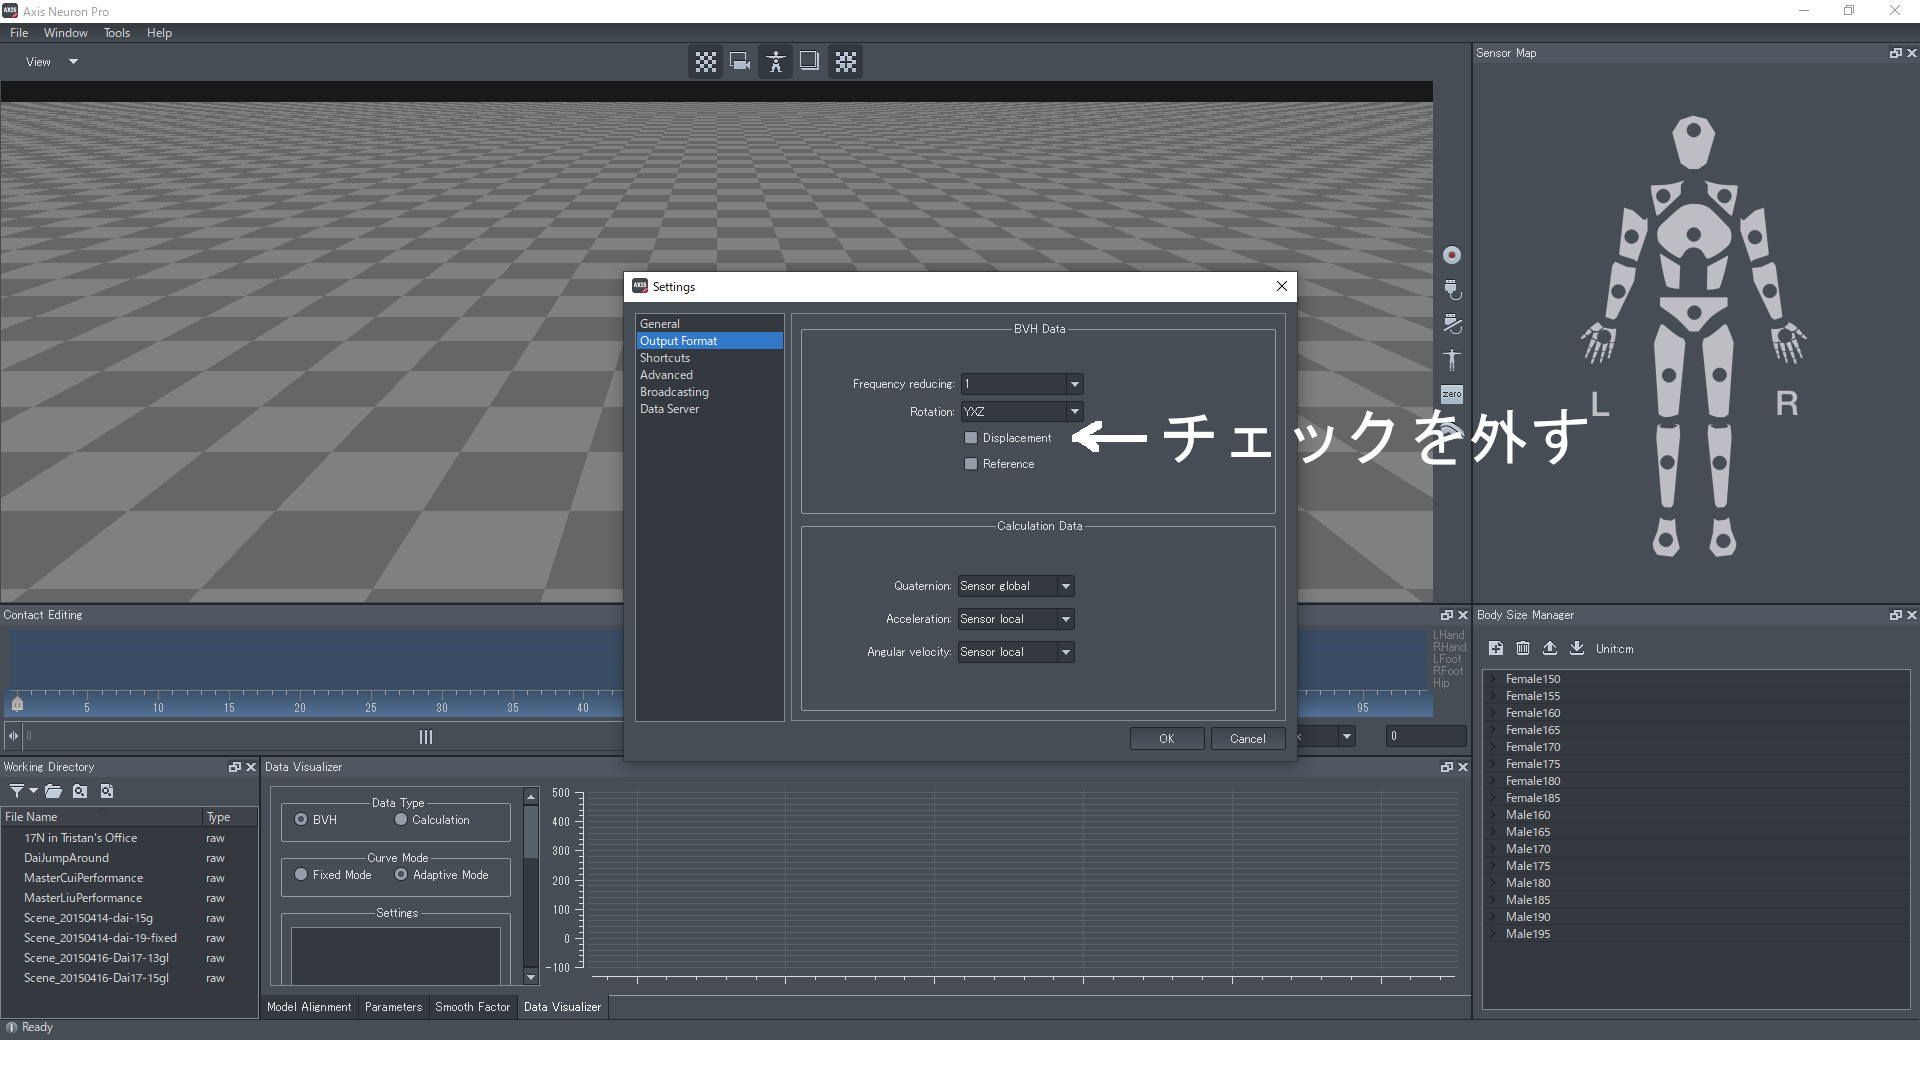
[File]->[Settings]->[Output Format]のBVH Dataの項目のDisplacementの項目のチェックを外す
-
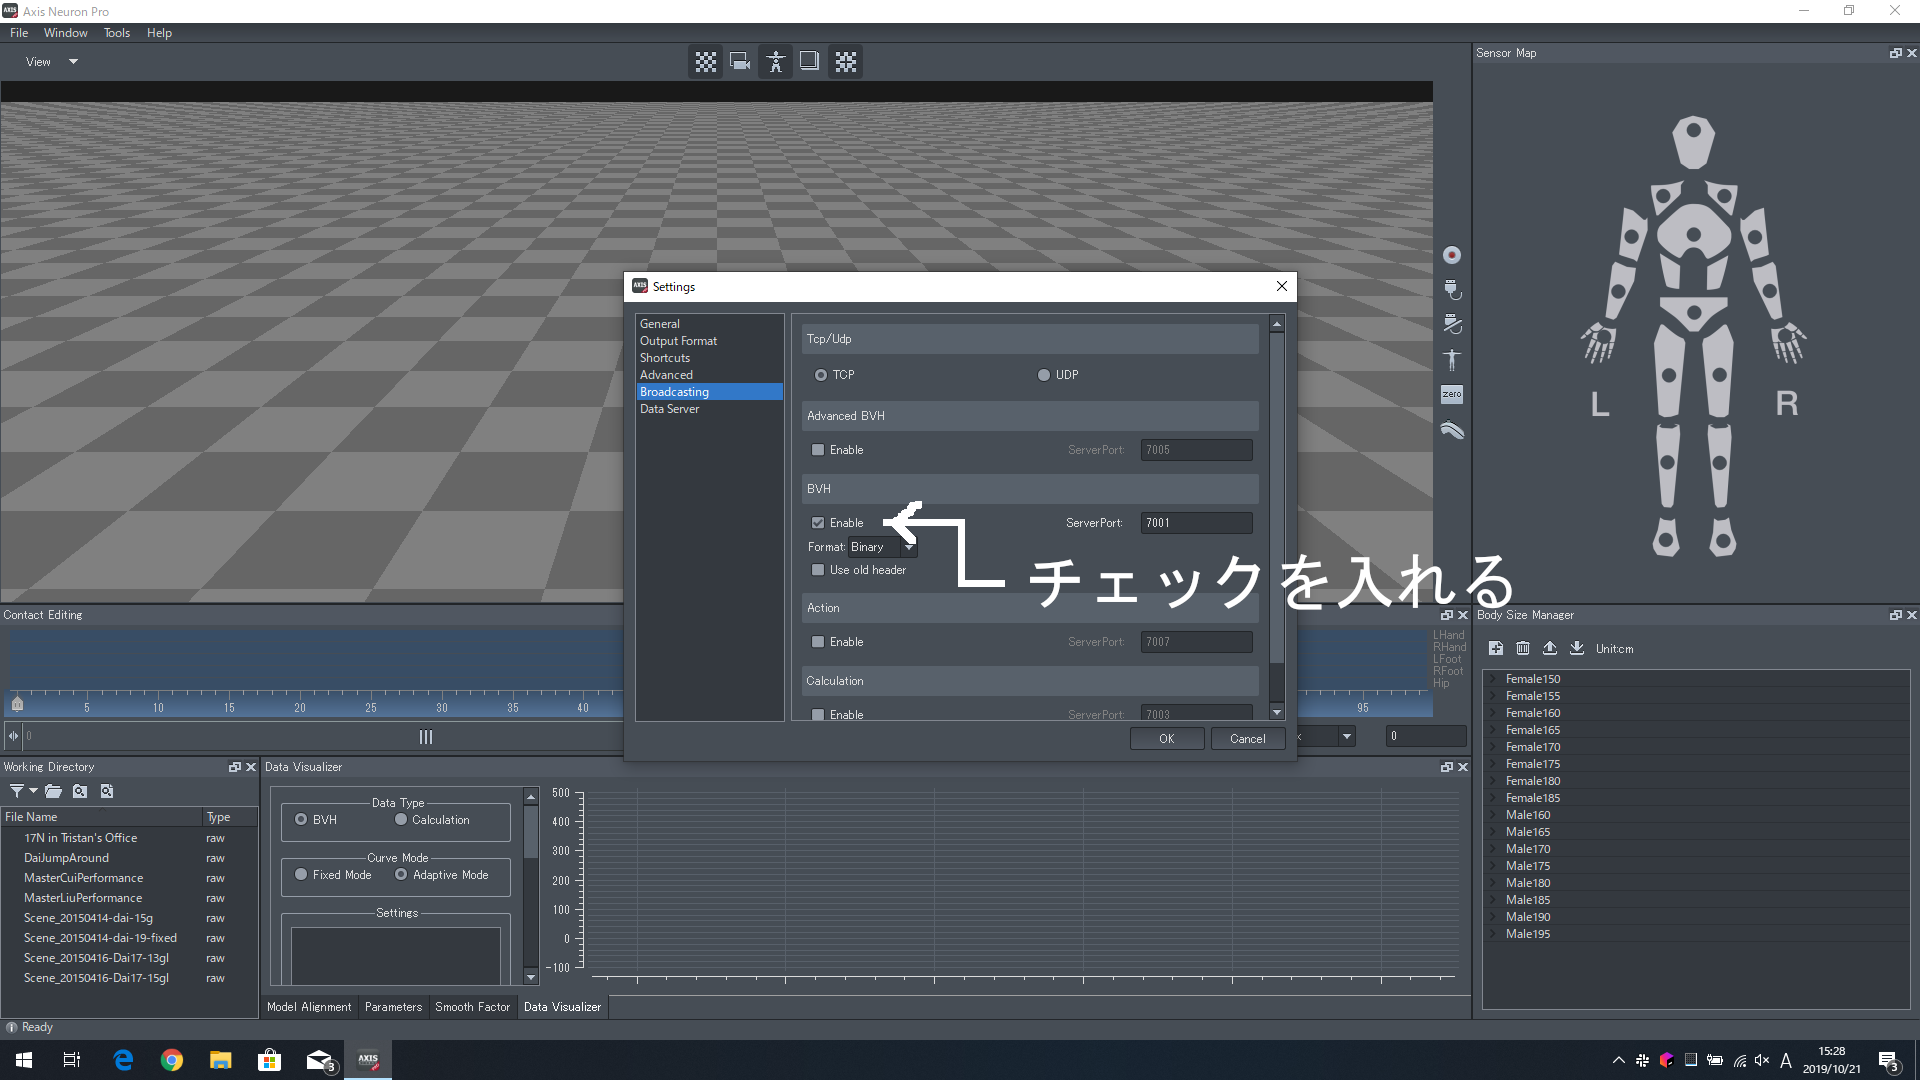
[File]->[Settings]->[Broadcasting]のBVHのEnableの項目にチェックを入れる
-
OKで設定を反映
Unity
モデルインポート
-
UniVRMリリースページから最新版の.unitypackageをダウンロード
-
UnityのプロジェクトにUnity Packageをインポート
-
VRM形式のモデルデータをAssetフォルダ直下にコピペする
-
UniVRMがUnity用にプレハブを作成する
Noitom Perception Neuron PRO
-
Perception Neuron PRO、Hi5設定ツールをダウンロードし、解凍する
-
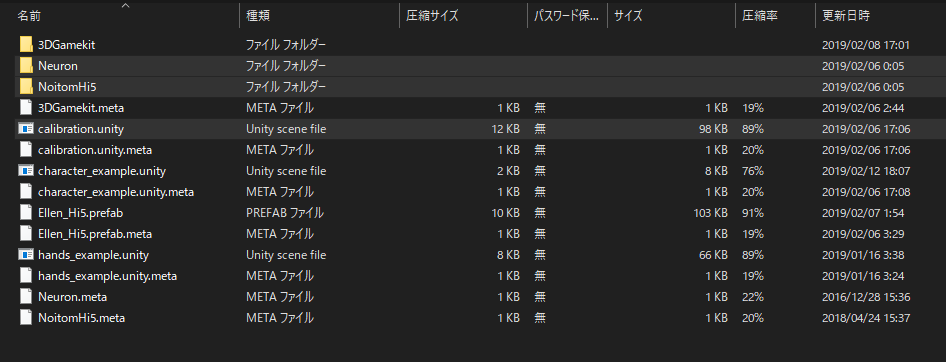
解凍後のフォルダのAssetフォルダから、
・Neuronフォルダ
・NotionHi5フォルダ
・calibration.unity
をUnityプロジェクトのAsset直下にコピペする
-
動かしたいモデルにNeuronAnimator.csをアタッチする
-
設定完了
気になる人はUnityを再生して、AXIS NEURON PRO上の動きがモデルに反映されているか確認する
Noitom Hi5
-
上記Noitom Perception Neuron PROの項目1.、2.を行っていない人は行う
-
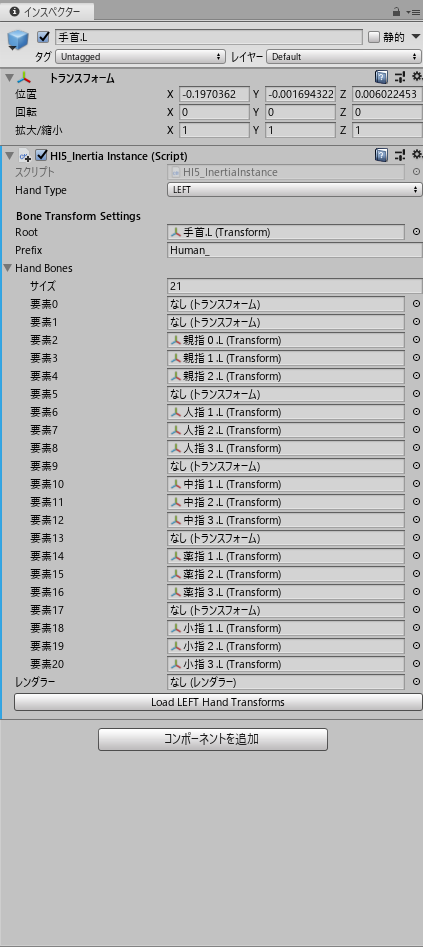
モデルの右手首、左手首にHi5_InertiaInstance.csをアタッチ
-
それぞれを以下の画像のように設定する
設定が面倒な方はHi5_InertiaInstance.csの設定が面倒な人向けの項目を確認してください
左手の設定サンプル(右手はそれぞれを右手のモデルに読み替えてください)
Hi5_InertiaInstance.csの設定が面倒な人向け
自動設定機能を追加します。
- Hi5_InertiaInstance.csにhttps://gist.github.com/neon-izm/395709df5af70021490625e4c03e59bdより引用した以下のコードを加える
/// <summary>
/// モデルを変えたときに HandBone をセットし直すのが面倒だったため、自動的にアタッチしてくれる関数
/// HandBones[0] に対象モデルのRoot(Animatorがアタッチされてるオブジェクト)を入れてから実行する。
/// </summary>
[ContextMenu("Automatic Set HandBone")]
void AutomaticSetHandBone()
{
    if (HandBones[0] == null)
    {
        Debug.LogError("HandBones[0] にモデルのRoot(Animatorとかあるオブジェクト)を入れてください。");
        return;
    }

    //Animator からボーン情報を持ってきたいので、Animator を取得
    var animator = HandBones[0].GetComponent<Animator>();
    if (animator == null)
    {
        Debug.LogError("Animator が見つかりません。");
        return;
    }

    //念の為初期化
    HandBones = new Transform[(int) Bones.NumOfHI5Bones];

    //左手と右手で取得すべきボーンが違うから判定
    switch (HandType)
    {
        case Hand.LEFT:
            HandBones[1] = animator.GetBoneTransform(HumanBodyBones.LeftHand);
            HandBones[2] = animator.GetBoneTransform(HumanBodyBones.LeftThumbProximal);
            HandBones[3] = animator.GetBoneTransform(HumanBodyBones.LeftThumbIntermediate);
            HandBones[4] = animator.GetBoneTransform(HumanBodyBones.LeftThumbDistal);

            HandBones[6] = animator.GetBoneTransform(HumanBodyBones.LeftIndexProximal);
            HandBones[7] = animator.GetBoneTransform(HumanBodyBones.LeftIndexIntermediate);
            HandBones[8] = animator.GetBoneTransform(HumanBodyBones.LeftIndexDistal);

            HandBones[10] = animator.GetBoneTransform(HumanBodyBones.LeftMiddleProximal);
            HandBones[11] = animator.GetBoneTransform(HumanBodyBones.LeftMiddleIntermediate);
            HandBones[12] = animator.GetBoneTransform(HumanBodyBones.LeftMiddleDistal);

            HandBones[14] = animator.GetBoneTransform(HumanBodyBones.LeftRingProximal);
            HandBones[15] = animator.GetBoneTransform(HumanBodyBones.LeftRingIntermediate);
            HandBones[16] = animator.GetBoneTransform(HumanBodyBones.LeftRingDistal);

            HandBones[18] = animator.GetBoneTransform(HumanBodyBones.LeftLittleProximal);
            HandBones[19] = animator.GetBoneTransform(HumanBodyBones.LeftLittleIntermediate);
            HandBones[20] = animator.GetBoneTransform(HumanBodyBones.LeftLittleDistal);
            break;

        case Hand.RIGHT:
            HandBones[1] = animator.GetBoneTransform(HumanBodyBones.RightHand);
            HandBones[2] = animator.GetBoneTransform(HumanBodyBones.RightThumbProximal);
            HandBones[3] = animator.GetBoneTransform(HumanBodyBones.RightThumbIntermediate);
            HandBones[4] = animator.GetBoneTransform(HumanBodyBones.RightThumbDistal);

            HandBones[6] = animator.GetBoneTransform(HumanBodyBones.RightIndexProximal);
            HandBones[7] = animator.GetBoneTransform(HumanBodyBones.RightIndexIntermediate);
            HandBones[8] = animator.GetBoneTransform(HumanBodyBones.RightIndexDistal);

            HandBones[10] = animator.GetBoneTransform(HumanBodyBones.RightMiddleProximal);
            HandBones[11] = animator.GetBoneTransform(HumanBodyBones.RightMiddleIntermediate);
            HandBones[12] = animator.GetBoneTransform(HumanBodyBones.RightMiddleDistal);

            HandBones[14] = animator.GetBoneTransform(HumanBodyBones.RightRingProximal);
            HandBones[15] = animator.GetBoneTransform(HumanBodyBones.RightRingIntermediate);
            HandBones[16] = animator.GetBoneTransform(HumanBodyBones.RightRingDistal);

            HandBones[18] = animator.GetBoneTransform(HumanBodyBones.RightLittleProximal);
            HandBones[19] = animator.GetBoneTransform(HumanBodyBones.RightLittleIntermediate);
            HandBones[20] = animator.GetBoneTransform(HumanBodyBones.RightLittleDistal);
            break;

        default:
            Debug.LogError("HandType が不正なものです。");
            break;
    }
}
-
下図の通り、
・Hand Baseの要素0にVRMのアニメーターがついているオブジェクトを設定
・自動設定を実行
・追加の設定
を行う
-
Asset直下のcalibration.unityを再生し、Hi5のキャリブレーションを行う(スペースキーで画面遷移します)
詳細な手順は以下の動画をご確認ください
https://youtu.be/FN1wvcpdOjk?t=157
レコーディング環境
1.EasyMotionRecorderリリースページから最新版のunitypackageをダウンロード、プロジェクトにインポート
2.Asset -> EasyMotionRecorder -> Prefubs -> EasyMotionRecorderをシーンにドラッグアンドドロップ
3.オブジェクトEasyMotionRecorderのMotionDataRecoder.csのアニメーターにモデルをドラッグアンドドロップ
動作
上記設定の項目を行った状態で再生すると、Hi5とPerception Neuron PROを着用した人のモーションがモデルに反映されます。
デモ用に取ったモーションを再生したもの
レコーディング
記録
Unityを再生中にEasyMotionRecorderのMotionDataRecorder.csに設定したキーで録画開始、終了ができます。
記録されたモーションはAsset -> Resourcesに記録されます。
アニメーションに変換
そのままでは、アニメーターで再生できないので、アニメーションに変換します。
Asset -> Resourcesに記録された.assetファイルを選択し、下図の通りHumanoid Animation Clipとしてエクスポートします。
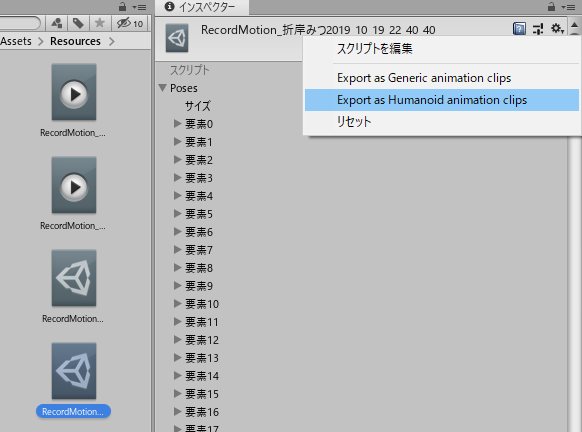
あとは、アニメーションコントローラーに張り付けて使用してください。
参考文献
-
Noitom Perception Neuron PROホームページ
https://www.aiuto-jp.co.jp/products/product_2459.php
Neuron PROの着方やSDKのダウンロードでお世話になりました -
유니티 라이브 모션 캡쳐 with 하이파이브 글러브 & 뉴런 프로
https://www.youtube.com/watch?v=FN1wvcpdOjk
Unity側のNeuron PRO、Hi5の設定、ツールのダウンロードでお世話になりました -
izm_11's blog
Noitom Hi5をVTuber案件で投入したのでレビューしつつ便利スクリプトを書いた
http://izm-11.hatenablog.com/entry/2018/10/10/184502
Hi5の自動設定のコードをお借りしました。 -
EasyMotionRecorder
http://github.com/duo-inc/EasyMotionRecorder
モーションの記録でお世話になりました。 -
UniVRM
https://github.com/vrm-c/UniVRM
VRMモデルのインポートでお世話になりました。 -
ニコニ立体 【モデル配布】折岸みつ【オリキャラ】
https://3d.nicovideo.jp/works/td35076
モデルをお借りしました