背景
前回、sequelizeを利用したコードのtypescript化を試みて、modelの呼び出し元はtypescriptっぽく書くようにできたけど、モデル自体はtypescript化できずに、中途半端な感じで終わってしまった。
sequelizeは、元々typescriptをサポートしていなかったため、typescriptと少し相性が悪いとの記事もいくつか見つけた。
そこで今回は最近伸びてきているTypeORMを試してみようと思う。
こちらは元々typescriptが前提となっているORMなので、typescript化で苦労することはなさそう。
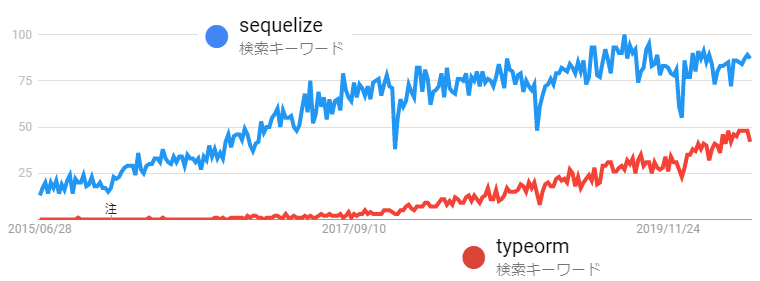
googleトレンドで見ると、sequelizeに追いつく勢いで伸びてきている。
(むしろtypescriptに限定すれば、既にTypeORMの方が人気がある気がする)
TypeORMのCLIを使った環境構築
DBは以前インストールしたpostgresql(windows)を利用する。
https://qiita.com/yusuke-ka/items/448843020c0406363ba5#%E6%BA%96%E5%82%99
pgadmin4でデータベースインスタンスだけ作っておく。
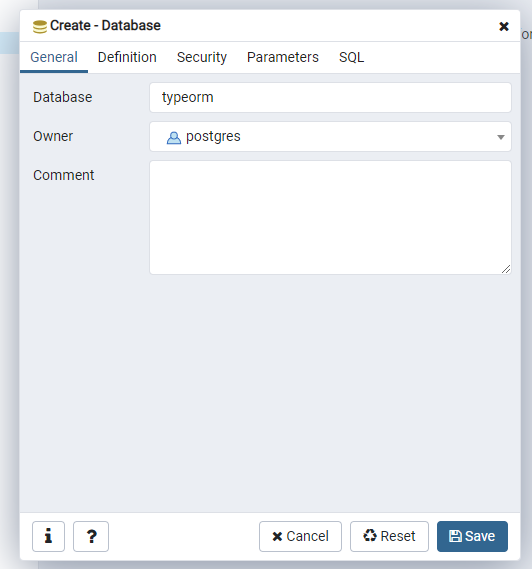
データベース名("typeorm"とした)を入力して作成。
ここからは、コード エディタ(VS Code)上での作業。
まずはベースとなるnode環境を作る。
> mkdir typeorm
> cd typeorm
> yarn init
検証なので、とりあえず全部デフォルト設定。
続いて、TypeORMのインストール。
また、DBはpostgresqlを使うのでpg(node-postgres)もインストール。
> yarn add typeorm
> yarn add pg
TypeORMのCLIがyarnで簡単に使えるようにpackage.jsonに以下を追加しておく。
{
  ...
  "scripts": {
    "typeorm-cli": "typeorm"
  },
  ...
}
TypeORMのCLIを使って、express、postgresqlのTypeORM環境を一気に構築。
> yarn typeorm-cli init --express --database postgres
自動で以下のようなフォルダ/ファイルが生成される。
|- typeorm/
 |- src/
  |- controller/
    |- UserController.ts
  |- entry/
    |- User.ts
  |- migration/
  |- index.ts
  |- routes.ts
 |- ormconfig.json
 |- tsconfig.json
設定ファイル(ormconfig.json)で接続先DBに合わせて設定を変更。
{
  "type": "postgres",
  "host": "localhost",
  "port": 5432,
  "username": "postgres",
  "password": "postgres",
  "database": "typeorm",
  "synchronize": true,
  "logging": false,
  "entities": ["src/entity/**/*.ts"],
  "migrations": ["src/migration/**/*.ts"],
  "subscribers": ["src/subscriber/**/*.ts"],
  "cli": {
    "entitiesDir": "src/entity",
    "migrationsDir": "src/migration",
    "subscribersDir": "src/subscriber"
  }
}
今回は以下だけ変更。
 ...
 "username": "postgres",
 "password": "postgres",
 "database": "typeorm",
 ...
これでTypeORMの環境構築は完了。簡単ですね。
TypeORMのCLIで自動構築された環境の確認
CLIで作成すると、サンプルとして"User"というモデルを操作するコードが自動で入っている。
自動生成されたモデル(src/entry/User.ts)は以下のようになっている。
import {Entity, PrimaryGeneratedColumn, Column} from "typeorm";

@Entity()
export class User {

    @PrimaryGeneratedColumn()
    id: number;

    @Column()
    firstName: string;

    @Column()
    lastName: string;

    @Column()
    age: number;

}
モデルを定義するときは、これを真似して<モデル名>.tsをentryフォルダ以下に配置すればよい模様。
続いて、コントローラー(src/controller/UserController.ts)は以下のようになっていた。
import {getRepository} from "typeorm";
import {NextFunction, Request, Response} from "express";
import {User} from "../entity/User";

export class UserController {

    private userRepository = getRepository(User);

    async all(request: Request, response: Response, next: NextFunction) {
        return this.userRepository.find();
    }

    async one(request: Request, response: Response, next: NextFunction) {
        return this.userRepository.findOne(request.params.id);
    }

    async save(request: Request, response: Response, next: NextFunction) {
        return this.userRepository.save(request.body);
    }

    async remove(request: Request, response: Response, next: NextFunction) {
        let userToRemove = await this.userRepository.findOne(request.params.id);
        await this.userRepository.remove(userToRemove);
    }

}
ここではモデルに対する操作を書く感じですね。
全件取得、1件取得、保存(作成/更新)、削除の機能がサンプルとして実装されている。
getRepository(Hoge)で取得されるRepositoryをTypeORMが提供してくれているので、このRepositoryのメソッド(findやsaveなど)を呼び出して、DBにアクセスしているっぽい。
次は、index.ts。expressを使用する感じで自動生成されている。
import "reflect-metadata";
import {createConnection} from "typeorm";
import * as express from "express";
import * as bodyParser from "body-parser";
import {Request, Response} from "express";
import {Routes} from "./routes";
import {User} from "./entity/User";

createConnection().then(async connection => {

    // create express app
    const app = express();
    app.use(bodyParser.json());

    // register express routes from defined application routes
    Routes.forEach(route => {
        (app as any)[route.method](route.route, (req: Request, res: Response, next: Function) => {
            const result = (new (route.controller as any))[route.action](req, res, next);
            if (result instanceof Promise) {
                result.then(result => result !== null && result !== undefined ? res.send(result) : undefined);

            } else if (result !== null && result !== undefined) {
                res.json(result);
            }
        });
    });

    // setup express app here
    // ...

    // start express server
    app.listen(3000);

    // insert new users for test
    await connection.manager.save(connection.manager.create(User, {
        firstName: "Timber",
        lastName: "Saw",
        age: 27
    }));
    await connection.manager.save(connection.manager.create(User, {
        firstName: "Phantom",
        lastName: "Assassin",
        age: 24
    }));

    console.log("Express server has started on port 3000. Open http://localhost:3000/users to see results");

}).catch(error => console.log(error));
routes.tsに定義されているRouteをforEachで回しているようなので、新しいAPIを追加するときには、このコード(index.ts)は変更せずに、routes.tsに定義を追加すれば良さそう。
最後のほうにある
// insert new users for test
以下はサーバー起動時にテストデータを入れているコードのようなので、実際に利用する際には消しておいた方がよさそう。
というか必要ないので、さっそく消しておく。
import "reflect-metadata";
import {createConnection} from "typeorm";
import * as express from "express";
import * as bodyParser from "body-parser";
import {Request, Response} from "express";
import {Routes} from "./routes";

createConnection().then(async connection => {

    // create express app
    const app = express();
    app.use(bodyParser.json());

    // register express routes from defined application routes
    Routes.forEach(route => {
        (app as any)[route.method](route.route, (req: Request, res: Response, next: Function) => {
            const result = (new (route.controller as any))[route.action](req, res, next);
            if (result instanceof Promise) {
                result.then(result => result !== null && result !== undefined ? res.send(result) : undefined);

            } else if (result !== null && result !== undefined) {
                res.json(result);
            }
        });
    });

    // setup express app here
    // ...

    // start express server
    app.listen(3000);

    console.log("Express server has started on port 3000. ");

}).catch(error => console.log(error));
routes.tsを見てみる。これも自動生成されている。
import {UserController} from "./controller/UserController";

export const Routes = [{
    method: "get",
    route: "/users",
    controller: UserController,
    action: "all"
}, {
    method: "get",
    route: "/users/:id",
    controller: UserController,
    action: "one"
}, {
    method: "post",
    route: "/users",
    controller: UserController,
    action: "save"
}, {
    method: "delete",
    route: "/users/:id",
    controller: UserController,
    action: "remove"
}];
サンプルとして、全件取得、1件取得、追加(更新)、削除の4つのAPIが定義されている模様。
最後に設定系のファイルを見てみる。
typeORMの設定ファイル(ormconfig.json)は、先ほど見たので、package.jsonから。
{
   "name": "typeorm",
   "version": "1.0.0",
   "main": "index.js",
   "license": "MIT",
   "scripts": {
      "typeorm-cli": "typeorm",
      "start": "ts-node src/index.ts"
   },
   "dependencies": {
      "typeorm": "0.2.25",
      "reflect-metadata": "^0.1.10",
      "pg": "^7.3.0",
      "express": "^4.15.4",
      "body-parser": "^1.18.1"
   },
   "devDependencies": {
      "ts-node": "3.3.0",
      "@types/node": "^8.0.29",
      "typescript": "3.3.3333"
   }
}
scriptsにstartが追加されている。これでサーバーを実行する模様。
あとは、必要な依存が自動的に追加されている。
tsconfig.jsonも確認。
{
   "compilerOptions": {
      "lib": [
         "es5",
         "es6"
      ],
      "target": "es5",
      "module": "commonjs",
      "moduleResolution": "node",
      "outDir": "./build",
      "emitDecoratorMetadata": true,
      "experimentalDecorators": true,
      "sourceMap": true
   }
}
typeORMのREADMEに書いてある設定が自動的に入っているようです。
https://github.com/typeorm/typeorm#installation
TypeORMのサンプルコードを実行してみる。
TypeORMのコードを実行してみようと思う。
まずは、モデルをDBに反映してみる。
migration:generateを実行すると、DBの内容とモデルを比較してマイグレーションファイルを作成してくれるようなので、これを実行してみる。
> yarn typeorm-cli migration:generate -n UserMigration
エラーが発生した。
yarn run v1.22.4
$ typeorm migration:generate -n UserMigration
Error during migration generation:
D:\study\orm\typeorm\src\entity\User.ts:1
import {Entity, PrimaryGeneratedColumn, Column} from "typeorm";
^^^^^^

SyntaxError: Cannot use import statement outside a module
...
本家サイトのここを参考にしてやってみる。
https://github.com/typeorm/typeorm/blob/master/docs/using-cli.md#installing-cli
package.jsonのscriptsを以下のように変更(typeormのscriptを追加)。
(ts-nodeは自動でインストールされているはずだけど、もし入っていなければ、インストールする必要があるかも)
   ...
   "scripts": {
      "typeorm-cli": "typeorm",
      "typeorm": "node --require ts-node/register ./node_modules/typeorm/cli.js",
      "start": "ts-node src/index.ts"
   },
   ...
再度実行してみる。
(今度は、yarn typeorm-cliではなく、yarn typeorm)
> yarn typeorm migration:generate -n UserMigration
今度は成功。
yarn run v1.22.4
$ node --require ts-node/register ./node_modules/typeorm/cli.js migration:generate -n UserMigration
Migration D:\study\orm\typeorm/src/migration/1593226939171-UserMigration.ts has been generated successfully.
Done in 2.03s.
こんな感じでマイグレーションファイルが生成された。
import {MigrationInterface, QueryRunner} from "typeorm";

export class UserMigration1593226939171 implements MigrationInterface {
    name = 'UserMigration1593226939171'

    public async up(queryRunner: QueryRunner): Promise<void> {
        await queryRunner.query(`CREATE TABLE "user" ("id" SERIAL NOT NULL, "firstName" character varying NOT NULL, "lastName" character varying NOT NULL, "age" integer NOT NULL, CONSTRAINT "PK_cace4a159ff9f2512dd42373760" PRIMARY KEY ("id"))`);
    }

    public async down(queryRunner: QueryRunner): Promise<void> {
        await queryRunner.query(`DROP TABLE "user"`);
    }

}
DBに反映させてみる。
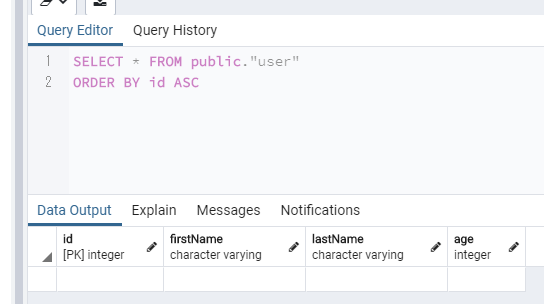
> yarn typeorm migration:run
userテーブルが作成された。
サーバーを起動。
> yarn start
今回もchromeの拡張ツール「Advanced REST client」で動作確認。
http://localhost:3000/users に各種リクエストを送ってみる。
routes.tsに定義されているRouteを見てURLを指定。
まずは全件取得。
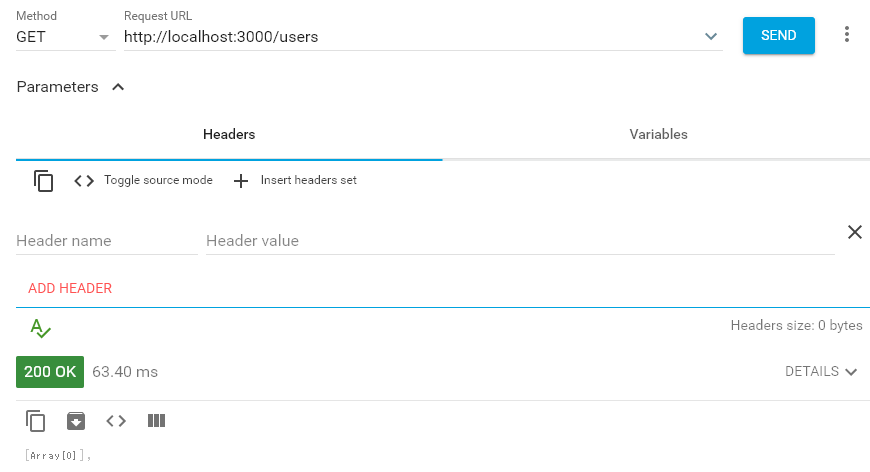
何も登録してないので、結果は空の配列。
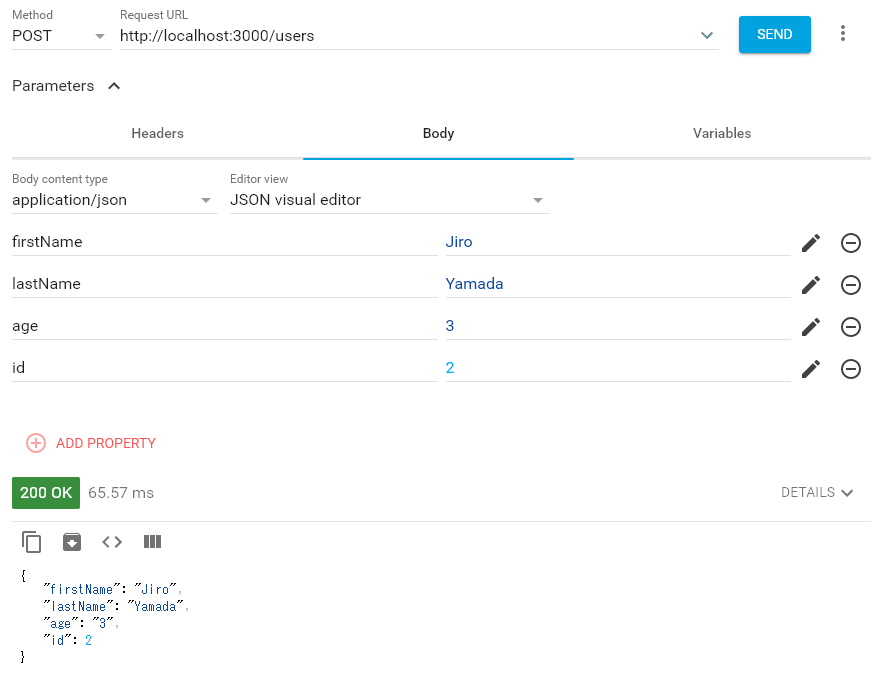
つづいて、ユーザーを登録してみる。
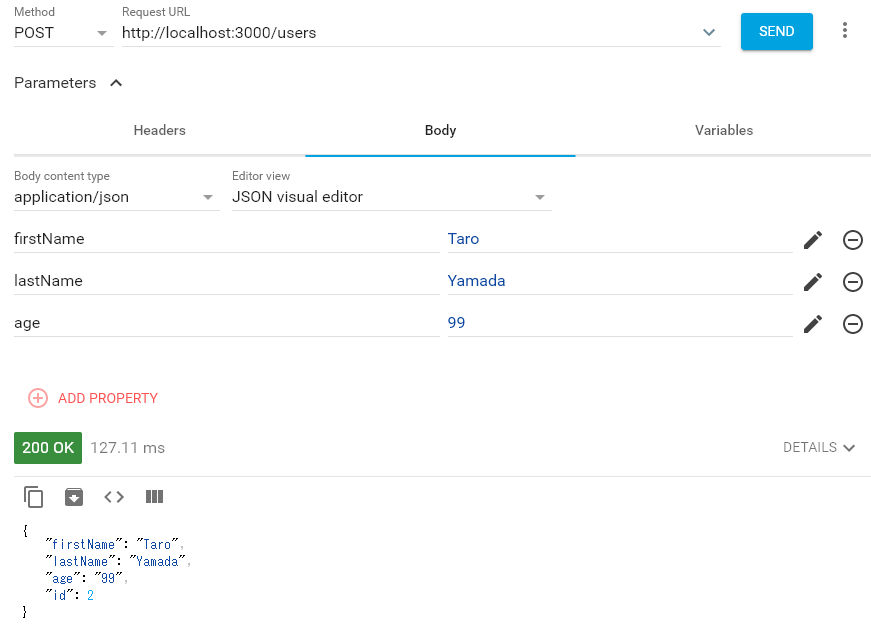
application/jsonで指定したパラメータでユーザーが登録された。
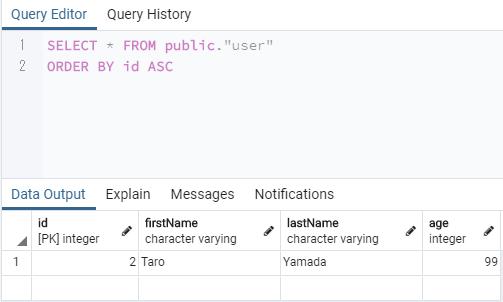
DBにも登録されている。
同様にもう一人ユーザーを追加した後、再度全件取得してみる。
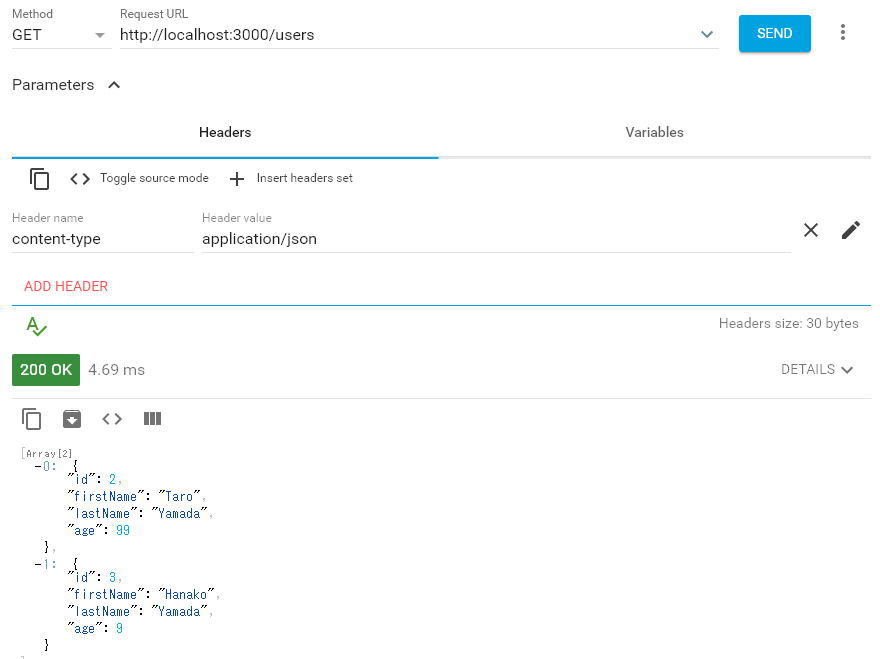
今度は配列が空じゃない状態で返ってきた。
パスにIDを指定して取得。
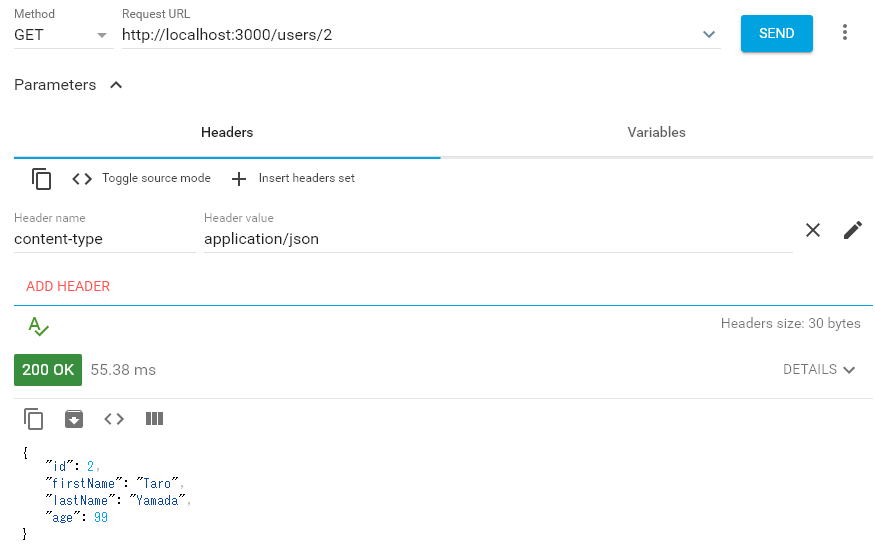
1件だけ返ってきた。
データ更新。
パラメータにID(integer)を指定してPOSTリクエストを送る。
データが更新された。
最後に、削除を試してみる。
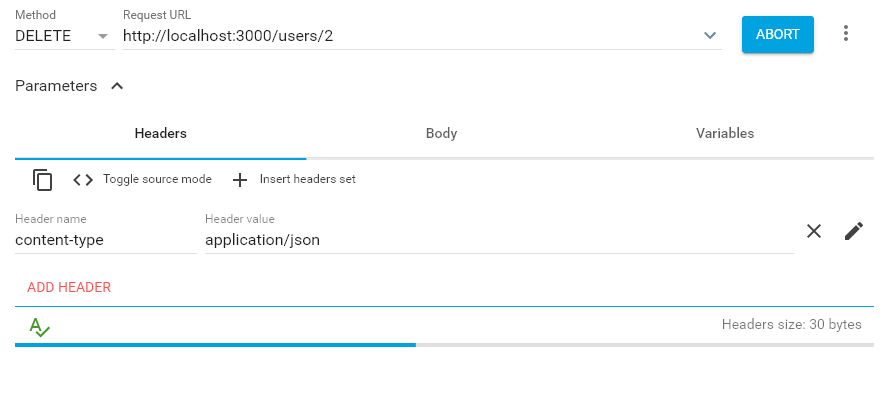
DBからデータが消えているようだが、レスポンスが返ってこない。
index.tsでresultがundefinedの時にレスポンスを返していないのが原因かと思われる。
    ...
    // register express routes from defined application routes
    Routes.forEach(route => {
        (app as any)[route.method](route.route, (req: Request, res: Response, next: Function) => {
            const result = (new (route.controller as any))[route.action](req, res, next);
            if (result instanceof Promise) {
                result.then(result => result !== null && result !== undefined ? res.send(result) : undefined); // ← ココ

            } else if (result !== null && result !== undefined) {
                res.json(result);
            }
        });
    });
    ...
試しに200を返すように書き換えてみる。
    ...
    // register express routes from defined application routes
    Routes.forEach(route => {
        (app as any)[route.method](route.route, (req: Request, res: Response, next: Function) => {
            const result = (new (route.controller as any))[route.action](req, res, next);
            if (result instanceof Promise) {
                result.then(result => result !== null && result !== undefined ? res.send(result) : res.send(200)); // ← ココ

            } else if (result !== null && result !== undefined) {
                res.json(result);
            }
        });
    });
    ...
他のIDを指定して削除を再実行。
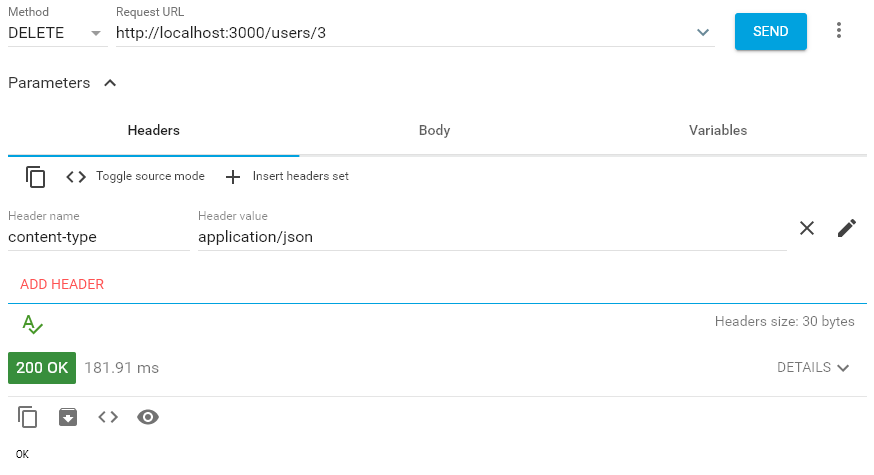
今度はレスポンスが返ってきた。
修正が正しいかどうかは置いといて、原因は特定できた。
さいごに
今回はTypeORMの環境構築を試してみた。
いくつかハマりポイントはあったもののsequelizeをtypescript化するよりは遥かに楽だったし、モデルもコントローラーもすべてtypescriptで書けそうなので、sequelizeの時のように中途半端な感じにならないのも良さげ。
(もう少し時間をかけて調べれば、sequelizeもいい感じにtypescript化できる方法があるのかもしれないけど…)
sequelizeほど成熟していない感はあるものの、typescriptで書くことが前提ならTypeORMの方がやりやすい気がします。