背景
前回の記事でC++でPythonのコードを実行する環境作りをまとめました。
C++ で Python を実行 on Visual Studio 2017
この記事だけだと、C++でPythonを呼ぶありがたみが分からないと思います。
そこで深層学習で物体検出できるYOLOv3を実行したいと思います。
C++でも深層学習モデルを使用できますが、現状のPythonには及ばないです(泣)。
開発環境
・OS : windos10 64bit
・CPU : Intel i3-8100
・GPU : NVIDIA GeForce GTX 1050 Ti
・Visual Studio 2017
・C++
・Python 3.7.3
以前の記事の環境よりもスペックをあげています()。
手順
前提条件として以下の二点の環境構築が必要です。
それぞれの構築ができた上で取り組ませていただきます。
・C++でPythonを呼び出す環境構築方法は以下の記事を参考にしてください。
C++ で Python を実行 on Visual Studio 2017
・PythonでGPUを使えるようにする環境構築方法は以下の記事を確認してください。
環境設定 tensorflow-gpu
以下の流れで進めていきたいと思います。
良かったらご一緒にどうぞ。
以前の記事から来たかたは手順のいくつかをスキップできます。
Cドライブ直下にgitファイルを展開
Cドライブ直下にファイルを展開したいと思います。
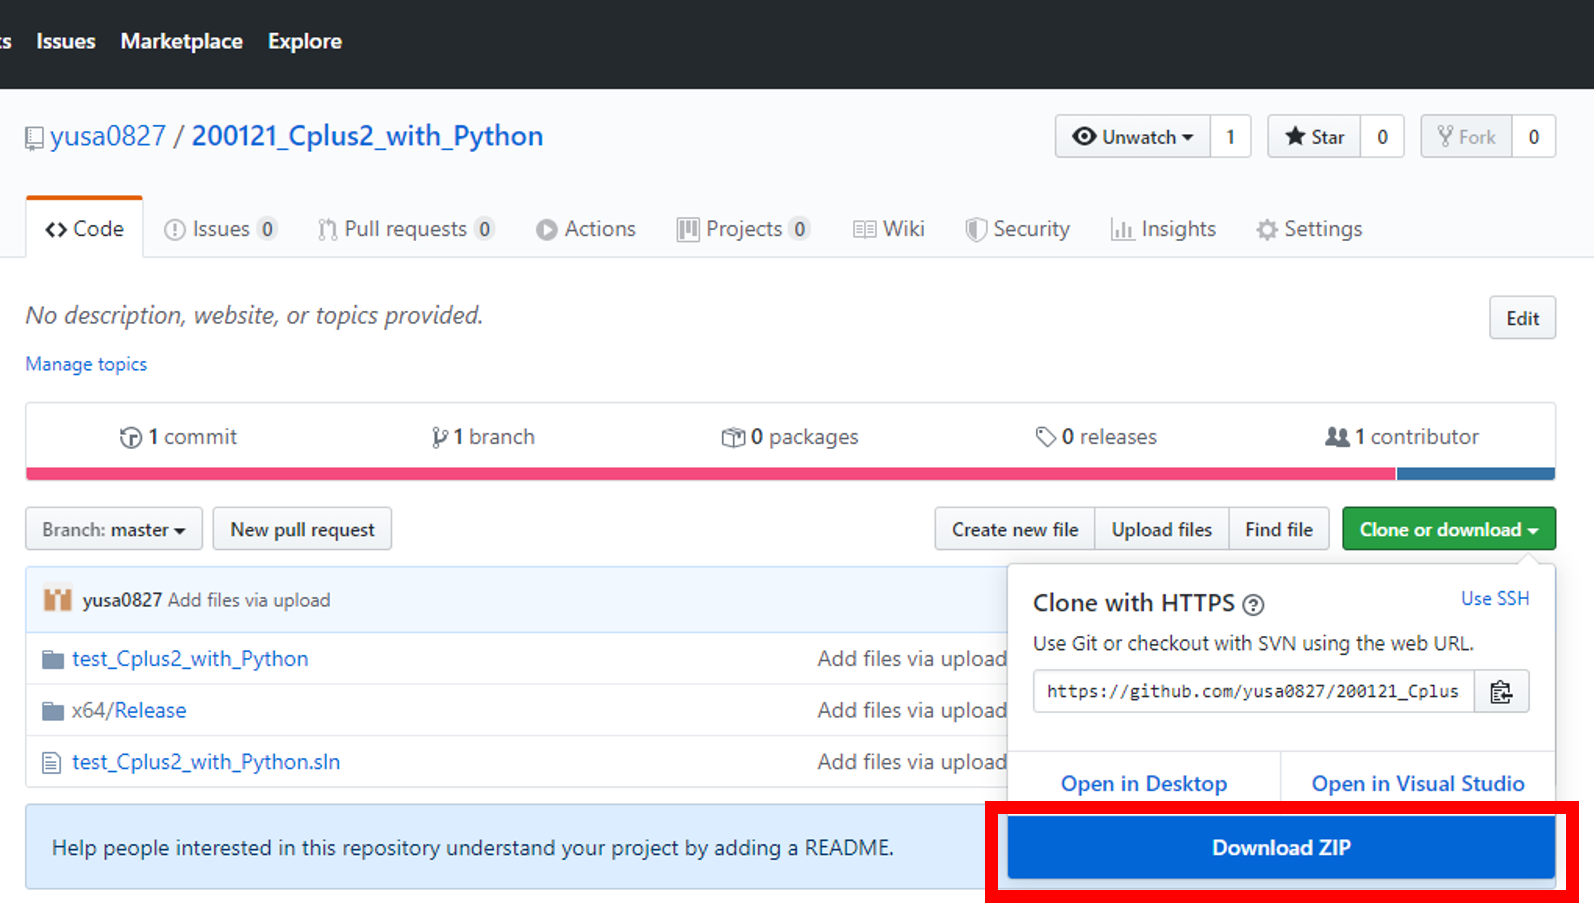
git clone https://github.com/yusa0827/200121_Cplus2_with_Python
方法は2です。
- git clone が使える方がCドライブ直下で任意のフォルダを作成し、git clone してください。
- git clone が使えない方は上記のURLに飛び、DownloadしてCドライブ直下に配置してください。
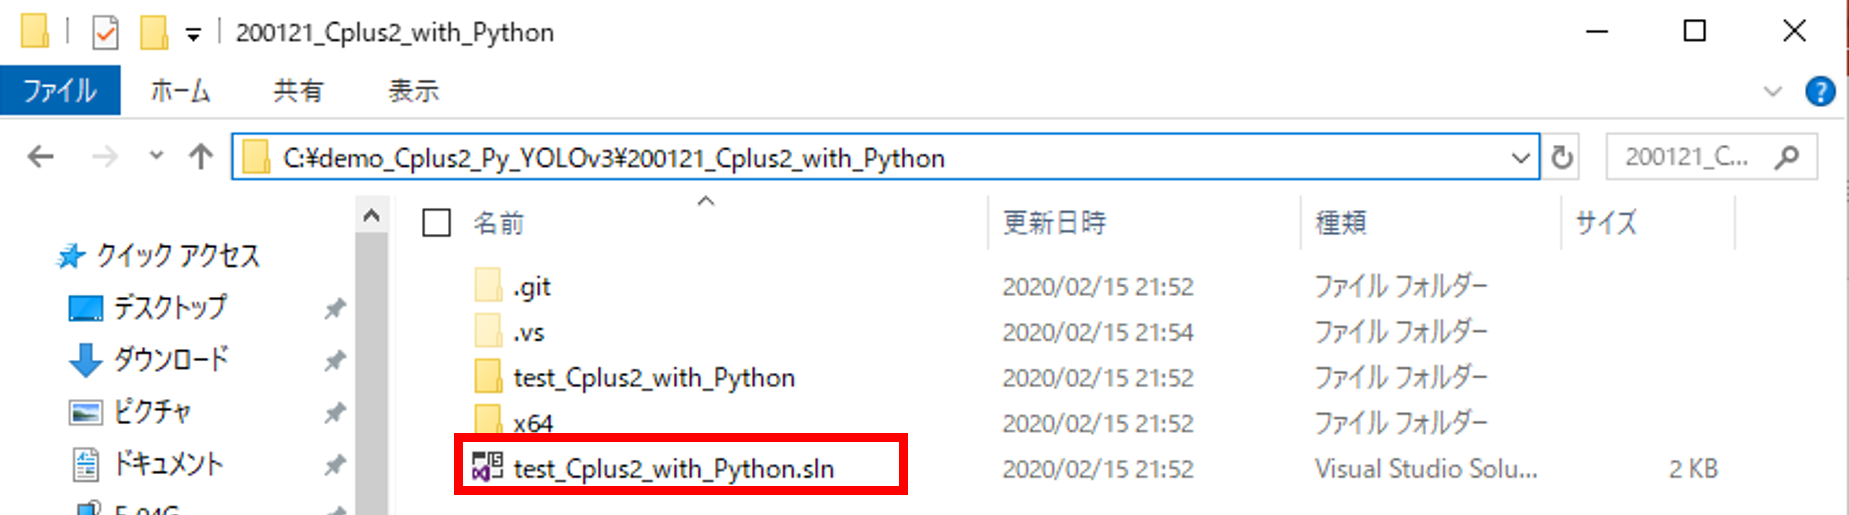
ファイル内の.slnをvisual studio 2017で起動
DLしたフォルダの中身をみると.slnファイルがあります。
.slnにサンプルプログラムが含まれているため、
こちらをダブルクリックするか、
右クリック⇒プログラムから開く⇒Microsoft Visual Studio 2017をクリック
すると、サンプルプログラムをvisual studioで起動することができます。
このプログラムはver2017で構築しています。
2019でも使えるとは思いますが、2019内で
2017のバージョンに落とさないといけないです。
サンプルプログラムの環境パスの設定
環境パスを修正する必要があります。
1. ソリューション構成とソリューションプラットホーム
Debug → Release に変更
x86 → x64

2. C++ → 全般 → 追加のインクルード
C:\boost_1_70_0
C:\Users\○○\AppData\Local\Programs\Python\Python37\include
↑要修正

3. C++ → コード生成 → ランタイムライブラリで
マルチスレッド(/MT)に変更

4. リンカー → 全般 → 追加のライブラリディレクトリ
C:\boost_1_70_0\stage\lib\x64
C:\Users\○○\AppData\Local\Programs\Python\Python37\libs
↑要修正
サンプルプログラムを実行
実行結果は以下の通りになります。

うまく行かない場合は環境パスを確認してみてください。
YOLOv3の準備
YOLOv3とは深層学習を用いた物体検出手法で、特徴としてはリアルタイム性に優れていいる点です。
今回は一般的に使われているkeras版を使用します。
いろんな方が使い方を教えているので、ググれば一発なんですがあえて記載します。
keras版のyolov3のインストール
git clone https://github.com/qqwweee/keras-yolo3.git
そのディレクトリに進みます。(cd keras-yolov3)
Pythonの必要なモジュールとして、Tensorflow、Keras、Matplotlib、Pillow、opencv(opencv-pythonでインストール)などがあげられます。
まだpythonにインストールしていない方はpipでインストールしてください。
学習済みファイルをダウンロード
wgetを使わずに、以下のURLから直接DLしても構いません。
ダウンロードしたらkeras-yolo3フォルダの中に入れてください。
ファイル名:yolov3.weights
サイズ:237MB
wget https://pjreddie.com/media/files/yolov3.weights
学習済みファイルを変換
keras版に変更します。
コマンドプロンプト上で以下のコードを入力。
python convert.py yolov3.cfg yolov3.weights model_data/yolo.h5
実行結果は以下の通り。
:
:
conv2d_75 (Conv2D)              (None, None, None, 2 65535       leaky_re_lu_72[0][0]
==================================================================================================
Total params: 62,001,757
Trainable params: 61,949,149
Non-trainable params: 52,608
__________________________________________________________________________________________________
None
Saved Keras model to model_data/yolo.h5
Read 62001757 of 62001757.0 from Darknet weights.

C:\demo_Cplus2_Py_YOLOv3\keras-yolo3>
webカメラでリアルタイムでの物体検出
今回はwebカメラを使用します。
カメラではなく動画でもいいんですが、カメラのほうが検証しやすかったのでこちらを選択。
物体検出するためのメインコードであるyolo.pyを簡単に編集します。173行目あたりです。
    import cv2
    vid = cv2.VideoCapture(video_path)

    # ↓ 以下に修正

    import cv2
    #vid = cv2.VideoCapture(video_path)
    vid = cv2.VideoCapture(0)
VideoCaptureの引数に0を与えると、カメラデバイスを選択したことになります。
コードを編集したうえでYOLOV3を実行します。
YOLOv3の実行とその結果
実行コード。
python yolo_video.py
実行結果。
ドラえもんはスポーツボールらしいですね。
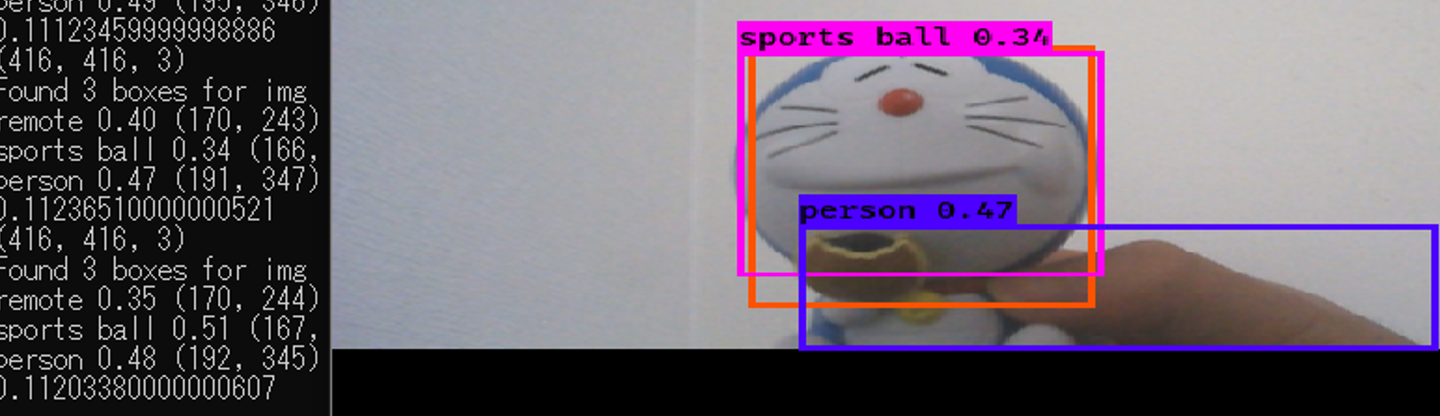
YOLOv3が動くかを確認できました。
続いてはC++でPyhtonのコードを引っ張ってこれるように工夫します。
C++でYOLOv3を引っ張ってくる
C++からYOLOv3を呼ぶために、いくつか工夫する必要があります。
その1つとしてYOLOクラスから生成されるオブジェクトをC++上で定義することです。
本来であれば物体検出をPythonで行えばいいんですが、オブジェクトを生成しないと、物体検出時に毎回Tensoflowを呼び出さないといけないため、大きな遅延が発生します。Tensorflowを立ち上げるのに私のPCでは15秒ほどかかります。
そのため、YOLOのオブジェクトを予め生成させておくことで、毎回の呼び出しを防ぐことができます。
既存のyolo.pyを修正します。
プログラムの内容
webカメラで物体検出します。
1.C++でPythonを呼ぶ
2.webカメラから得られた画像を深層学習の物体検出器YOLOv3にぶち込む
3.検出した物体の横軸(x軸)での中心軸を求め、C++に返す
4.C++でPythonから返された中心軸を出力
webカメラがない方は、yolo.pyのcv2.VideoCapture("動画パス")を指定すると対応できます。
ファイル構成
git cloneしたvisul stusioファイルとkeras-yolo3ファイルを準備します。
visul stusioファイルにkeras-yolo3ファイルの中でも物体検出に必要なファイルのみをコピーします。
構成は以下の通りです。
〇を付けたファイルを修正します。またCドライブ直下にYOLOv3に必要なファイルを配置しました。
Cドライブ ── model_data
       │  ├── yolo.h5 ← keras-yolo3のmodel_dataフォルダ内に存在
       │  ├── yolo_anchors.txt ← keras-yolo3のmodel_dataフォルダ内に存在
       │  ├── coco_classes.txt ← keras-yolo3のmodel_dataフォルダ内に存在
       │  └── FiraMono-Medium.otf ← keras-yolo3のfontフォルダ内に存在
       │
       └─ 200121_Cplus2_with_Python
          ├── test_Cplus2_with_Python
          │  ├── test_Cplus2_with_Python.cpp 〇
          │  ├── x64
          │  └── others
          ├── x64
          │  └── Release
          │       ├── test_Cplus2_with_Python.exe
          │       ├── yolo3 ← keras-yolo3のフォルダ内に存在
          │       ├── yolo.py 〇 ← keras-yolo3のフォルダ内に存在
          │       └── others
          ├── (others( .git .vs))
          └── test_Cplus2_with_Python.sln
メインコードの修正
ファイル構成に二個の〇が付いています。
それぞれC++とPythonのメインコード部分にあたります。
それぞれを以下のように修正します。
C++のメインコード
以前の記事に修正を加えました。
Pythonのpyファイル、pyファイルの関数、オブジェクトなどそれぞれを定義しています。
基本的にはauto型でC++に決めてもらうことにしています。
whileで回す前に、予めYOLOのオブジェクトを定義しています。
whileの中では、Pytohnの物体検出関数を実行するのみ。
他にオリジナルの処理を加えたい場合には、適当な場所にコードを挿入してください。
# define BOOST_PYTHON_STATIC_LIB
# define BOOST_NUMPY_STATIC_LIB

# include <iostream>
# include <boost/python.hpp>

//名前空間を定義
namespace py = boost::python;

/* YOLOv3をC++で実行 */
int main()
{
	//Pythonを初期化
	Py_Initialize();
	//YOLOv3のpyファイル(yolo.py)をインポート
	py::object YOLOv3 = py::import("yolo").attr("__dict__");
	//yolo.py内の "object_YOLOv3" 関数を定義
	auto object_YOLOv3 = YOLOv3["object_YOLOv3"];
	//object_YOLOv3関数内でオブジェクト変数を定義
	py::object object_YOLOv3_init;
	//object_YOLOv3関数内でオブジェクト変数を初期化
	auto object_YOLOv3_maker = object_YOLOv3(object_YOLOv3_init);
	//物体検出の関数を定義
	auto insert_object_YOLOv3 = YOLOv3["insert_object_YOLOv3"];
	//観測値
	double py_y;

	/* リアルタイムでのYOLOv3による物体検出 */
	while (true) {

		//深層学習による物体検出した中心のx軸変位
		auto x_centor = insert_object_YOLOv3(object_YOLOv3_maker);
		//変位をC++で使える型に変換
		py_y = py::extract<double>(x_centor);

		/*
		他に処理したい場合は適当に記述
		*/

		//コメント
		std::cout << "py_y = " << py_y << std::endl;

	}
}
Pythonのメインコード
webカメラから画像を取得するため、YOLOクラスの初期化(init)にwebカメラをオープンしたオブジェクトを定義しています。
他にも物体検出した横軸の中心を計算し、returnさせています。
また「1_オブジェクトの初期化のための関数」と「2_物体検出のための関数」を新たに書き加えています。
# -*- coding: utf-8 -*-
"""
Class definition of YOLO_v3 style detection model on image and video
"""
import colorsys
import os
from timeit import default_timer as timer
import numpy as np
from keras import backend as K
from keras.models import load_model
from keras.layers import Input
from PIL import Image, ImageFont, ImageDraw
from yolo3.model import yolo_eval, yolo_body, tiny_yolo_body
from yolo3.utils import letterbox_image
import os
from keras.utils import multi_gpu_model

# 追加
import cv2
# 追加  TensorFlowのGPUメモリ使用量の制限
import tensorflow as tf
from keras.backend.tensorflow_backend import set_session
config = tf.ConfigProto()
config.gpu_options.per_process_gpu_memory_fraction = 0.3
set_session(tf.Session(config=config))
# 追加 グローバル変数を定義
model_path_ = 'C:/model_data/yolo.h5'
anchors_path_ = 'C:/model_data/yolo_anchors.txt'
classes_path_ = 'C:/model_data/coco_classes.txt'
font_path_ = 'C:/model_data/FiraMono-Medium.otf'

class YOLO(object):
    _defaults = {
        "model_path": model_path_,#変更点
        "anchors_path": anchors_path_,#変更点
        "classes_path": classes_path_,#変更点
        "score" : 0.3,
        "iou" : 0.45,
        "model_image_size" : (416, 416),
        "gpu_num" : 1,
    }

    @classmethod
    def get_defaults(cls, n):
        if n in cls._defaults:
            return cls._defaults[n]
        else:
            return "Unrecognized attribute name '" + n + "'"

    def __init__(self, **kwargs):
        self.__dict__.update(self._defaults) # set up default values
        self.__dict__.update(kwargs) # and update with user overrides
        self.class_names = self._get_class()
        self.anchors = self._get_anchors()
        self.sess = K.get_session()
        self.boxes, self.scores, self.classes = self.generate()
        #追加 カメラをオープン
        self.cap = cv2.VideoCapture(0)

    def _get_class(self):
        classes_path = os.path.expanduser(self.classes_path)
        with open(classes_path) as f:
            class_names = f.readlines()
        class_names = [c.strip() for c in class_names]
        return class_names

    def _get_anchors(self):
        anchors_path = os.path.expanduser(self.anchors_path)
        with open(anchors_path) as f:
            anchors = f.readline()
        anchors = [float(x) for x in anchors.split(',')]
        return np.array(anchors).reshape(-1, 2)

    def generate(self):
        model_path = os.path.expanduser(self.model_path)
        assert model_path.endswith('.h5'), 'Keras model or weights must be a .h5 file.'

        # Load model, or construct model and load weights.
        num_anchors = len(self.anchors)
        num_classes = len(self.class_names)
        is_tiny_version = num_anchors==6 # default setting
        try:
            self.yolo_model = load_model(model_path, compile=False)
        except:
            self.yolo_model = tiny_yolo_body(Input(shape=(None,None,3)), num_anchors//2, num_classes) \
                if is_tiny_version else yolo_body(Input(shape=(None,None,3)), num_anchors//3, num_classes)
            self.yolo_model.load_weights(self.model_path) # make sure model, anchors and classes match
        else:
            assert self.yolo_model.layers[-1].output_shape[-1] == \
                num_anchors/len(self.yolo_model.output) * (num_classes + 5), \
                'Mismatch between model and given anchor and class sizes'

        print('{} model, anchors, and classes loaded.'.format(model_path))

        # Generate colors for drawing bounding boxes.
        hsv_tuples = [(x / len(self.class_names), 1., 1.)
                      for x in range(len(self.class_names))]
        self.colors = list(map(lambda x: colorsys.hsv_to_rgb(*x), hsv_tuples))
        self.colors = list(
            map(lambda x: (int(x[0] * 255), int(x[1] * 255), int(x[2] * 255)),
                self.colors))
        np.random.seed(10101)  # Fixed seed for consistent colors across runs.
        np.random.shuffle(self.colors)  # Shuffle colors to decorrelate adjacent classes.
        np.random.seed(None)  # Reset seed to default.

        # Generate output tensor targets for filtered bounding boxes.
        self.input_image_shape = K.placeholder(shape=(2, ))
        if self.gpu_num>=2:
            self.yolo_model = multi_gpu_model(self.yolo_model, gpus=self.gpu_num)
        boxes, scores, classes = yolo_eval(self.yolo_model.output, self.anchors,
                len(self.class_names), self.input_image_shape,
                score_threshold=self.score, iou_threshold=self.iou)
        return boxes, scores, classes

    #修正 C++用に物体検出位置の修正
    def detect_image_for_Cplus2(self, image):

        if self.model_image_size != (None, None):
            assert self.model_image_size[0]%32 == 0, 'Multiples of 32 required'
            assert self.model_image_size[1]%32 == 0, 'Multiples of 32 required'
            boxed_image = letterbox_image(image, tuple(reversed(self.model_image_size)))
        else:
            new_image_size = (image.width - (image.width % 32),
                              image.height - (image.height % 32))
            boxed_image = letterbox_image(image, new_image_size)
        image_data = np.array(boxed_image, dtype='float32')

        image_data /= 255.
        image_data = np.expand_dims(image_data, 0)  # Add batch dimension.

        out_boxes, out_scores, out_classes = self.sess.run(
            [self.boxes, self.scores, self.classes],
            feed_dict={
                self.yolo_model.input: image_data,
                self.input_image_shape: [image.size[1], image.size[0]],
                K.learning_phase(): 0
            })

        font = ImageFont.truetype(font=font_path_,
                    size=np.floor(3e-2 * image.size[1] + 0.5).astype('int32'))
        thickness = (image.size[0] + image.size[1]) // 300

        #物体のx変位
        self.x_centor = .0

        for i, c in reversed(list(enumerate(out_classes))):

            predicted_class = self.class_names[c]
            box = out_boxes[i]
            score = out_scores[i]

            label = '{} {:.2f}'.format(predicted_class, score)
            draw = ImageDraw.Draw(image)
            label_size = draw.textsize(label, font)

            #ここら辺に重心の位置がある
            top, left, bottom, right = box
            top = max(0, np.floor(top + 0.5).astype('int32'))
            left = max(0, np.floor(left + 0.5).astype('int32'))
            bottom = min(image.size[1], np.floor(bottom + 0.5).astype('int32'))
            right = min(image.size[0], np.floor(right + 0.5).astype('int32'))
            print(label, (left, top), (right, bottom))

            #x軸の重心 x_centor = ( x1 + x2 ) / 2
            self.x_centor = ( left + right ) / 2.

            if top - label_size[1] >= 0:
                text_origin = np.array([left, top - label_size[1]])
            else:
                text_origin = np.array([left, top + 1])

            # My kingdom for a good redistributable image drawing library.
            for i in range(thickness):
                draw.rectangle(
                    [left + i, top + i, right - i, bottom - i],
                    outline=self.colors[c])
            draw.rectangle(
                [tuple(text_origin), tuple(text_origin + label_size)],
                fill=self.colors[c])
            draw.text(text_origin, label, fill=(0, 0, 0), font=font)
            del draw

        return image, self.x_centor

    def close_session(self):
        self.sess.close()

# 1_オブジェクトの初期化のための関数
def object_YOLOv3(object_YOLO):
    #クラスからオブジェクトを作成
    object_YOLO = YOLO()
    #C++にyoloのオブジェクトを返す
    return object_YOLO

# 2_物体検出のための関数
def insert_object_YOLOv3(object_YOLO):
    #カメラから画像を取得
    ret, frame = object_YOLO.cap.read()
    #RGGBの順番を変更
    frame = np.asarray(frame)[..., ::-1]
    #opnecvからpillowに変更
    frame = Image.fromarray(frame)
    #物体検出し、出力結果と物体のx軸の中心を返す
    r_image, x_centor = object_YOLO.detect_image_for_Cplus2(frame)
    #画像表示
    cv2.imshow("out",np.asarray(r_image)[..., ::-1])
    #表示に1ms
    cv2.waitKey(1)
    #C++には物体のx軸の中心を返す
    return x_centor
実行結果
学習済みモデルを使っているため、personなどと検出されています。
サンプルプログラムなので、オリジナルモデルを使用したい場合でもpyファイル内のパスを変えてあげるだけ使えます。
使用用途
どんな場合にC++でPythonを呼ばなきゃいけないんだ・・・
と悩む人もいるかと思います。
その理由として、
・C++に準拠したデバイス(モーションコントロールボードなど)のときに、どうしても深層学習処理を組み込みたいとき
・C++から離れられないくらい大好きなエンジニア(変人)
・とにかく変人
冗談はここまでで。
コメント
プログラム言語間での環境依存にお悩みの方のお役に立てることを心からお祈りしています。