FlutterアプリにSMS認証を実装してみました。VonageのVerify APIを使うとクライアントのコードだけでさくっと実装することができました。
つくったもの
SMS認証を実装したFlutterベースのアプリです。指定した電話番号にSMSで認証コードを送信し、認証コードを再度サーバーで検証し認証フローを確立します。
Vonage Verify APIの概要
Verify APIはVonage API群のコミュニケーションAPIの一部としてクラウド上のAPIとして提供されています。APIのエンドポイントがapi.nexmo.comであることからもわかるように、Vonage APIはNexmoから改称された経緯があるようです。
SMS認証のフロー
APIの形式
APIの呼び出し形式はhttps://developer.vonage.com/en/api/verify#Verify-Check で参照できます。
Verify Requests
認証コードをVonageサーバーへ要求します。workflow_idが6の場合にSMSのみを使った認証になります。workflow_idを変更すると、電話による音声を併用した多要素認証も可能です。workflow_idの指定方法は https://developer.vonage.com/ja/verify/verify-v1/guides/workflows-and-events に説明がありました。
リクエストの例はPOST形式で記載されていますが、GETリクエストも使用できました。
POST /verify/:format HTTP/1.1
Host: api.nexmo.com
Content-Type: application/x-www-form-urlencoded
Content-Length: 197

api_key=abcd1234&api_secret=Sup3rS3cr3t%21%21&number=447700900000&country=GB&brand=Acme+Inc&sender_id=ACME&code_length=6&lg=en-us&pin_expiry=240&next_event_wait=120&workflow_id=6&pin_code=AKFG-3424
{
   "request_id": "abcdef0123456789abcdef0123456789",
   "status": "0"
}
Verify Check
認証コードの検証をVonageサーバーへ要求します。パラメーターにはVerify Requestsで取得したrequest_idが必要です。
POST /verify/check/:format HTTP/1.1
Host: api.nexmo.com
Content-Type: application/x-www-form-urlencoded
Content-Length: 122

api_key=abcd1234&api_secret=Sup3rS3cr3t%21%21&request_id=abcdef0123456789abcdef0123456789&code=1234&ip_address=123.0.0.255
{
   "request_id": "abcdef0123456789abcdef0123456789",
   "event_id": "0A00000012345678",
   "status": "0",
   "price": "0.10000000",
   "currency": "EUR",
   "estimated_price_messages_sent": "0.03330000"
}
Flutterアプリの実装
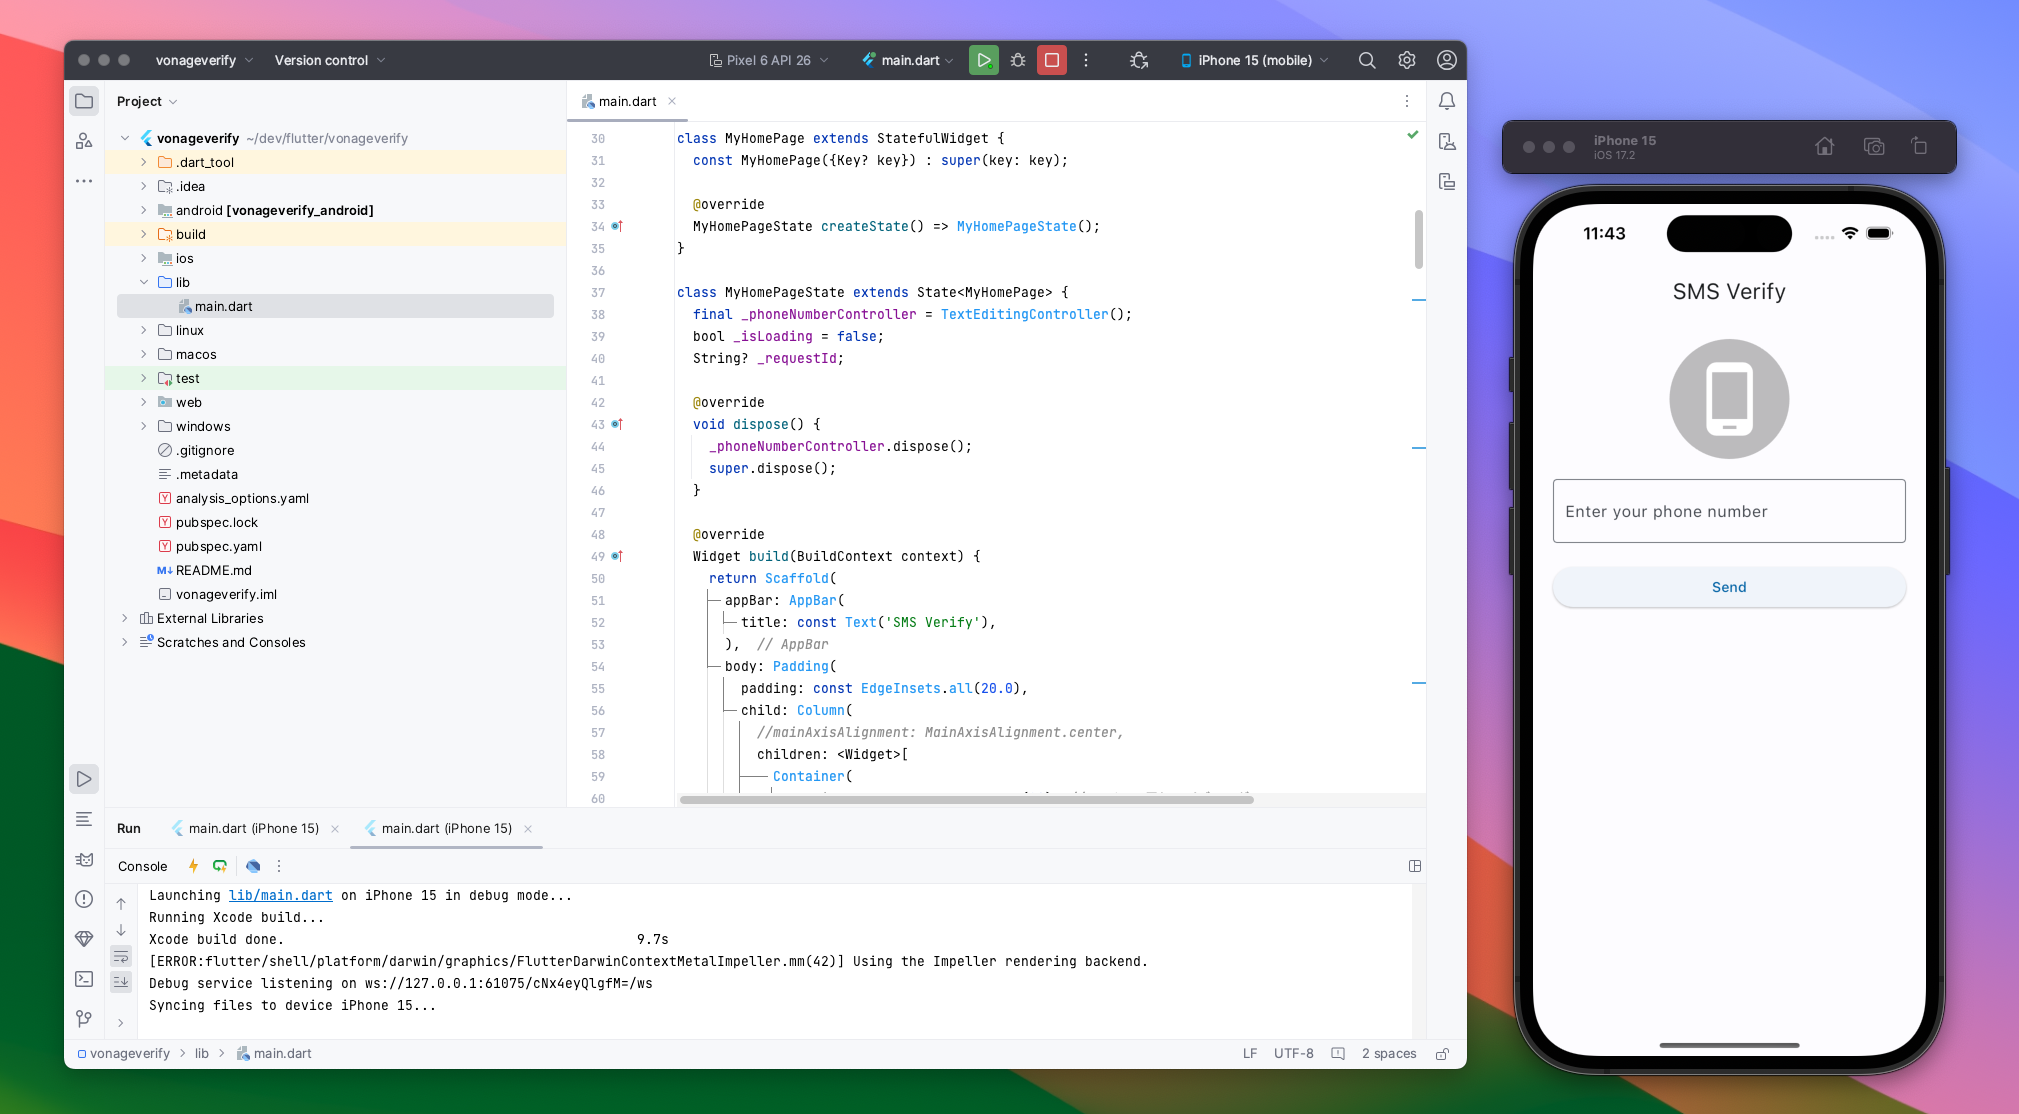
Verify APIの呼び出し方法がわかったので、Flutterアプリを実装していきます。
開発環境
- Flutter 3.16.0
- Android Studio Hedgehog | 2023.1.1
API呼び出し処理
HTTPリクエストを非同期化するために、Futureに通信処理を実装をします。
Verify Requests
  Future<String?> sendVerificationRequest(String apiKey, String apiSecret, String phoneNumber) async {
    var url = Uri.parse('https://api.nexmo.com/verify/json'
        '?api_key=$apiKey'
        '&api_secret=$apiSecret'
        '&number=$phoneNumber'
        '&brand=MyAppName'
        '&sender_id=MyCompany'
        '&code_length=4'
        '&workflow_id=6' // SMS only
        );

    try {
      var response = await http.get(url);
      if (response.statusCode == 200) {
        var data = json.decode(response.body);
        print('verify response: $data');
        if (data['status'] == '0') {
          return data['request_id'];
        }
      }
      return null;
    } catch (e) {
      print('Error: $e');
      return null;
    }
  }
Verify Check
  Future<bool> verifyCode(String apiKey, String apiSecret, String requestId, String code) async {
    var url = Uri.parse('https://api.nexmo.com/verify/check/json'
        '?api_key=$apiKey'
        '&api_secret=$apiSecret'
        '&request_id=$requestId'
        '&code=$code');

    try {
      var response = await http.get(url);
      if (response.statusCode == 200) {
        var data = json.decode(response.body);
        print('check response: $data');
        return data['status'] == '0'; // 成功した場合trueを返す
      }
      return false;
    } catch (e) {
      print('Error: $e');
      return false;
    }
  }
UIの実装
上記のFutureをUIから呼び出す実装例です。Verifyボタンが押されたらasync/awaitを使ってFuture化した通信処理を呼び出します。サーバーから要求が返ってくるまでの間、CircularProgressIndicatorでローディングUIを表示しています。
class VerifyCodePageState extends State<VerifyCodePage> {
  final _codeController = TextEditingController();
  bool _isLoading = false;

  @override
  void dispose() {
    _codeController.dispose();
    super.dispose();
  }

  @override
  Widget build(BuildContext context) {
    return Scaffold(
      appBar: AppBar(
        title: const Text('Enter Verification Code'),
      ),
      body: Padding(
        padding: const EdgeInsets.all(20.0),
        child: Column(
          children: <Widget>[
            Container(
              padding: const EdgeInsets.all(20), // アイコン周りのパディング
              decoration: const BoxDecoration(
                color: Colors.black26, // 円の色
                shape: BoxShape.circle, // 円形
              ),
              child: const Icon(Icons.key, size: 80, color: Colors.white), // アイコンの色とサイズ
            ),
            const SizedBox(height: 20),
            TextField(
              controller: _codeController,
              decoration: const InputDecoration(
                labelText: 'Verification Code',
                border: OutlineInputBorder(),
              ),
              keyboardType: TextInputType.number,
            ),
            const SizedBox(height: 20),
            ElevatedButton(
              onPressed: () async {
                String code = _codeController.text;
                setState(() {
                  _isLoading = true;
                });
                bool isVerified = await verifyCode(AppConfig.apiKey, AppConfig.apiSecret, widget.requestId, code);
                setState(() {
                  _isLoading = false;
                });
                if (!mounted) return;
                Navigator.of(context).pushReplacement(
                  MaterialPageRoute(
                    builder: (context) => AuthResultPage(isSuccess: isVerified),
                  ),
                );
              },
              child: const Text('Verify'),
            ),
            const SizedBox(height: 20),
            _isLoading ? const CircularProgressIndicator() : SizedBox.shrink(),
          ],
        ),
      ),
    );
  }
これで完成です。
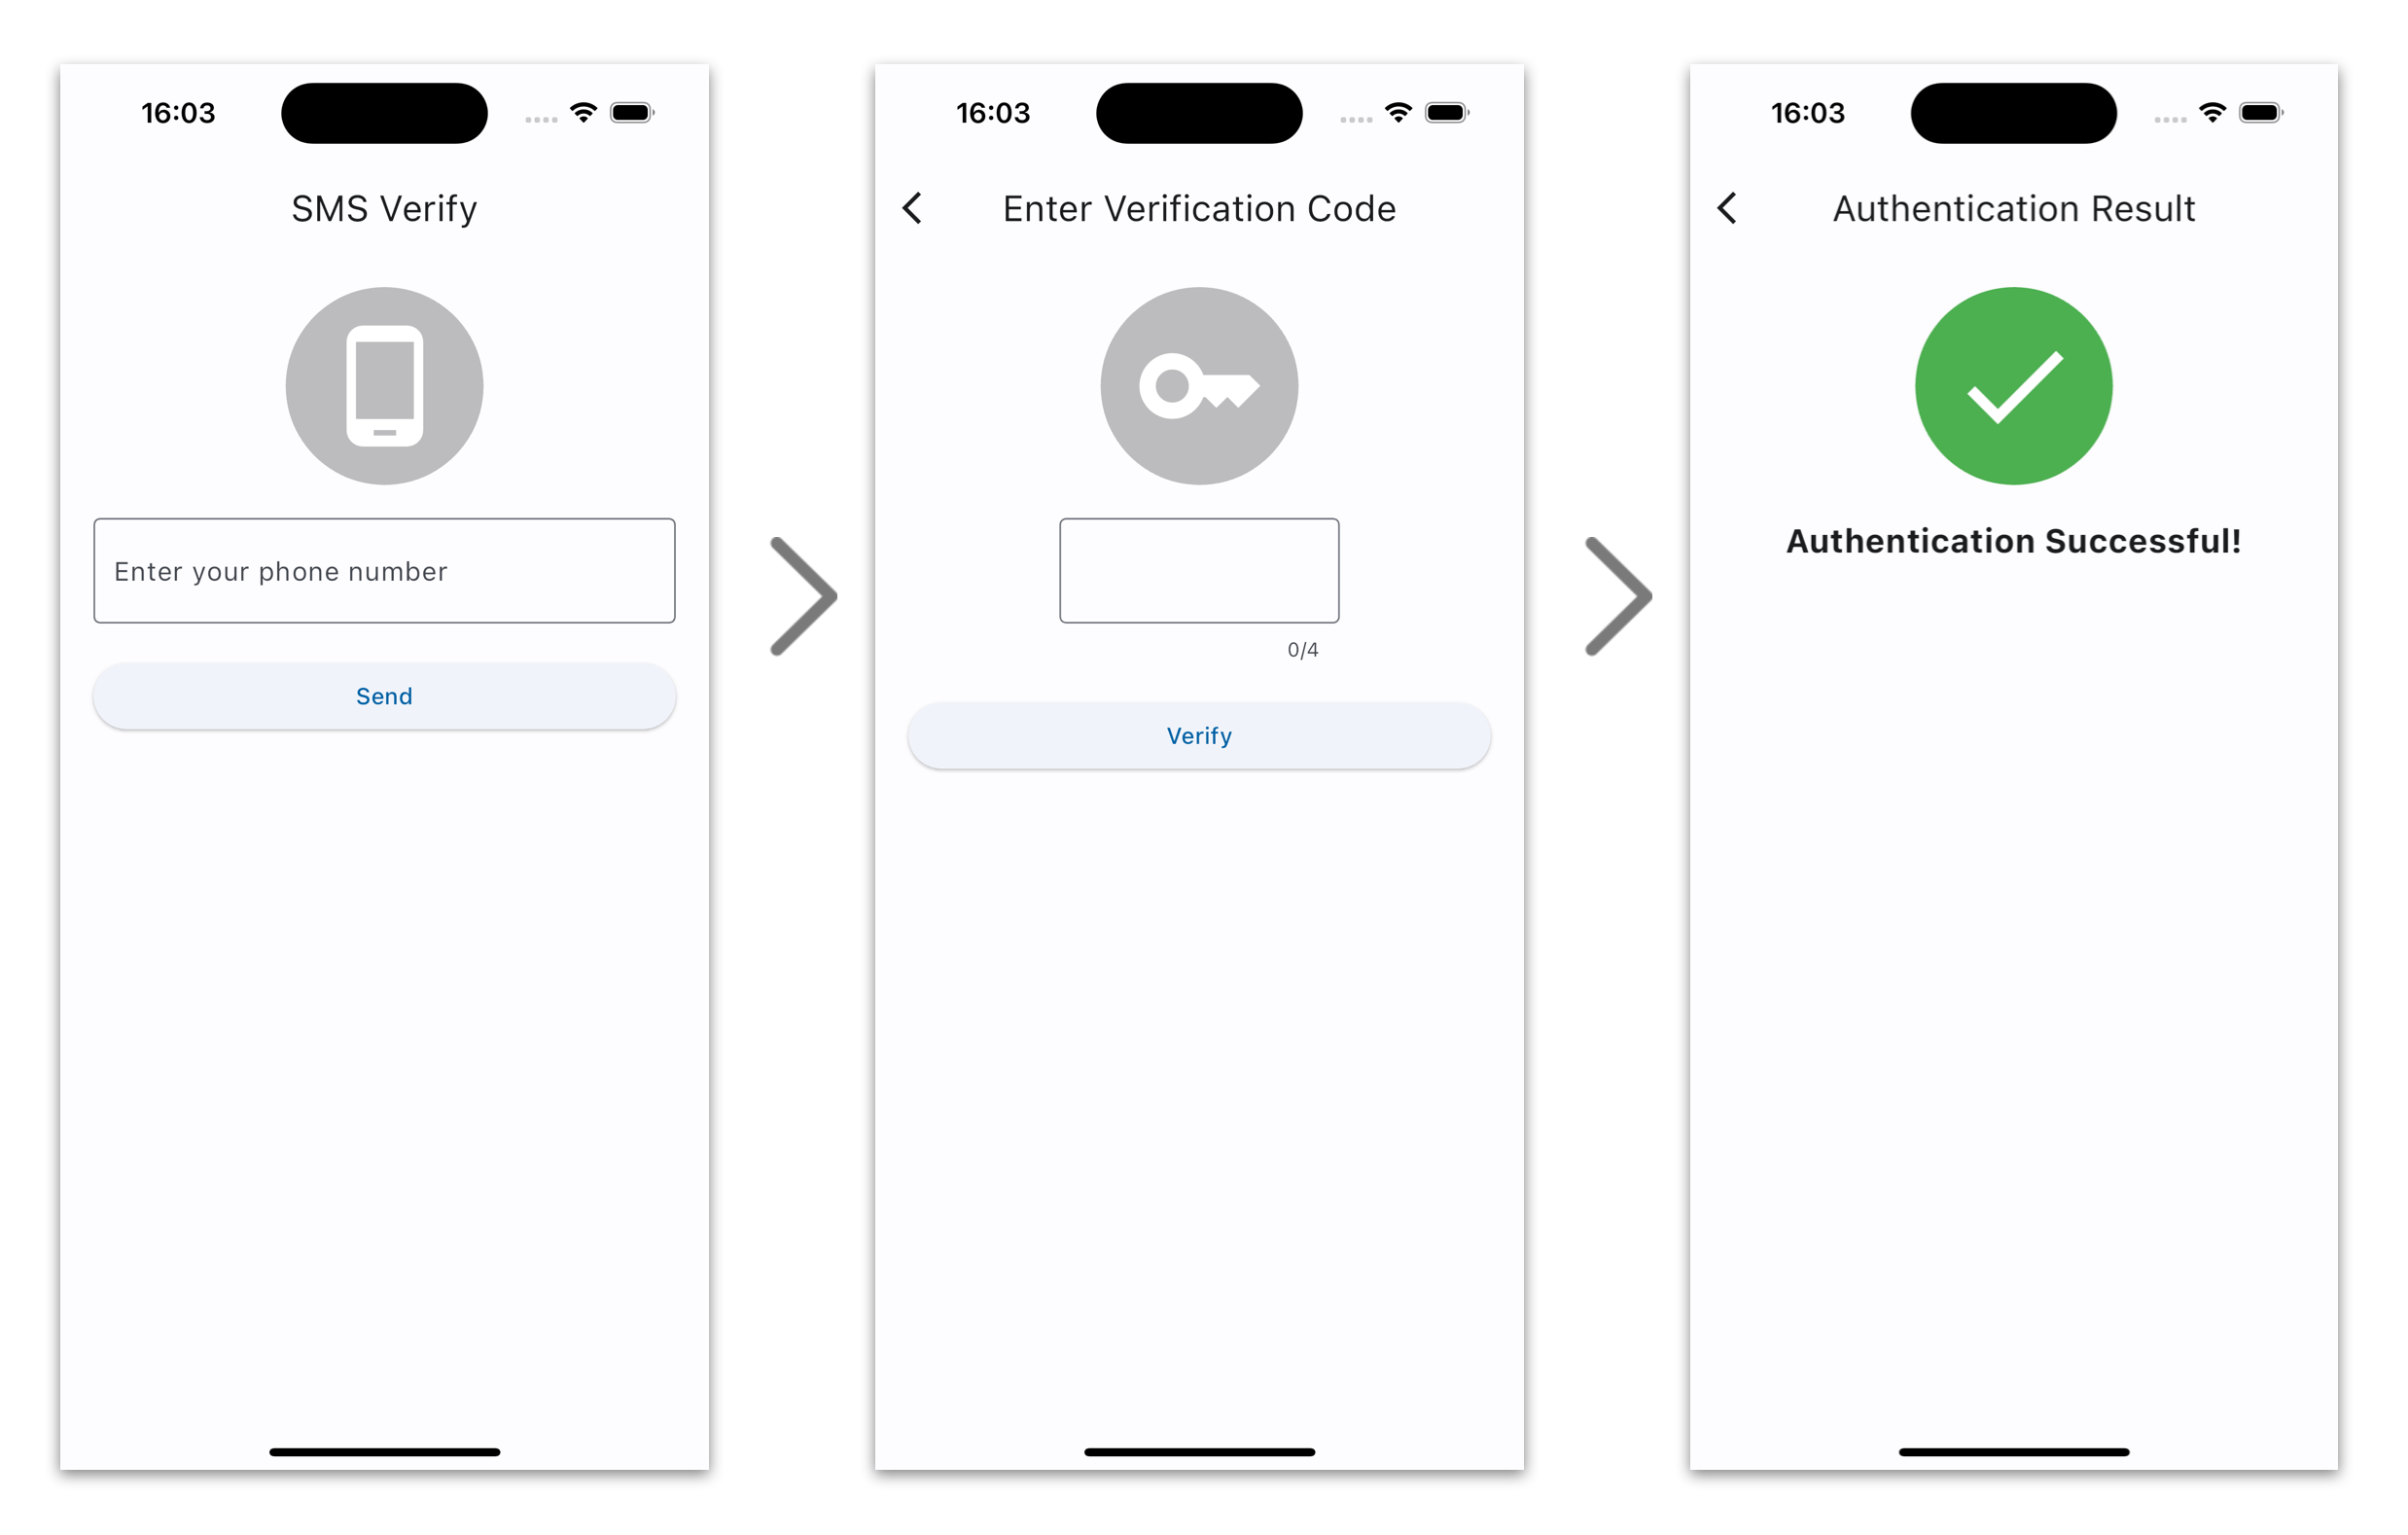
動作イメージ

APIダッシュボード
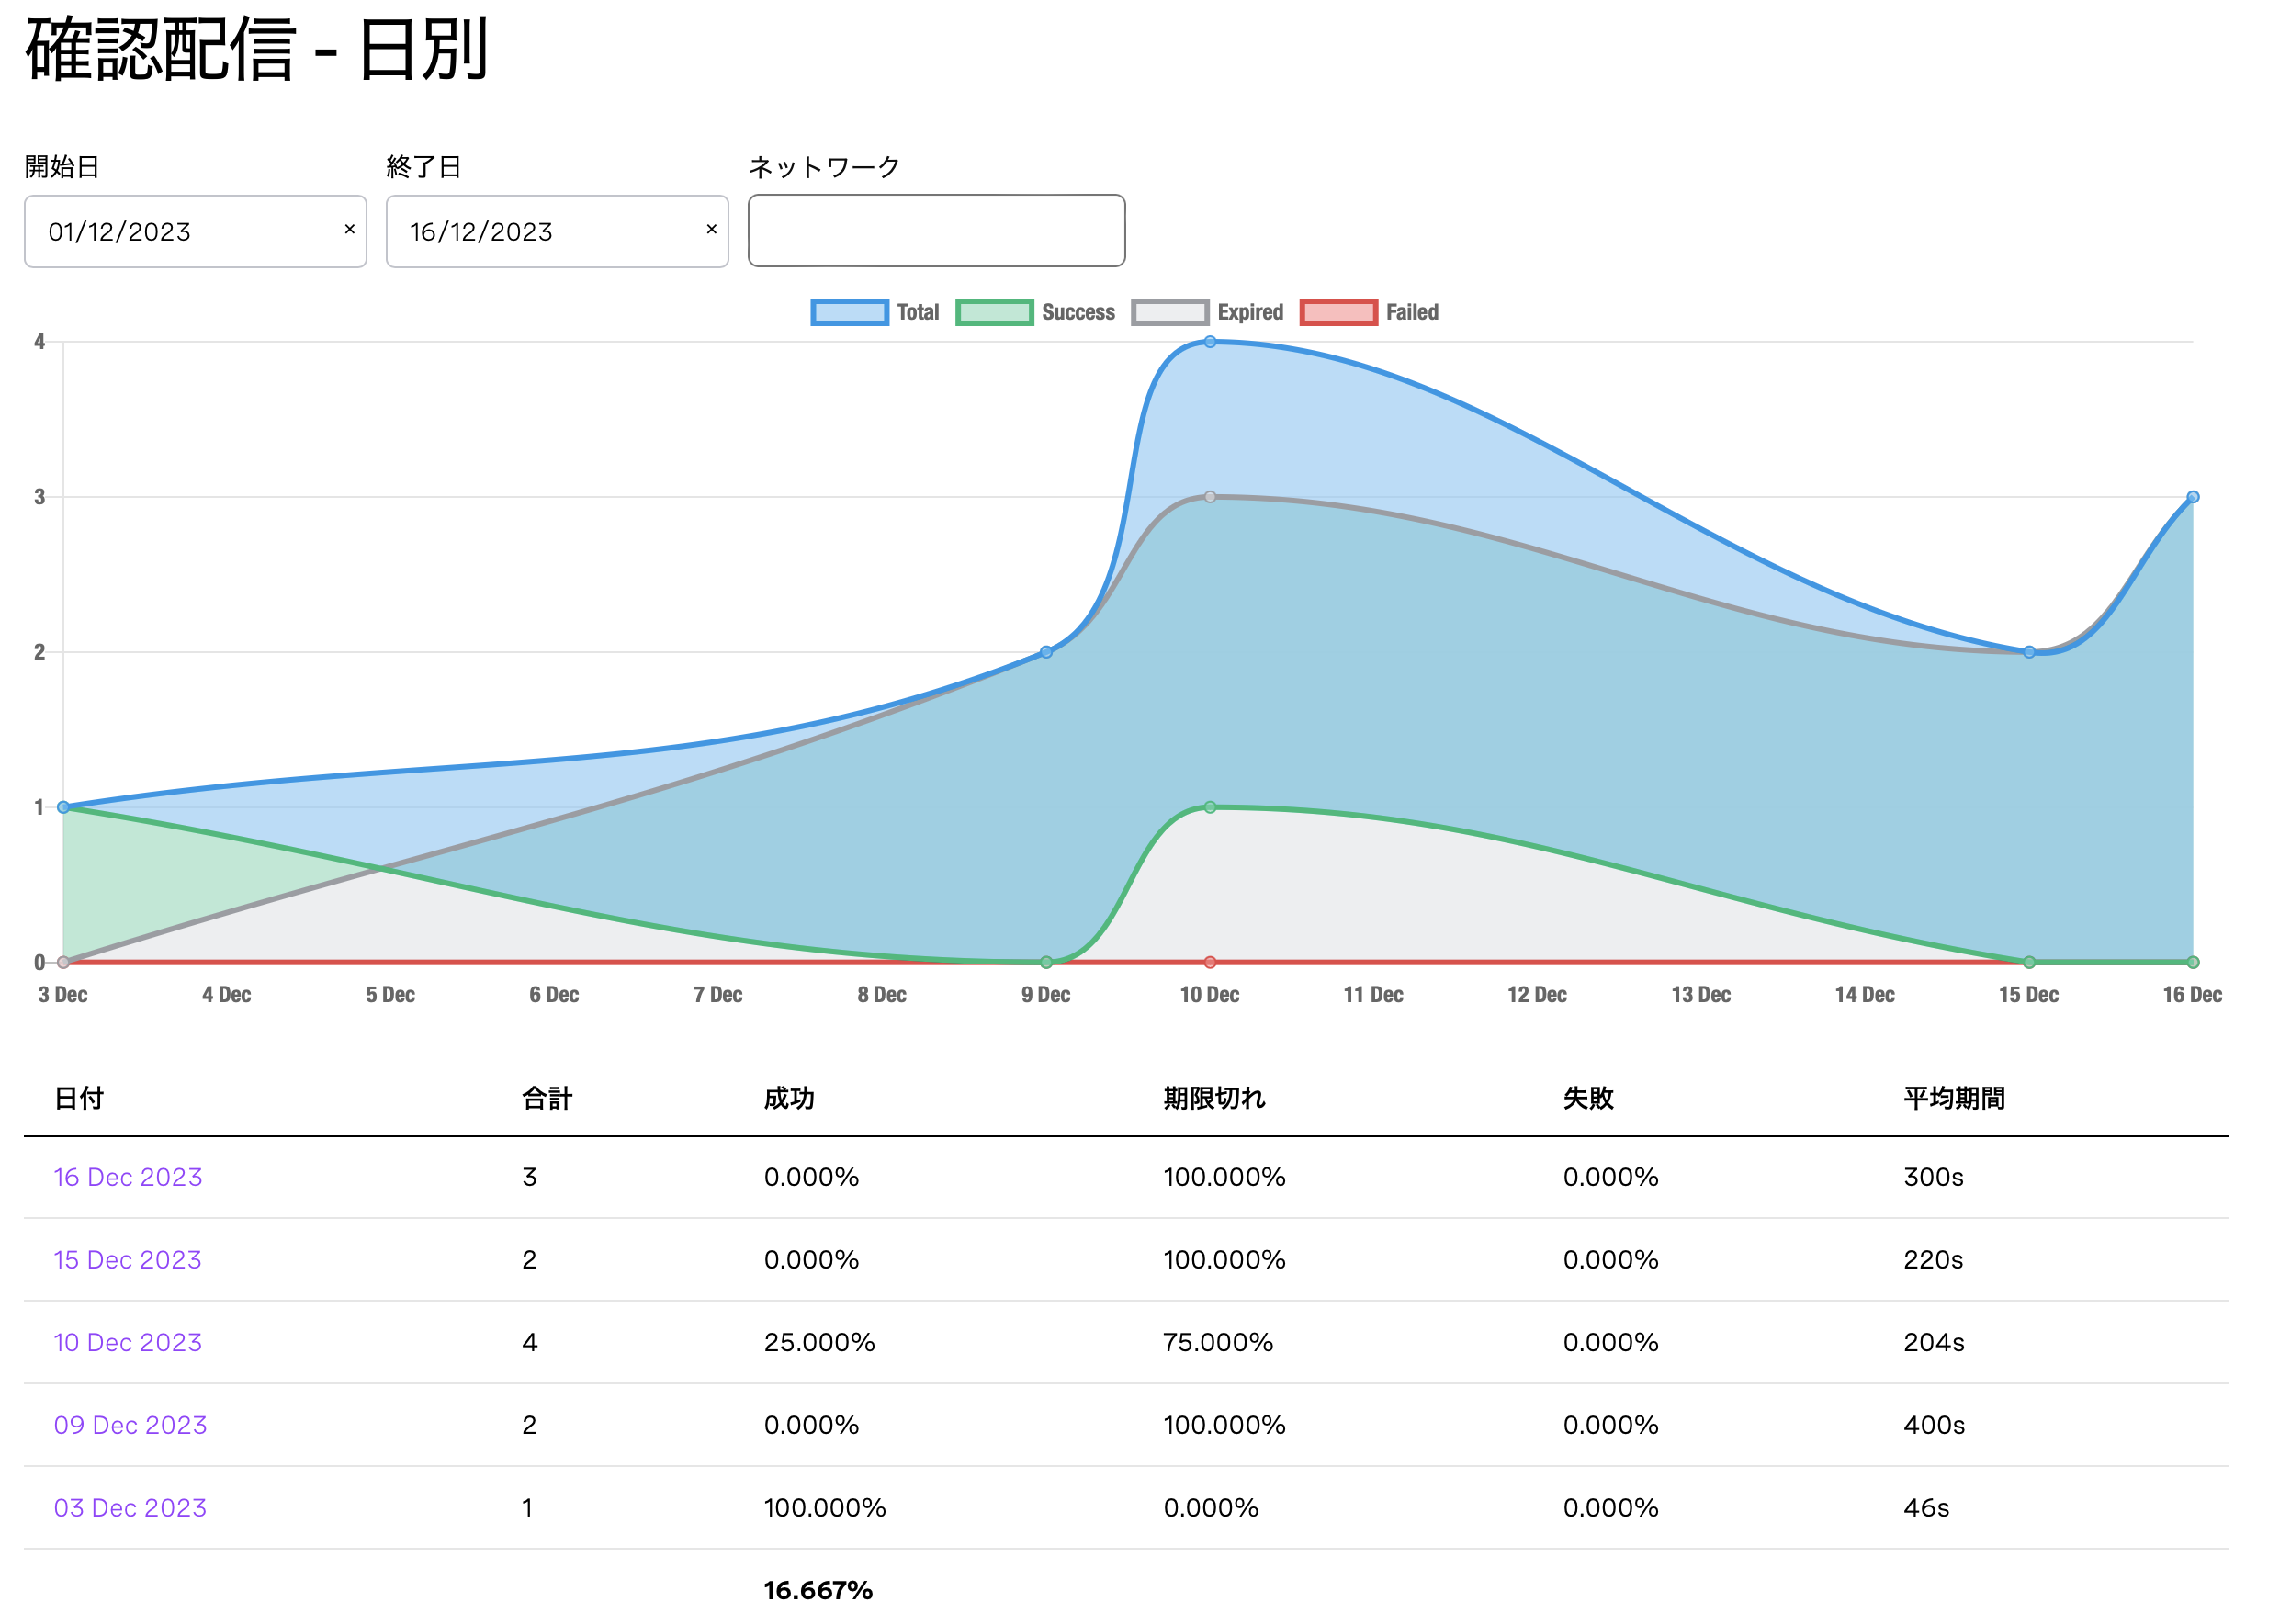
Vonage API DashboardでSMSや音声配信状況を視覚的に確認できてグッドです。

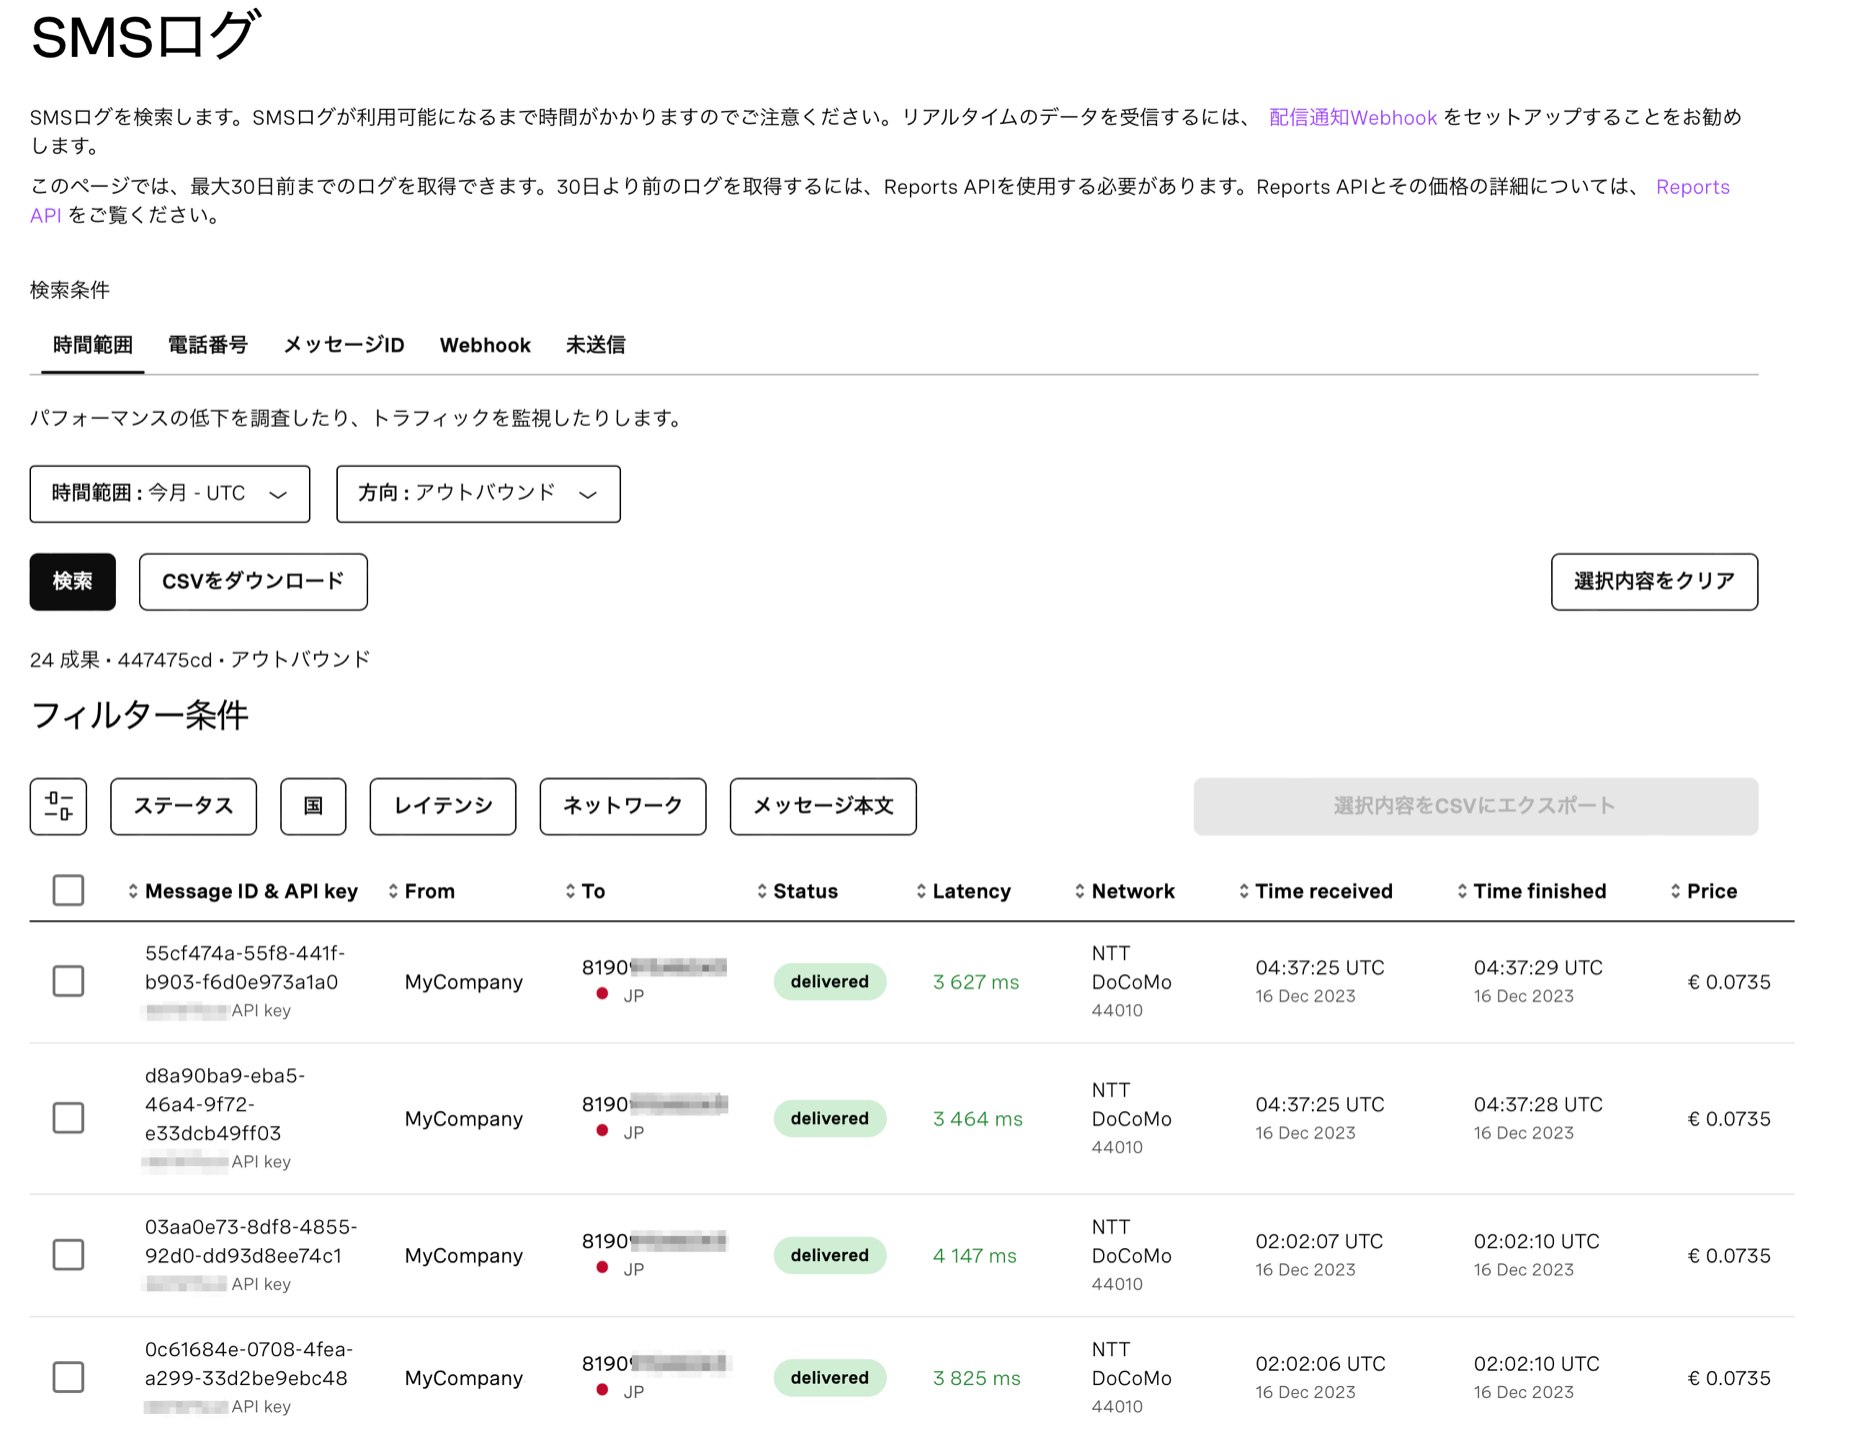
SMSログでは1件ごとのレイテンシや料金なども確認することができます。

まとめ
スタンドアローンの端末アプリで本人認証だけ簡単に実装したい場合にVonage Verify APIは重宝しそうです。認証方法はSMSに加えて電話音声による多要素認証にも対応できて、複数の認証要素にまたがる認証シーケンスもVerify API側で制御してくれるのも嬉しい点です。
お試しあれ!
今回のコード一式
参考
-
Vonage verify APIリファレンス
https://developer.vonage.com/ja/api/verify -
Workflow
https://developer.vonage.com/ja/verify/verify-v1/guides/workflows-and-events


