概要
私は過去に、「勤怠連絡を簡単に!」というテーマで色々とやってきました。
そしてついに、Google Home が日本に上陸したということで、
下記の勤怠連絡ボタンの**(音声)版**をやってみたのでまとめてみます。
- myThingsで勤怠連絡ボタンを作ってみた
- myThingsとAmazon Dash ButtonをAWS経由で繋げてみる
- Raspberry Pi3×SORACOM×AWS IoT×myThingsで勤怠連絡ボタンを作ってみる
- Android Thingsで勤怠連絡ボタンで作ってみる
今回もサーバを用意したりはせず(Serverless)、できるだけ簡単に実現することを目指します!
そのため、myThings developersの設定は上記リンクまでのものを利用し、
一部Cloud Functions on firebaseでコードを書きますが、
そこもAndroid Thingsで利用したGoogle Functionsはそのまま利用しようと思いますmm
やりたいこと
下記の流れで勤怠連絡を送るようにします。
- 【自分】OK、Google。勤怠連絡アプリにつないで。
- 【Google Home】勤怠連絡アプリにつなぎました。
- 【Google Home(アプリ)】おはようございます。本日はいかがいたしましたでしょうか? or 休みの理由は?
- 【自分】しんどい
- 【Google Home(アプリ)】午前半休?全休にしますか?
- 【自分】午前半休
- 【Google Home(アプリ)】それでは、体調不良による午前半休で勤怠をお送ります。よろしいですか?
- 【自分】おなしゃす or はい
- 【Google Home(アプリ)】勤怠連絡をお送りしました。
- 【自分】おやすみ
- 【Google Home(アプリ)】ごゆっくりお休みください。
概要のリンクと同様、勤怠連絡にはメールとSlackを利用することにします。
処理イメージ
Google Home
↓
Dialogflow
↓
Cloud Functions for Firebase
↓
myThings Developers
↓
Slack & Y!メール
やってみたこと
Google Homeの設定などは検索すればゴロゴロ転がっているので割愛。
Actions on Google (準備編)
まずは、Actions on Googleの設定が必要です。
そもそも、Google Homeとは、
Google Assistantと音声でやりとりすることができるデバイス
※Actions on Googleの「GET STARTED - Basics」の日本語訳を作ってみました
なので(自分も上記の理解)、これを自分流にカスタマイズして、
「こういうこともさせたい」「ああいうこともお願いしたい」という時は、
Actionというものを構築することで、Google Assistantを拡張できます。
その拡張するためのものがActions on Googleになるので、まずはこちらの設定からやってみます。
- Actions on Googleにアクセスし、右上の「Actions Console」にアクセス

- 「Add/import project」を選択し、プロジェクト名とリージョンを入力後、「CREATE PROJECT」を押下

- プロジェクトの作成に成功すると下記のような画面になるので、次はDialogflowを構築していきます。

※Actions on GoogleはDialogflowのあとにまだもう少し続きますmm
Dialogflow
Dialogflowとは、
Dialogflow is a conversational platform that lets you design and build actions by wrapping the functionality of the Actions SDK and providing additional features such as an easy-to-use IDE, natural language understanding (NLU), machine learning, and more.
※Dialogflow Overview より
とあるように、会話インターフェースのPFで、簡単にActionをデザイン・ビルドできるようにするためのものとのこと。
要は、Actions SDKの機能をwrapしてくれていて、簡単に作れますよーくらいで捉えて早速構築へ。
準備編
- Dialogflowの「BUILD」リンクを押下すると、下記の画面が表示されるので、「CREATE ACTIONS ON DIALOGFLOW」を押下

-
そうすると、Dialogflowが「Google Cloud Platform」へアクセス許可を求めてくるので、利用したいアカウントを選択の上、許諾する

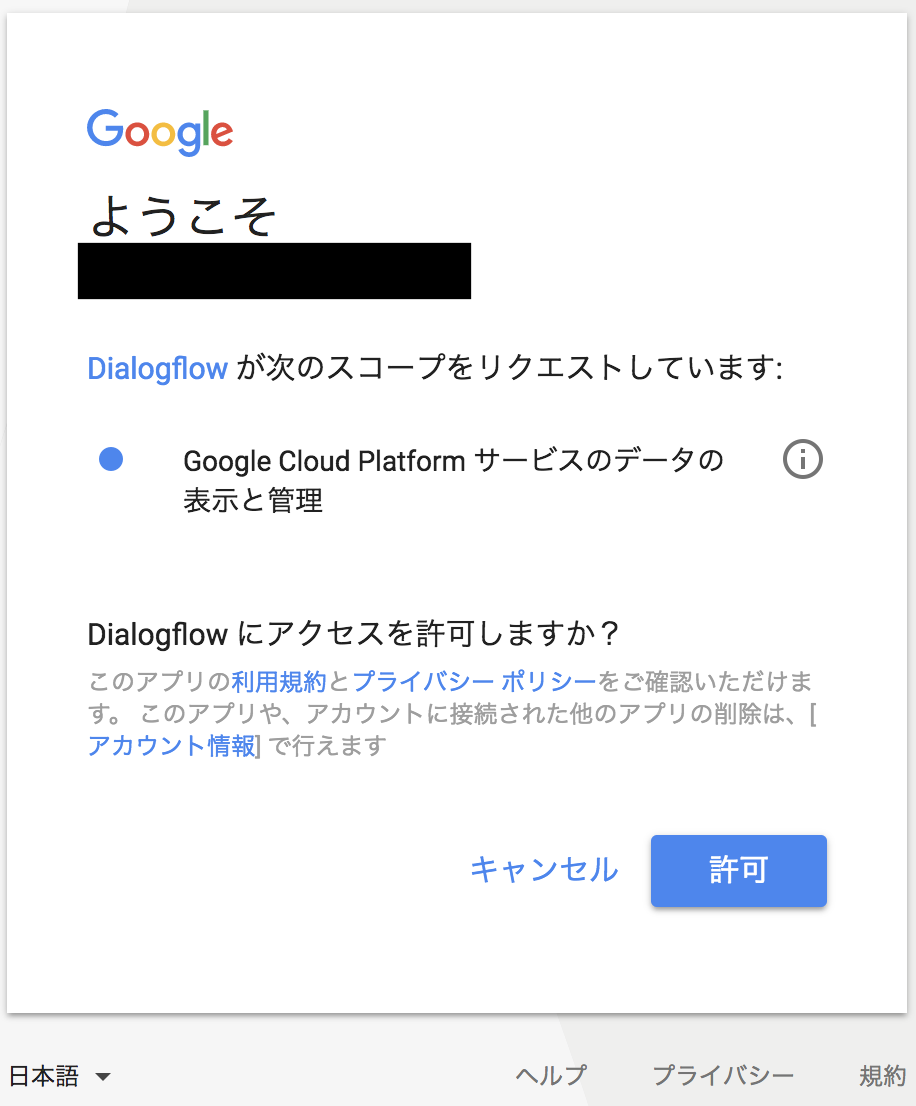
-
許諾すると、下記のように、「パーミッションが不適切」と怒られるので、「AUTHORIZE」を押下。上記と同様に今度は「Actions on Google」へのアクセスを許可してあげる

- 2つの許可が完了すると、下記のような画面が表示されるので、説明(DESCRIPTION)と言語を変えて右上のSAVEを押してあげる

Entitiesの設定
Entitiesとは、「表現の違う言葉でも、同じ意味の言葉として判断してくれる」的なもの。
今回は、下記の3つを設定してみました。

休む理由(AttendanceReason)
勤怠の文面に、「体調不良」なのか「私用」なのか入れたいので、
Google Homeに言った言葉を勤怠として遅れる言葉として判定してくれるように設定

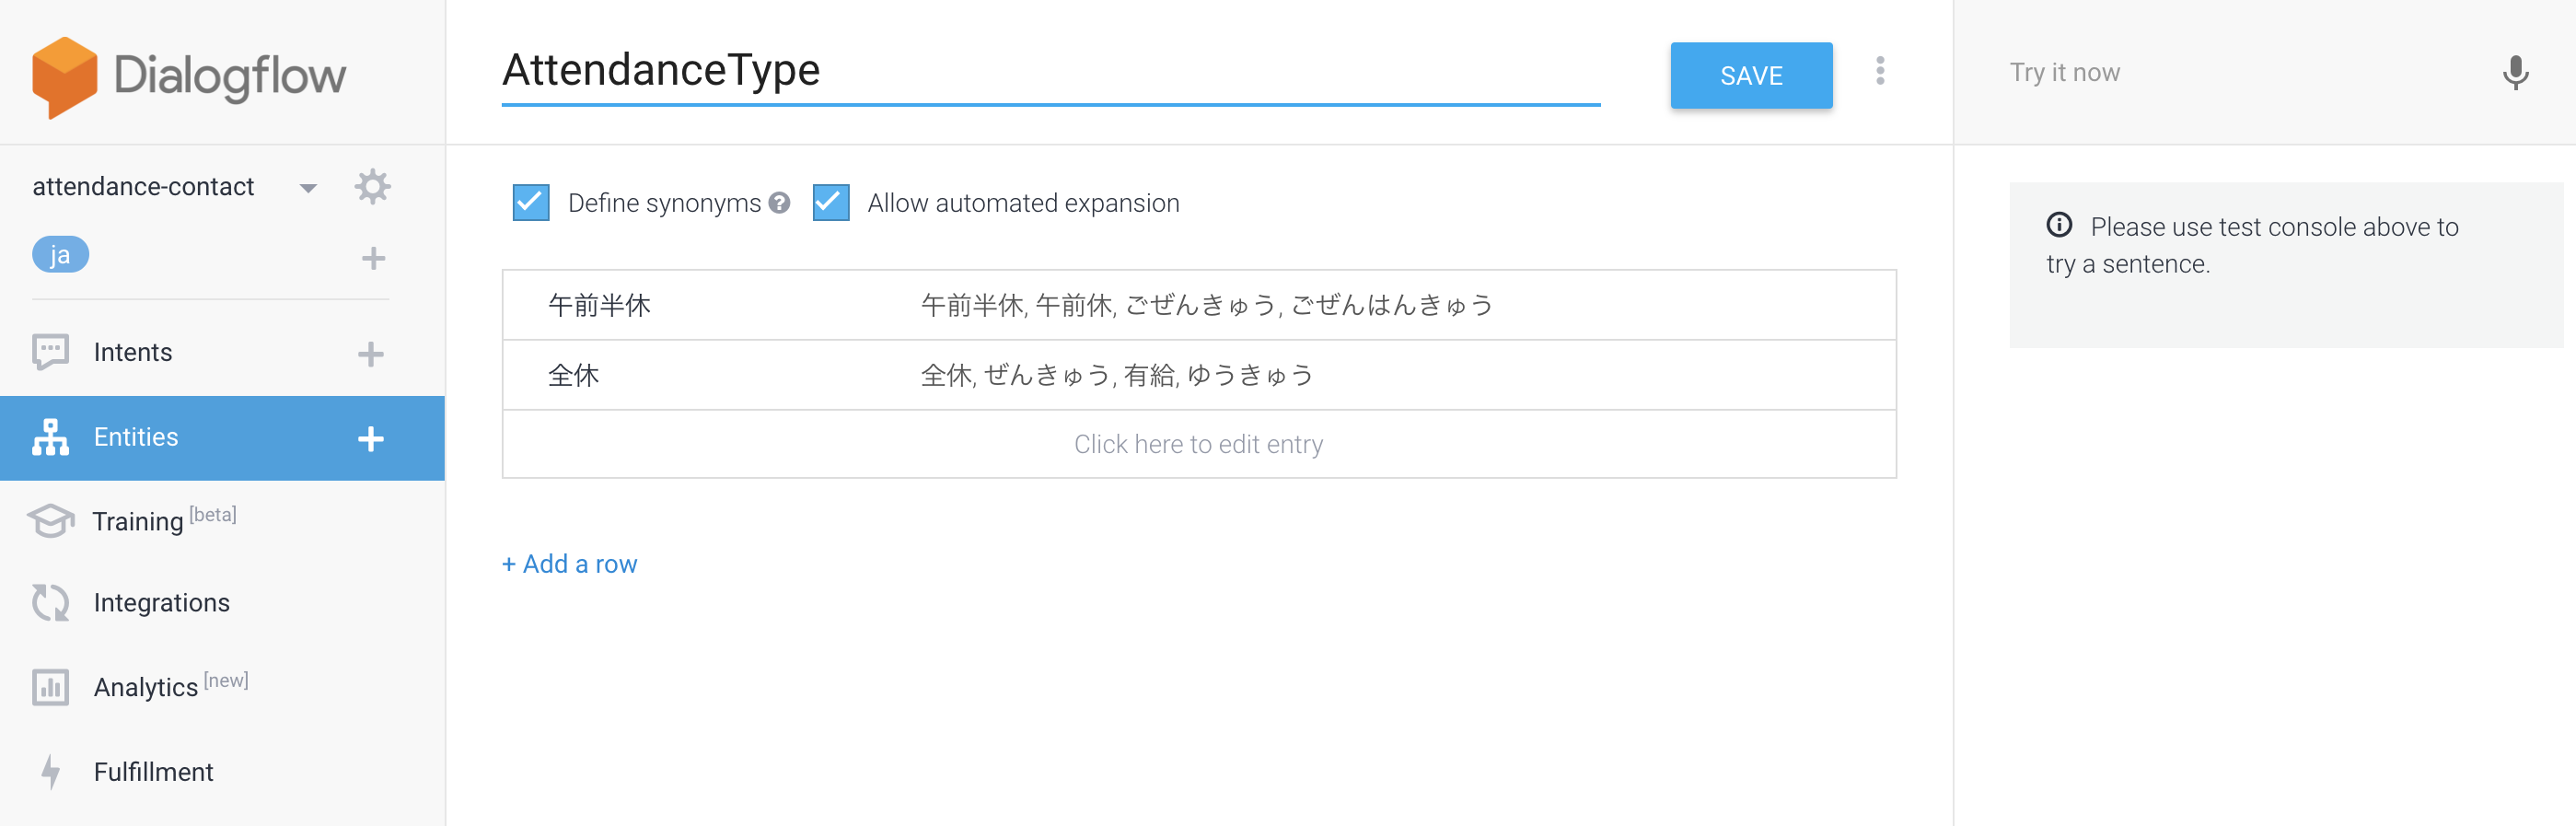
お休みタイプ(AttendanceType)
午前半休、全休も動的に変えたいので、下記のように設定
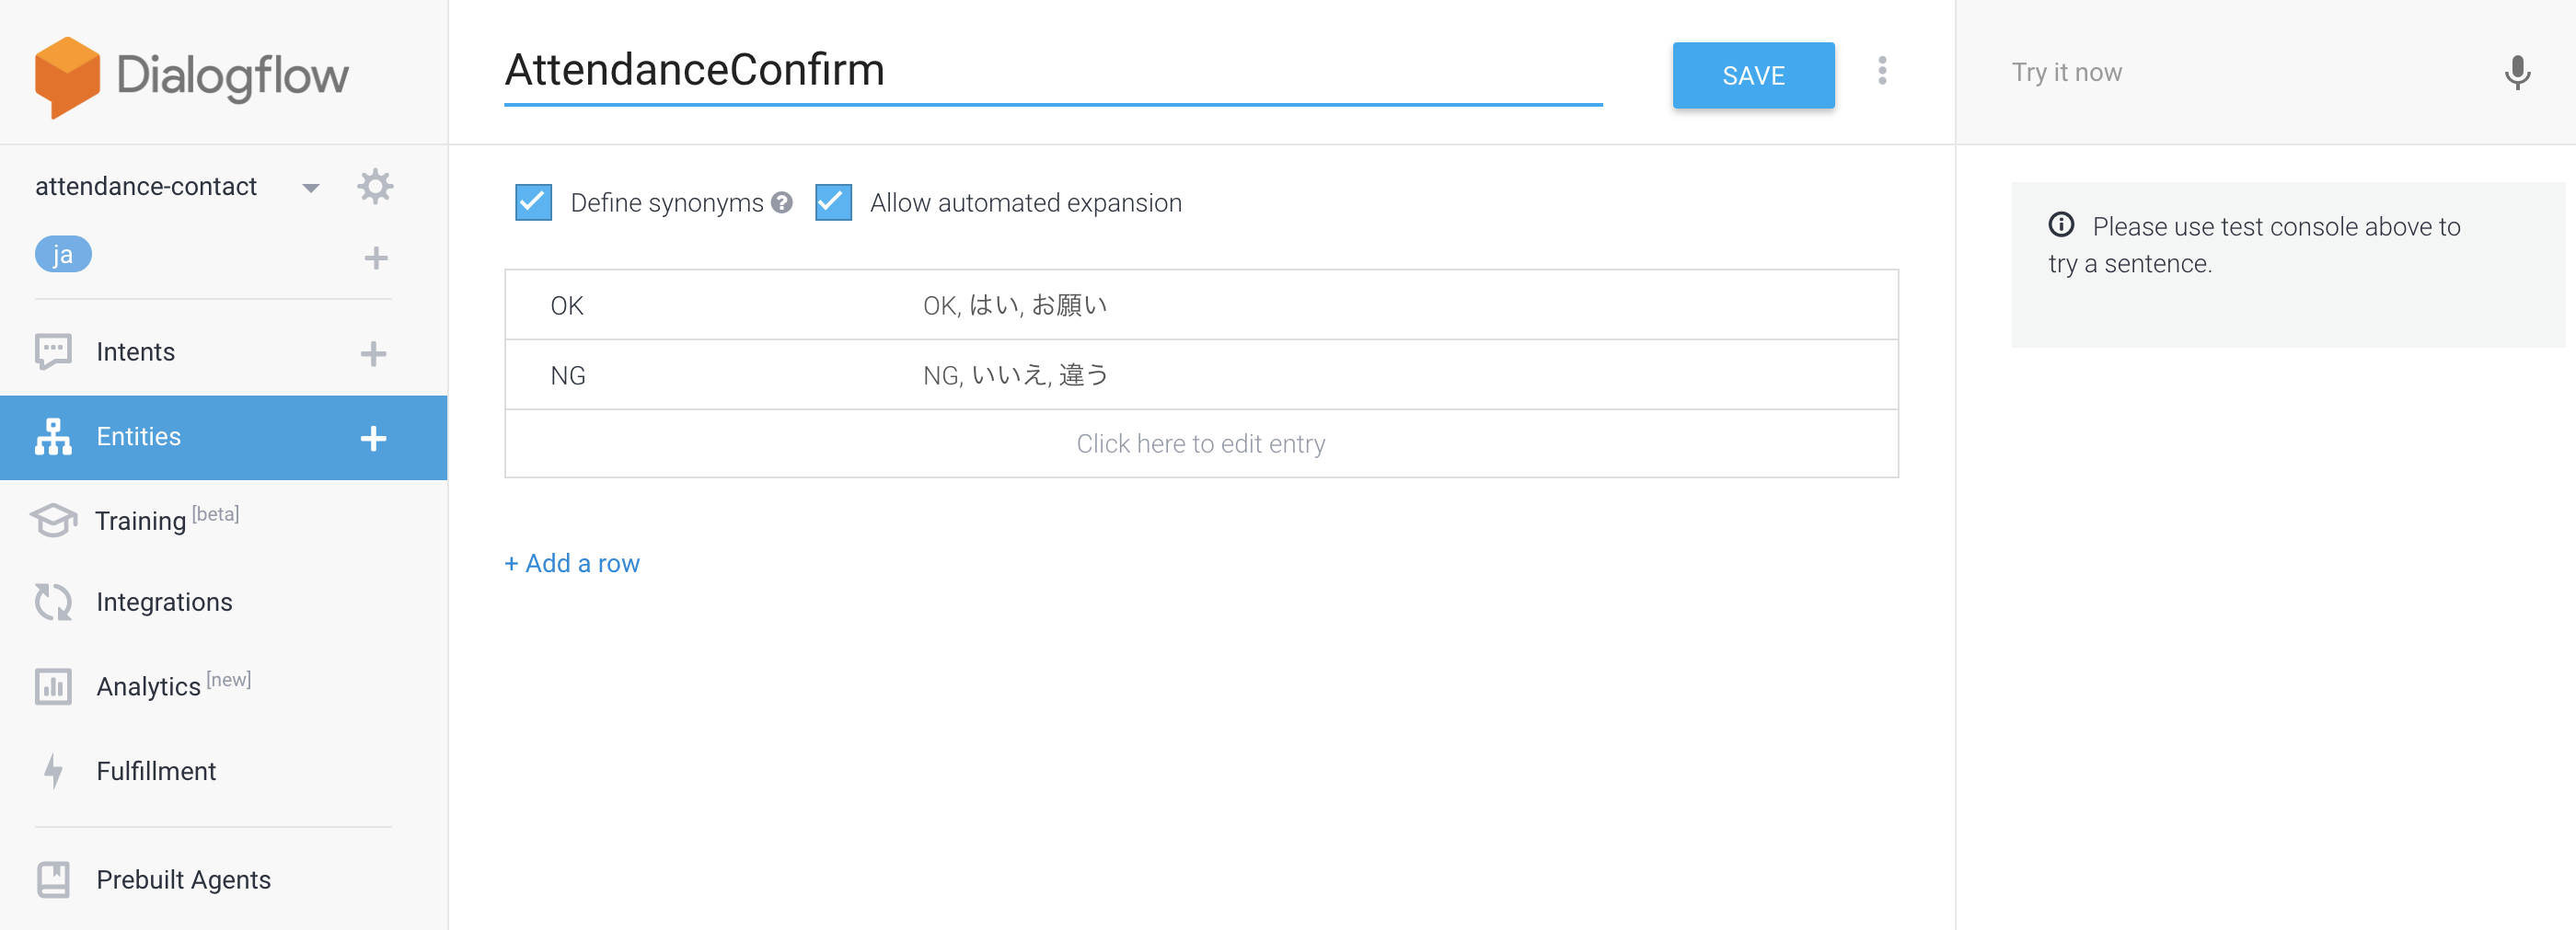
最終確認(AttendanceConfirm)
間違った情報で勤怠連絡されると困るので、最終確認への回答パターンを用意。
Intentの追加
いわば「ユーザが何と言ったらどういう反応をするか」といったものを設定します。
色々と試してみた結果、下記の3つのIntentを用意することに。
(1)アプリ起動時のIntent
(2)勤怠連絡処理のIntent
(3)アプリ終了のIntent
本来は、Intent一つでもやれると思いますが、どうも上手く動かなかったので、3つの用意となってしまいました><
もしこうやると一個でやれるとかありましたら教えてください!
(Cloud Functions on Firebaseでガリガリコード書けば間違いなく色々とできそう><)
(1)アプリ起動時のIntent
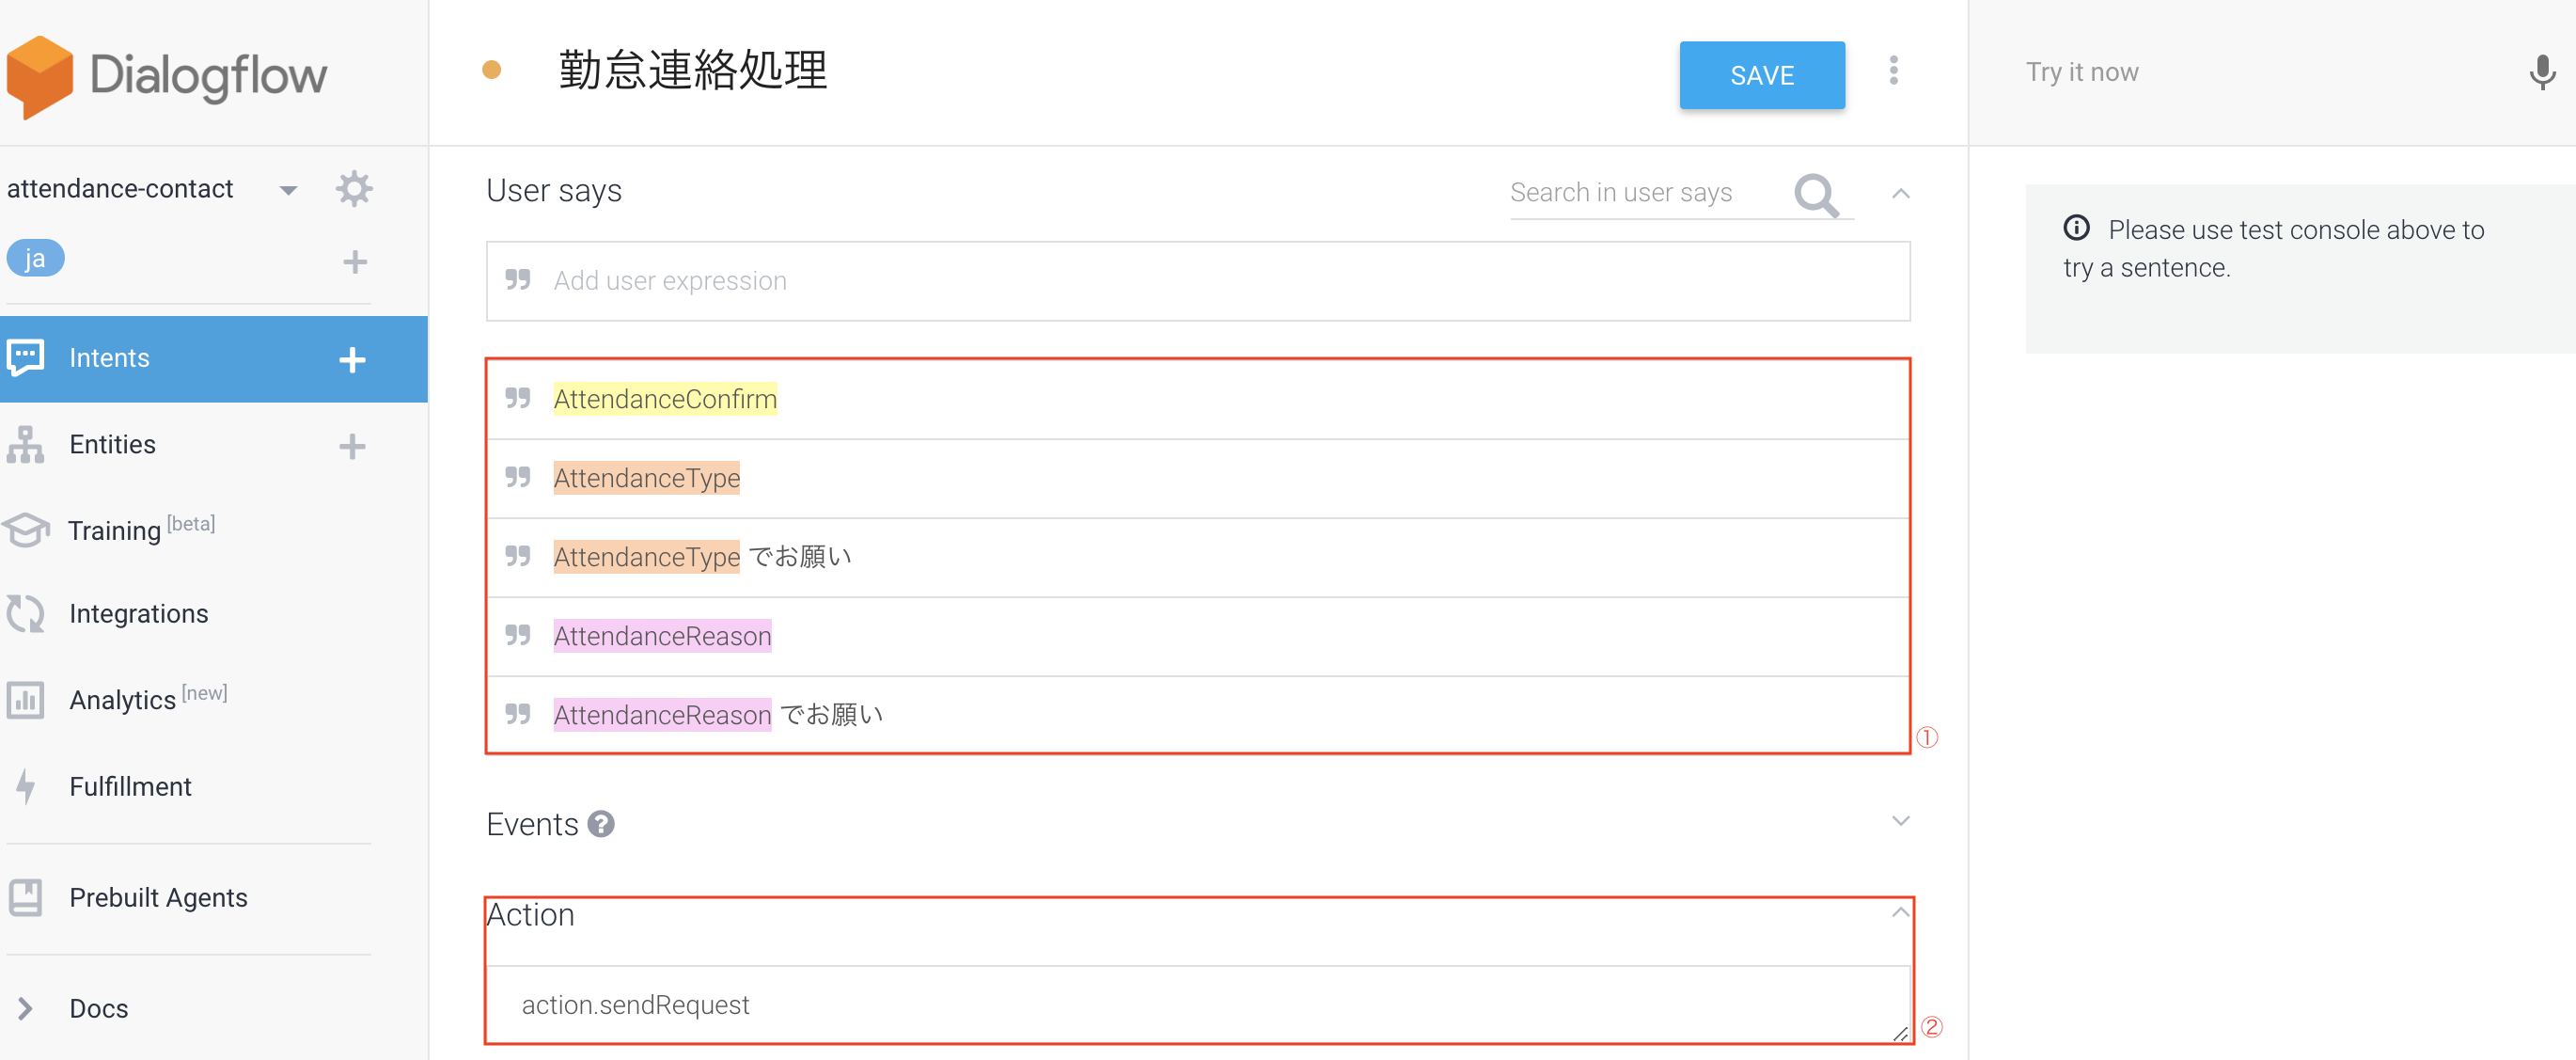
アプリ起動時の処理内容。記載した内容は下記のようなもの。
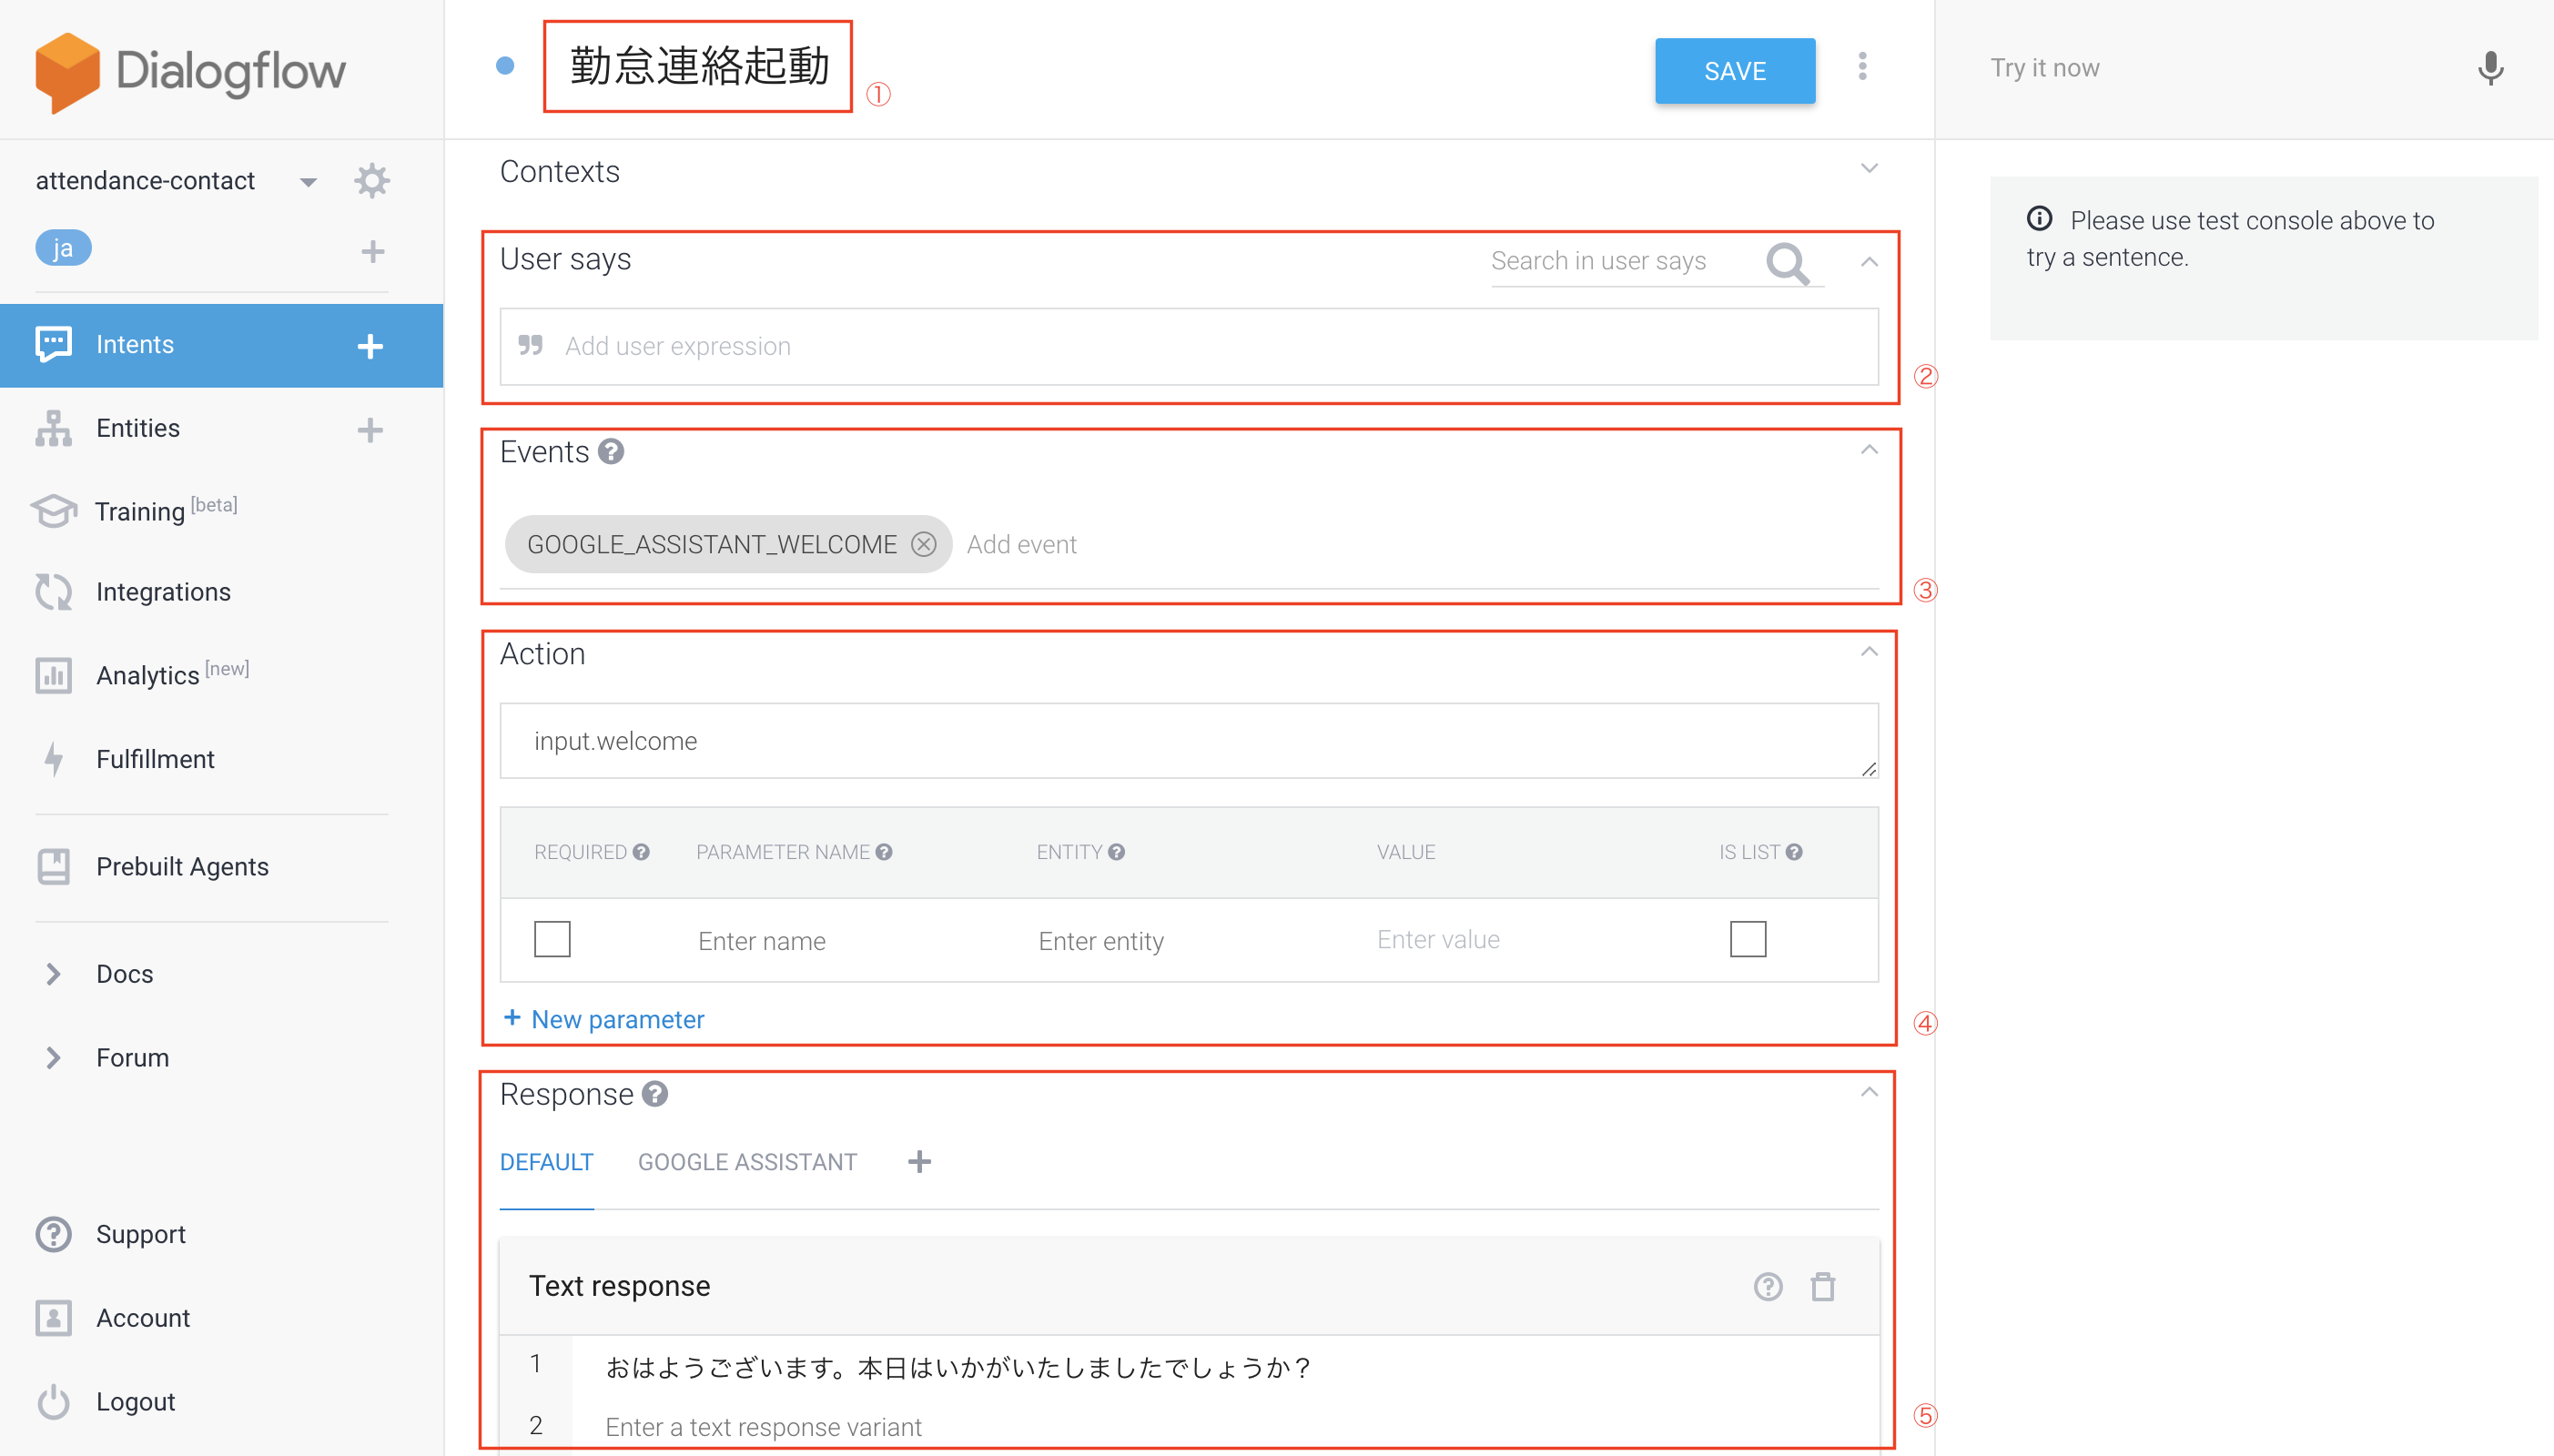
簡単に各設定項目の意味するところをまとめ。
①Intentの名前
②User Says:何を言ったらこのIntentが反応するか
③Events:このIntentが起動するイベント (ex. Googleアシスタントでアプリ起動時)
⑤Action
・実際にこのIntentが起動した際に、何かActionを実行する必要がある場合は記載 (ex.後述しますが、勤怠連絡を送るなど)
・parameter部分は、勤怠連絡処理時に記載しますが、こういうパラメータが必須などの設定ができます
⑤Text response:このIntentが起動した時に、Google Assistantが返す言葉。複数設定するとランダムに選ばれる)
起動時は、「どうしましたか?」と聞いてくれるだけに設定。
(2)勤怠処理のIntent
今回の一番重要な処理がここになります。まず設定した内容は下記。
①User Says
先ほど、「Entities」項目で設定した内容を使います。
ここでやっていることとしては、ユーザが「Entities」で設定した項目(Enter synonymという右側の項目)を言うと、それに該当したこと(Entity reference value)を言ったと判断され、このIntentが起動されます。
②Action (Fulfillment処理への布石)
このIntentが実行された時に、「どういうことをしたいか、処理を実行したいか」を、
Actionタイプを設定できる。今回でいうと勤怠連絡を送るという処理。
ここは後述する「Fulfillment」で使用します。
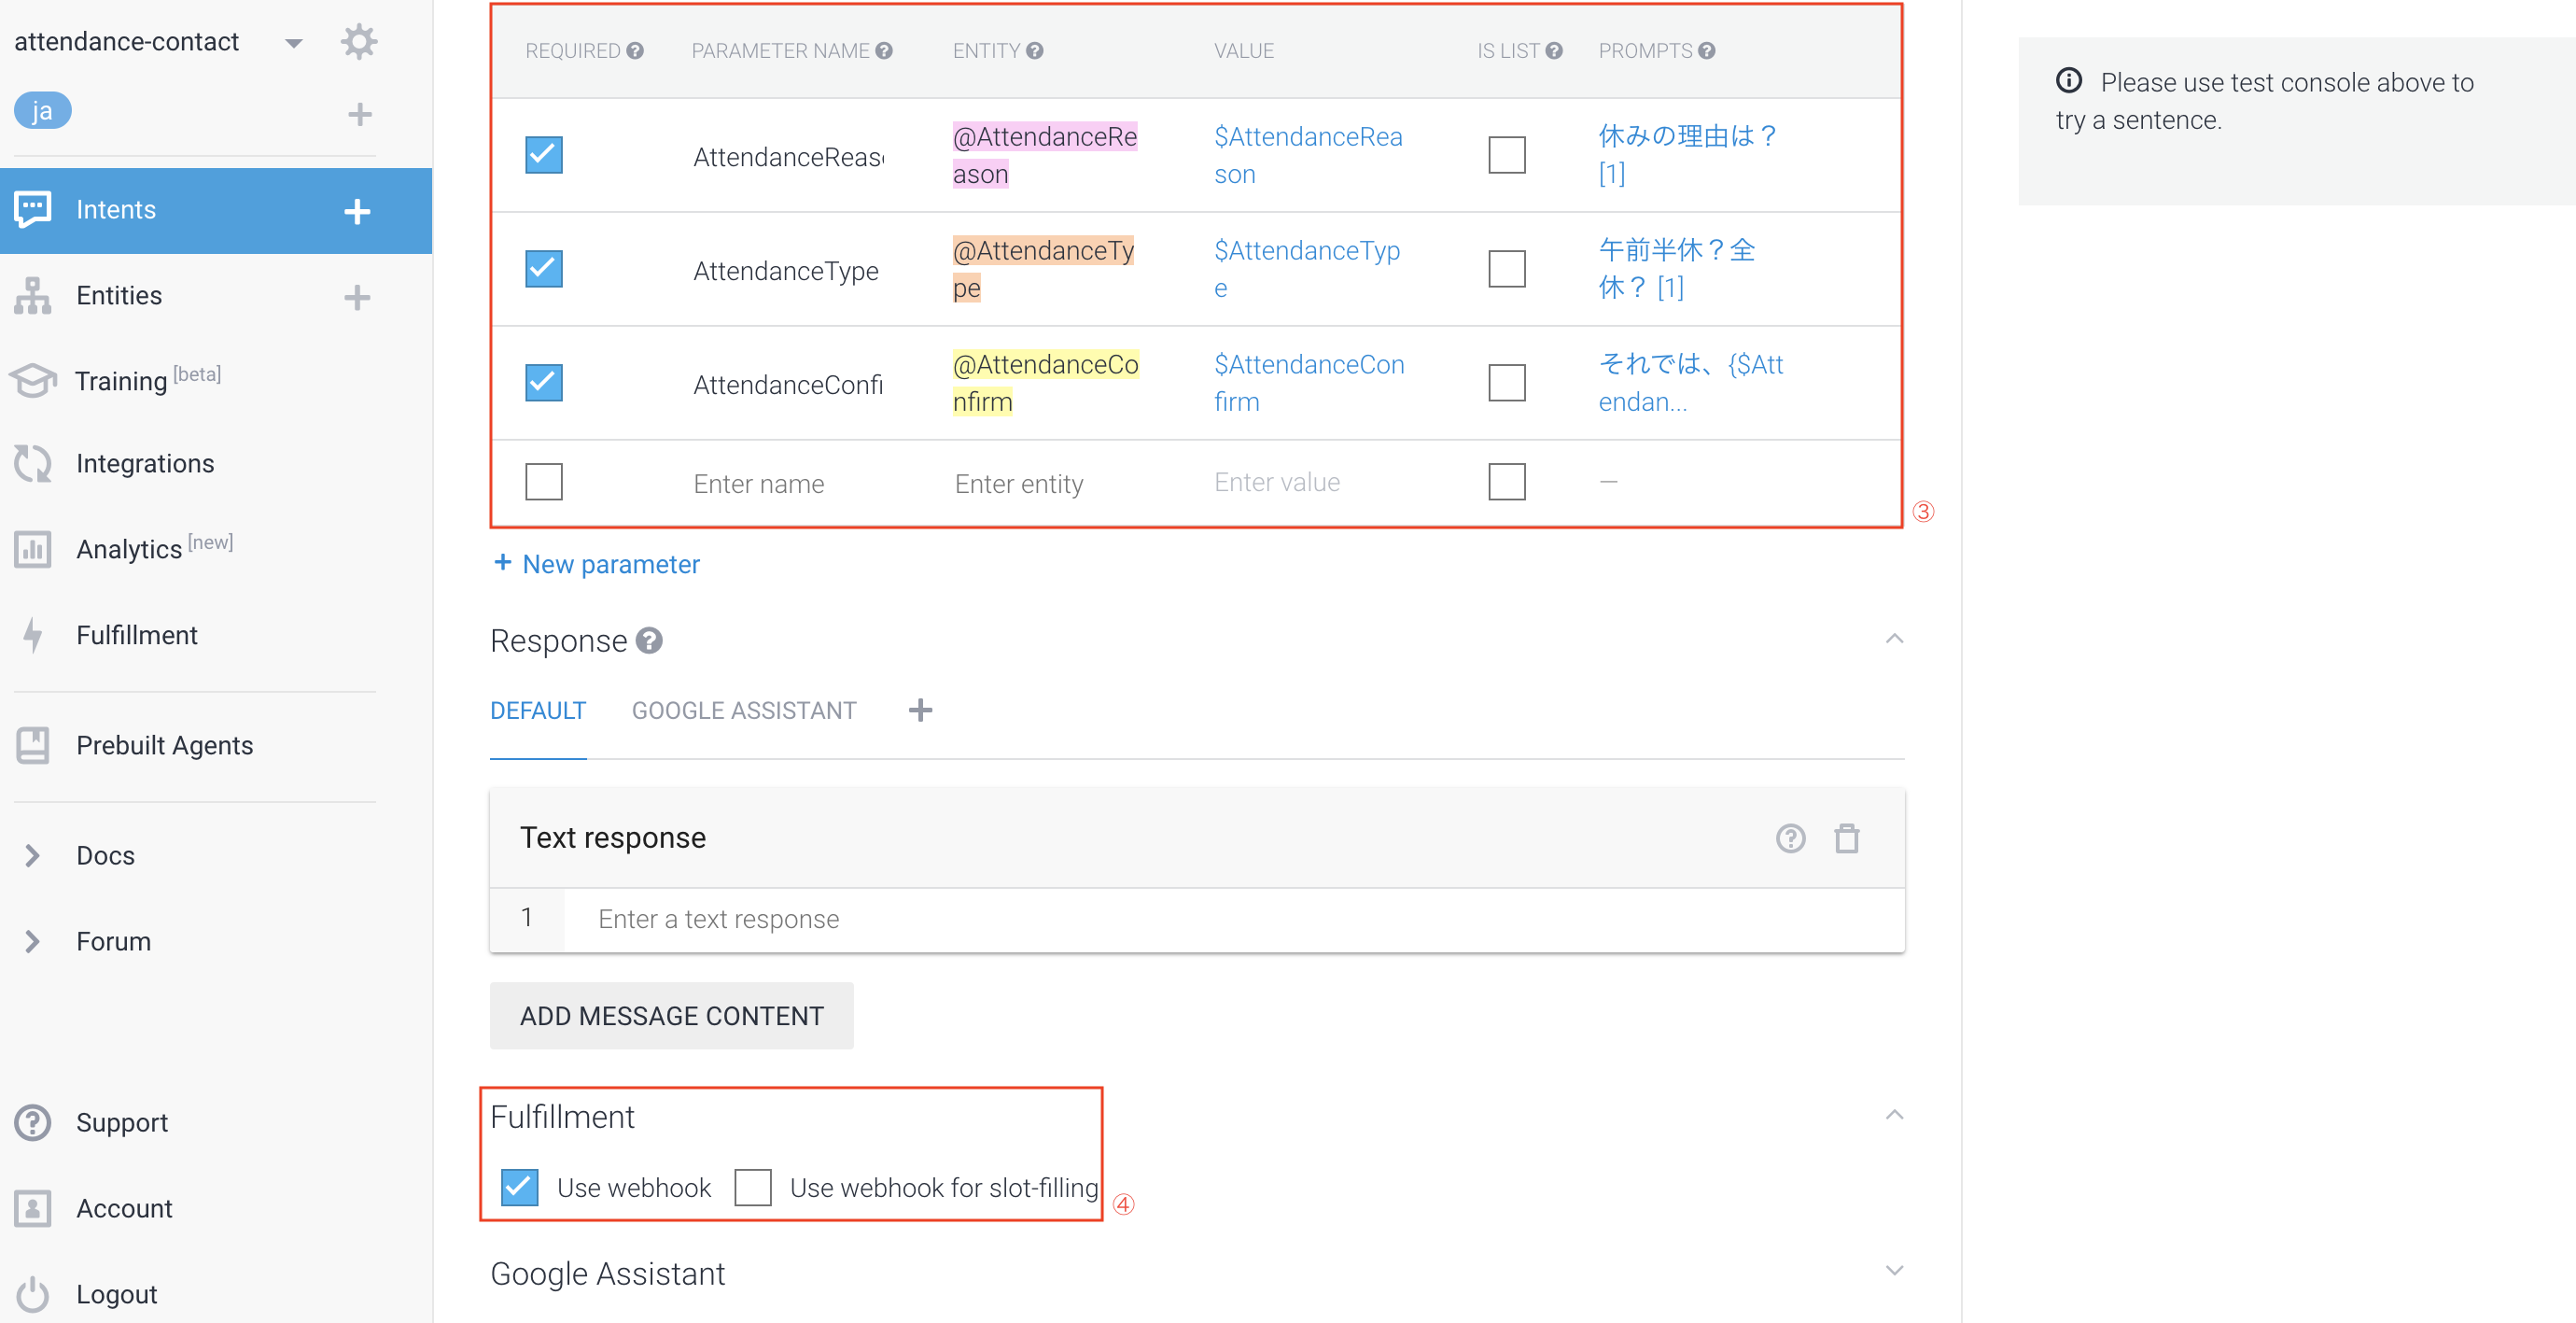
③Action (パラメータ指定)
ここが今回面白いなと思ったところ。
ここまでで設定した「Entities」「User Says」に関わるところで、
ユーザが発話した内容で、該当のEntitiesをパラメータとして受け取ることができる。
そして、「REQUIRED」にチェックをつけてると、この情報は絶対に必要と判断されるので、
「PROMPTS」に設定した内容をGoogle Assistantが聞いてくるというもの。
しかも、必須としたパラメータに関しての発話がされないと、聴き続けてくるのと、
上記②で設定したFulfillment処理へのActionタイプは実行されない。
なので、最終的にやりたい処理のために、これは情報としてくれ!というものは、
このパラメータで必須(REQUIRED)として設定してあげると良い。
その際にEntitiesをうまく活用すると、ユーザの発話がどのようにされても自分の意図通りに動きます。
④Fulfillment
こちらは後述しますが、カスタマイズした処理、いわば自分が書いたプログラムを実行したいときは、
この「Use webhook」にチェックを入れる。ただし最初は項目ができないので、Fulfillment項目で、
「Inline Editor(Powered by Cloud Functions for Firebase)」
を「ENABLED」に設定すると、このチェック項目が出てきます
(3)アプリ終了のIntent
今までの設定だと、Google Assistantは終了せずに会話を待ち続けてしまうので、
下記のようにGoogle Assistantの「End conversation」をチェックしたIntentを用意。

これでGoogle Homeに「おやすみ」というと勤怠連絡アプリが終了する。
Fulfillment
自分が書いたプログラムなどを実行するために設定する項目。
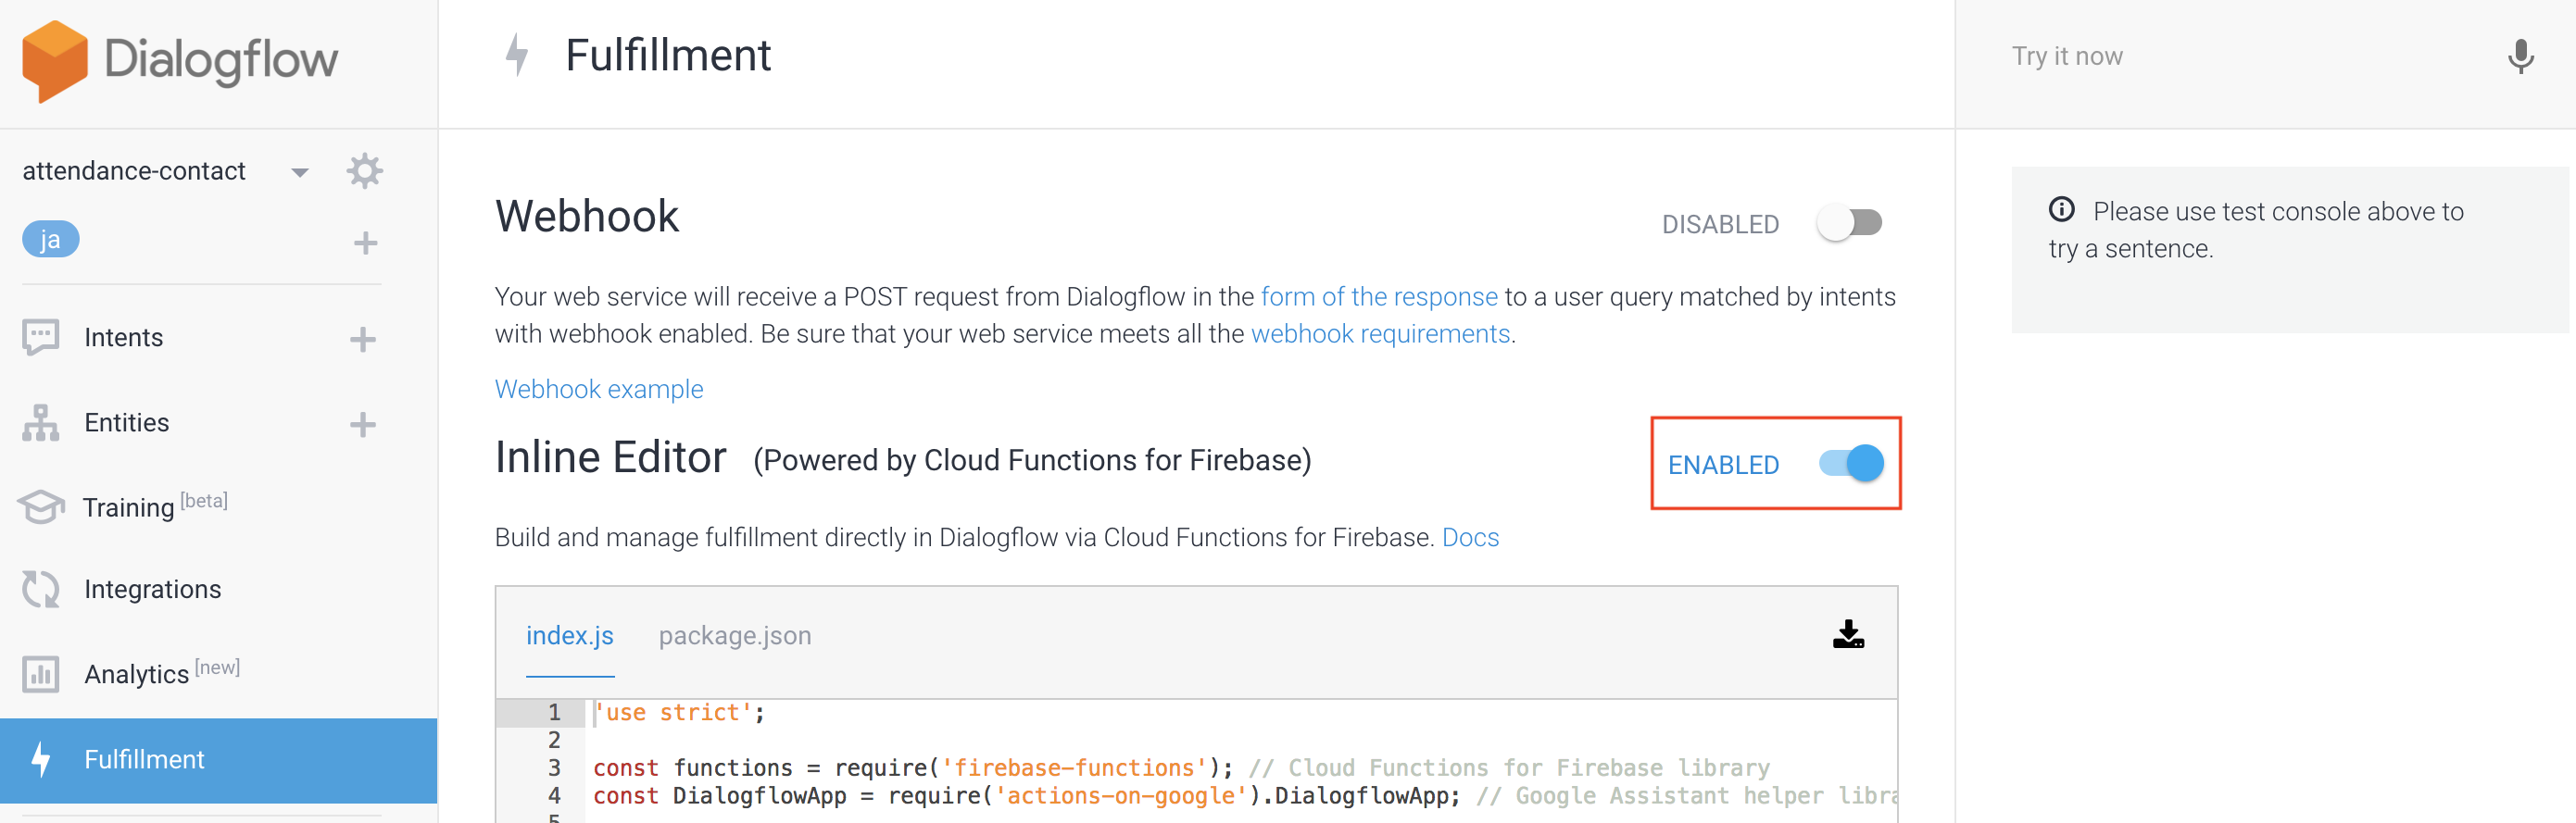
今回は、「Inline Editor」を使いたいので、まずは「ENABLED」にする。
あとは、既にEditorにあるプログラムをベースに、勤怠処理を送る処理、
正確にいうと、勤怠連絡処理が設定されているmyThings Developersへのリクエストを書いておきます
下記は以前書いたFunctionsに置ける処理をベースに書いてみましたmm
'use strict';

const functions = require('firebase-functions'); // Cloud Functions for Firebase library
const DialogflowApp = require('actions-on-google').DialogflowApp; // Google Assistant helper library

const googleAssistantRequest = 'google'; // Constant to identify Google Assistant requests

const qs = require("querystring");
var https = require("https");
var date = new Date();
var dateString = createPostTimeString();

// myThings Developersに必要なリクエスト項目
var appid = "<<your appid>>";
var secret = "<<your secret>>";
var accessToken = "<<your access token>>";
var attendanceType = "午前半休";
var attendanceReason = "体調不良";

exports.dialogflowFirebaseFulfillment = functions.https.onRequest((request, response) => {
  let action = request.body.result.action;

  attendanceType = request.body.result.parameters.AttendanceType;
  attendanceReason = request.body.result.parameters.AttendanceReason;

  const inputContexts = request.body.result.contexts;

  const requestSource = (request.body.originalRequest) ? request.body.originalRequest.source : undefined;
  const app = new DialogflowApp({request: request, response: response});

  const actionHandlers = {
    'input.welcome': () => {
      if (requestSource === googleAssistantRequest) {
        sendGoogleResponse('Hello, Welcome to my Dialogflow agent!'); // Send simple response to user
      } else {
        sendResponse('Hello, Welcome to my Dialogflow agent!'); // Send simple response to user
      }
    },
    'input.unknown': () => {
      if (requestSource === googleAssistantRequest) {
        sendGoogleResponse('I\'m having trouble, can you try that again?'); // Send simple response to user
      } else {
        sendResponse('I\'m having trouble, can you try that again?'); // Send simple response to user
      }
    },
    'default': () => {
      if (requestSource === googleAssistantRequest) {
        let responseToUser = {
          speech: 'This message is from Dialogflow\'s Cloud Functions for Firebase editor!', // spoken response
          displayText: 'This is from Dialogflow\'s Cloud Functions for Firebase editor! :-)' // displayed response
        };
        sendGoogleResponse(responseToUser);
      } else {
        let responseToUser = {
          speech: 'This message is from Dialogflow\'s Cloud Functions for Firebase editor!', // spoken response
          displayText: 'This is from Dialogflow\'s Cloud Functions for Firebase editor! :-)' // displayed response
        };
        sendResponse(responseToUser);
      }
    },
    'action.sendRequest': () => {
        if (requestSource === googleAssistantRequest) {
        let responseToUser = {
          speech: '勤怠連絡をお送りしました', // spoken response
          displayText: '勤怠連絡をお送りしました' // displayed response
        };
        requestDevelopers(function() {
            sendGoogleResponse(responseToUser);
        });
      } else {
        let responseToUser = {
          speech: '勤怠連絡をお送りしました', // spoken response
          displayText: '勤怠連絡をお送りしました' // displayed response
        };
        requestDevelopers(function() {
            sendResponse(responseToUser);
        });
      }
    }
  };

  // If undefined or unknown action use the default handler
  if (!actionHandlers[action]) {
    action = 'default';
  }

  // Run the proper handler function to handle the request from Dialogflow
  actionHandlers[action]();

  function sendGoogleResponse (responseToUser) {
    if (typeof responseToUser === 'string') {
      app.ask(responseToUser); // Google Assistant response
    } else {
      // If speech or displayText is defined use it to respond
      let googleResponse = app.buildRichResponse().addSimpleResponse({
        speech: responseToUser.speech || responseToUser.displayText,
        displayText: responseToUser.displayText || responseToUser.speech
      });

      // Optional: Overwrite previous response with rich response
      if (responseToUser.googleRichResponse) {
        googleResponse = responseToUser.googleRichResponse;
      }

      // Optional: add contexts (https://dialogflow.com/docs/contexts)
      if (responseToUser.googleOutputContexts) {
        app.setContext(...responseToUser.googleOutputContexts);
      }

      app.ask(googleResponse); // Send response to Dialogflow and Google Assistant
    }
  }

  // Function to send correctly formatted responses to Dialogflow which are then sent to the user
  function sendResponse (responseToUser) {
    // if the response is a string send it as a response to the user
    if (typeof responseToUser === 'string') {
      let responseJson = {};
      responseJson.speech = responseToUser; // spoken response
      responseJson.displayText = responseToUser; // displayed response
      response.json(responseJson); // Send response to Dialogflow
    } else {
      // If the response to the user includes rich responses or contexts send them to Dialogflow
      let responseJson = {};

      // If speech or displayText is defined, use it to respond (if one isn't defined use the other's value)
      responseJson.speech = responseToUser.speech || responseToUser.displayText;
      responseJson.displayText = responseToUser.displayText || responseToUser.speech;

      // Optional: add rich messages for integrations (https://dialogflow.com/docs/rich-messages)
      responseJson.data = responseToUser.richResponses;

      // Optional: add contexts (https://dialogflow.com/docs/contexts)
      responseJson.contextOut = responseToUser.outputContexts;

      response.json(responseJson); // Send response to Dialogflow
    }
  }
});

// Construct rich response for Google Assistant
const app = new DialogflowApp();
const googleRichResponse = app.buildRichResponse()
  .addSimpleResponse('This is the first simple response for Google Assistant')
  .addSuggestions(
    ['Suggestion Chip', 'Another Suggestion Chip'])
    // Create a basic card and add it to the rich response
  .addBasicCard(app.buildBasicCard(`This is a basic card.  Text in a
 basic card can include "quotes" and most other unicode characters
 including emoji 📱.  Basic cards also support some markdown
 formatting like *emphasis* or _italics_, **strong** or __bold__,
 and ***bold itallic*** or ___strong emphasis___ as well as other things
 like line  \nbreaks`) // Note the two spaces before '\n' required for a
                        // line break to be rendered in the card
    .setSubtitle('This is a subtitle')
    .setTitle('Title: this is a title')
    .addButton('This is a button', 'https://assistant.google.com/')
    .setImage('https://developers.google.com/actions/images/badges/XPM_BADGING_GoogleAssistant_VER.png',
      'Image alternate text'))
  .addSimpleResponse({ speech: 'This is another simple response',
    displayText: 'This is the another simple response 💁' });

// Rich responses for both Slack and Facebook
const richResponses = {
  'slack': {
    'text': 'This is a text response for Slack.',
    'attachments': [
      {
        'title': 'Title: this is a title',
        'title_link': 'https://assistant.google.com/',
        'text': 'This is an attachment.  Text in attachments can include \'quotes\' and most other unicode characters including emoji 📱.  Attachments also upport line\nbreaks.',
        'image_url': 'https://developers.google.com/actions/images/badges/XPM_BADGING_GoogleAssistant_VER.png',
        'fallback': 'This is a fallback.'
      }
    ]
  },
  'facebook': {
    'attachment': {
      'type': 'template',
      'payload': {
        'template_type': 'generic',
        'elements': [
          {
            'title': 'Title: this is a title',
            'image_url': 'https://developers.google.com/actions/images/badges/XPM_BADGING_GoogleAssistant_VER.png',
            'subtitle': 'This is a subtitle',
            'default_action': {
              'type': 'web_url',
              'url': 'https://assistant.google.com/'
            },
            'buttons': [
              {
                'type': 'web_url',
                'url': 'https://assistant.google.com/',
                'title': 'This is a button'
              }
            ]
          }
        ]
      }
    }
  }
};

/**
 * "2016/12/21(水)"の形式の文字列を返す
 * @return string 日付文字列
 */
function createPostTimeString() {
    // 年
    var year = date.getFullYear();
    // 月
    var month = date.getMonth() + 1;
    if (month < 10) {
        month = '0' + month;
    }
    // 日
    var day = date.getDate();
    if (day < 10) {
        day = '0' + day;
    }
    // 曜日
    var weekDayList = [ "日", "月", "火", "水", "木", "金", "土" ];
    var weekDay = weekDayList[ date.getDay() ];

    return year+"/"+month+"/"+day+"("+weekDay+")";
}

/**
 * myThings Developersへのリクエスト
 * @return void
 */
function requestDevelopers(callback) {
    // リクエストパラメータの生成
    var postArgs = {
        date: dateString,
        type: attendanceType,
        reason: attendanceReason
    }
    var postData = qs.stringify({
        "entry": JSON.stringify(postArgs),
    });
    console.log('requestDevelopers postData:' + postData);

    // リクエスト設定
    var options = {
        hostname: "mythings-developers.yahooapis.jp",
        path: "/v2/services/<<your path>>/mythings/<<your path>>/run",
        port: 443,
        method: "POST",
        headers: {
            "Content-Type": "application/x-www-form-urlencoded; charset=utf-8",
            "Authorization": "Bearer " + accessToken,
        },
    };

    // リクエスト
    var req = https.request(options, function(res){
        // 401のとき
        if (res.statusCode == 401) {
            // コールバック付きのrefreshAccessTokenを呼ぶ
            refreshAccessToken(callback);
            return;
        }

        // レスポンス処理
        res.on("data", function(body){
            var parseData = JSON.parse(body);
            if(typeof( parseData["flag"] ) != "undefined") {
                callback();
            } else {
                console.log("カスタムトリガーの実行リクエストの受付に失敗しました。:"+body);
            }
        });
    })
    .on("error", function(res){
        console.log('error:' + res);
        callback();
    });
    req.end(postData)
}

/**
 * アクセストークンのリフレッシュ
 */
function refreshAccessToken(callback) {
    console.log("refreshAccessTokenにきたよ");
    // リフレッシュ用データのセット
    var reqData = qs.stringify({
        "grant_type": "refresh_token",
        "refresh_token": refreshToken
    });
    // リクエスト設定
    var buffer = new Buffer(appid + ":" + secret, "ascii");
    var options = {
        hostname: "auth.login.yahoo.co.jp",
        path: "/yconnect/v1/token",
        port: 443,
        method: "POST",
        headers: {
            "Content-Type": "application/x-www-form-urlencoded; charset=utf-8",
            "Authorization": "Basic " + buffer.toString("base64"),
        }
    };

    // リクエスト実行
    var req = https.request(options, function(res) {
        console.log("refreshAccessTokenのrequestのなかにきたよ");
        // 401の場合
        if(res.statusCode == 401) {
            callback();
        } else if(res.statusCode != 200) {
            callback();
        }

        // レスポンス処理
        res.on('data', function(body){
            var parseData = JSON.parse(body);
            accessToken = parseData['access_token'];
            requestDevelopers(callback);
        });
    });

    // POSTデータのリクエスト
    req.end(reqData);
}
あとは、「Deploy」ボタンを押下すると、Firebase上に反映されます。
※Firebaseから外部にリクエストを実行するためには無料プランから変更する必要がありそうです><
Google AssistantへのIntegration
これまで設定したものを、Google Assistantで使えるようにします。
1.Dialogflowの「Integrations」を選択し、その中のGoogle Assistantを押下
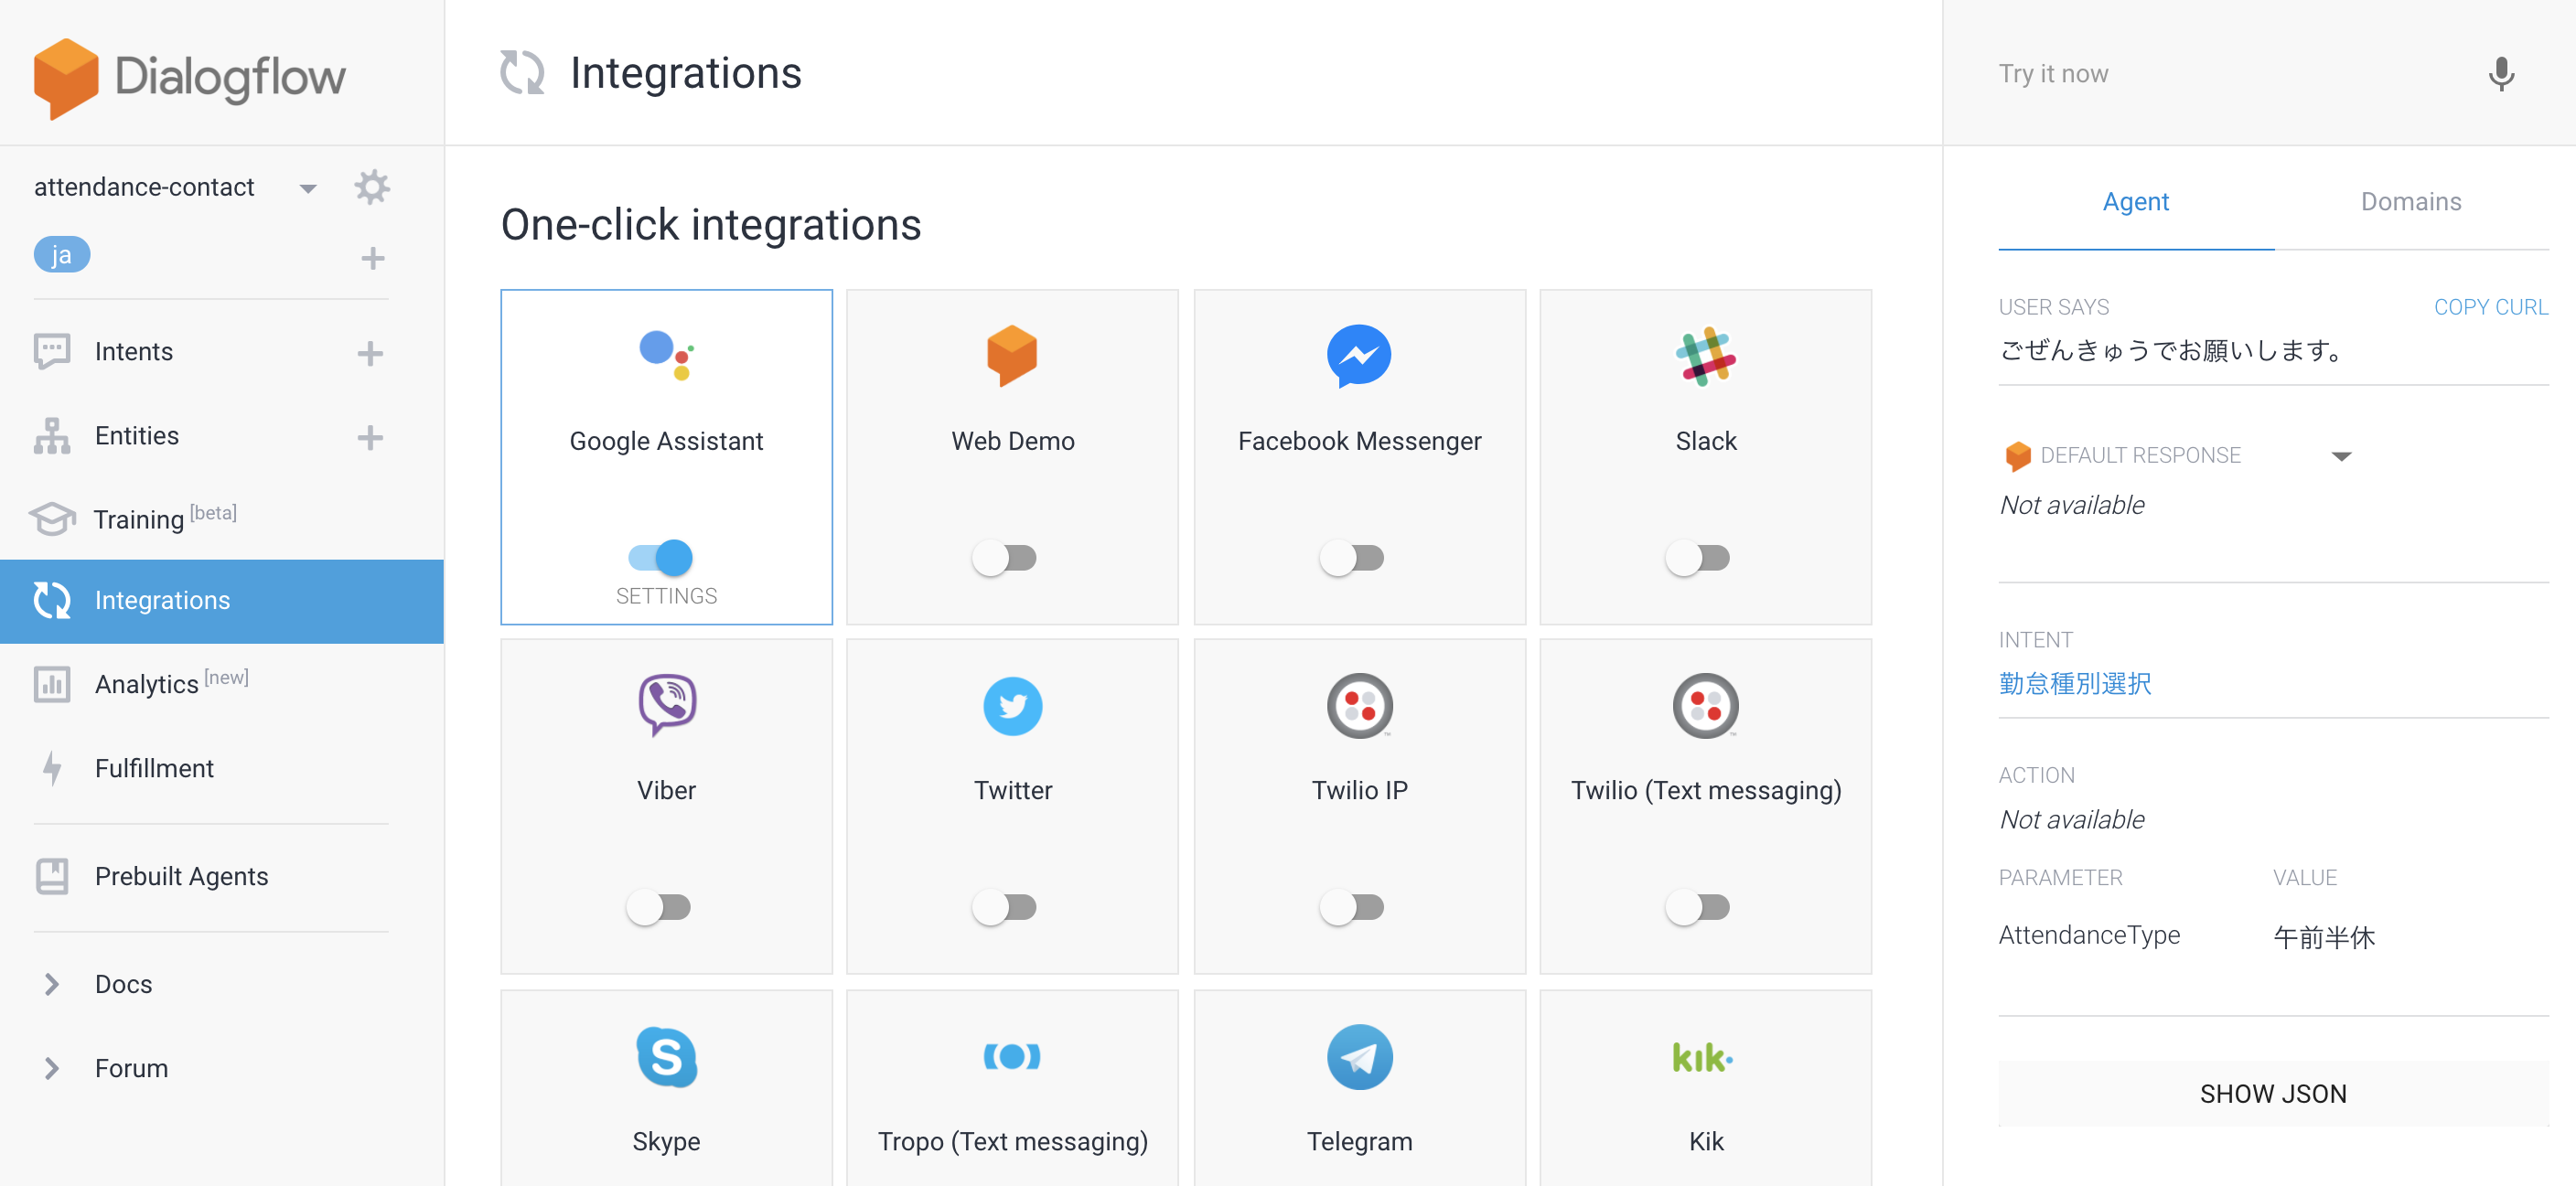
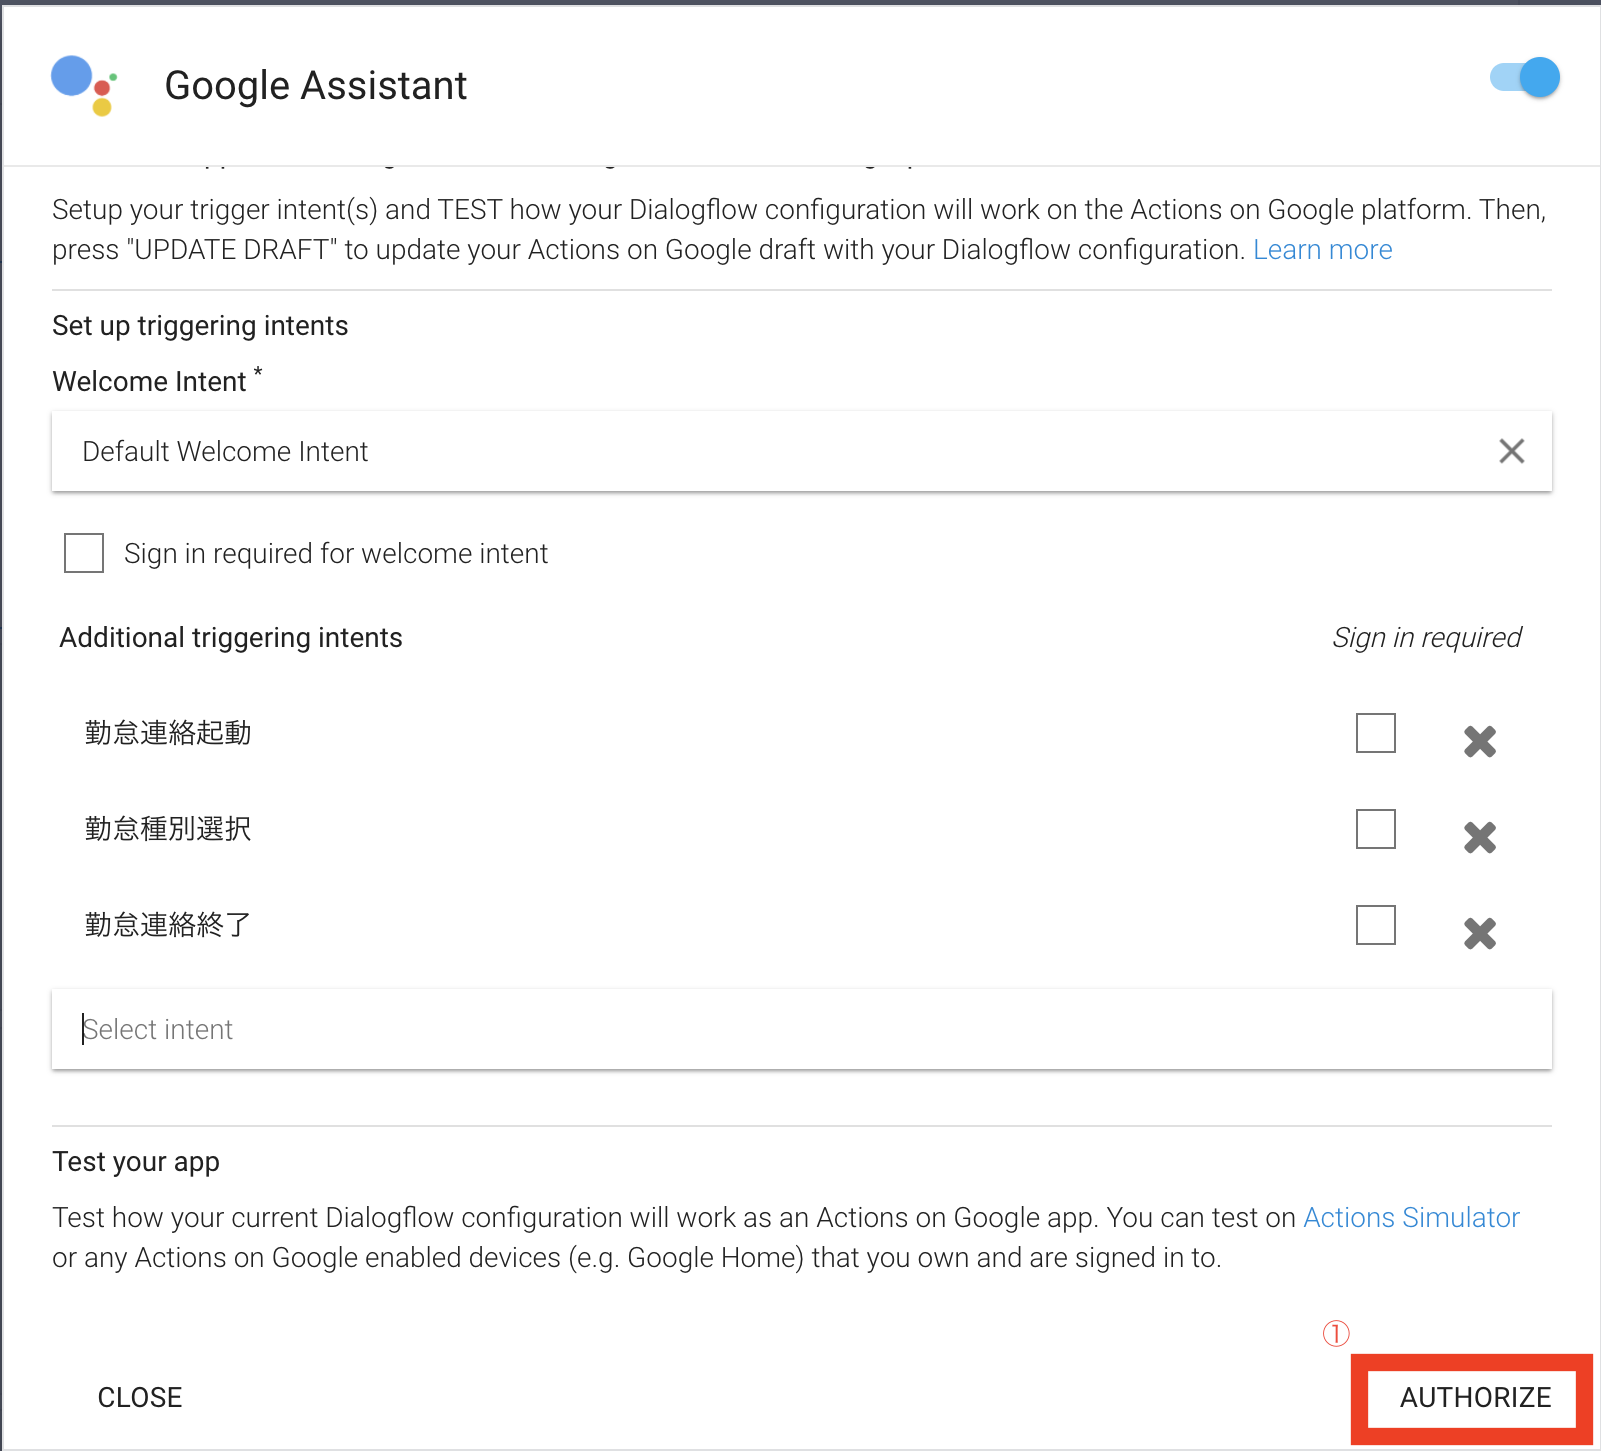
2.DialogflowがGoogle Assistantを使えるようにするため、右下の「AUTHORIZE」を押下し、認証する
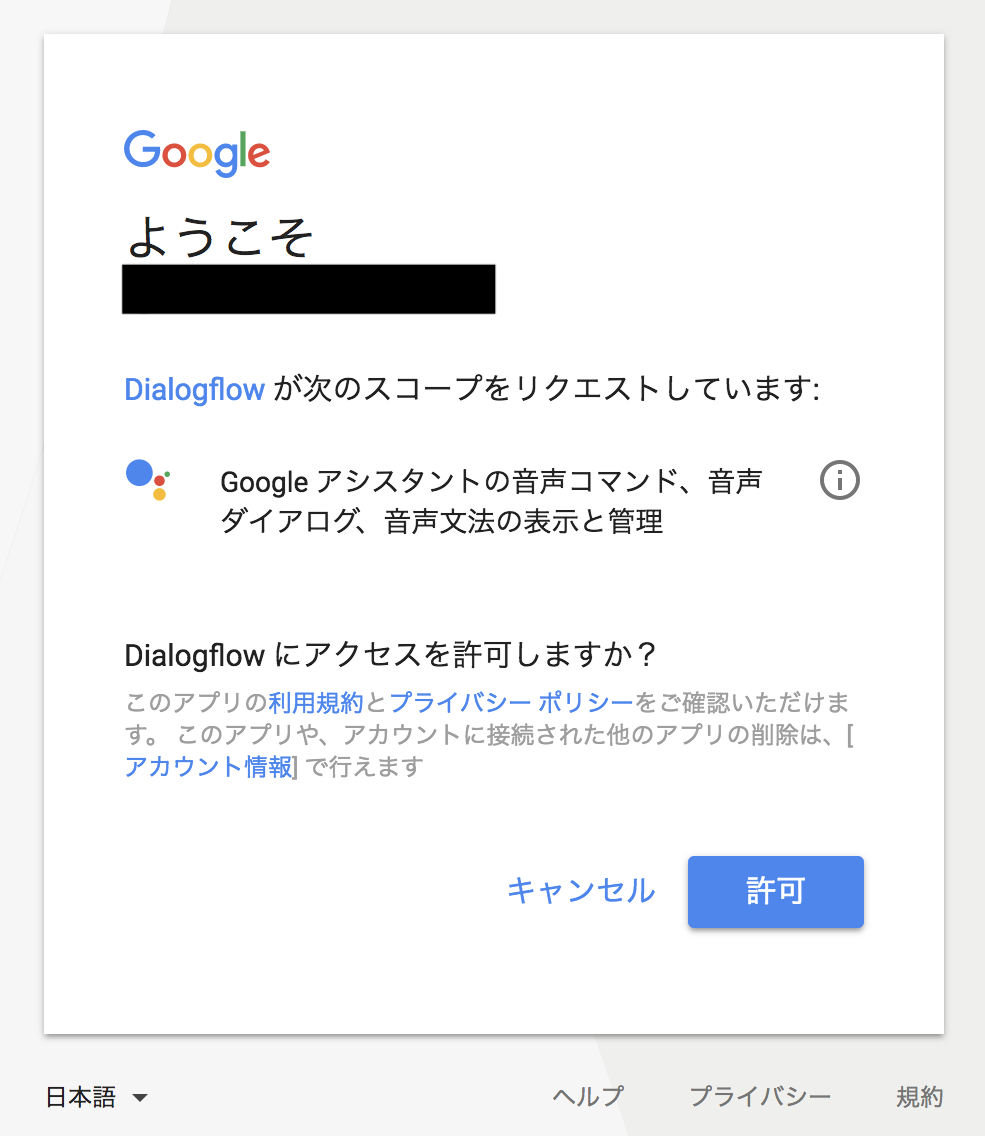
3.認可が完了したら、必要な設定をしていきます。
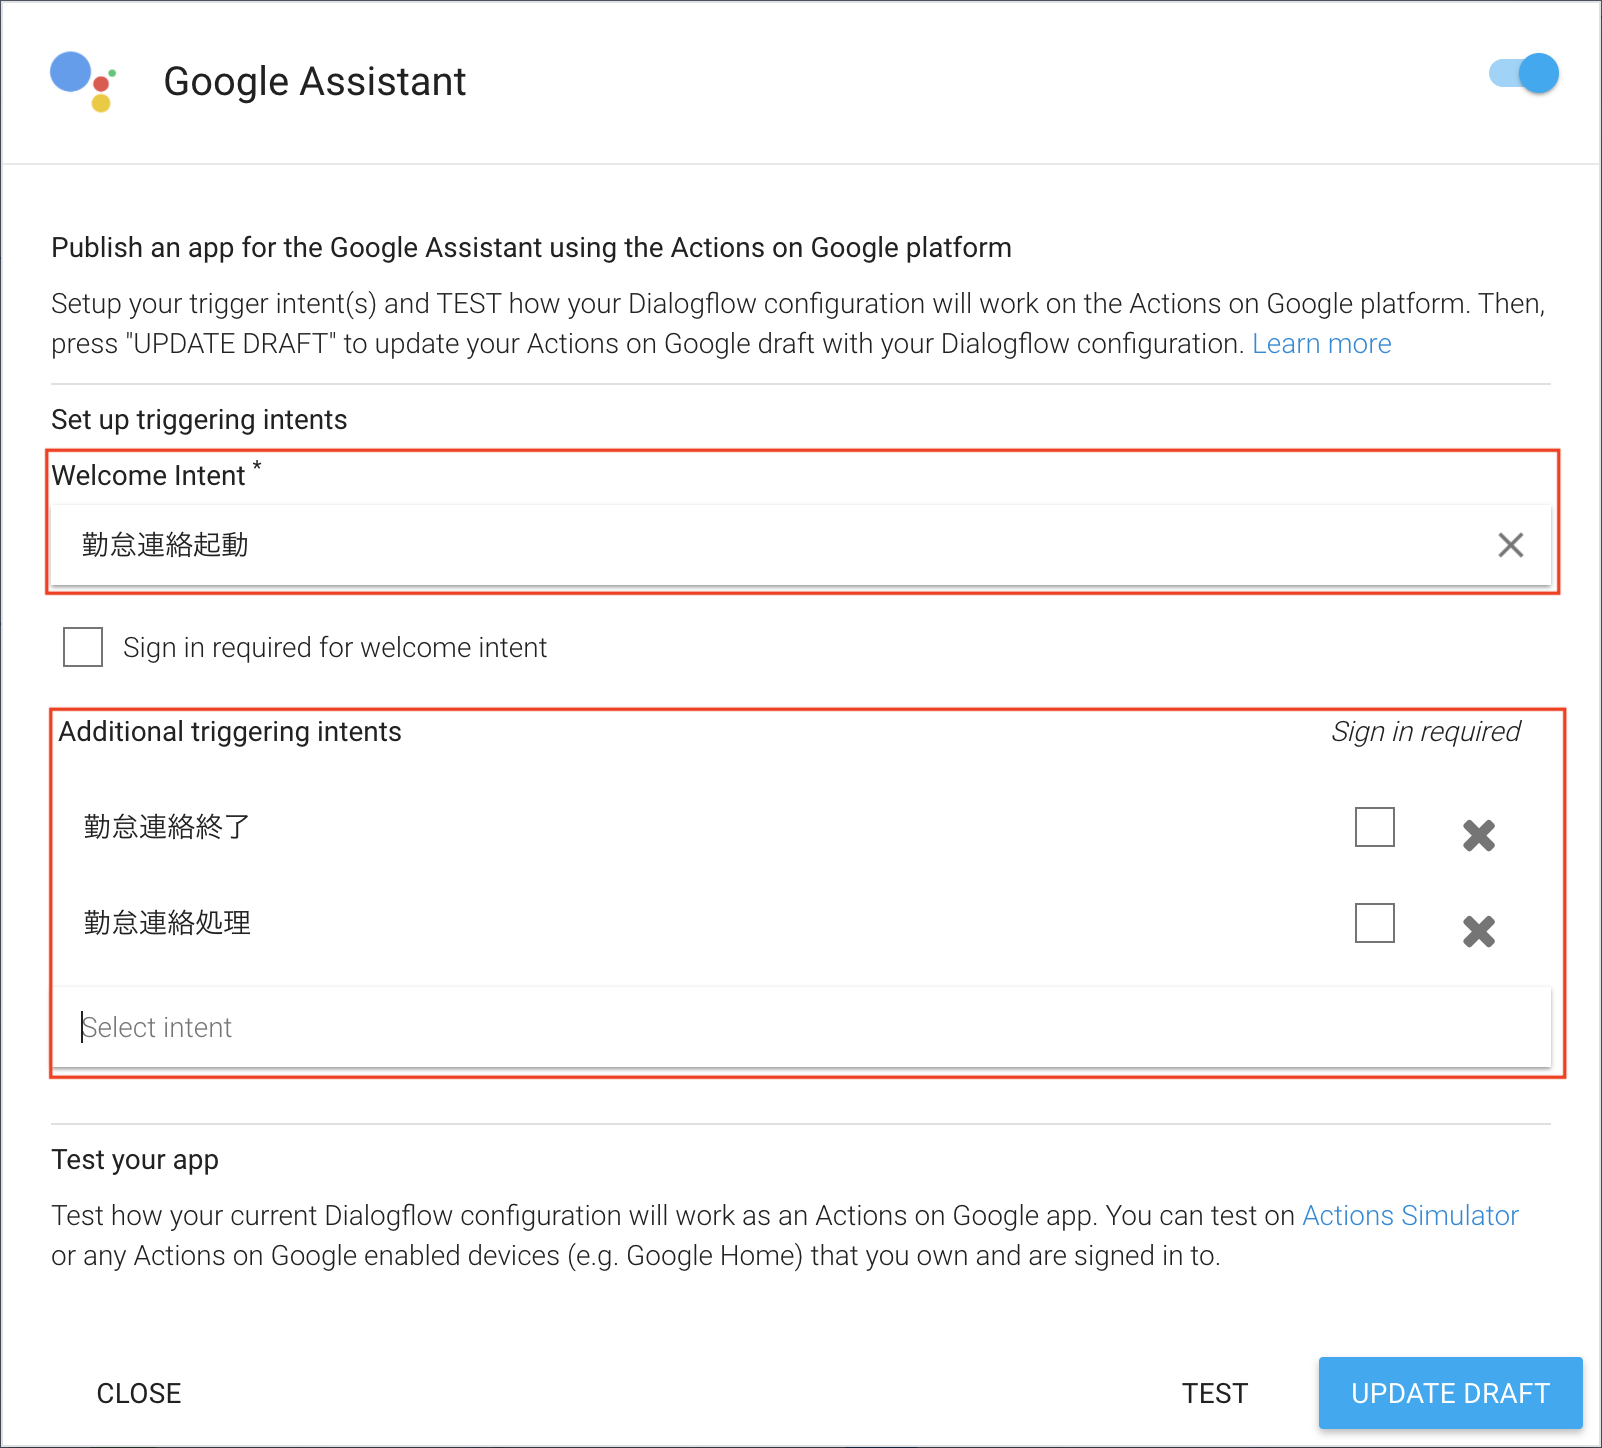
3-1.Welcome Intentの設定
Google Assistantに設定したアプリが、起動した時に実行するIntentを設定。
今回は起動用の設定を用意したので、「勤怠連絡起動」を設定
3-2.Additional triggering intentsの設定
アプリを動かすのに必要なIntentを設定。残りの「勤怠連絡処理」「勤怠連絡終了」を設定
4.ここまでの設定で問題ないかを確認するため、「TEST」を実行。問題なければ下記のように表示されるはずです。

5.最後に、「UPDATE DRAFT」を押して設定をGoogle Assistantに反映します。更新が完了すると、下記のようなダイアログが表示されます。

ここまでDialogflowの設定は完了です!ダイアログの「VISIT CONSOLE」を押下して、Actions on Googleページにて動かしてみましょう
Actions on Google (アプリの情報設定編)
ここからは必ずしも必要ではないのですが、自分のアプリ名をつけてGoogle Homeから呼び出したいときは必要です。
テストアプリとして利用のみで良い場合は、この項目は不要になりますmm
1.今まで作成したアプリに関する情報を設定します。Actions on GoolgeコンソールのOverviewから、「②App information」の「ADD」(既に作成した場合は「EDIT」)を押下し、設定画面へ
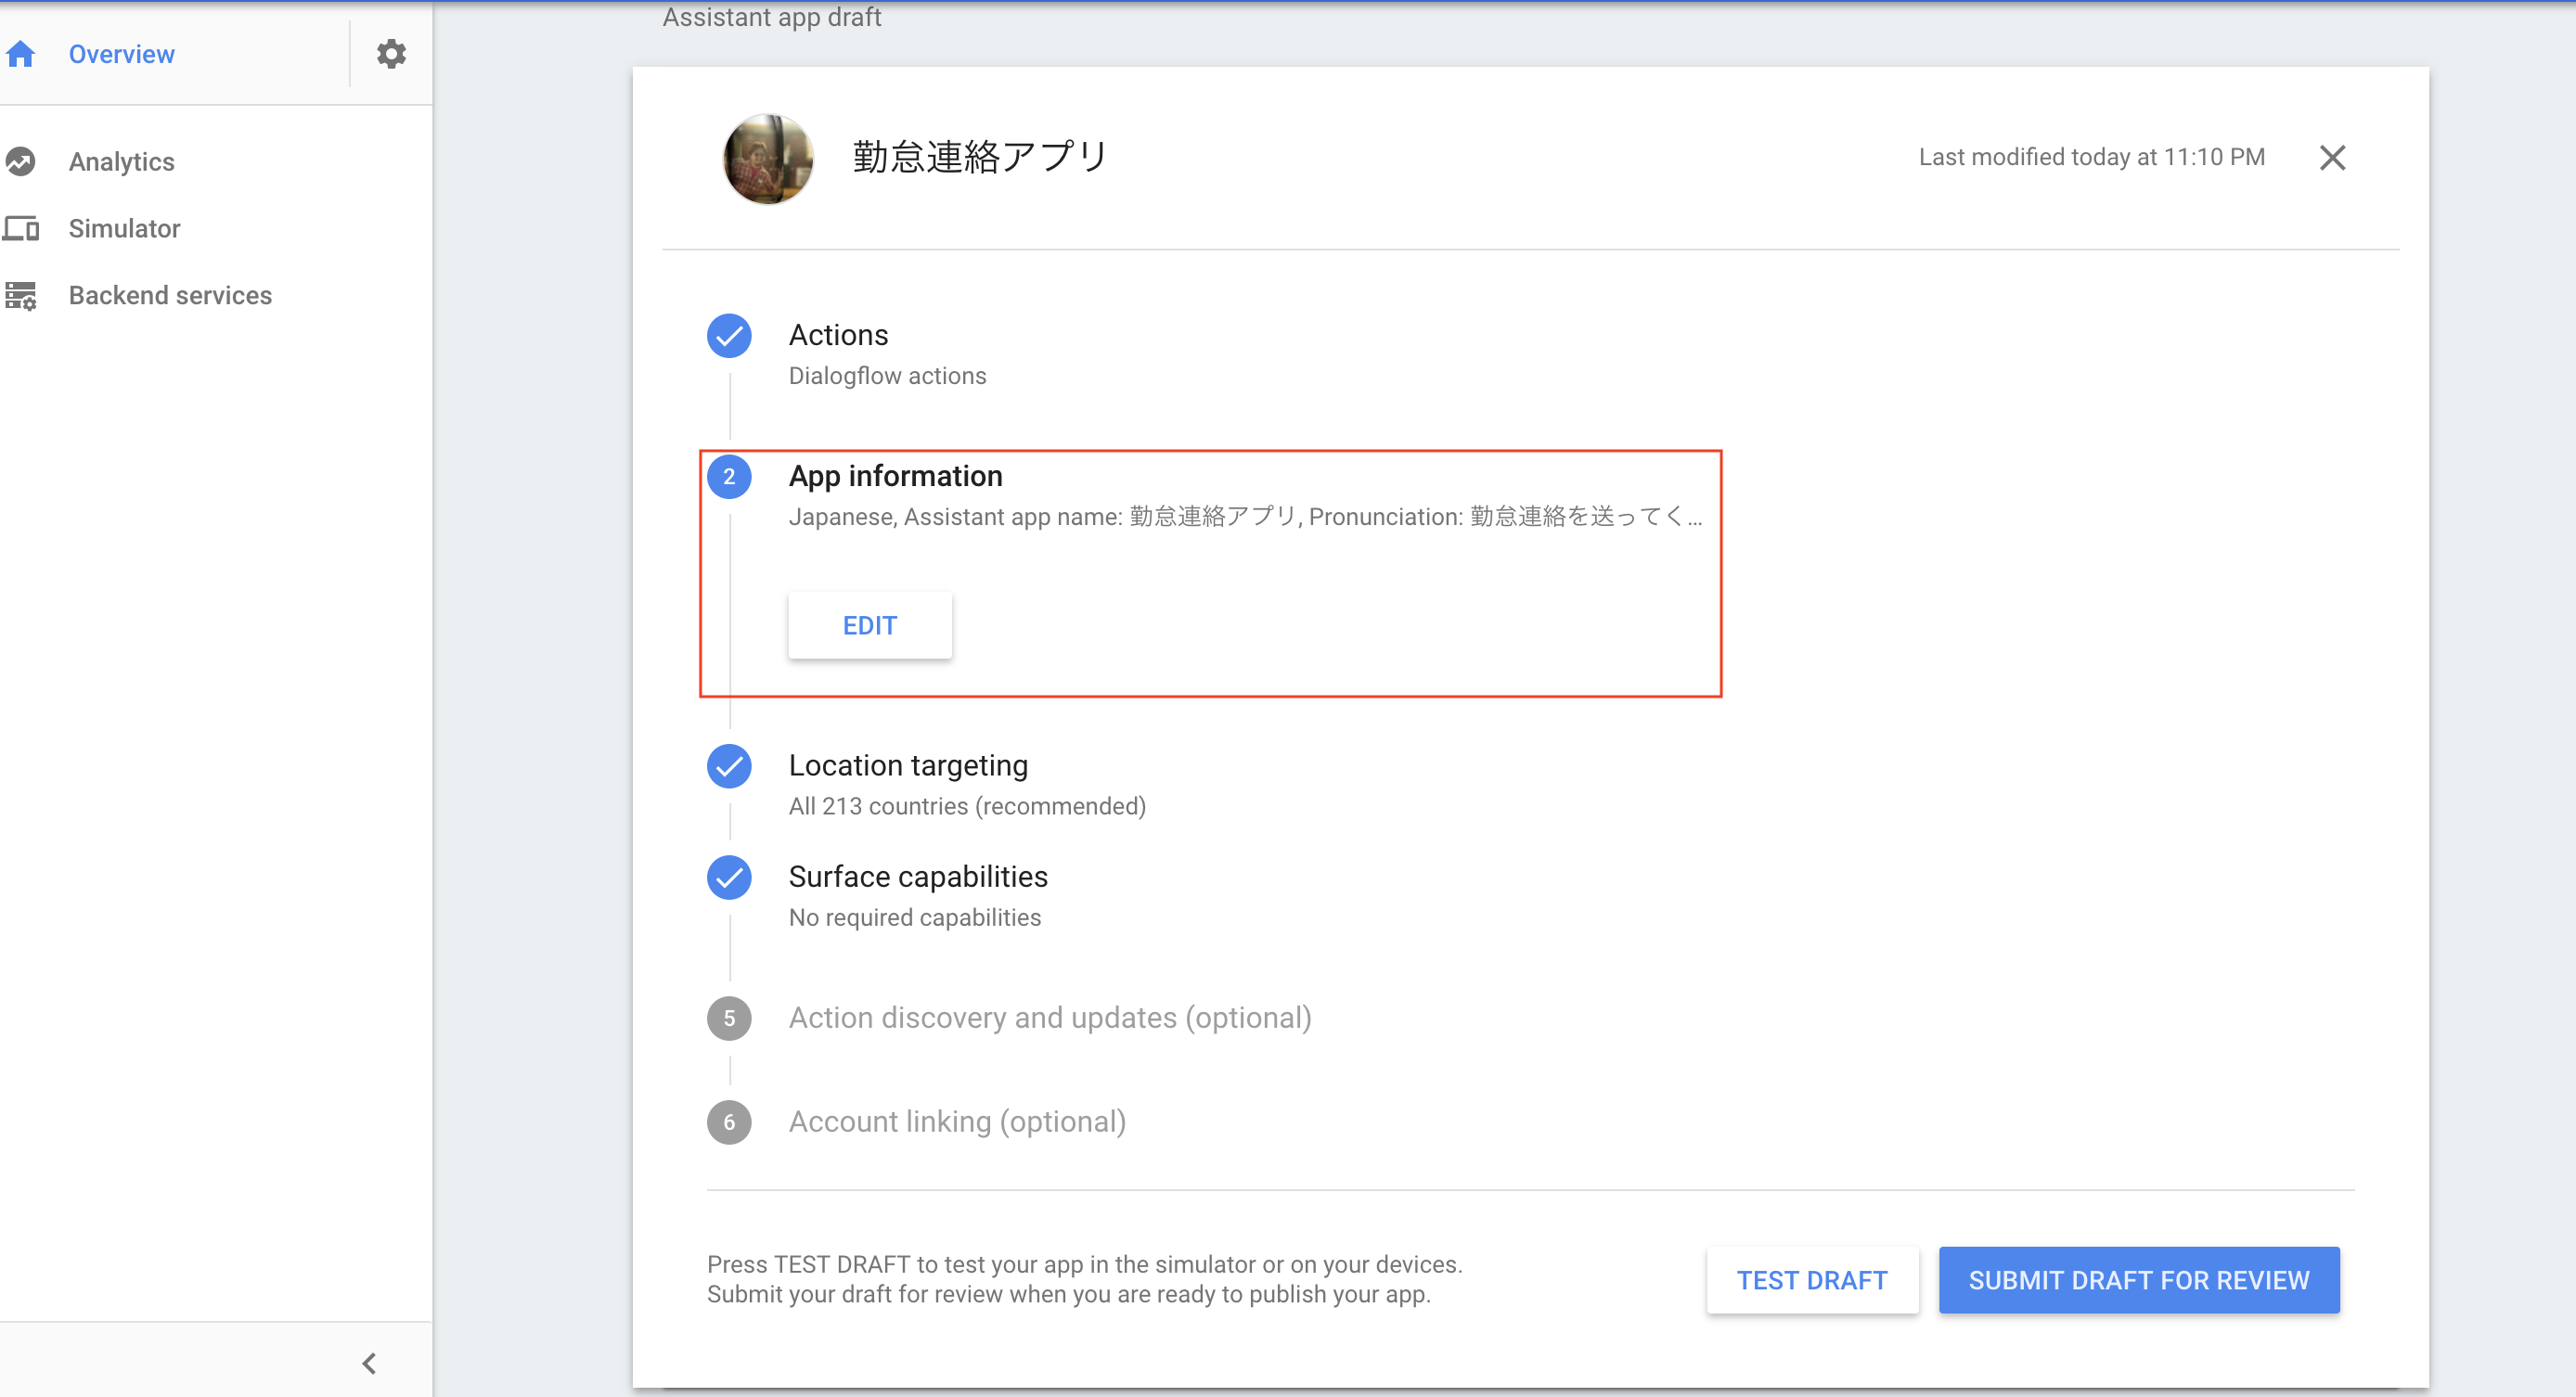
2.そうすると、アプリのタイトル、詳細な説明、アプリの声種別(男性、女性など)、アプリの起動に必要な言葉などを設定できます。
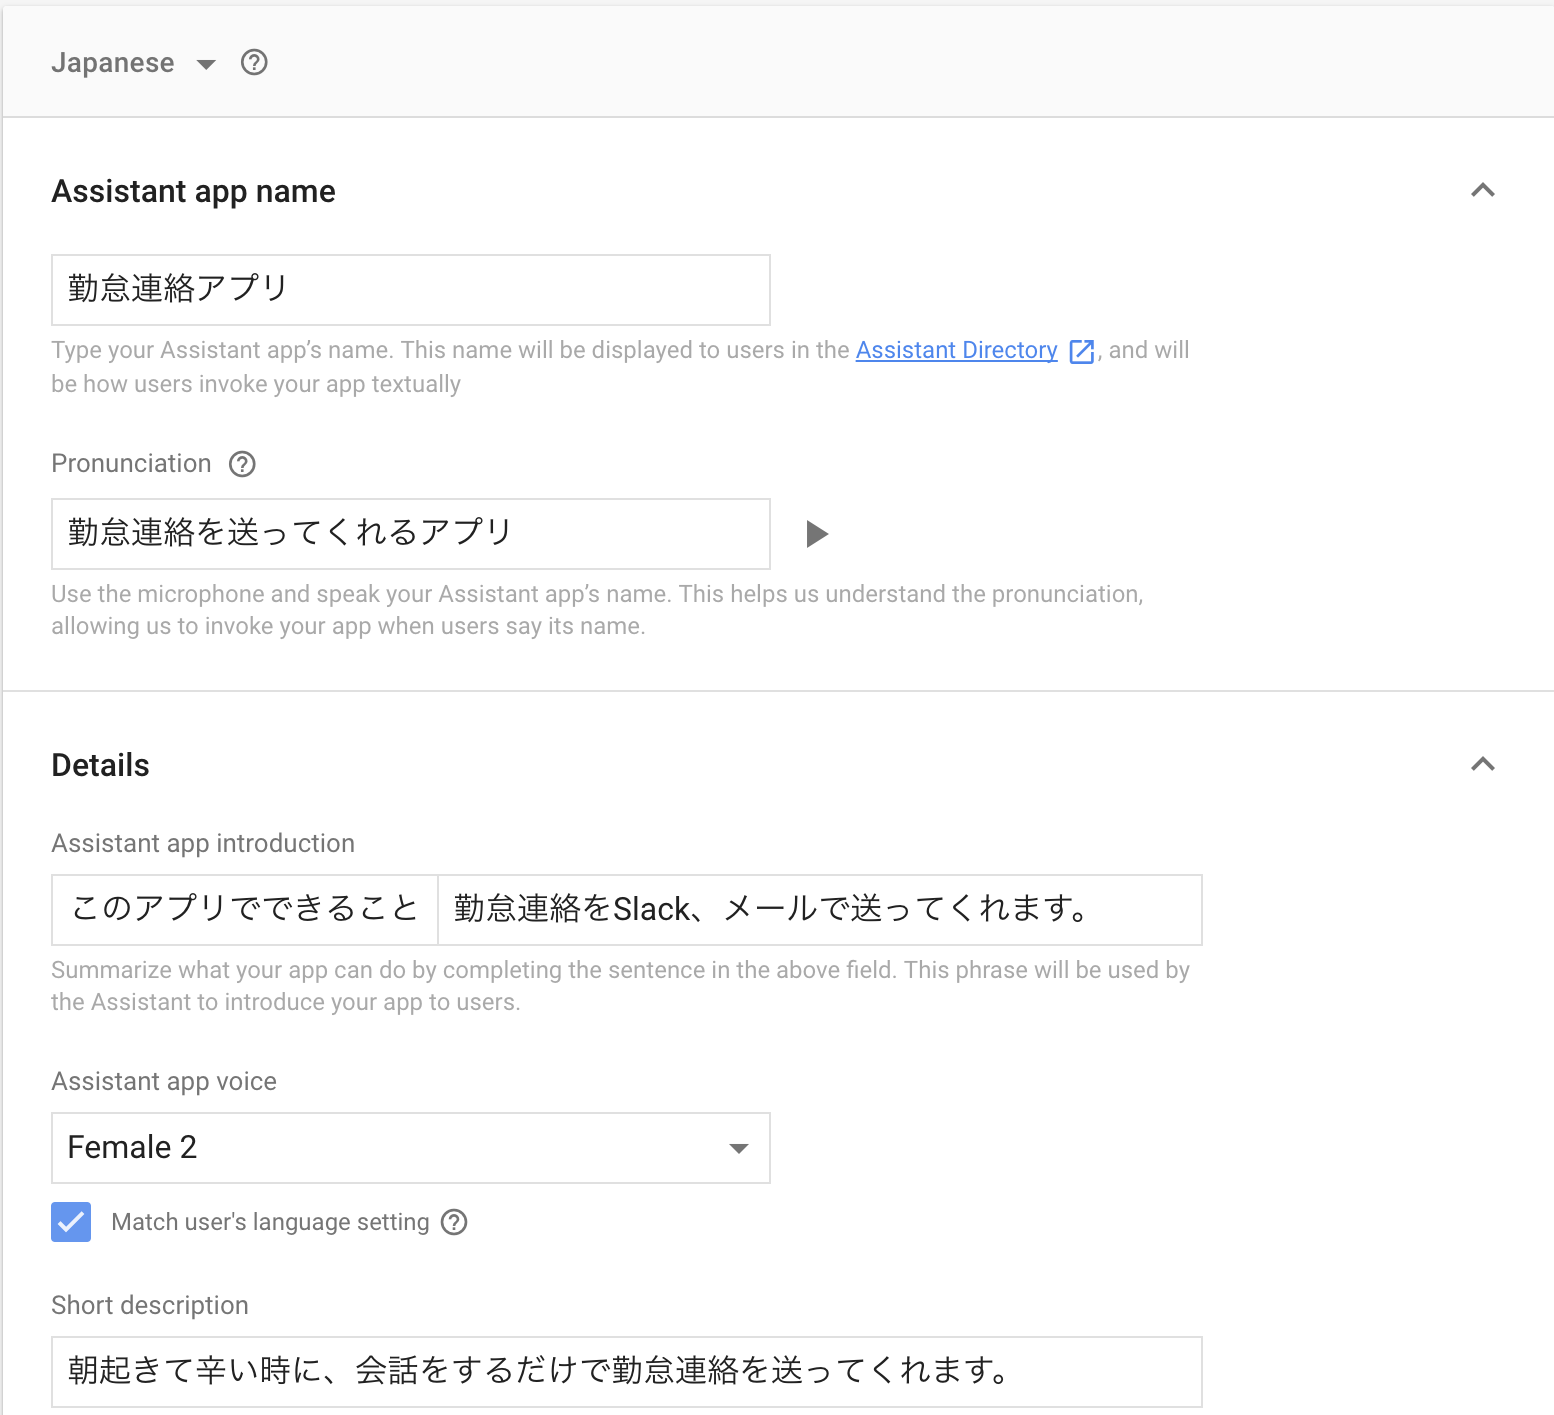
Androidアプリや、チャットボットなどを公開したことがある方はお馴染みの、アプリ画像や連絡先、利用規約ページURLなどを入れる箇所がありますが、ここはダミーで入れておき、実際に公開するとなった時に正式なものを入れれば問題ございません。
3.必要な項目を入れ終わったら、「SAVE」して、Overviewに戻り、右下の「TEST DRAFT」を押下して「Simulator」ページにて動作確認をしてみましょう
動作確認
Simulatorの場合
下記がシュミレータの画面になります。
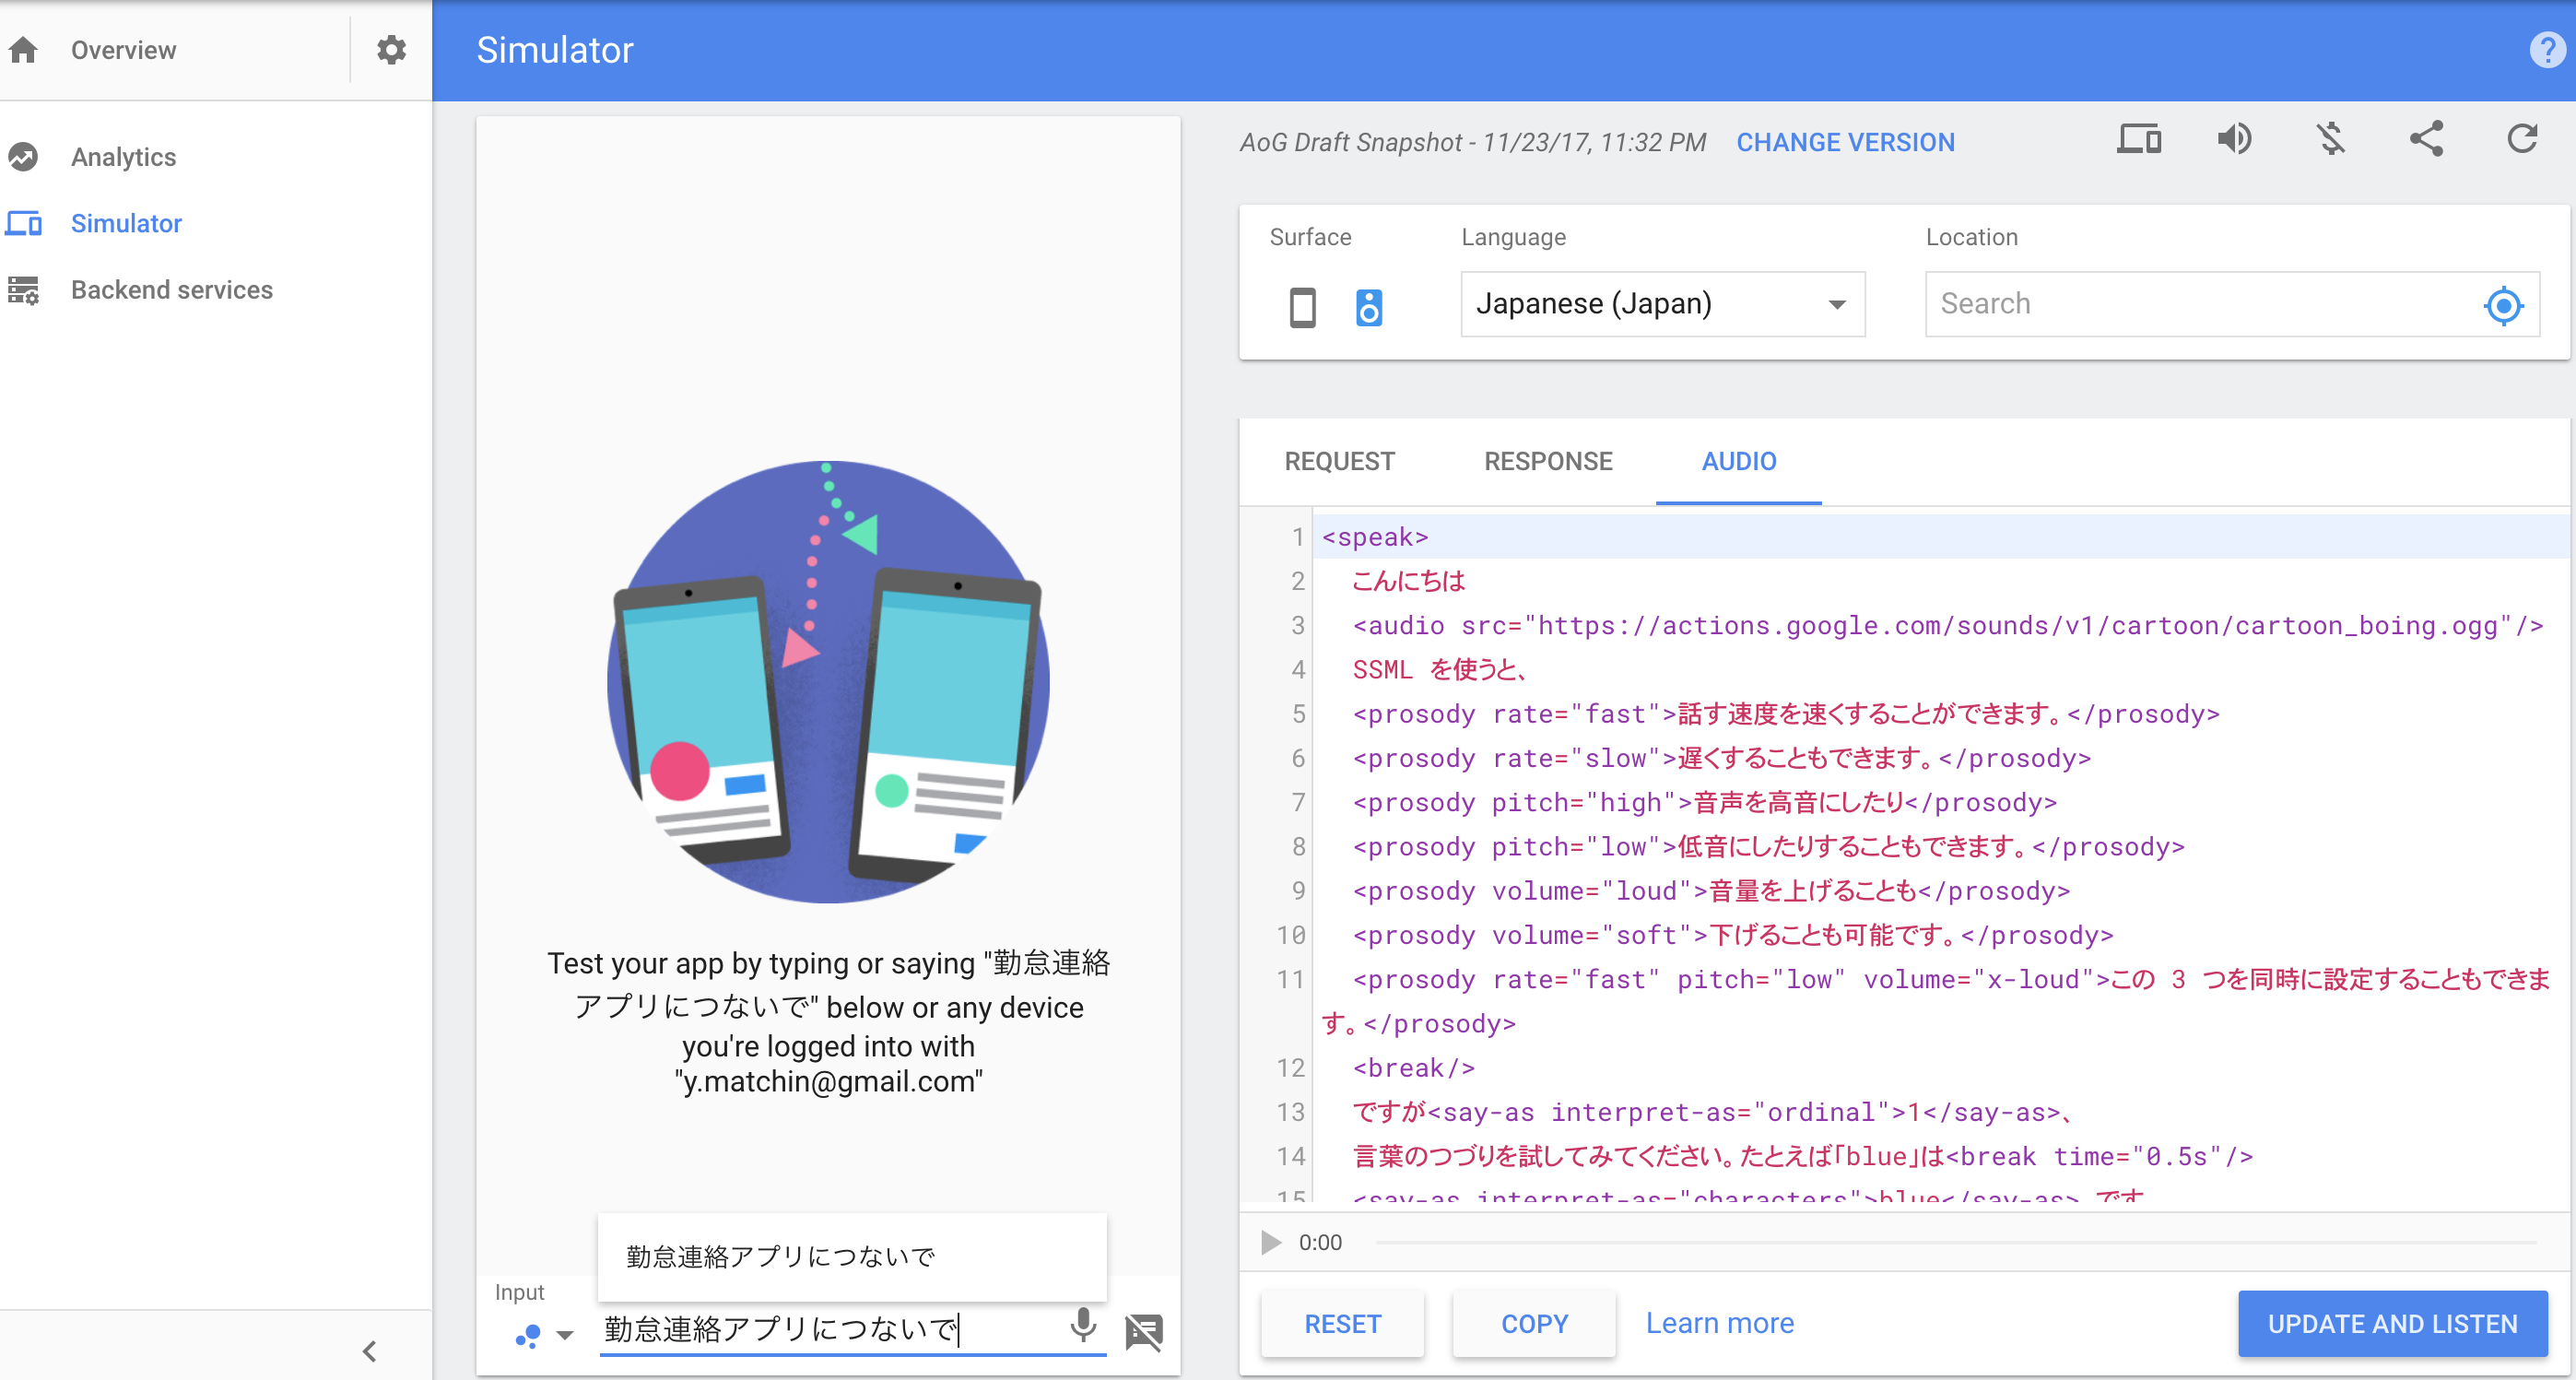
左下の入力欄に言葉を入れていき、自分が意図した通りの動作になるか確認することができます。
右には、そのさいのRequestやResponseなども見ることができるのは便利ですね。
実際にやってみた画像は下記で、最後まで実行すると、Slackに送られていることを確認!


Google Homeの場合
今までの作業で認可してきたアカウントに、Google Homeが連携されていれば、Simulatorと同じようにテスト用アプリを起動できます。下記はそのデモ動画になります
(多少言葉の言いましが違いますが、アプリ反映時の差分になります><)
Google Homeで勤怠連絡を送ってみたhttps://t.co/qyhhiajYhj @YouTubeさんから
— まっちゃん (@yumatsud) 2017年11月23日
最後に
ここまで読んでいただき誠にありがとうございました。
自分のメモ代わりにしていた部分もあるため、読みにくい点はご了承ください。
Google Homeなどの音声デバイス(スマートスピーカー)の登場によって、
声だけで色々な物事が解決していくのはなんだかワクワクしますね。
他にもあれこれできそうなのと、ご紹介した通り手間をかけずともある程度のことはできるので、
やりたいことがある方は是非チャレンジして見ると良いかもしれません!
そしてそれを公開して是非僕にも使わせてくださいmm