概要
今回はフロントエンドに Next.js、バックエンドに Ruby on Rails を用いたフルスタックの Blog アプリを作成します。
今回の記事では、基本的な CRUD 操作のみを行いますが、次回以降の記事では、認証機能(ログイン・ログアウト)やバリデーション機能の追加を行います。
また、この記事の対象者としては、各種環境構築が終了している方を想定しています。環境構築がまだの方は、各自環境設定から宜しくお願いいたします。
開発手順
1. バックエンド構築
- プロジェクト作成
- controller 作成
- model 作成
- マイグレーション
- ルーティング設定
- アクション追加
- API テスト
- ポート番号変更
2. フロントエンド構築
- プロジェクト作成
- ブログ取得
- ブログ表示
- 新規ブログ投稿
- ブログ詳細表示
- ブログ編集
-
ブログ削除
実装
1. バックエンド編
➀ プロジェクト作成
まずは適当なディレクトリを作成し、そこに移動します。
mkdir blog
cd blog
次に、blog ディレクトリに rails のひな型を作成します。
今回はフロントエンドを Next.js で書くため --api オプションを付け、API モードでひな型を作成します。
また、テストファイルは今回無しで進めるので、-T オプションも付けておきます。
rails new backend --api -T
作成が完了したら、backend ディレクトリに移動します。
cd backend
➁ controller 作成
続いて、コントローラーを作成します。
コントローラー名は複数形にしましょう。
また、Api : : Blogsとすることで、Api ディレクトリの中に Blogs のコントローラーを作成します。
rails g controller Api::Blogs index show create update destroy
➂ model 作成
続いて、モデルを作成します。
モデル名は単数形にしましょう。
また、今回は3つのカラムを作成します。
rails g model Blog title:string author:string content:text
➃ マイグレーション
③で作成したモデルをマイグレーションします。
rails db:migrate
➄ ルーティング設定
ここでは、リクエストに対して適切なコントローラーのアクションに振り分けます。
今回はフロントエンドを Next.js で書くため、views に関するアクションは追加しません。
Rails.application.routes.draw do
  namespace :api do
    # resources :blogsとすることで BlogsController を参照
    # api/blogsというURLをリクエストしたとき(HTTPメソッドはGET)、indexアクションが実行
    # (以下略)
    # api/blogs/:id GET    -> showアクション
    # api/blogs      POST   -> createアクション
    # api/blogs/:id  PUT    -> updateアクション
    # api/blogs/:id  DELETE -> destroyアクション
    resources :blogs, only: [:index, :show, :create, :update, :destroy]
  end
end
➅ アクション追加
続いて、アクションの詳しい挙動を定義します。
class Api::BlogsController < ApplicationController
  # 一覧表示
  def index
    # Blog.all の Blog は、model の名前
    blogs = Blog.all
    # render でクライアント側にレスポンスを返す
    # json: でJSON形式に変換
    render json: blogs
  end

  # 詳細表示
  def show
    # params[:id]で、URLのid部分を取り出す
    # Blog.find -> idを基に、特定のデータをdbから取り出す
    blog = Blog.find(params[:id])
    render json: blog
  end

  # 新規投稿
  def create
    # blog_params -> ストロングパラメーター(コード下部で定義)
    blog = Blog.new(blog_params)
    # if blog.save -> blog 変数が保存されたとき
    if blog.save
      # status: -> ステータスコードを定義
      render json: blog, status: :created
    else
      render json: blog.errors, status: :unprocessable_entity
    end
  end

  # 更新
  def update
    blog = Blog.find(params[:id])
    # if blog.update -> blog 変数が更新されたとき
    if blog.update(blog_params)
      render json: blog, status: :ok
    else
      render json: blog.errors, status: :unprocessable_entity
    end
  end

  # 削除
  def destroy
    blog = Blog.find(params[:id])
    blog.destroy
  end

  # ストロングパラメーターのメソッド(blog_params)は private 以下に書く
  private
  def blog_params
    # params -> クライアントからのリクエストが入ったオブジェクト
    # require の引数には、リクエストのキーを入れる(デフォルトでは、モデル名)
    # permit の引数には、サーバー側で利用するリクエストのデータを指定
    params.require(:blog).permit(:title, :author, :content)
  end
end
➆ API テスト
次に、ローカルサーバーを立てて、実際に API が正しく動くのかをテストします。
まずは、ローカルサーバーを立ち上げます。
rails s
また、テストには Postman を使用します。
手順は以下の通りです。(インストールがまだの方は、先にインストールをお願いします。)

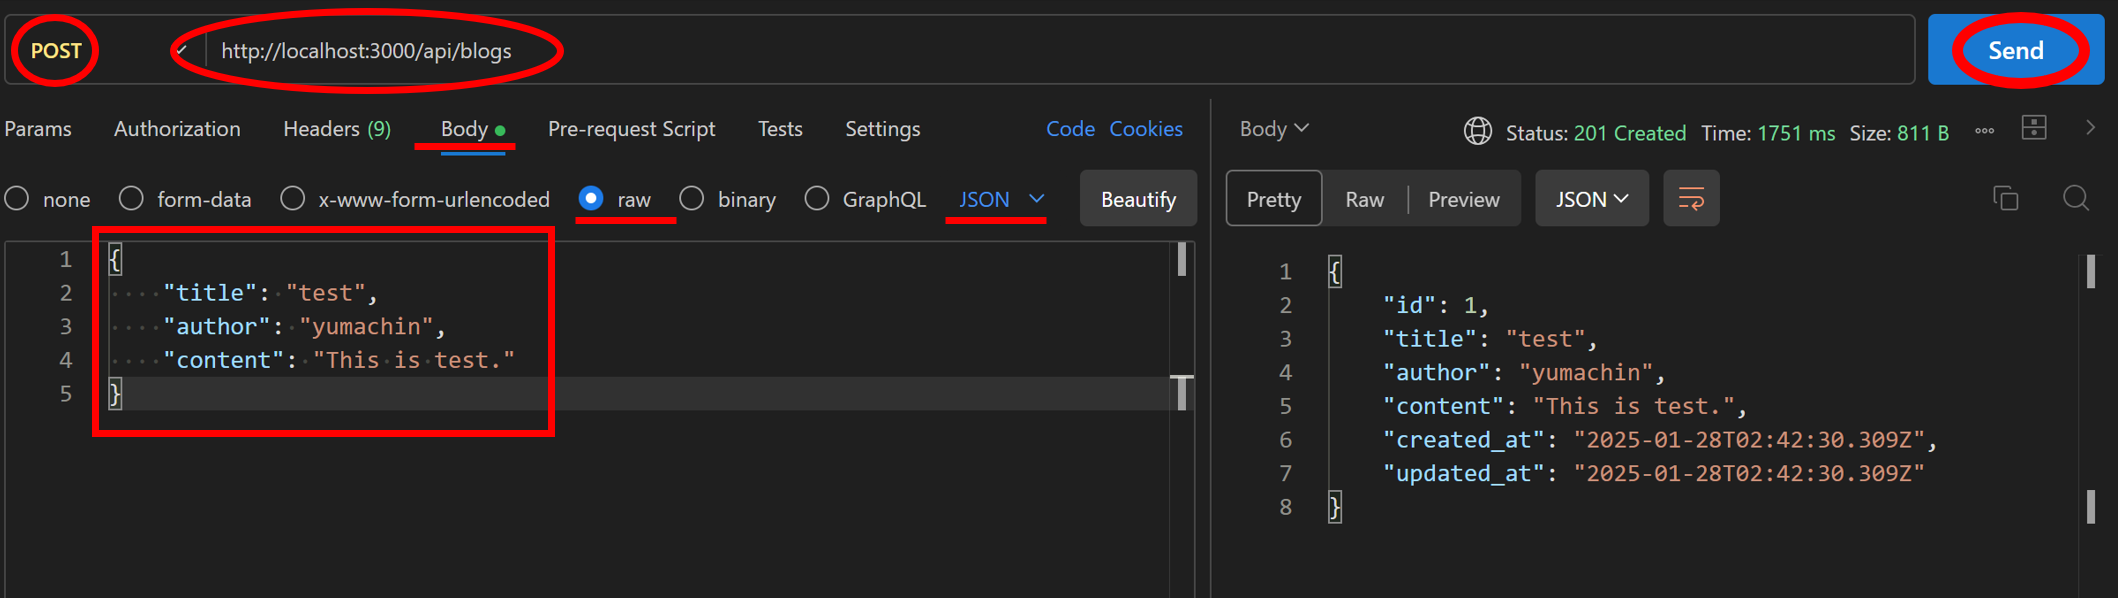
まずは、データを追加してみましょう。POST メソッドを選択し、エンドポイント(ルーティング設定時に自動作成されたルート)を設定します。
そして、Body -> raw -> JSON を選択し、追加するデータを JSON 形式で定義します。
この時、コントローラーのストロングパラメーターで定義したカラムのみデータとして定義します。
最後に、Send ボタンを押すと画面右側、あるいは画面下部に送信されたデータが表示されます。
これで、ポストできたことが分かりました! API もしっかり叩けているみたいです。
続いては、このポストしたデータを取得します。
GET メソッドに変更し、エンドポイントはそのままで Send ボタンを押すと、しっかりデータを取得できています。

更新も行っておきましょう。
PUT メソッドに変更し、エンドポイントには id を指定しましょう。
POST の API を叩いた時と同様に、変更後のデータを入力し、Send ボタンを押すと、データが更新されました。
念のため、先ほどと同じ手順で GET の API を叩いてみてください。取得したデータは更新されているはずです。

同じ要領で、show アクション(詳細表示)や、destroy アクション(削除)もテストしてみてください。
エラーが吐かれなければ、バックエンドの構築は終了です、と言いたいところですが、フロントエンドの開発を行う前にポート番号を変更しておきます。
⑧ ポート番号変更
フロントエンド構築を行う前に、ポート番号を変更します。
なぜなら、フロントエンド側でサーバーを立てた際、ポート番号が被ってしまうからです。
そのため、バックエンド側のポート番号を 3001 に変更しておきましょう。
まずは、gem "rack-cors" のコメントアウトを外します。
# Use Rack CORS for handling Cross-Origin Resource Sharing (CORS), making cross-origin Ajax possible
gem "rack-cors"
その後、以下のコマンドを実行します。
bundle i
続いて、Rails.application. ~ 以下のコメントアウトを外し、origins の値を "localhost:3000" に変更します。
# Be sure to restart your server when you modify this file.

# Avoid CORS issues when API is called from the frontend app.
# Handle Cross-Origin Resource Sharing (CORS) in order to accept cross-origin Ajax requests.

# Read more: https://github.com/cyu/rack-cors

Rails.application.config.middleware.insert_before 0, Rack::Cors do
 allow do
   origins "localhost:3000"

   resource "*",
     headers: :any,
     methods: [:get, :post, :put, :patch, :delete, :options, :head]
 end
end
最後にローカルサーバーを立ちあげます。-p 3001 はポート番号を 3001 番に変更するコマンドです。
rails s -p 3001
これで、バックエンド構築は終了です。お疲れさまでした。
2. フロントエンド編
➀ プロジェクト作成
まずはターミナルを分割して( api 側のサーバーは立ち上げたまま)、backend ディレクトリから、blog ディレクトリに移動します。
cd ..
バックエンド編と同様に、blog ディレクトリに Next.js のひな型を作成します。
設定の選択を促されますが、すべてデフォルトのままで構いません。
npx create-next-app frontend
作成が完了したら、frontend ディレクトリに移動します。
cd frontend
➁ ブログ取得
フロントエンド側で、API を叩いくことでデータの取得を行います。
エンドポイントの URL が localhost:3001 になっていることに気を付けましょう。
export default async function Home() {
 const getAllBlogs = async () => {
   const res = await fetch("http://localhost:3001/api/blogs", {
     // SSRでデータを取りに行く
     cache: "no-store"
   });
   // JSON形式に変換
   return res.json();
 };
 const blogs = await getAllBlogs();
 console.log("取得したデータは、", blogs);
}
ローカルサーバーを立ち上げて、コンソールへの出力を確認しましょう。
以下のようになっていれば、しっかりとデータの取得ができています!次は、この取得したデータを表示させましょう。
npm run dev

➂ ブログ表示
次は、先ほど取得したデータを表示させます。まずその前に、blogs 変数の型定義をしておきましょう。以下のディレクトリ構成で、types ファイルを作成します。
// ( blog / backend / db / schema.rb )を参照
// schema.rb に id は定義されていないが、デフォルトで定義されるため、型宣言する必要あり
export interface Blog {
  id: number;
  title: string;
  author: string;
  content: string;
  created_at: Date;
  updated_at: Date;
};
また、CSSファイルも編集しておきましょう。
@tailwind base;
@tailwind components;
@tailwind utilities;
あとは、blog を表示する部分をコンポーネント化し、クライアントコンポーネントとサーバーコンポーネントをそれぞれ独立させます。とりあえず、ひな型だけ作っておきましょう。
export default function BlogList() {
  return (
    <></>
  );
}
最後に、ページの遷移先のディレクトリを作成しましょう。
新規投稿ページ、編集ページ、投稿詳細ページの、計3ページ作成します。
編集ページと投稿詳細ページは動的ルーティングを実現するために、[id] ディレクトリを作成します。
export default function CreateBlog() {
 return (
   <></>
 );
}
export default function EditBlog() {
 return (
   <></>
 );
}
export default function SpecificBlog() {
 return (
   <></>
 );
}
お待たせしました。では、実際に表示させましょう。
import BlogList from "@/components/BlogList";
import { Blog } from "@/types/types";
import Link from "next/link";

export default async function Home() {
 const getAllBlogs = async () => {
   const res = await fetch("http://localhost:3001/api/blogs", {
     // SSRでデータを取りに行く
     cache: "no-store"
   });
   // JSON形式に変換
   return res.json();
 };
 // 型指定(複数データを取得するため、配列型にしておく)
 const blogs: Blog[] = await getAllBlogs();
 // console.log("取得したデータは、", blogs);

 return (
   <div className="min-h-screen bg-gray-50">
     <div className="bg-blue-600 text-white py-4 shadow-md">
       <div className="container mx-auto px-6 flex justify-between items-center">
         <span className="text-3xl font-bold">Blog</span>
         <div>
           <Link
             href={"manage/create"}
             className="bg-green-500 text-white py-2 px-4 rounded-lg hover:bg-green-600 transition-all"
           >
             新規投稿
           </Link>
         </div>
       </div>
     </div>
     <div className="container mx-auto px-6 py-8">
       {/* BlogList コンポーネント に blogs を渡す*/}
       <BlogList blogs={blogs} />
     </div>
   </div>
 );
}
今回 HTTP リクエストには、axios を使用し、トースト通知には、react-hot-toast を使用します。
トースト通知を行うために、layout.tsx を少しいじります。
npm i axios react-hot-toast
import type { Metadata } from "next";
import { Geist, Geist_Mono } from "next/font/google";
import "./globals.css";
import { Toaster } from "react-hot-toast";

const geistSans = Geist({
  variable: "--font-geist-sans",
  subsets: ["latin"],
});

const geistMono = Geist_Mono({
  variable: "--font-geist-mono",
  subsets: ["latin"],
});

export const metadata: Metadata = {
  // 任意のタイトル・説明に変更
  title: "Blog App",
  description: "Generated by using next.js & ruby on rails",
};

export default function RootLayout({
  children,
}: Readonly<{
  children: React.ReactNode;
}>) {
  return (
    // en から ja に
    <html lang="ja">
      <body
        className={`${geistSans.variable} ${geistMono.variable} antialiased`}
      >
        {/* トースター通知をさせるために必要 */}
        <Toaster />
        {children}
      </body>
    </html>
  );
}
ここで、BlogList コンポーネントの中身を作成します。
プロップスを受け取って、それを map 関数で展開しましょう。
// クライアントコンポーネント
"use client";

import { Blog } from "@/types/types";
import axios from "axios";
import Link from "next/link";
import { useRouter } from "next/navigation";
import toast from "react-hot-toast";

// props オブジェクトから、blogs プロパティを分割代入で直接取得
export default function BlogList({ blogs }: { blogs: Blog[] }) {
  // ページ遷移に利用
  const router = useRouter();
  const handleDelete = async ( id: number ) => {
    // ➅ ブログの削除で実装
  };

  return (
    <div className="grid grid-cols-1 sm:grid-cols-2 md:grid-cols-3 lg:grid-cols-4 gap-6 p-6">
      {blogs.map((blog: Blog) => (
        <div
          key={blog.id}
          className="bg-white rounded-lg shadow-lg hover:shadow-xl p-6 transition-all transform hover:scale-105 flex flex-col"
        >
          <div className="mb-4">
            <Link href={`/manage/${blog.id}`}>
              <h2 className="text-2xl font-semibold text-gray-800 mb-2 hover:text-blue-600 transition-colors hover:underline">
                {blog.title}
              </h2>
            </Link>
            <div className="text-sm text-gray-500">{blog.author}</div>
          </div>
          <div className="text-gray-700 text-base mb-4 line-clamp-3">
            {blog.content}
          </div>
          <div className="text-sm text-gray-400 text-right mb-4">
            {new Date(blog.created_at).toLocaleDateString()}
          </div>
          <div className="flex justify-between items-center">
            <Link
              href={`manage/edit/${blog.id}`}
              className="text-green-500 hover:text-green-600 hover:underline"
            >
              Edit
            </Link>
            <button
              className="text-red-500 hover:text-red-600 hover:underline"
              onClick={() => handleDelete(blog.id)}
            >
              Delete
            </button>
          </div>
        </div>
      ))}
    </div>
  );
}
これで、投稿が表示されるはずです。
ローカルサーバーを立ち上げて、確認してみましょう。
npm run dev

上記のようになっていたら OK です。続いては、ブログ記事の投稿を行いましょう。
➃ ブログの新規投稿
次は、ブログの新規投稿機能を追加します。
"use client";

import axios from "axios";
import { useRouter } from "next/navigation";
import { FormEvent, useState } from "react";
import toast from "react-hot-toast";

export default function CreateBlog() {
  const [title, setTitle] = useState<string>("");
  const [author, setAuthor] = useState<string>("");
  const [content, setContent] = useState<string>("");
  const router = useRouter();

  const handleSubmit = async (e: FormEvent) => {
    e.preventDefault();
    const loadingToast = toast.loading("投稿中...");
    try {
      // 第1引数にエンドポイント、第2引数に投稿データ
      await axios.post("http://localhost:3001/api/blogs", {
        title: title,
        author: author,
        content: content
      });
      toast.success("投稿に成功しました!", { id: loadingToast });
      // トースト通知を十分に表示したのちに、ルートディレクトリに遷移
      setTimeout(() => {
        toast.dismiss(loadingToast);
        router.push("/");
      }, 1000);
    } catch (error) {
      toast.error(`投稿に失敗しました。 エラー:${error}`,  { id: loadingToast })
    }
  };

  return (
    <>
      <div className="min-h-screen bg-gray-100 py-12 px-4 sm:px-6 lg:px-8">
        <div className="max-w-lg mx-auto bg-white p-8 rounded-lg shadow-lg">
          <h2 className="text-2xl font-semibold text-gray-700 text-center mb-6">ブログ投稿フォーム</h2>
          <form onSubmit={handleSubmit}>
            <div className="space-y-4">
              <div>
                <label htmlFor="title" className="block text-sm font-medium text-gray-600">タイトル</label>
                <input
                  id="title"
                  type="text"
                  onChange={(e) => setTitle(e.target.value)}
                  className="mt-1 p-2 w-full border border-gray-300 rounded-lg focus:outline-none focus:ring-2 focus:ring-blue-500"
                  placeholder="タイトルを入力してください"
                />
              </div>
              <div>
                <label htmlFor="author" className="block text-sm font-medium text-gray-600">名前</label>
                <input
                  id="author"
                  type="text"
                  onChange={(e) => setAuthor(e.target.value)}
                  className="mt-1 p-2 w-full border border-gray-300 rounded-lg focus:outline-none focus:ring-2 focus:ring-blue-500"
                  placeholder="名前を入力してください"
                />
              </div>
              <div>
                <label htmlFor="content" className="block text-sm font-medium text-gray-600">内容</label>
                <textarea
                  id="content"
                  onChange={(e) => setContent(e.target.value)}
                  className="mt-1 p-2 w-full h-32 border border-gray-300 rounded-lg focus:outline-none focus:ring-2 focus:ring-blue-500"
                  placeholder="ブログ内容を入力してください"
                />
              </div>
              <div className="mt-6 text-center">
                <button
                  type="submit"
                  className="px-6 py-2 text-white bg-blue-600 rounded-lg hover:bg-blue-700 focus:outline-none focus:ring-2 focus:ring-blue-500"
                >
                  投稿する
                </button>
              </div>
            </div>
          </form>
        </div>
      </div>
    </>
  );
}
これで、ブログの投稿フォームが作成できました。
ブログの内容を入力して投稿すると、しっかりホーム画面に投稿が追加されましたね!続いては、ブログを詳細表示できるようにします。

➄ ブログの詳細表示
次は、ブログの詳細を表示するページを作りましょう。
ブログのタイトルを押すと、詳細画面に遷移するようにします。
"use client";

import { Blog } from "@/types/types";
import { use, useEffect, useState } from "react";

// URLのパラメータ取得(詳しくは前回の記事参照)
export default function SpecificBlog({ params }: { params: Promise<{ id: number }> }) {
  const [blog, setBlog] = useState<Blog>();
  const [loading, setLoading] = useState<boolean>(true);
  // Promiseデータのラッピング
  const wrapParams = use(params);
  const getSpecificBlog = async ( id: number ) => {
    const res = await fetch(`http://localhost:3001/api/blogs/${id}`,{
      // ISRで取得(30秒ごとにページを再生成)
      next: {revalidate: 30}
    });
    return res.json();
  };

  // 初期値の入れ込み
  useEffect(() => {
    const fetchSpecificBlog = async () => {
      const blog = await getSpecificBlog(wrapParams.id);
      setBlog(blog);
      setLoading(false);
    }
    fetchSpecificBlog();
  }, [wrapParams.id]);

  // ローディング画面
  if (loading) {
    return (
      <div className="flex justify-center items-center h-screen">
        <div className="text-xl text-gray-600">Loading...</div>
      </div>
    );
  }

  if (!blog) {
    return (
      <div className="flex justify-center items-center h-screen">
        <div className="text-xl text-red-500">ブログ記事は存在しません。</div>
      </div>
    );
  }

  return (
    <div className="max-w-3xl mx-auto p-6 bg-white shadow-xl rounded-lg my-8 border border-gray-200">
      <h1 className="text-4xl font-bold text-gray-900 mb-6 leading-tight">
        {blog.title}
      </h1>
      <div className="flex items-center justify-between text-sm text-gray-500 mb-8">
        <div className="flex items-center space-x-2">
          <span className="font-medium">{blog.author}</span>
          <span className="text-gray-400">|</span>
          <span>{new Date(blog.created_at).toLocaleDateString()}</span>
        </div>
      </div>
      <p className="text-gray-700 text-lg leading-relaxed">
        {blog.content}
      </p>
    </div>
  );
}
これで、ブログの詳細が表示されました!
あとは、編集と削除だけです。頑張りましょう!

➅ ブログの編集
ブログを編集できるようにします。
詳細表示機能と大差ないので、サクっと作ります!
"use client";

import axios from "axios";
import { useRouter } from "next/navigation";
import { FormEvent, use, useEffect, useState } from "react";
import toast from "react-hot-toast";

export default function EditBlog({ params }: { params: Promise<{ id: number }> }) {
  const [title, setTitle] = useState<string>("");
  const [author, setAuthor] = useState<string>("");
  const [content, setContent] = useState<string>("");
  const wrapParams = use(params);
  const router = useRouter();

  const getSpecficBlog = async ( id: number ) => {
    const res = await fetch(`http://localhost:3001/api/blogs/${id}`);
    return res.json();
  };

  useEffect(() => {
    const fetchSpecificBlog = async () => {
      const blog = await getSpecficBlog(wrapParams.id);
      setTitle(blog.title);
      setAuthor(blog.author);
      setContent(blog.content);
    };
    fetchSpecificBlog();
  }, [wrapParams.id]);

  const handleSubmit = async ( e: FormEvent ) => {
    e.preventDefault();
    const loadingToast = toast.loading("投稿中...");
    try {
      await axios.put(`http://localhost:3001/api/blogs/${wrapParams.id}`, {
        title: title,
        author: author,
        content:content
      });
      toast.success("更新しました!", { id: loadingToast });
      setTimeout(() => {
        toast.dismiss(loadingToast);
        router.push("/");
      }, 1000);
    } catch (error) {
      toast.error(`更新に失敗しました。${error}`, { id: loadingToast });
    }
  };

  return (
    <div className="min-h-screen bg-gray-100 py-12 px-4 sm:px-6 lg:px-8">
      <div className="max-w-lg mx-auto bg-white p-8 rounded-lg shadow-lg">
        <h2 className="text-2xl font-semibold text-gray-700 text-center mb-6">ブログ編集フォーム</h2>
        <form onSubmit={handleSubmit}>
          <div className="space-y-4">
            <div>
              <label htmlFor="title" className="block text-sm font-medium text-gray-600">タイトル</label>
              <input
                id="title"
                type="text"
                onChange={(e) => setTitle(e.target.value)}
                className="mt-1 p-2 w-full border border-gray-300 rounded-lg focus:outline-none focus:ring-2 focus:ring-blue-500"
                value={title}
              />
            </div>
            <div>
              <label htmlFor="author" className="block text-sm font-medium text-gray-600">名前</label>
              <input
                id="author"
                type="text"
                onChange={(e) => setAuthor(e.target.value)}
                className="mt-1 p-2 w-full border border-gray-300 rounded-lg focus:outline-none focus:ring-2 focus:ring-blue-500"
                value={author}
              />
            </div>
            <div>
              <label htmlFor="content" className="block text-sm font-medium text-gray-600">内容</label>
              <textarea
                id="content"
                onChange={(e) => setContent(e.target.value)}
                className="mt-1 p-2 w-full h-32 border border-gray-300 rounded-lg focus:outline-none focus:ring-2 focus:ring-blue-500"
                value={content}
              />
            </div>
            <div className="mt-6 text-center">
              <button
                type="submit"
                className="px-6 py-2 text-white bg-blue-600 rounded-lg hover:bg-blue-700 focus:outline-none focus:ring-2 focus:ring-blue-500"
              >
                更新する
              </button>
            </div>
          </div>
        </form>
      </div>
    </div>
  );
}
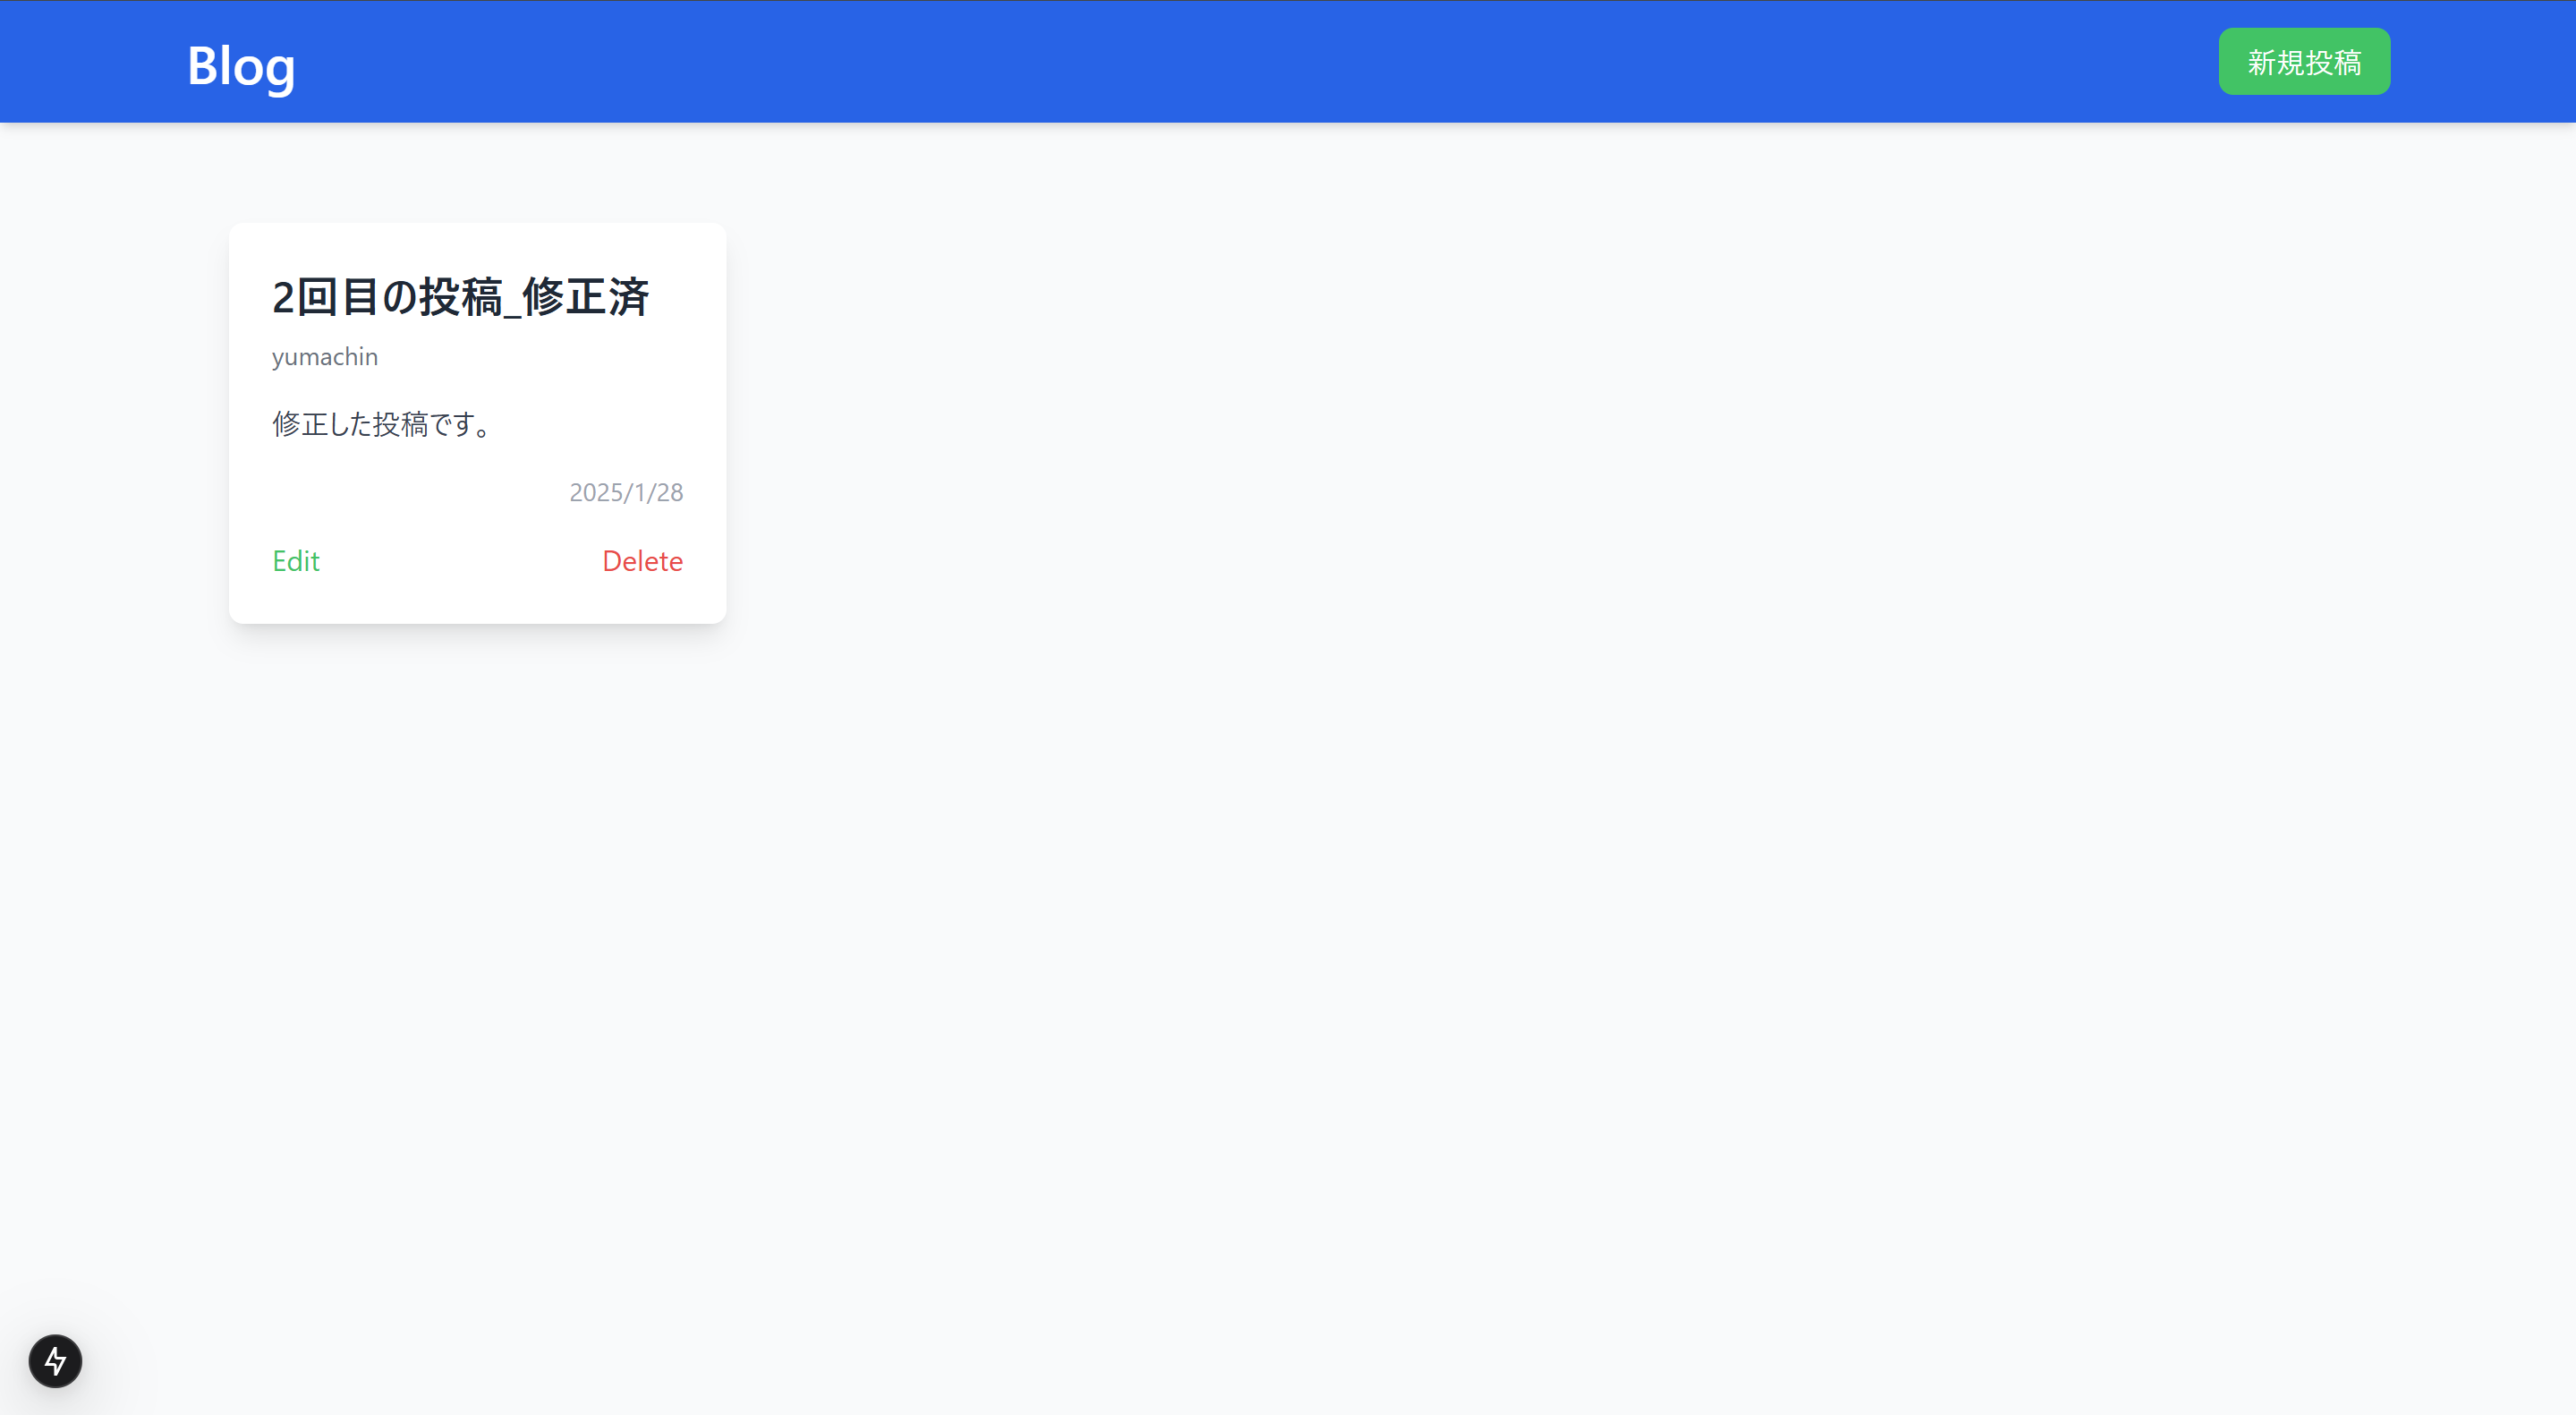
これで、編集ができるようになりました。
早速2つ目の投稿を編集してみましょう!

➆ ブログの削除
最後にブログの削除を行います!
"use client";

import { Blog } from "@/types/types";
import axios from "axios";
import Link from "next/link";
import { useRouter } from "next/navigation";
import toast from "react-hot-toast";

// props オブジェクトから、blogs プロパティを分割代入で直接取得
export default function BlogList({ blogs }: { blogs: Blog[] }) {
  const router = useRouter();
  const handleDelete = async ( id: number ) => {
    // 削除確認ダイアログの表示
    const deleteChecker = window.confirm("本当にこの投稿を削除しますか?");
    // 削除キャンセルが選択された場合、処理を中断
    if (!deleteChecker) {
      return;
    }
    try {
      await axios.delete(`http://localhost:3001/api/blogs/${id}`);
      // ページをリロード(削除ボタン押下後、ページをリロードしないと、投稿が削除されないから)
      router.refresh();
    } catch (error) {
      // id に一意の識別子を割り当てることで、トースト通知の重複を防ぐ
      toast.error(`削除に失敗しました。 エラー:${error}`, {id: "a"});
    }
  };

  return (
    <div className="grid grid-cols-1 sm:grid-cols-2 md:grid-cols-3 lg:grid-cols-4 gap-6 p-6">
      {blogs.map((blog: Blog) => (
        <div
          key={blog.id}
          className="bg-white rounded-lg shadow-lg hover:shadow-xl p-6 transition-all transform hover:scale-105 flex flex-col"
        >
          <div className="mb-4">
            <Link href={`/manage/${blog.id}`}>
              <h2 className="text-2xl font-semibold text-gray-800 mb-2 hover:text-blue-600 transition-colors hover:underline">
                {blog.title}
              </h2>
            </Link>
            <div className="text-sm text-gray-500">{blog.author}</div>
          </div>
          <div className="text-gray-700 text-base mb-4 line-clamp-3">
            {blog.content}
          </div>
          <div className="text-sm text-gray-400 text-right mb-4">
            {new Date(blog.created_at).toLocaleDateString()}
          </div>
          <div className="flex justify-between items-center">
            <Link
              href={`manage/edit/${blog.id}`}
              className="text-green-500 hover:text-green-600 hover:underline"
            >
              Edit
            </Link>
            <button
              className="text-red-500 hover:text-red-600 hover:underline"
              onClick={() => handleDelete(blog.id)}
            >
              Delete
            </button>
          </div>
        </div>
      ))}
    </div>
  );
}
削除機能も実装することができました!
一番初めに投稿したブログを削除してみましょう!
これで、一通りの CRUD 操作の実装が完了しました。お疲れさまでした。
最後に
かなり、記事が長くなってしまいましたが、これにて CRUD 編終了です。
次は、認証機能の実装をしていきたいと考えているので、是非そちらもご覧ください!