現在開発中のParnoviでのCollectionViewのカスタムレイアウトについての記事です🐶
レイアウトの種類
collectionViewのレイアウトは大きく分けて二つのセグメントに分かれます。
- UICollectionViewFlowLayout
- UICollectionViewLayout
後者のUICollectionViewLayoutはカスタムでレイアウトを作るため比較的敷居が高いですが、だいたいのレイアウトは比較的簡単な前者のUICollectionViewFlowLayoutで実装することができます。
完成イメージ
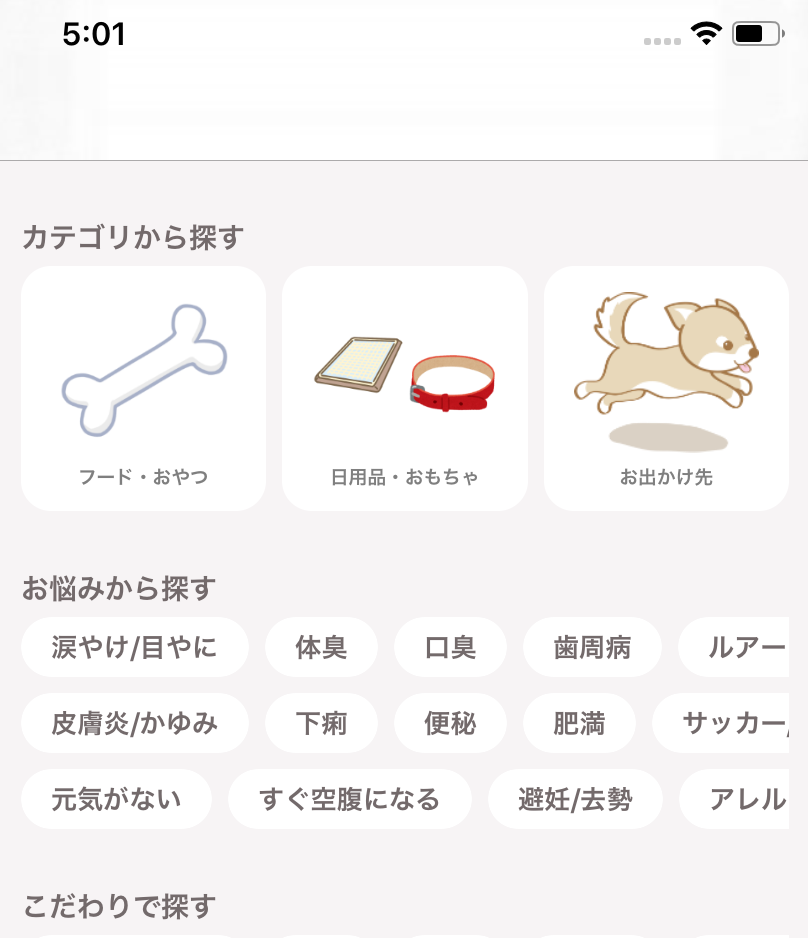
下記のお悩みで探すセクションが完成系のイメージです。
完成コード
レイアウトClassの実装
class MenuCollectionViewFlowLayout: UICollectionViewFlowLayout {
    let itemSpacing: CGFloat = 0.0
    let lineSpacing: CGFloat = 0.0
    private let leftInset: CGFloat = 8.0
    private let column = 3

    override func layoutAttributesForElements(in rect: CGRect) -> [UICollectionViewLayoutAttributes]? {
        guard let attributes = super.layoutAttributesForElements(in: rect) else {
            return nil
        }
        for index in 0..<attributes.count {
            let columnRow = (column - 1)
            if index <= columnRow{
                attributes[index].frame.origin.x = sectionInset.left
            } else {
                let leftCellIndex = (index - column)
                attributes[index].frame.origin.x = attributes[leftCellIndex].frame.minX + attributes[leftCellIndex].frame.width + leftInset
            }
        }
        return attributes
    }
}
CollectionViewClassの実装
class MenuCollectionView: UICollectionView {
    private let cellName = MenuCollectionViewCell.className()
    private let demoItem = ["涙やけ/目やに", "皮膚炎/かゆみ", "元気がない", "体臭", "下痢", "すぐ空腹になる", "口臭", "便秘", "避妊/去勢", "歯周病", "肥満", "アレルギー", "ルアーフィッシング", "サッカー/フットサル"]

    override func awakeFromNib() {
        super.awakeFromNib()
        setViews()
        setFlowLayout()
    }
    private func setViews() {
        let defaultCollectionHeight: CGFloat = 106.0
        self.heightAnchor.constraint(equalToConstant: defaultCollectionHeight).isActive = true
        self.register(UINib(nibName: cellName, bundle: nil), forCellWithReuseIdentifier: cellName)
        self.dataSource = self
        self.delegate = self
    }

    private func setFlowLayout() {
        let flowLayout = MenuCollectionViewFlowLayout()
        flowLayout.estimatedItemSize = UICollectionViewFlowLayout.automaticSize
        flowLayout.minimumInteritemSpacing = flowLayout.itemSpacing
        flowLayout.minimumLineSpacing = flowLayout.lineSpacing
        flowLayout.scrollDirection = .horizontal
        self.collectionViewLayout = flowLayout
    }
}

extension MenuCollectionView: UICollectionViewDataSource {
    func collectionView(_ collectionView: UICollectionView, numberOfItemsInSection section: Int) -> Int {
        return demoItem.count
    }

    func collectionView(_ collectionView: UICollectionView, cellForItemAt indexPath: IndexPath) -> UICollectionViewCell {
        let cell = collectionView.dequeueReusableCell(withReuseIdentifier: cellName, for: indexPath) as! MenuCollectionViewCell
        cell.set(text: demoItem[indexPath.row])
        return cell
    }
}
解説
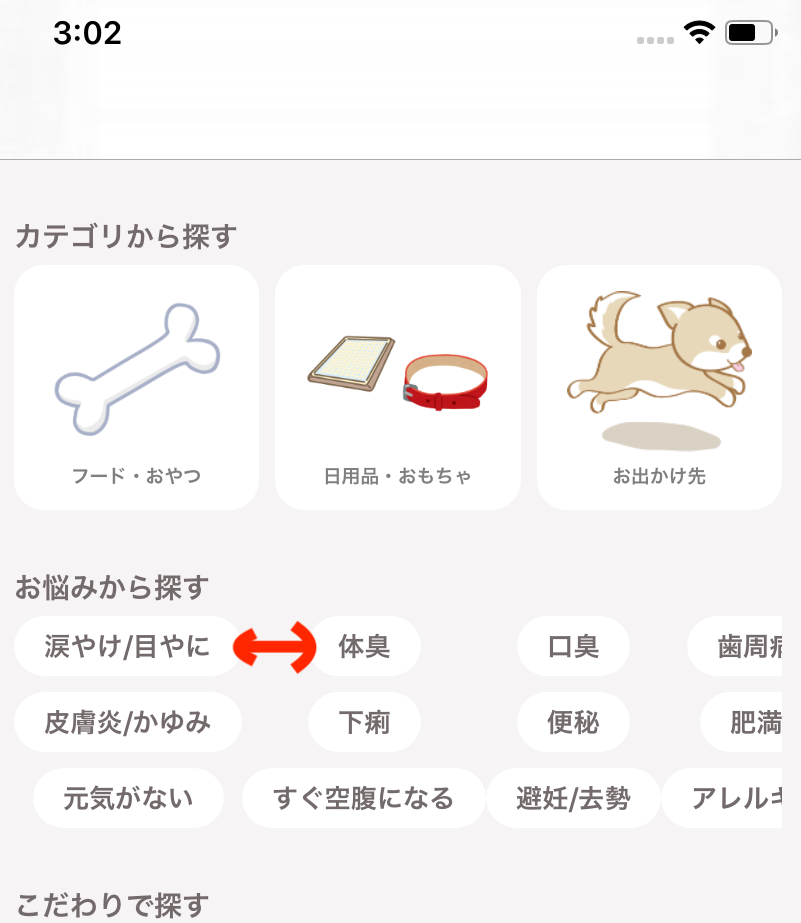
タグ風レイアウトを作る上で問題となってくるのはItem同士のスペーシングです。下記のような感じですね。(適当に再現しているのでItemがくっついている部分は気にしないでください)
画像から見てわかるように、デフォルトではColumnの最大幅から次のColumnのスペースを決定しています。つまり列にある最大幅のItemより小さいItemの場合スペーシングが残念な感じになってしまうということですね。
解決策
タイトルの通り、より簡単にレイアウトを実現するために今回はUICollectionViewFlowLayoutでレイアウトを実装しました。方法はいたって簡単で、隣のItem(今回は左隣のItem)を基準にスペースを決定するというやり方です。つまり今回の場合、左隣のminXとwidthを使用して次のItemのスペーシングをするといった感じです。コードで見ると以下の部分が該当する部分です。
override func layoutAttributesForElements(in rect: CGRect) -> [UICollectionViewLayoutAttributes]? {
        guard let attributes = super.layoutAttributesForElements(in: rect) else {
            return nil
        }
        for index in 0..<attributes.count {
            let columnRow = (column - 1)
            if index <= columnRow{
                attributes[index].frame.origin.x = sectionInset.left
            } else {
                let leftCellIndex = (index - column)
                attributes[index].frame.origin.x = attributes[leftCellIndex].frame.minX + attributes[leftCellIndex].frame.width + leftInset
            }
        }
        return attributes
    }
layoutAttributesForElementsとは
CollectionViewのレイアウトにはライフサイクルがあり、このSuperクラスのメソッドは、該当するCollectionViewItemの表示領域が決定した時に呼び出されます。つまり、このメソッドで何をしているかというと現在表示されている部分のItemレイアウトを編集して、レイアウトを更新するよ!的な感じのことを行っています。その他にも、事前にItemのレイアウトを決定するprepareLayoutやItemの追加などで呼ばれるlayoutAttributesForItemなどがあります。
まとめ
CollectionViewのレイアウトの実装方法は色々あり迷ってしまいますが、それぞれのデザインで最も簡単に実装ができるようこれから意識したいですね🧐個人的にレイアウトを組む際にクックパッドさんの記事がとても参考になりました。
何かご意見・質問があれば、ぜひお聞かせください。